
Chess notation cheat-sheet (for new readers)
Pieces: K king · Q queen · R rook · B bishop · N knight · (a pawn move has no letter)
Actions: x takes · + check · # mate · O-O short castles · O-O-O long castles · e8=Q pawn promotes to queen
Annotations: ! good move · !! brilliant · ? mistake · ?? blunder
The first read at the board: is the f-square still naked
Before you calculate a single capture in these puzzles, run one check: does f2 or f7 still lean only on its own king? That is the trigger. While the king sits on e1 or e8, the f-pawn has no piece behind it, so a bishop or knight aimed at the square can break through before the defender gets organized. The moment you train yourself to glance at that square first, half of these positions announce themselves.
The second half of the read is timing. The weakness is sharpest while the king has not castled. Once a side tucks away kingside, the rook lands on f1 or f8 and steps in behind the pawn, and the same hit that crushed an uncastled king now just throws material. So in every puzzle here, clock the king before you clock the pawn: a king still in the center is the green light, a castled king is usually the brake.
Spotting the two attackers stacked on f7
One square, count the attackers. The pattern you are hunting is a bishop on c4 and a knight on g5, both pointed at f7, with the defender unable to add a guard in time. That is the shape behind the Fried Liver, where the knight grabs the square with Nxf7 (the knight captures the f7 pawn) and drags the king out. The bishop version, Bxf7+ (the bishop captures on f7 with check), is the lighter strike: it peels off castling rights and buys a long initiative instead of immediate material.
Then count the defenders. The same setup that wins also loses outright when it is rushed. If Black has met the bishop with a knight on f6 and a knight on c3 has replaced the g5 raider, f7 is covered and a reflex Nxf7 simply hangs the piece. So each position asks two questions in order: is the second attacker actually there, and can the defender reach f7 before the sac forces matters? I weighted this set toward loaded positions across the 400-to-2400 band, so you land roughly three in four, with three hints (the motif, then the piece, then the move) when a sac stalls you.
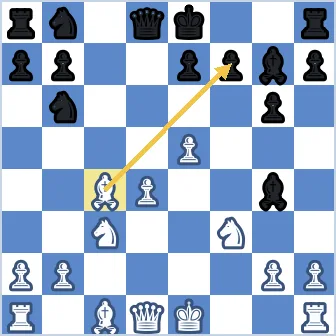
After the sac: drag the king out and make the check forced
The capture is the easy half. A puzzle here is solved only when the follow-up is forced, so the drill is to see the next blow before you play the sac. After Nxf7 (the knight takes on f7) the king is dragged into the open with Kxf7, and the move that earns the piece back is usually Qf3+ (the queen swings to f3 with check), hitting the exposed king and a loose knight on the same beat; Qh5 ideas borrow from the Scholar's Mate threats to keep pressure on the square. Train yourself to count those tempi during the calculation, not after.
From the check it becomes a king hunt. A king on f7 or f2 has no roof, and the puzzle wants the fork, the second check, or the quiet move that nets material before the king scurries home. Watch for the mirror image too: the Traxler and Wilkes-Barre lines flip the whole motif, letting Black answer with ...Bxf2+ (Black's bishop captures on f2 with check) against White's king. Drill both directions and you will spot the f-square break, and its refutation, far earlier in your own games.