
Chess notation cheat-sheet (for new readers)
Pieces: K king · Q queen · R rook · B bishop · N knight · (a pawn move has no letter)
Actions: x takes · + check · # mate · O-O short castles · O-O-O long castles · e8=Q pawn promotes to queen
Annotations: ! good move · !! brilliant · ? mistake · ?? blunder
Count the forcing line before the piece leaves your hand
Nearly every sacrifice you can solve here is a sham one: you give up the rook or bishop, and the line that follows is a chain of checks and captures the defender cannot escape, so the material comes back or the king falls. Each position has a concrete answer, so your job is to find it, not to hope for it.
Drill the same order every time. Look at checks first, then captures, then threats the opponent has to answer. Walk that chain to its last move before you commit. If every reply is forced and the line ends in mate or a clean material gain, the offer holds; if the defender has a quiet move that snaps the chain, it does not. When you stall, take the first hint to confirm the motif, then keep counting on your own. Guessing on a half-seen idea is how a won position flips to a lost one.
Spotting the bishop, exchange, and queen offers on the board
Most attacking sacrifices in these puzzles aim at the castled king, and three shapes recur. Learn the trigger that tips you off to each one so you test the move before you calculate it.
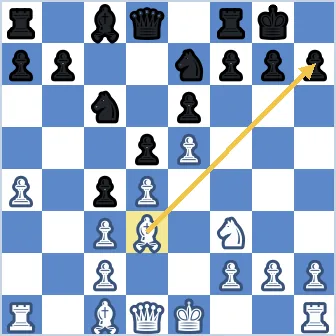
Greek gift. The offer is Bxh7+ (the bishop captures the h7 pawn with check), tearing open the king's pawn cover so the knight and queen pour in behind the check. Reach for it when the dark squares around the king look thin and you already have a bishop, knight, and queen pointed that way. If two of those three are missing, do not bother counting.
Exchange sacrifice. You give a rook for a bishop or knight to win a square, open a file, or kill the piece holding the defense together. Spot it by weighing what the rook was actually doing: if it was passive and the minor piece is the glue, the trade is worth a hard look.
Queen sacrifice. The biggest offer and usually the most forcing. Test it the moment the enemy king has almost no flight squares, since the payoff is mate by force, often a smothered finish from a knight or a back-rank net. If the king can run, the queen sac is rarely the move.
Naming your compensation as you drill
Before any piece leaves the board, say out loud what you get for it: open lines toward the king, a defender dragged off its post, a square cleared for your knight, or a mating net two moves out. If you cannot point to the return, the move is a punt, and the trainer will mark it wrong. Make that one-line compensation call a fixed step on every sacrifice puzzle, and your guesses drop fast.
The puzzles come from real games, the rating slider spans roughly 400 to 2400 so the offers stay near a 75 to 80 percent solve rate, and three hints sit ready when you stall: one flags the motif, the next isolates the piece, and the last plays it. Lean on them to check your compensation call, not to skip the counting.