
 By

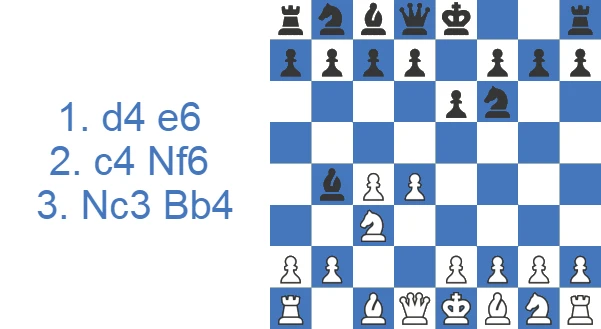
The opening embodies the hypermodern philosophy: Black pressures the center with pieces rather than pawns, and aims to damage White's structure if White ever has to recapture on c3 with a pawn. It was accepted quickly among the strongest players thanks to its flexibility and its store of positional ideas, and it has held its place at the top for a hundred years.
Where the Nimzo-Indian Came From
The Nimzo-Indian Defense is named after Aron Nimzowitsch, the Latvian-Danish grandmaster who pioneered it in the 1920s as a practical expression of the hypermodern school. In his book My System, Nimzowitsch argued that the center could be controlled from a distance with pieces rather than occupied with pawns. The move 3...Bb4 is that idea stripped to its bones: the bishop pins the knight that defends e4, contesting the square White most wants to claim. The opening was adopted quickly at the top level and never went out of fashion. Its ECO classification spans E20 to E59, with the broad E20 family covering White's various fourth-move tries. A hundred years on, the founding philosophy still matches how the strongest players treat it today.
Study the Nimzo-Indian Defense as White or Black
The Nimzo-Indian Defense turns move three into a dispute over principles: White claims the center with pawns while Black's bishop on b4 argues the whole structure is a liability.
Take On the Nimzo-Indian Defense as White
White's task in the Nimzo-Indian Defense is winning the argument over e4, and the ideas section below shows which setups do it best. Walk through the Samisch model game and the survey of Black's main schemes so your structure never gets caught by a plan you have not seen.
Play the Nimzo-Indian Defense as Black
Black needs a counter ready for each of White's main tries against 3...Bb4, and the line-by-line theory below supplies one per branch. Skim the overview first, then use the quiz positions to check you know how to face the critical Nimzo-Indian Defense moments over the board.
Nimzo-Indian Defense at a Glance
Here are the essentials in one place before we get into the lines.
| Opening moves | 1.d4 Nf6 2.c4 e6 3.Nc3 Bb4 |
|---|---|
| Also spelled | Nimzo-Indian Defense |
| ECO codes | E20-E59 |
| Named after | Aron Nimzowitsch |
| Type | Hypermodern, semi-closed defense for black |
| Main idea | Pin the c3-knight, control e4, target white s doubled pawns |
| Best for | Players who like solid, positional, low-risk chess |
| Main variations | Rubinstein (4.e3), Classical (4.Qc2), Sämisch (4.a3), Kmoch (4.f3), Leningrad (4.Bg5) |
How the Nimzo-Indian Scores in Practice
Here are the essentials in one place before we get into the lines. The club numbers match a sound positional defense: Black posts a respectable score against White's slight edge, and decisive games heavily outnumber the rare draws.
| Rating level (Lichess) | White wins | Draw | Black wins |
|---|---|---|---|
| 800, beginner | 49.8% | 3.0% | 47.2% |
| 1000, novice | 50.1% | 3.2% | 46.7% |
| 1200, improver | 50.2% | 3.4% | 46.4% |
| 1600, club | 49.4% | 4.3% | 46.3% |
| 1800, club | 48.0% | 5.0% | 46.9% |
| 2000, advanced club | 47.3% | 5.9% | 46.8% |
Source: Lichess opening explorer, blitz, rapid and classical games at the position after 1.d4 Nf6 2.c4 e6 3.Nc3 Bb4. Figures are win rates by Lichess rating band; draws are rare at these levels.
Watch: A Quick Visual Walkthrough
If you prefer to see the plans in motion before reading on, the video below walks through the main setups.
Key Ideas in the Nimzo-Indian Defense: The Battle for e4
The opening moves follow simple, classical logic, which is part of why it is so easy to pick up. Black's two minor pieces are already developed, the f6-knight controls e4 with help from the bishop's pin on the c3-knight, and Black is a single move from castling kingside, while White still needs several moves to get the king to safety.
The pin on the c3-knight is the defining feature of the opening, and it does two jobs at once. First, it cuts into White's control of e4, the square the whole opening revolves around; Black's plans center on keeping a grip there with moves like ...b6, ...Bb7 or ...d5. Second, the bishop on b4 always threatens to take on c3, saddling White with doubled c-pawns and a weakened queenside.
Those two threats point to Black's main aims. One is to pressure the doubled pawns once they appear, usually with ...b6, ...Ba6 and ...Nc6-a5. The other is to keep the center closed with moves like ...d6, ...c5 and ...e5, so White's bishop pair never gets room to work. Black can also play aggressively with dynamic moves, taking advantage of the time White needs to castle.
Should You Take on c3, and When?
This question matters more than any single variation. Capturing with ...Bxc3 gives White the bishop pair, so do it only when there is a concrete payoff. Take when the recapture is forced with a pawn (bxc3), leaving White doubled c-pawns you can besiege with ...b6, ...Ba6, ...Nc6 and ...Na5 while keeping the center closed so those bishops never breathe. Take, too, when capturing wins time, for instance after White has already spent moves chasing the bishop with a3. Keep the bishop when White recaptures with a piece or the queen, since there is then no structural damage to justify giving it up. The error I keep seeing is the same one: Black trades on c3 early, then leaves the doubled pawns alone, and White's bishop pair and central majority simply roll forward.
How to Play the Nimzo-Indian as Black: Black's Five Core Plans, Step by Step
One reason the Nimzo-Indian is so easy to pick up is that Black follows the same handful of ideas no matter what White throws at the b4-bishop. Remember the plan rather than memorize moves, and you will rarely feel lost in the opening.
- Pin first, then castle. The bishop reaches b4 on move three and pins the c3-knight. With the kingside already clear, Black is usually ready to play ...0-0 within a move or two, long before White finishes development.
- Fight for e4. This is the square the whole opening revolves around. Black supports it with ...b6 and ...Bb7, with ...d5, or by jumping a knight into e4 when the chance appears.
- Decide when to trade on c3. Capturing on c3 hands White the bishop pair but can leave doubled, vulnerable c-pawns. Trade when it damages the structure or wins time; otherwise, keep the bishop.
- Target the doubled pawns. If White ends up with pawns on c3 and c4, pile up against them with ...b6, ...Ba6, ...Nc6 and ...Na5, and keep the center closed so White's bishops never breathe.
- Choose your center. With ...d5 Black plays for clarity and isolated-queen's-pawn positions; with ...c5 and ...d6 Black keeps things flexible and prepares ...e5 to clamp down on e4.
Master these five ideas and the named variations below stop feeling like separate openings and reveal themselves as the same plan in different guises.
The Nimzo-Indian by Rating Level
How you treat this opening should change as you improve. For club players in the 1000-1600 range, the practical key is not the theory at all but discipline with the bishop. Resist the urge to capture on c3 until it actually damages White's structure or wins time, and you will avoid the steamroller that flattens most amateurs. Learn the five core plans, castle quickly, and let your lead in development do the work. For intermediate players in the 1600-2000 range, the focus shifts to structure recognition: knowing whether to steer toward an isolated queen's pawn with ...d5, clamp the center with ...c5 and ...e5, or pile up on the doubled pawns. At this level the Rubinstein and Classical lines reward concrete preparation, and the choice between bishop pair and pawn weaknesses becomes a position-by-position judgment rather than a fixed rule.
Theoretical Lines of the Nimzo-Indian Defense: White's Main Replies to 3...Bb4
The main position arrives after 1.d4 Nf6 2.c4 e6 3.Nc3 Bb4, but be ready for White to dodge it with 3.Nf3, the Anti-Nimzo move order. Against 3.Nf3 Black shifts gears and pressures c4 with 3...b6 4.g3 Ba6. If White does allow the Nimzo with 3.Nc3 Bb4, there is a wide choice ahead: at least nine fourth moves are reasonable. The main ones are the Rubinstein Variation (4.e3), which is also the main line, and the Classical Variation (4.Qc2). The Kmoch Variation (4.f3) is the most popular sideline, and 4.a3, the Samisch Variation, resolves the pin at once. Preparing for every reply can feel like a lot at first, but the underlying ideas stay much the same across the variations.
Classical Variation: 3...Bb4 4.Qc2
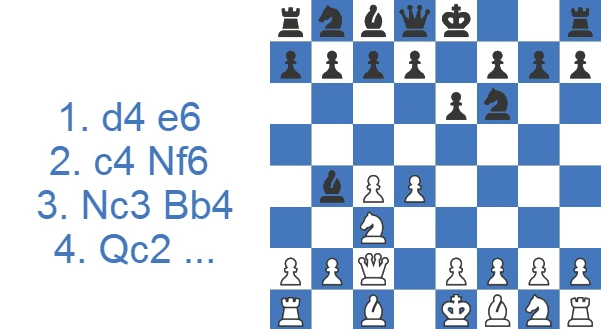
The point of 4.Qc2 is to keep the c-pawns intact even if Black captures on c3, since the queen does the recapturing. The drawback is that White spends another tempo on the queenside. Black simply finishes kingside development with 4...0-0, and White usually clarifies the pin with 5.a3, forcing the issue. Retreating the bishop makes no sense, so Black trades on c3 with 5...Bxc3 6.Qxc3. Black now has a clear lead in development, since White still needs at least four moves to castle kingside.
From here, both sides fight over e4. The moves 6...b6, 6...d6 and 6...d5 are all good. For example, 6...d5 7.Nf3 dxc4 8.Qxc4 b6 9.Bg5 Ba6 reveals the idea behind 7...dxc4: Black's light-squared bishop makes White's life awkward, because playing e3 would let Black exchange on f1 and cost White the right to castle. Castling queenside, meanwhile, is simply too risky for White.
Black is also doing fine after 6...d6 7.Bg5 Nbd7 8.e3 b6 9.Bd3 Bb7.
The most common choice in the Classical, though, is 6...b6, focusing squarely on e4. After 7.Bg5 Bb7 8.f3, White wants to claim e4, but 8...h6 9.Bh4 d5 keeps the contest for the square alive. Notice that all of White's kingside pieces are still on their starting squares.
Samisch Variation: 4.a3
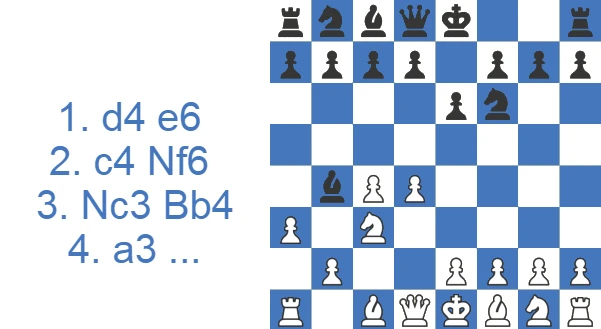
The urge to settle the queenside tension at once is understandable. Fritz Samisch's idea behind 4.a3 is to force the capture on c3 and then build a big pawn center, which is why White happily accepts doubled pawns after 4...Bxc3 5.bxc3. Black moves to stop White from building the ideal pawn center and strikes immediately with 5...c5, without losing time. White would not take on c5, since tripled c-pawns are a liability rather than an asset. A natural sequence for both sides follows: 6.e3, preparing to castle, 6...Nc6 7.Bd3 0-0 8.Ne2, eyeing g3 to support e4, 8...b6 9.e4 Ne8, ready for ...f5, 10.0-0 Ba6. Moves like ...f5 and ...Na5 are next on Black's agenda.
Rubinstein Variation: 4.e3
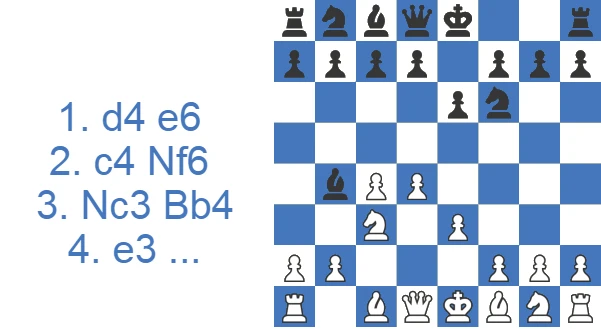
The main line is 4.e3, the Rubinstein Variation. The reasoning is that chasing the b4-bishop with a move like 4.a3 is unnecessary, and the tempo is better spent on development; 4.e3 just prepares to castle. White's plan is straightforward: 4...0-0 5.Bd3 d5 6.Nf3 c5 7.0-0. The position is balanced for both sides, and the pawn structure remains completely fluid.
If Black is in the mood to play against an isolated queen's pawn, that structure is easy to reach with 7...cxd4 8.exd4 dxc4 9.Bxc4. The plans now change to suit the position. White's d4-pawn is an asset in the middlegame, so White will look to stir up play against Black's king, and the d5 break is in the air, so Black often plans ...Bb7 to keep an eye on that square.
Kmoch Variation: 4.f3
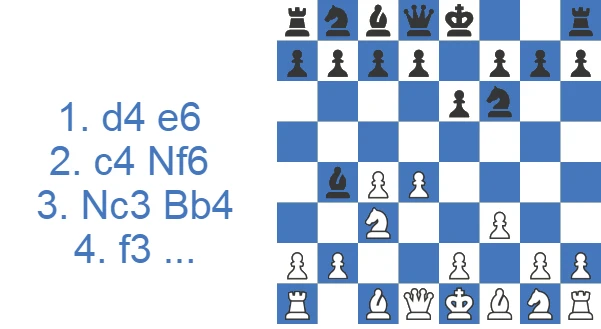
White can also support e4 directly with 4.f3, which Black answers by challenging the center with 4...d5. After 5.a3 Bxc3 6.bxc3, Black needs to play energetically: 6...c5 7.cxd5 Nxd5 8.dxc5 Qa5 keeps the initiative.
Leningrad Variation: 4.Bg5
With 4.Bg5 White develops the dark-squared bishop with tempo, pinning the f6-knight and reinforcing e4 the direct way. The downside is the one that follows White all through the Nimzo: the kingside knight and bishop are still at home, so Black is happy to hit the center. A typical sequence is 4...h6 5.Bh4 c5 6.d5 d6 7.e3 exd5 8.cxd5 Nbd7, when Black has a comfortable, well-known structure and clear play down the half-open e-file.
Black should not fear the pin. If it ever gets annoying, ...g5 followed by ...Ne4 breaks it while clamping the key square. As usual in the Nimzo, the moment White wastes time on the queenside, Black gets to set the agenda in the center.
Three Knights Variation: 4.Nf3
By playing 4.Nf3 White develops naturally and keeps the door open to several setups, often steering toward a fianchetto with g3. This is also where the Kasparov Variation belongs, and the move overlaps with White's try to avoid the Nimzo entirely: after the earlier 3.Nf3 (the Anti-Nimzo move order), Black sidesteps with 3...b6 4.g3 Ba6, hitting the c4-pawn just as in the Queen's Indian.
Against 4.Nf3 Black has two reliable approaches. The classical, Queen's-Indian-flavored route is 4...b6, putting the bishop on b7 to contest the long diagonal. The sharper modern try is 4...c5, hitting the center at once: 5.g3 cxd4 6.Nxd4 0-0 7.Bg2 d5 8.cxd5 Nxd5, when Black is fully developed and has no opening problems at all.
Common Nimzo-Indian Trap: The Family Fork (11.Qxb4?? Nc2+)
Here is a trap worth knowing on both sides. After 1.d4 Nf6 2.c4 e6 3.Nc3 Bb4 4.Qc2 Nc6, attacking d4, White defends with 5.Nf3 d6 6.Bg5 h6 7.Bh4 g5 8.Bg3 g4, pushing the defender of d4 away. Then 9.Nh4 Nxd4 and White may imagine winning the b4-bishop with check: 10.Qa4+ Bd7 11.Qxb4?? walks straight into the family fork 11...Nc2+, which picks up the queen and rook.
Nimzo-Indian vs Queen's Indian vs Bogo-Indian: One Repertoire
All three openings start the same way (1.d4 Nf6 2.c4 e6), and they fit together as a single, low-maintenance repertoire against 1.d4. The only difference is how Black meets White's third move.
| Opening | Triggered by | Black’s third move | Character |
|---|---|---|---|
| Nimzo-Indian | 3.Nc3 | 3…Bb4 | Pin the knight, fight for e4, hit the doubled pawns |
| Queen’s Indian | 3.Nf3 | 3…b6 | Fianchetto the bishop, contest the long diagonal |
| Bogo-Indian | 3.Nf3 | 3…Bb4+ | A solid, simplifying check when you want a quieter game |
This is why so many players learn the Nimzo-Indian first and pair it with the Queen's Indian Defense: whenever White avoids 3.Nc3 and the Nimzo, Black switches systems without learning anything genuinely new. The Bogo-Indian is the no-fuss backup for when you simply want to neutralize White and reach a balanced middlegame.
Famous Nimzo-Indian Games Worth Studying: Three Model Games
The fastest way to absorb the plans above is to watch them in the hands of the players who shaped the opening. These three classics each highlight a different face of the Nimzo-Indian.
- Botvinnik vs Capablanca, AVRO 1938. A Samisch where White's central pawns roll forward and finish with one of the most famous breakthroughs in chess history. The best advert for White's side of the structure.
- Kasparov vs Karpov, World Championship 1985. Karpov's precise handling of Black's pieces shows how the doubled-pawn pressure and control of e4 turn into long-term positional dominance.
- Fischer vs Spassky, Reykjavik 1972 (Game 5). Black's pieces swarm the doubled c-pawns and White collapses, a textbook demonstration of why the structure matters.
Replay each game move by move with an engine alongside, and the ideas in the variations above start to feel like second nature.
Who Plays the Nimzo-Indian
Few defenses can claim a pedigree this deep. Almost every world champion has trusted the Nimzo-Indian with the black pieces. Anatoly Karpov used it as a positional weapon at the very top, squeezing wins out of the doubled-pawn pressure and his grip on e4. Garry Kasparov, his great rival, played it from both sides across their world championship matches, and Bobby Fischer leaned on it in his 1972 title run against Spassky. Earlier still, Jose Raul Capablanca handled the black side with the kind of clarity that made the freeing maneuvers look easy. A defense that has survived a hundred years of testing at the very top, and still shows up in modern grandmaster play, has earned its place in your repertoire.
Where to Go From Here
Once the five core ideas feel natural, the best next step is to pair the Nimzo-Indian with the Queen's Indian Defense, so you have a complete answer to 1.d4 whether or not White allows 3.Nc3. From there, study annotated grandmaster games in the lines you actually reach instead of memorizing engine trees. The doubled-pawn structures of the Samisch and the isolated-queen's-pawn positions from the Rubinstein both repay close attention. A good classic collection of Nimzowitsch's games or a dedicated Nimzo-Indian course will sharpen your feel for the e4 fight. The cheapest practice of all is replaying the model games above move by move with an engine, asking at each branch why Black chose his plan.
Where the Nimzo-Indian Shines and Where It Struggles
The trade-offs are easy to summarize: Black accepts a little less space in return for flexibility, fast development and a structural target.
PROS
- Offers a high degree of flexibility in structure and piece placement
- Significant lead in development, especially on the kingside
- Developed pieces give black attacking chances
CONS
- Black concedes center to white, giving white a space advantage in the early stages of the game
- White often gets the bishop pair due to the exchange on c3. Open positions will favor white.
Case Study: A Model Samisch Plan for Both Sides
The Samisch with 4.a3 produces the most thematic Nimzo-Indian structure of all: doubled c-pawns for White against a big pawn center, with both sides racing to make their trumps count. The line below is the model sequence club players should know cold, because it shows exactly how each side pursues its plan.
The early moves set the battle lines. With 4.a3 White spends a tempo to force 4...Bxc3 5.bxc3, accepting doubled c-pawns in exchange for the bishop pair and a pawn duo on c3 and d4 that wants to expand. This is the one case where capturing on c3 is clearly correct for Black: the recapture is forced with a pawn, so Black gets the structural target the whole defense is built around.
Black's reply 5...c5 is the key move, and it should be played without delay. It hits the d4-pawn immediately and stops White from rolling out the dream center with e4 and a healthy d4. White would never grab with dxc5, since a third pawn on the c-file is a weakness, not a gain.
White's plan from 6.e3 onward is logical: castle, place the bishop on its best diagonal with 7.Bd3, and route the knight to a useful square with 8.Ne2, where it eyes g3 to support the e4 break. White is preparing to play e4 under good conditions and put the bishop pair to work in an open game.
Black answers exactly as the opening's ideas demand. The move 8...b6 prepares ...Ba6, trading off White's good light-squared bishop and clearing the way to pressure the doubled c-pawns. When White finally plays 9.e4, the retreat 9...Ne8 looks odd but is purposeful: the knight steps aside so Black can meet the center with ...f5, challenging e4 head-on. By 10.0-0 Ba6 Black has reached the position both sides were aiming for.
The turning point in this structure is always the e4 break and how Black meets it. If Black sits passively, White's center expands and the bishop pair takes over. If Black answers energetically with ...f5 and ...Na5, hitting the c4-pawn and the e4-square at once, the doubled pawns become a lasting weakness and Black's pieces find excellent posts.
The practical takeaway for a club player is the rhythm, not the exact moves. Trade on c3 only because the pawn recapture hands you a target, then go straight after that target with ...b6, ...Ba6 and ...Na5 while keeping the center under control with ...c5 and ...f5. Do that and you are playing the Nimzo-Indian the way it was designed to be played; ignore the doubled pawns and you hand White a free center and two strong bishops.
How I Play the Nimzo-Indian Defense Myself
The Nimzo is my answer to 1.d4, and this game is close to why. At 1946 against a 2000-rated opponent I had Black and took on c3 as soon as it made sense: 8...Bxc3 9.Bxc3 Ne4 10.Bxe4 dxe4. I gave up the dark-squared bishop, White's light-squared bishop came off two moves later on e4, and the e4-square went to a black pawn.

After that the plan wrote itself. The queen came to h4 on move 12, then 13...f5, then the rook lift 18...Rf6 and 20...Rh6. I slowed myself down with 17...Bc4, which moved the engine from -2.81 to -1.14, and it was 21.h3 that let me back in, from -2.21 to -3.89. My opponent resigned after 37...Rxf5.

The point I would keep is that ...Bxc3 is usually not a decision about the bishop pair at all. It buys control of one square in exchange for a long-term concession, and it only pays when the follow-up is there: ...Ne4, ...f5 and a real fight for e4.
Should You Add the Nimzo-Indian to Your Repertoire?
The lasting popularity of the Nimzo-Indian at every level says a lot about how reliable it is. For beginners and intermediate players, it is an excellent way to sharpen your skills and deepen your understanding, because it exposes you to a wide range of positions and strategic ideas. At the top level it challenges White from the opening moves, giving Black real chances to seize the initiative. If you want a sound, principled answer to 1.d4 that rewards understanding over memorization, the Nimzo-Indian is hard to beat.
Test Yourself: Nimzo-Indian Defense Positions
Set up each position and find the best move. Use Hint for a nudge or Answer to reveal the engine’s top move.
Find the best move.
Find the best move.
Find the best move.
Find the best move.
Find the best move.