
 By

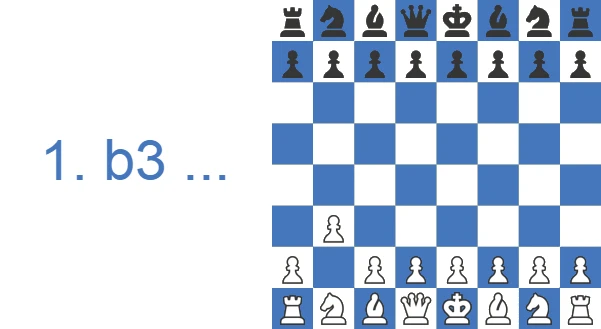
The opening takes its double name from the two players who did the most to popularize it. During the 1920s Aron Nimzowitsch employed the idea regularly, often starting with 1.Nf3 and following up with 2.b3. In the 1970s Bent Larsen made the line a main part of his repertoire and beat world-class opposition with it. At the top level 1.b3 still appears often, especially in faster time controls. Players mostly reach for it to sidestep their main repertoire and the heavy theory that comes with it, which they would rather save for classical games.
The Origins: From Nimzowitsch's Hypermodernism to Larsen's Practice
The 1.b3 idea is a direct product of the hypermodern revolution of the 1920s. Aron Nimzowitsch, whose book My System reshaped how players thought about the center, argued that squares could be controlled from a distance rather than occupied by pawns, and the queenside fianchetto with Bb2 is that philosophy in its purest form. Nimzowitsch often reached the setup via 1.Nf3 and 2.b3 rather than the immediate 1.b3. Four decades later, the Danish grandmaster Bent Larsen adopted it as a main weapon, beat world-class opposition with it, and gave the line its second name. Even Bobby Fischer leaned on 1.b3 during his 1970 run before returning to 1.e4. A positional idea that held up against the world's best is why the opening still earns respect.
Study the Nimzowitsch-Larsen Attack as White or Black
From the very first move of the Nimzowitsch-Larsen Attack, 1.b3 announces a fight over the long diagonal that White wants to win and Black must learn to defuse.
Play the Nimzowitsch-Larsen Attack as White
Everything in the Nimzowitsch-Larsen Attack flows through the b2-bishop, so White picks pawn breaks and trades that keep the long diagonal working. Start with the dark-square strategy, then study how the three main replies branch, and watch the model game to see the pressure land.
Meet 1.b3 with the Center as Black
A sound Nimzowitsch-Larsen Attack counter takes the center with pawns and keeps g7 covered before the b2-bishop gets traction. For a full answer on how to face the Nimzowitsch-Larsen Attack, the guarding-g7 plan, the named defensive setups, and the win-rate data give you the complete picture.
Who Plays 1.b3 Today
It is rare in elite classical chess, since top players save their main repertoires for slow time controls, but the Nimzowitsch-Larsen Attack thrives in faster formats. Hikaru Nakamura is the line's best-known modern advocate, wheeling out 1.b3 regularly in online blitz and bullet to sidestep an opponent's preparation and reach fresh middlegames quickly. That explains the opening's appeal: low on theory, flexible, and good at dragging a well-booked opponent out of their prepared lines. At club level and in rapid and blitz, where understanding the plans matters more than memorized theory, it is a fine choice. In long classical games against a well-prepared opponent, expect Black to equalize with accurate central play, which is exactly why you rarely see it in elite classical events.
The Short Version
- White's main idea: pile up on the dark squares and the e5 and g7 points with Bb2, e3, Bb5, f4 and Ne5, often with the option of castling queenside and storming the kingside with g4 and h4.
- Main variations: 1...e5 (Modern), 1...d5 (Classical) and 1...Nf6 (Indian) are Black's principled replies, with 1...e5 by far the most common.
- For Black, how to defend: take the center with 1...e5 or 1...d5, develop naturally, keep g7 defended, and don't chase White's flank pawns. Black equalizes comfortably.
- Watch out for: a nasty mating trap after careless play on the kingside, covered below, so handle the early g4 push calmly.
- Best for: club players and beginners who want a flexible, low-theory line that drags opponents out of their prep.
How White and Black Score with 1.b3
The numbers below sum up how each side does in practice from the position after 1.b3 e5 2.Bb2 Nc6 3.e3.
| Rating level (Lichess) | White wins | Draw | Black wins |
|---|---|---|---|
| 800, beginner | 50.8% | 3.7% | 45.5% |
| 1000, novice | 51.1% | 3.6% | 45.3% |
| 1200, improver | 51.3% | 3.6% | 45.1% |
| 1600, club | 51.5% | 3.9% | 44.6% |
| 1800, club | 51.8% | 4.3% | 43.9% |
| 2000, advanced club | 50.5% | 5.2% | 44.3% |
Source: Lichess opening explorer, blitz, rapid and classical games at the position after 1.b3 e5 2.Bb2 Nc6 3.e3. Figures are win rates by Lichess rating band; draws are rare at these levels.
Watch: The Nimzowitsch-Larsen Attack in Action
If you prefer to see the plans in motion, the short video below walks through the main setups and typical attacking ideas.
After watching, read on for the deeper analysis: the key variations, the common mistakes, and the winning setups for White.
White's Plans: The Dark-Square Strategy
The Nimzowitsch-Larsen Attack puts plans ahead of strict theory, which leaves room to play creative middlegames while keeping a sound, playable position. That is why it draws both strong players and anyone who would rather skip exhaustive memorization.
White's most standard plan is a dark-square strategy with Bb2, e3, Bb5, f4, Nf3 and Ne5, which often transposes into Bird's Opening or borrows its ideas. The setup also mirrors Black's ideal formation in the Nimzo-Indian Defense, with colors reversed. A second common approach is the double fianchetto with Bb2 and Bg2, leaving White free to castle on either side. A third idea, seen often, is to castle queenside and launch a kingside pawn storm with g4 and h4.
Nimzowitsch-Larsen Attack Theory: The Three Main Replies (1...e5, 1...d5 and 1...Nf6)
Each of Black's main first moves has its own name. 1...e5 is the Modern Variation, 1...d5 is the Classical Variation, 1...Nf6 is the Indian Variation, and 1...c5 is the English Variation. All of them are branches of the same A01 family. We cover the most important ones in turn below.
The two main branches are 1...d5 and 1...e5, the latter being the more popular. In both cases Black tries to occupy the center with a pawn, but each leads to a different middlegame. White's response stays much the same: 1...e5 2.Bb2 Nc6 3.e3 followed by 4.Bb5, or 1...d5 2.Bb2 c5 3.e3 Nc6 4.Bb5. Less commonly, Black can also adopt a King's Indian approach with 1...Nf6 2.Bb2 g6, answering White's queenside fianchetto with one of his own on the kingside.
Move Order and Transpositions: 1.b3 or 1.Nf3 First?
A 1.b3 player needs a little move-order awareness, because the same fianchetto position can be reached by more than one route. Larsen often played the direct 1.b3, while Nimzowitsch preferred 1.Nf3 followed by 2.b3. The knight move keeps options open and sidesteps an immediate ...e5 with tempo on the bishop. The trade-off is that flexible move orders can slide into neighbouring systems. A quick g3 and Bg2 alongside Bb2 blurs the line into a Reti or a double-fianchetto English, and after c4 the game can take on a reversed-color Owen's or English character. None of this changes White's core plan. But knowing which move order you want, and which transpositions into Reti or English structures you are happy to allow, keeps you in familiar territory instead of being steered somewhere you did not intend.
1...Nf6: The Indian Variation
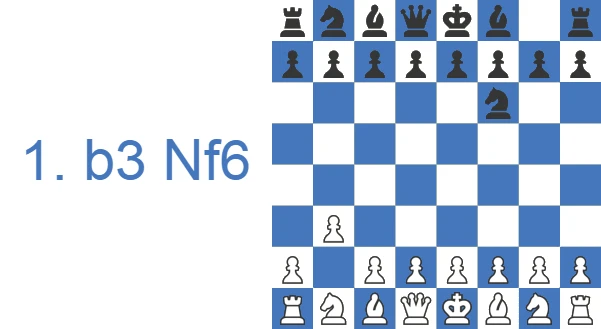
Black can meet White's fianchetto with a King's Indian-style setup, 1...Nf6 2.Bb2 g6, but this hands White several original tries. One is 3.Bxf6, giving up the bishop for the knight to wreck Black's structure and clamp the d5 square after 3...exf6 4.c4 Bg7 5.Nc3. Another is the bolder 3.g4!? Bg7 4.g5 Nh5 5.Bxg7 Nxg7, followed by Qc1-Qb2 and 0-0-0.
A third option is the double fianchetto: 3.g3 Bg7 4.Bg2 0-0 5.Nf3 d6 6.d4.
1...e5: The Modern Variation
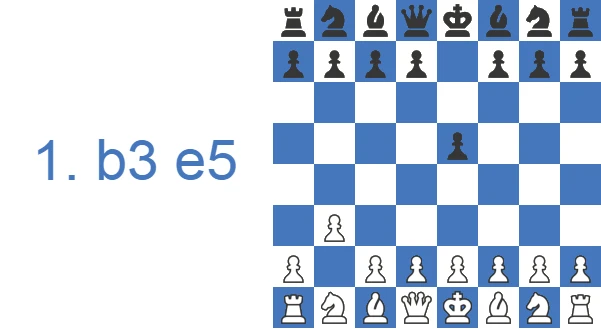
1...e5 is the overwhelmingly most common reply to 1.b3, played about twice as often as the runner-up, 1...d5. Now 2.Bb2 hits e5 with tempo, and 2...Nc6 is the way to defend it. White can steer toward an English-type position with 3.c4 Nf6 4.e3 d5 5.cxd5 Nxd5 6.a3 Bd6 7.Qc2 0-0, but 3.e3 is the standard move, intending Bb5 and a claim on d4.
The main line here is 3...Nf6, though 3...d5 is also seen now and then.
3...d5
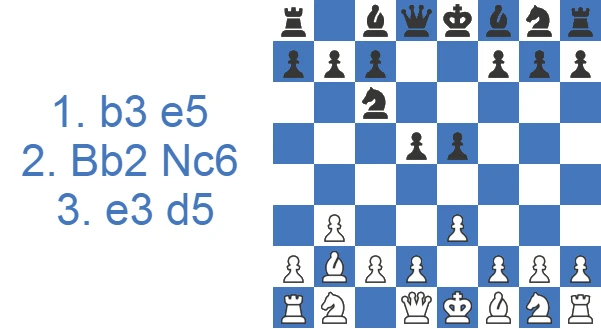
3...d5 lets White show what an ideal Nimzowitsch-Larsen position looks like: 4.Bb5 Bd6 5.f4! Now that g7 is loose, 5...exf4? loses quickly to 6.Bxg7 Qh4+ 7.Kf1 fxe3, threatening ...Qf2 mate, 8.dxe3 Bxh2 9.Nf3 Qg3.
So Black should play 5...Qh4+ instead. A typical continuation is 6.g3 Qe7 7.Nf3 f6 8.Nc3 Be6 9.0-0 with a balanced game.
3...Nf6
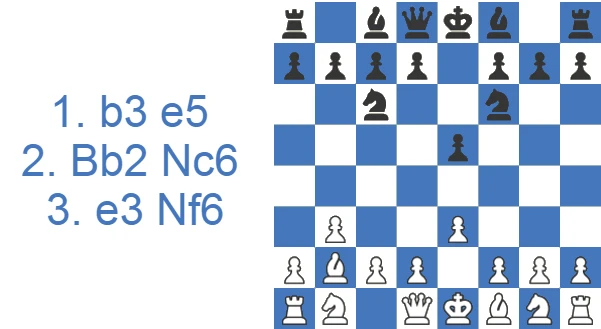
After 3...Nf6 White renews the threat on e5 with 4.Bb5, and now Black has two main ways to defend.
4...d6 is the lesser option but still playable, while Black's strongest move is the ugly-looking 4...Bd6.
4...d6
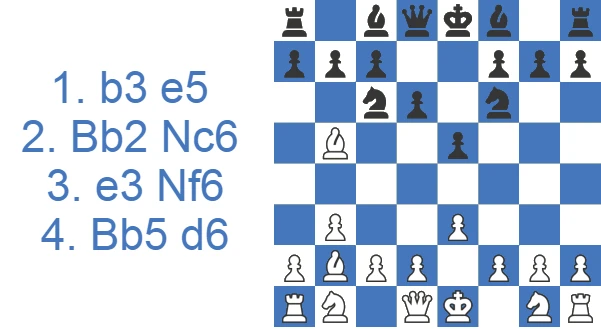
5.Ne2 prepares castling and supports d2-d4. After 5...Bd7 6.d4 (6.0-0 a5 7.Bxc6 Bxc6 8.d4 Qe7 9.c4 g6 is just as good) Black has nothing better than 6...exd4 7.Nxd4. Now 7...Nxd4 helps White: 8.Bxd7+ Qxd7 9.Qxd4, and the centralized queen gives White a firm grip on the long diagonal. After 9...Qg4 10.Qxg4 Nxg4 11.Ke2, Black's dark-squared bishop is chained to the defense of g7. Then 11...Nf6 12.Bxf6! ruins Black's structure, 12...gxf6 13.Nd2, and the knight will reach f5 to dominate.
7...Be7 is more prudent, but White again gives up the bishop pair to damage Black's structure for a positional edge: 8.Bxc6 bxc6 (8...Bxc6 9.Nxc6 bxc6 10.Qf3) 9.Qf3 d5 10.Nf5! Bxf5 11.Qxf5 0-0 12.Nd2, and White stands better. White reroutes the knight to d4, with queenside castling and a later central break with e4 or c4 also on the agenda.
4...Bd6
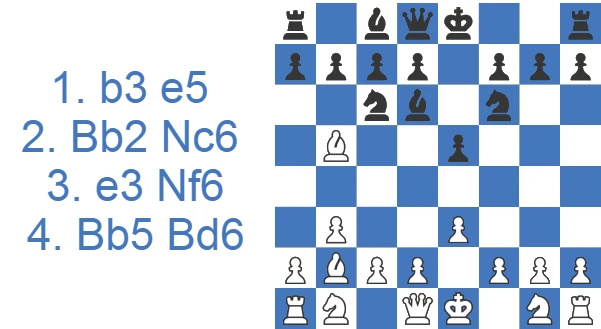
This counterintuitive move, which seems to break the opening principles, has a concrete point: in many lines White trades on c6, and after ...dxc6 the bishop on d6 is already nicely placed, defending the long diagonal's entry. The main line now runs through a string of unorthodox moves: 5.Na3, intending Nc4 and Nxd6, 5...Na5, stopping Nc4. 6.Be2, since the bishop has no future on b5 and the move clears the square to renew Nxd6. Black halts it with 6...a6. 7.c4, planning to tuck the knight away on c2, 7...0-0 8.Nc2 Nc6 9.d3 Re8.
White can continue routinely with 10.Nf3 Bf8 11.0-0 d5 12.cxd5 Nxd5,
but the aggressive 10.g4 is fully justified by Black's awkward queenside pieces and promises a sharp game. A sample pawn storm runs 10...h6 11.h4 Nh7 12.g5 hxg5 13.hxg5 Nxg5 14.Nf3 b6 15.Nxg5 Qxg5 16.Bf3 Bb7 17.Bd5, with a crushing attack for White after queenside castling.
1...d5: The Classical Variation
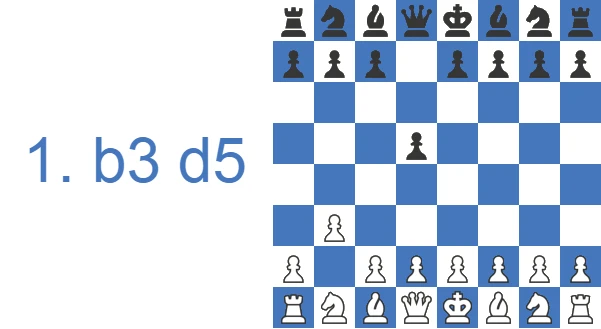
Black may try to blunt the b2-bishop with the d5-c5-d4 idea: 1...d5 2.Bb2 c5, so 3.e3 to claim d4, 3...Nc6, insisting on ...d4 again, 4.Bb5 to pin the knight, 4...e6. White's main theme in this structure is pressure on the dark squares of the long diagonal and control of e5. The rest of White's moves build on that: 5.f4 Nf6 6.Nf3 Bd7 7.0-0 (7.d3?? Qa5+! 8.Nc3 d4 9.Bxc6 Bxc6 and White is in trouble) 7...Be7 8.d3 0-0 9.Bxc6, a topical trade in many lines, removing Black's only defender of e5. Then 9...Bxc6 10.Ne5 Rc8, and White concentrates on regrouping toward the kingside for an attack.
For instance: 11.Nd2 Nd7 12.Qg4 Nxe5 13.Bxe5 Bf6 14.Rf3 Bxe5 15.fxe5 Qc7 16.Qh5 h6 17.Raf1, Nimzowitsch-Spielmann 1927, with strong attacking chances for White.
Nimzowitsch-Larsen Attack Traps: The Qg4-Nh6 Mating Trap
1.b3 e5 2.Bb2 Nc6 3.c4 Nf6 4.Nf3 e4 5.Nd4 Bc5 6.Nf5 attacks g7. After 6...0-0 7.e3 d5 8.cxd5 Nxd5?? Black gives up control of the g4 square, a fatal mistake: 9.Qg4 and the mate cannot be stopped, for example 9...g6 10.Nh6 mate.
How to Play Against the Nimzowitsch-Larsen Attack as Black: Take the Center and Guard g7
If you have the black pieces, the good news is that 1.b3 is far from a knockout blow. White voluntarily delays the fight for the center, so Black's most reliable plan is the most natural one: grab the center with pawns and develop comfortably. The single most important square to remember is g7. Almost every white idea in this opening, from the Bb2 battery to the Qg3 and f4-f5 plans, eventually points at it. Keep g7 defended and you take most of the venom out of White's setup.
The two principled tries are 1...e5 and 1...d5. After 1...e5 2.Bb2 Nc6, Black already nudges the b2-bishop's diagonal and prepares smooth development with ...Nf6, ...Bd6 and ...0-0. The slightly passive but very solid 4...Bd6 (instead of 4...d6) is worth knowing, since it keeps the e5-pawn defended and refuses to damage Black's structure even if White trades on c6.
With 1...d5 2.Bb2 c5, Black takes space and prepares ...Nc6 and ...d4, gaining time on the long diagonal. A practical tip: don't rush ...d4 if it lets White's pieces spring to life. Develop first, castle, and only then decide whether to clamp the center or open it.
A common question is how to meet the early g4 pawn storm that White sometimes throws in. The short answer: don't panic and don't grab loose pawns on the kingside. Finish your development, keep your king flexible, and remember that every tempo White spends pushing flank pawns is a tempo Black can spend in the center. As long as g7 is covered and your pieces are coordinated, Black equalizes comfortably.
A Defender's Repertoire: Naming Black's Setups
Most coverage of 1.b3 is written from White's side, so here is a clean menu for Black. The classical center is the backbone: 1...e5 (the Modern Variation) or 1...d5 with ...c5 (the Classical Variation) plants pawns in the middle and dares the b2-bishop to do something. There is also a reversed London setup: meet White's fianchetto with a solid ...d5, ...Nf6, ...Bf5/...e6 and ...c5 formation, treating Black's position as a London with colors reversed and a tempo less to worry about. The ...f6 support plan reinforces e5 directly and takes the sting out of an early Bxc6 and Ne5. Finally, the kingside fianchetto (1...Nf6 and 2...g6, ...Bg7) answers White's long diagonal with one of Black's own. Pick whichever suits your style. All four equalize comfortably.
Two Defining Games from 1970: Larsen-Spassky and Fischer-Andersson
No two games show this opening better than the pair from 1970. In the USSR versus Rest of the World match in Belgrade, Larsen trotted out his own 1.b3 against Boris Spassky and was punished brutally. Spassky grabbed the center with 1...e5 and 2...Nc6, opened the position, and after Larsen overextended on the flanks the attack crashed through, finishing 17...Qxh2 mate in just 17 moves. It is the sharpest warning there is that the long diagonal counts for nothing if Black owns the center. The contrast is Fischer's clean win over Ulf Andersson at the Siegen Olympiad the same year, where a patient build-up on the dark squares and a well-timed kingside expansion showed the system working as intended. The lesson keeps proving itself whenever I sit down to play: control the center first, and only then storm a wing.
Test Yourself: Spot the Best Move
Make the move on the board. Hint gives you a nudge, Answer shows the move and why it works.
Black answered 1.b3 with 1...e5, and the pawn is undefended. Which bishop move attacks it with tempo?
White took the knight with 3.Bxf6. Which pawn recapture opens the e-file and keeps the queen at home?
Black insists on ...d4 with 3...Nc6. Which bishop move pins the c6-knight to the king?
White's bishop eyes the c6-knight. Which bishop move defends e5 even though it blocks the d-pawn?
White's bishop and knight both aim at e5. Which central pawn move counters and challenges the c4-pawn?
White's 5.f4 left the f2-square empty. Which check does Black have?
Black took on f4 and opened the long diagonal. Which bishop capture wins a pawn and attacks the h8-rook?
White's f5-knight has no defender. Which pawn move opens the c8-bishop's line to it and challenges c4?
White has traded on c6 and Black's bishop recaptured. Which knight jump reaches a strong central outpost backed by the f4-pawn?
White has Qf3 behind the d4-knight. Which knight jump uses that support and eyes e7 and g7?
Case Study: Nimzowitsch-Spielmann, 1927
The best illustration of White's dark-square plan is a model game between two of the era's leading players. It is not a game I played; it is an instructive example of the attack working exactly as designed. Watch how White trades off Black's defenders of e5, plants a knight there, and then swings the heavy pieces to the kingside.
The opening moves are textbook 1.b3. White fianchettoes with 2.Bb2, claims d4 with 3.e3, and pins with 4.Bb5. The move 5.f4 is the heart of the plan: it stakes a permanent claim on e5 and opens the f-file for later use. Through move 8 both sides develop and castle, nothing forced yet.
The first real decision is 9.Bxc6. Giving up the bishop pair looks odd, but the point is concrete: the c6-knight was the only black piece attacking e5, and once it is gone Black no longer attacks that square. After 9...Bxc6 10.Ne5, the knight sits on the outpost the whole opening was built around, hitting c6, d7, f7 and g6 all at once.
Black tries to dislodge it. 10...Re8 and 11...Nd7 challenge the knight, but 11.Nd2 quietly reinforces and 12.Qg4 brings the queen toward the king. After the trades 12...Nxe5 13.Bxe5 Bf6 14.Rf3, White recaptures toward the kingside and the rook is already eyeing g3 or h3. The turning point is 14...Bxe5 15.fxe5: Black removes one attacker, but the recapture puts a white pawn on e5 that cramps Black's kingside and shuts the f6-square to the defense.
From there it is one-way traffic. 16.Qh5 hits h7 and f7, 16...h6 is forced, and 17.Raf1 doubles on the half-open f-file with the whole army pointing at a king that has no defenders left. Black is already lost in practical terms.
The takeaway for a club player is simple and repeatable. The trade on c6 was not a concession; it removed a defender of e5. After the later exchanges on e5, White used the f-file and a queen-and-rook lift to continue the attack. If you remember one plan from this opening, make it this one: fight for e5 first, and the kingside attack follows almost on its own.
When I Get 1.b3: A Nimzowitsch-Larsen Attack Game of Mine
Black against 1.b3, opponent rated 2074. I did the thing that usually works, 1...e6 and 2...d5 with ...c6 behind it, and took the center he was giving me. It went well enough that after 19.Qb1 the engine had me at -2.6.

Then I loosened my own position. 19...g5 gave back about a point and a half on the spot, down to -1.2, and 24...Bh1 was the real one: after 25.e4 Bb4 26.Kxh1 he stood around +3. He handed a lot of it back with 27.Bxc3, from +3.0 to +0.3, and I lost anyway, mated on 42.Qe4#.

So the honest verdict on 1.b3 is that it does not fight for the center, which means you should take the center. What it does buy White is the b2 bishop on a diagonal it keeps coming back to, and that diagonal points at your king. Loosening pawn moves in front of your own king, 19...g5 here, are what turn a comfortable position into a lost one.
Strengths and Weaknesses of 1.b3
The table below weighs what the opening gives White against what Black can count on in return.
PROS
- The long-diagonal pressure provides white with the option to castle queenside and initiate a kingside attack.
- Focus on themes and middlegame ideas rather than heavy theory.
CONS
- White s approach might not exert enough pressure on the center, allowing black to seize control with precise moves.
- White s play can be limited if black successfully neutralizes white s dark-squared bishop.
Final Thoughts
The Nimzowitsch-Larsen Attack is a great choice if you want something off the beaten path. Its quiet queenside fianchetto lets White press on the long diagonal and fight for the e5 square, and the option of a kingside pawn storm with g4 keeps the play sharp. It is not a regular guest in elite classical chess, but it can catch opponents off guard at every level, and it suits players who enjoy the freedom to create their own middlegame ideas rather than recite theory.