
 By

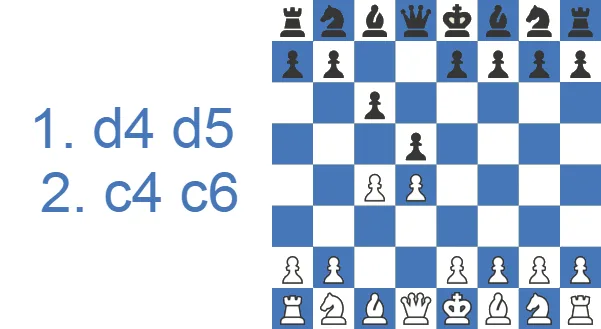
The ...c6 idea has been around since the 1500s, but it only became a serious top-level weapon in the early twentieth century. The name comes from the Slavic masters who built its theory, among them Alekhine and Alapin. Today the Slav is regarded as one of the most reliable and flexible setups available to Black, and it appears constantly at the grandmaster level. It keeps the early play free of needless complications and usually carries Black smoothly from the opening into the middlegame.
The Slav in One Paragraph
- The Slav answers 1.d4 with 1...d5 and 2...c6, defending the d5-pawn without locking in the light-squared bishop, which is the main problem of the Queen's Gambit Declined.
- The point of ...c6 is to develop the c8-bishop to f5 or g4 first, and only then play ...e6.
- The four lines you actually meet: the Main Line with 5.a4 Bf5, the Exchange Variation (3.cxd5), the quiet 4.e3 Modern Slav, and the Semi-Slav with ...e6.
- It is solid, light on forced theory, and sound enough for World Championship play, which makes it a reliable choice from beginner to club level.
- Black's typical plans: hold or win a tempo on the c4-pawn, finish development, and play in the center or on the queenside. White's: claim space and use the half-open c-file.
Study the Slav Defense as White or Black
The Slav Defense pairs 1...d5 with 2...c6 so the c8 bishop keeps its diagonal, leaving White to prove that a small pull in space outweighs Black's clean development.
How White Fights the Slav Defense
White's edge against the Slav Defense comes from precise pressure, and the key ideas chapter explains why Black's free bishop changes everything about the position. Follow the coverage of the 5.a4 main line and the notes on Black's ...a6 system to recognize every structure you will meet.
Play the Slav Defense as Black
Read the origins chapter to see why the Slav Defense became Black's most trusted counter to 1.d4, then let the win-rate tables show how it performs at your level. Prefer watching to reading? A five-minute video below covers how to face White's main tries in real games.
The Origins of the Slav Defense
The ...c6 idea against the Queen's Gambit goes back to the 1500s, but the Slav only became a serious top-level choice in the early twentieth century. It took its name from the Slavic masters who built its theory, among them Alapin and Alekhine. It arrived on the world stage in the 1935 World Championship match between Max Euwe and Alexander Alekhine, where the defense came up again and again. Mikhail Botvinnik then made both the Slav and Semi-Slav cornerstones of his repertoire, which settled any doubts about their soundness. From there the opening passed into the hands of nearly every world-class player, and that is why it still shows up in elite events almost a century later.
How the Slav Scores: Win Rates for White and Black
Numbers tell the story better than adjectives. The first table reflects master practice, where the high draw rate confirms how solid the defense is; the second comes from a much larger pool of amateur games, where decisive results are far more common.
Master Games Statistics
| Results | Rate |
|---|---|
| Victory for White | 31% |
| Draw | 51% |
| Victory for Black | 18% |
Statistics from 36 Million Amateur Games
| Rating level (Lichess) | White wins | Draw | Black wins |
|---|---|---|---|
| 800, beginner | 51.9% | 3.4% | 44.7% |
| 1000, novice | 52.0% | 3.6% | 44.4% |
| 1200, improver | 51.6% | 3.7% | 44.7% |
| 1600, club | 50.7% | 4.6% | 44.6% |
| 1800, club | 50.7% | 5.4% | 43.9% |
| 2000, advanced club | 50.9% | 6.2% | 42.9% |
Source: Lichess opening explorer, blitz, rapid and classical games at the position after 1.d4 d5 2.c4 c6 3.Nf3 Nf6 4.Nc3. Figures are win rates by Lichess rating band; draws are rare at these levels.
The Slav by the Numbers: ECO Codes D10–D19
On opening databases the Slav is filed under ECO codes D10 to D19. The Semi-Slav, because it heads in a sharper and more independent direction, gets its own block at D43 to D49. The pure Slav lines branch out from the D10 root. The Exchange Variation and early sidelines sit around D10 and D11. The quiet 4.e3 systems and the Chebanenko (...a6) fall in the D12 to D15 range. The main lines with 4...dxc4, 5.a4 and ...Bf5 cluster at D16 to D19. You do not need to memorize the numbers, but they help when you study. Searching by ECO code lets you pull up exactly the structure you want to learn rather than wading through every reply to 1.d4.
Watch: The Slav Defense in Five Minutes
If you would rather see the ideas in motion before reading on, the video below runs through the Slav in about five minutes.
Key Ideas in the Slav Defense: A Free Light-Squared Bishop
The Slav gives Black a solid pawn structure, which makes it easy to develop the pieces and reach equality quickly. The play often produces symmetrical pawn formations where each side tries to provoke a weakness in the other camp, while White hopes to convert the small head start of the first move into a lasting edge.
The defining feature is the light-squared bishop. Unlike the Semi-Slav or the Queen's Gambit Declined, the Slav lets Black's c8-bishop come out and breathe in most lines, usually to f5 or g4, outside the central pawn chain. Finding a good home for that bishop before ...e6 shuts it in is the single most important idea in the whole opening.
Slav Pawn Structures
Most Slav middlegames come down to one of three pawn structures. Recognize the structure and you already know the plan, even if you have never seen the exact position before.
The Slav Triangle (c6–d5–e6)
When Black keeps the pawns on c6, d5 and e6, the position is rock-solid but a little passive. The job is to free the game with a timely ...c5 or ...e5 break, and to make sure the light-squared bishop got out to f5 or g4 before it was buried. Without that bishop trade or development, this structure can become the "bad Slav."
The Open c-file Structure (after ...dxc4)
When Black captures on c4 and White recaptures, the c-file opens. Black usually has the better minor-piece coordination and a target on d4; White has space and the potential bishop pair. Play revolves around who controls the c-file and whether White can push e4.
The Symmetrical Exchange Structure
After 3.cxd5 cxd5 the d-pawns face off and the c-file is half-open for both sides. The thematic plan is the minority attack with b4 and b5 to damage the opponent's queenside pawns. Whoever creates a weakness first usually presses; if neither side commits, the game stays balanced.
Semi-Slav Pawn Structure
Once Black adds ...e6 and ...dxc4 with the knight already on f6 and a pawn coming to b5, the structure becomes far sharper than the pure Slav. Black gets a queenside pawn majority and the ...c5 break to open lines for the bishops, while White aims for the central e4 push. This is the structure behind the Meran and the reason the Semi-Slav is so combative.
Slav Defense Theory: The Four Lines You Will Actually Face
The Main Line usually produces a balanced position where both sides develop quickly and keep a solid pawn structure.
The Exchange Variation arises when the c-pawns come off on move three. It tends to lead to symmetrical formations in which the c-file matters for both players.
The Modern line, also called the Quiet Variation, steers the game toward positional, maneuvering play where each side tries to outplay the other.
The Semi-Slav often shuts Black's c8-bishop in behind the pawn chain. In return, Black gets an excellent central pawn structure.
The Chameleon Variation gives Black flexible options. Black usually looks to launch a pawn advance on the kingside.
3.Nc3 Nf6 4.Nf3
We start from the Slav move order (1.d4 d5, 2.c4 c6). Both sides develop toward the center (3.Nc3 Nf6). Once White brings the second knight to its natural square (4.Nf3), the main line appears after Black captures on c4 with the d-pawn (4...dxc4).
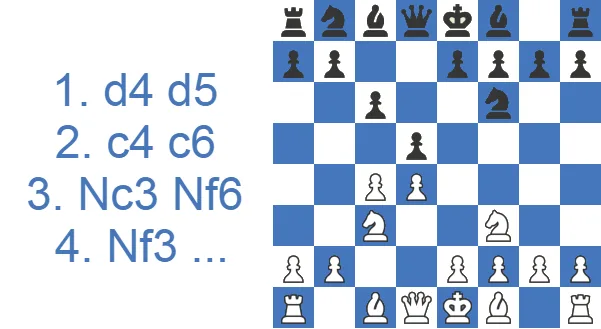
After 4...dxc4 White has several choices. To rule out ...b5, the usual move is 5.a4, which clears the way for the c8-bishop to come out to f5 (5...Bf5). Black then tends to play ...e6, develop the dark-squared bishop, and prepare to castle short.
After 6.e3 (opening the f1-bishop's path to recapture on c4 and preparing to castle), Black plays 6...e6. White picks up the pawn with 7.Bxc4, and Black can pin the c3-knight (7...Bb4) while preparing to castle. Once both sides are safe (8.O-O O-O), White usually looks to open the c1-bishop's diagonal with e4. To support that push, the standard move is 9.Qe2. Since the e4 advance is coming, Black develops with 9...Nbd7, and after White plays 10.e4 with tempo, Black protects the attacked f5-bishop by dropping it back to g6 (10...Bg6).
From here Black aims to strike at White's center with ...c5, while White tries to expand in the middle and push Black's pieces off their best squares. The result is a strategic tug-of-war in which the side with the better-placed pieces tends to come out a touch ahead.
Exchange Variation: 3.cxd5 cxd5
The Exchange Variation begins when White captures on d5 (3.cxd5) and Black recaptures with the c-pawn (3...cxd5). Recapturing with the queen instead (3...Qxd5) is a mistake, since after Nc3 and e4 White seizes the whole center with tempo.
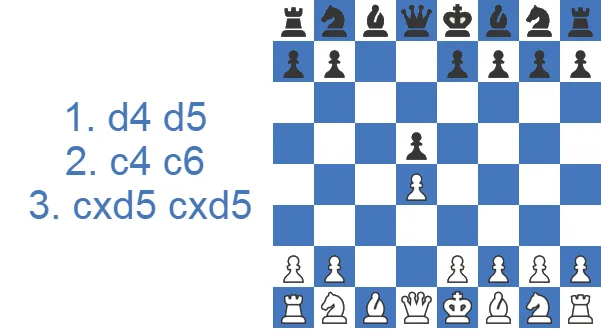
The play that follows is built around a symmetrical pawn structure. The main idea for both sides is to provoke a weakness in the opponent's camp and then exploit it. White's most common moves are 4.Nc3 (developing the knight) and 4.Bf4 (developing the bishop). After 4.Bf4 in particular, Black should keep developing and resist the urge to launch a premature queenside attack.
One line that lands Black in trouble runs 4.Bf4 Qb6 (eyeing the b2-pawn) 5.Nc3. If Black grabs the pawn with 5...Qxb2, White wins on the spot with 6.Nxd5, when the threat of Nc7+ is unstoppable and Black's king is left in serious danger.
So the correct path is to develop the kingside knight with 4...Nf6. After 5.e3, Black brings out another knight (5...Nc6) and chooses whether to play ...e6 and castle, dealing with the c8-bishop later, or to go for the sharper ...Bg4.
In practice 4.Nc3 is the more common move, usually met by 4...Nf6. After 5.Bf4 we reach the structure described above. Black develops with 5...Nc6, White brings out the other knight (6.Nf3), and the position takes on a symmetrical character after 6...Bf5. Note that 6.Nb5, with the idea of Nc7+, is a mistake: 6...Qa5+ stops it cold, and once the knight retreats with 7.Nc3 Black already holds the initiative. So White generally targets the b7-pawn instead by developing the queen to b3 (7.Qb3).
After 7.Qb3, Black has to be precise. The move 7...Na5, which both defends b7 and harasses the queen, is almost always best. White has no real way to exploit the light squares here. The check 8.Qa4+ is parried by 8...Bd7, and the queen then has to retreat to a square like c2 or d1.
From here Black wants to develop the f8-bishop and bring the a8-rook to c8. The usual start is 9...e6 (after 9.Qc2). White, meanwhile, prepares to castle short with 10.e3 and Bd3, while Black plays ...Rc8 to occupy the only open file, develops the f8-bishop (to b4 to pin the c3-knight, or to e7 for solidity), and castles.
These positions reward understanding more than memory. With no forcing lines to calculate, both sides simply maneuver their pieces to good squares and build harmonious queenside pawn formations.
The Main Line: 5.a4 Bf5 and the Fight for c4
The Main Line is the heart of the Slav and the reason the opening has such a strong reputation. After 3.Nf3 Nf6 4.Nc3, Black grabs the pawn with 4...dxc4. White cannot win it back at once, so the standard move is 5.a4, stopping ...b5. Now comes the point of the whole system: 5...Bf5, developing the bishop on the good diagonal before ...e6 shuts it in.
From here Black follows a clear sequence: ...e6, ...Bb4 to pin or trade the knight, castle, and only then decide where the pawns belong. White rebuilds with e3, Bxc4 and O-O, accepting that a4 has slightly loosened the queenside in exchange for development and central space.
The strategic battle is about the c4-square and the b4-square that a4 created. If Black can plant a knight or trade into a clean structure, equality is easy. If White gets in e4 under good circumstances, the extra space tells. Knowing this trade-off is worth more than memorizing twenty moves of theory.
How White Fights the Slav
Most of this guide is written from Black's chair, but it pays to know what White can throw at you. The most ambitious try is the Geller Gambit, 1.d4 d5 2.c4 c6 3.Nf3 Nf6 4.Nc3 dxc4 5.e4, where White gives up a pawn for a big center and fast development. Meet it calmly with ...b5 and ...e6, hand the pawn back if you need to, and the initiative fizzles. The a4-based systems linked to the Alekhine Attack aim to clamp down on Black's queenside before the c8-bishop gets comfortable. The Exchange Variation is White's quietest choice, yet it carries a real winning try through the minority attack. Rarer offers like the Diemer and assorted Slav gambits turn up too. None of them hold up against accurate play, so develop your pieces, stay off the free pawns, and they fall apart on their own.
A Carlsen Model: Outplaying From Equality
The clearest way to understand the Slav is to watch a great player win a "boring" position. In his Main Line ...Bf5 setups, Magnus Carlsen rarely reaches the middlegame with any objective edge. The structure is dead level. What he does instead is squeeze the small print. He fights for the c4- and b4-squares that 5.a4 weakens, trades into a clean structure where his pieces are a touch better coordinated, then slowly turns tiny edges into a winning endgame. For the 1200 to 1700 club player that is freeing. You are not trying to memorize twenty moves of theory or land a knockout from the opening. You reach a sound, flexible position, and then you out-maneuver your opponent over the next thirty moves.
Modern Slav: 3.Nf3 Nf6 4.e3
Here both sides develop to f3 and f6 (3.Nf3 Nf6), and White opts for the quiet 4.e3 to steer toward a positional game. Black's two main replies are 4...Bf5 (placing the light-squared bishop outside the pawn chain) and 4...e6 (aiming for a compact structure). The ...e6 setup often leads Black to fianchetto the light-squared bishop on b7 after a later ...b6.
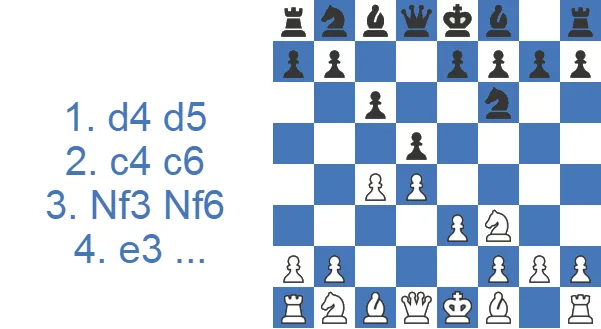
Since 4...e6 transposes into a Semi-Slav type of structure with the bishop behind the pawn chain, we will focus on 4...Bf5 in this section.
After 4...Bf5, White has several options. The natural developing move is 5.Nc3, which Black meets by solidifying with 5...e6. Black then aims to develop the rest of the army: the b8-knight to d7 (to support a later ...c5), the f8-bishop to e7, castle, and the a8-rook to c8.
White can also try 5.Qb3 with a real threat, since the b7-pawn is no longer guarded by the bishop. Matching queens with 5...Qb6 is the usual way to keep things level. If White doubles Black's b-pawns with 6.Qxb6, then 6...axb6 opens the a-file for the a8-rook, which is fine compensation, because the b4-square becomes very hard to cover (a3 fails to the pin).
A sample line runs 6.Qxb6 axb6 7.cxd5 Nxd5, where the knight heads for b4 once ...e6 lets the f8-bishop cover that square, with the idea of ...Nc2+. After 8.Bc4, Black plays 8...e6, opening the dark-squared bishop. The position is quite comfortable for Black, though it does ask for a good feel for the structure.
After 4...Bf5, White can also chase the bishop with 5.Nh4. Black answers by capturing the b1-knight (5...Bxb1), and after 6.Rxb1 builds a solid pawn structure to make up for surrendering the light-squared bishop with 6...e6.
This line often leads to slow, maneuvering positions, so it is not the best choice for beginners.
Exchange Variation
The Exchange Variation starts with 3.cxd5 cxd5, and it is the line you will meet most often from club players who want a quiet game. The pawns come off, the position turns symmetrical, and the structure looks harmless. It is not as toothless as its reputation suggests.
White's plan is simple: develop with Nc3, Nf3 and Bf4, drop the bishop on f4 before Black can challenge it, and pressure the half-open c-file. The standard try for an edge is the minority attack, pushing the b-pawn to b4 and b5 to create a weak pawn on c6 or d5.
Black equalizes by copying the setup a tempo behind, then breaking the symmetry at the right moment: ...Bf5 to get the bishop out, ...e6, ...Bd6 to contest f4, and ...Ne4 or ...Qb6 to generate counterplay. If you reach a clean symmetrical position and trade pieces, the game is a comfortable draw; if White overpresses on the queenside, Black gets the center.
Do not play this line on autopilot. The most common mistake for Black is allowing the bishop to be locked behind the e6-pawn, exactly the problem the Slav is supposed to avoid. Get the c8-bishop out first.
Semi-Slav Defense: 4.Nc3 e6
The Semi-Slav starts like the Main Line, but instead of taking on c4, Black plays ...e6 and builds a sturdy pawn structure. The drawback is that the light-squared bishop is now shut in behind the chain. For that reason White usually avoids capturing on d5, since exd5 would free the c8-bishop. In the Semi-Slav, that bishop often comes out later via a fianchetto on b7.
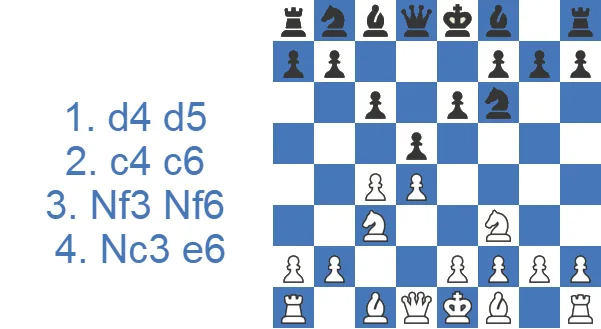
Black typically bonds the two knights on f6 and d7, planning a ...c5 break at some point. The f8-bishop goes to e7 to free the queen, and the light-squared bishop is fianchettoed on b7. White usually keeps an f2-e3-d4-c4 pawn chain, develops the dark-squared bishop outside it, and aims to expand on the queenside with c5 and b4 or to break in the center with e4.
A sample line runs 5.Bg5 (pinning the f6-knight) Be7 (breaking the pin and developing) 6.e3 (freeing the f1-bishop) O-O. White improves with 7.Bd3, Black plays 7...Nbd7, White castles with 8.O-O, and Black takes on c4 (8...dxc4). After 9.Bxc4, Black gains a tempo with 9...b5, making room for the bishop on b7. Once White retreats the bishop with 10.Bd3, Black completes the plan with 10...Bb7, White centralises a rook with 11.Rc1, and Black prepares ...a6 to hold b5 before going for the ...c5 break.
The a6 Chebanenko: A Flexible Queenside Plan
The Chebanenko, or Chameleon, begins with 4...a6 (after 3.Nf3 Nf6 4.Nc3). The idea is to prepare a queenside expansion with ...b5 once Black has captured on c4. White can simply play e3 and transpose into the lines above. The independent try is to grab space with 5.c5.
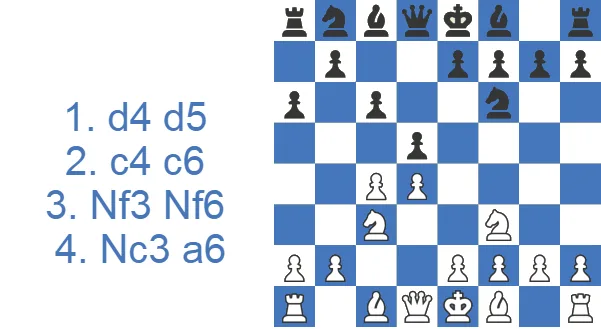
After 5.c5, Black usually fianchettoes the f8-bishop to g7, castles short, and bonds the knights as in the other variations. The main plan is to undermine White's queenside with ...a5 and ...b6, opening the a-file for the a8-rook.
A sample line runs 5.c5 g6 6.Bf4 Bg7 7.e3 O-O. White develops with 8.Be2 and castles with 9.O-O, while Black plays 8...Nbd7 and 9...Re8, gearing up for an ...e5 break supported by ...Nh5 or ...Ne4. White, for his part, expands on the queenside with b4 and a4.
Move-Order Traps and Transpositions
The Slav is a maze of move orders, and knowing your way around it saves real points. The big fork in the road is 3.Nc3 versus 3.Nf3. After 3.Nc3, an early ...e6 can drift into Semi-Slav or even Queen's Gambit Declined territory, so if you want the pure Slav, get ...Bf5 in before ...e6. Timing matters in the other direction too. Delaying ...dxc4 lets White set up the quiet 4.e3 systems, while grabbing on c4 early invites the Geller Gambit. My own rule of thumb in blitz is to decide which structure I am aiming for before I commit the ...e6 pawn, because that single move is what separates the free-bishop Slav from the locked-in defenses. Get the transpositions right and you steer the game into your preferred middlegame rather than your opponent's.
Slav Defense Trap: The 4…Be6 Knight-Winner
This one comes out of the Modern move order (3.Nf3). After Black captures on c4 (3...dxc4), White plays 4.e3 intending to recapture with the bishop. Black then tries the unusual 4...Be6 to cling to the extra pawn. If White lunges with 5.Ng5 to win the bishop, 5...Qa5+ wins the knight outright.
Slav vs Semi-Slav vs Queen's Gambit Declined
These three defenses all start by holding d5, but they part ways on the very next idea. The table below lines them up side by side.
| Feature | Slav | Semi-Slav | Queen’s Gambit Declined |
|---|---|---|---|
| Key move | c6 then Bf5/ Bg4 | c6 and e6 | e6 early |
| Light-squared bishop | Active, develops outside | Stays home, opens later | Often passive |
| Character | Solid, flexible | Sharp, double-edged | Classical, strategic |
| Theory load | Moderate | Heavy | Moderate |
| Best for | Beginners to club players | Tactical players | Positional players |
| ECO | D10-D19 | D43-D49 | D30-D42 |
The Two Ways You Lose the Slav
For all its solidity, the Slav has two recurring failure modes, and almost every club-level loss traces back to one of them. The first is greed. You snatch the b2-pawn with the queen, or you cling to the extra c4-pawn while your development stalls. The Exchange-line trap, 4.Bf4 Qb6 5.Nc3 Qxb2?? 6.Nxd5!, is the sharpest punishment, but the same theme costs games quietly all the time when Black falls behind just to hold an extra pawn. The second is burial. You play ...e6 before the light-squared bishop escapes, and the c8-bishop sits trapped behind its own pawn chain, which is the exact problem the Slav was designed to avoid. Two reminders carry the whole opening: get the bishop out before ...e6, and do not grab b2.
One of My Games Against the Slav Defense
This is the Slav bishop problem in one of my own games. 1.d4 d5 2.c4 c6 3.Nf3 Bg4, and the piece this guide calls Black's main asset was outside the pawn chain before I had finished developing. I chased it with 6.h3 Bh5 7.g4 Bg6, then castled behind those same pawns with 9.O-O.

I still got something out of the position. Playing 2037 against 2041, I built up with 12.d5 and 13.b4, and after my opponent's 27...Rxd6 the engine had me at +3.99. Then came 28.Nf5, and it went from +3.99 to -0.19 in one move. After 28...Bxf5 29.Bxf5 Rf6 the advantage was simply gone, and I lost.

Two things worth keeping. Chasing that light-squared bishop with h3 and g4 usually costs White more than it costs Black, especially if the king then goes to the side those pawns have left. And when a Slav finally gives you a winning position, look for the move that keeps it rather than the one that looks like the finish.
The Real Trade-Offs of Playing the Slav
Every opening asks for something in return for what it gives. Here is the honest balance sheet for the Slav.
Pros
- The solid nature of the opening allows players to transition the game to the middlegame quickly.
- Flexible opening
- Most moves are similar in different variations.
- The side with better positional chess can prove it during this opening.
Cons
- Requires a high level of understanding of positional chess in certain scenes.
- It requires knowledge of specific maneuvers in some positions.
- Little nuances can make a huge impact on the game.
- It lacks the concept of developing tactical patterns in most cases.
Case Study: A Model Semi-Slav Plan
The cleanest way to see how a Slav-family middlegame is built is to follow one complete plan move by move. The line below is the classical Semi-Slav setup, and it is worth knowing because every move has a purpose you can reuse in your own games.
The opening moves are pure Slav logic: 1.d4 d5 2.c4 c6 holds the center, and after 3.Nf3 Nf6 4.Nc3 Black chooses the Semi-Slav with 4...e6, accepting that the c8-bishop will stay home for a while in exchange for a granite pawn structure.
5.Bg5 pins the f6-knight, and 5...Be7 quietly breaks the pin and develops. There is nothing flashy here, and that is the point. White's 6.e3 opens the f1-bishop, Black castles with 6...O-O, and after 7.Bd3 Nbd7 both sides have completed natural development. Notice how Black's knights sit on f6 and d7, the classic pairing that supports the freeing ...c5 break later.
The turning point of the plan is the timing of the central capture. Black waits until White has spent a tempo on Bd3, then strikes with 8...dxc4. After 9.Bxc4 the bishop has been lured to c4, and now 9...b5 hits it with a tempo. This is the whole idea: Black uses the queenside pawns to gain time and create a home for the bishop on b7. White retreats with 10.Bd3, Black completes the structure with 10...Bb7, and the once-buried bishop is now staring down the long diagonal at White's center.
After 11.Rc1 a6, Black has solved the opening's one real problem. The bishop is out, the b5-pawn is secured, and the next break, ...c5, will open lines for every Black piece at once. The practical takeaway for a club player is the move order, not the moves themselves: develop first, capture on c4 only after it costs White a tempo, then use ...b5 and ...Bb7 to free the bad bishop before you commit to ...c5. Get that sequence right and you reach a comfortable middlegame without memorizing a single forcing variation.
Should You Add the Slav to Your Repertoire?
The Slav is a solid, flexible, and positional way to meet 1.d4. Most of its lines reward understanding over memory, and the games are often decided by long maneuvers and small nuances rather than opening tricks. It belongs in the repertoire of any player who wants a sound, reliable defense and is willing to learn a handful of structures rather than rote lines. If you enjoy strategic play and are happy to outplay opponents from a level position, the Slav will serve you for years.
Test Yourself: Slav Defense Positions
Set up each position and find the best move. Use Hint for a nudge or Answer to reveal the engine’s top move.
Find the best move.
Find the best move.
Find the best move.
Find the best move.
Find the best move.