
 By
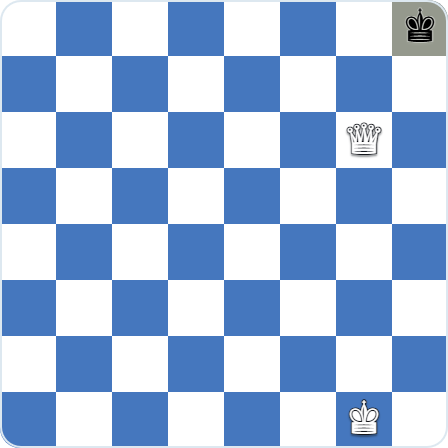
Stalemate might be the cruelest draw in chess. The player to move has no legal move anywhere on the board, yet their king is not in check. So instead of losing, they walk away with half a point. It is scored ½-½, neither side wins, and the game stops on the spot. Because the whole army has to be frozen at once, stalemate turns up most often in simplified endgames. There it can rescue a hopeless position or throw away a won one. Plenty of languages just call it “pat” (French, German, Russian and others), so if you have seen “pat” for a drawn, no-moves position, it is the same thing.
The short version
- Stalemate is a draw that happens when the side to move has no legal move and is not in check, and it most often appears in simplified endgames.
- The basic rules are straightforward: once this position is reached the game stops immediately, is scored ½-½, and nobody wins.
- Typical stalemate patterns include blocked kings with no squares, locked pawn structures where pawns can’t move, and pinned pieces that freeze the position; you’ll see all of these in the examples.
- To avoid throwing away a completely winning game, you need to stay alert in low-time endgames, give the enemy king at least one legal square, and not push the opponent into a no-move cage by accident.
- From the losing side, stalemate is a defensive resource: you lock your pawns, aim to trap your own king, and sometimes sacrifice everything so your opponent is forced into a draw instead of a clean win.
- Stalemate is not the same as checkmate, in checkmate the king is in check and can’t escape, which ends the game with a win, while stalemate is a draw, usually reached in the endgame.
Stalemate Rules: the Three Conditions That Must All Be True
1) It occurs once one player has to move but has no legal moves available, and their king is not in check.
2) When a stalemate position is reached, the game ends immediately. It is declared a draw, and neither player wins nor loses.
3) Once stalemate happens, players use the ‘=’ or “½-½” symbol in their note sheet to represent a draw in the game score.
When Does a Stalemate Happen? What Has to Be True at the Same Time
A position is a stalemate only when all of these are true at the same time:
- It is your turn to move.
- None of your pieces has a single legal move.
- Your King is not in check.
If even one of these fails, it isn’t a stalemate. If your King were in check with no escape, that’s checkmate, not stalemate. If you had any legal move at all, even a pointless pawn push, the game simply continues. The trick people miss is the whole army has to be frozen, not just the King: blocked pawns, pinned pieces, and a King with no safe square all have to line up together.
Stalemate vs Checkmate: What’s the Difference? How to Tell Them Apart at a Glance
| Stalemate | Checkmate | |
| King in check? | No | Yes |
| Legal moves left? | None | None |
| Result | Draw (½-½) | Win/Loss (1-0 / 0-1) |
| Typical phase | Almost always the endgame | Any phase of the game |
| Notation symbol | ½-½ (or =) | # |
The main difference is that Stalemate is a draw, and Checkmate is a win for one side. Checkmate occurs by putting the enemy King in the check, and the enemy has no response to recover their King. On the other hand, Stalemate is where one side has no legal move, and their King is not under check. Checkmate happens when there is no way to save the king. The losing side can still have plenty of pieces and pawns on the board when checkmate falls. Hence, checkmate takes place in all phases of the game, whereas a Stalemate is likely to happen in the endgame.
Is the stalemate rule fair? A debate as old as the modern game
Stalemate has not always been a draw, and players still argue about it. In some historical versions of chess it counted as a win for the side delivering it, in others as a loss, and at times it was simply illegal to leave an opponent with no move. The modern half-point verdict only settled in the nineteenth century. Reformers have proposed since then that stalemate should score as a win, on the grounds that it would reward the attacker and cut down on sterile draws. The other camp says the rule rewards precise technique and hands the defending side a real fighting chance, which has produced some of the loveliest saves in endgame studies. Take whichever side you like. Knowing the rule’s contested history is what explains an outcome that feels so wrong: a huge material lead and still only a draw.
Stalemate Examples
The stalemates often occur in the endgames where only a handful of pieces remain on the board.
Example #1
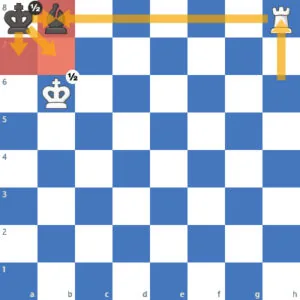
In the diagram above, the Black King on a8-square has nowhere to go. From the three possible (a7-b7-b8) squares, the Bishop covers b8, and the b6-King covers the a7 and b7-squares. For this to be a stalemate, Black shouldn’t be able to move any pieces legally. Bishop also cannot move due to the pin from the h8-Rook. Hence, this game is a stalemate. And this endgame (Rook vs Bishop) is a theoretical draw due to this stalemate.
Example #2
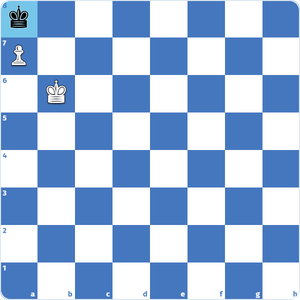
Similar to the first example, the Black King resides on the a8-square. The enemy King covers the a7-b7 squares, and the a7-pawn covers the b8-square. Since it’s Black to move and they are not in check, the game is a draw by Stalemate. It’s important to note that even if this were White’s turn, Black would either capture the a7-pawn or be Stalemated. The a- and h- pawns in the King and Pawn endgames tend to be drawn if the defending King can cover the promotion square.
Example #3
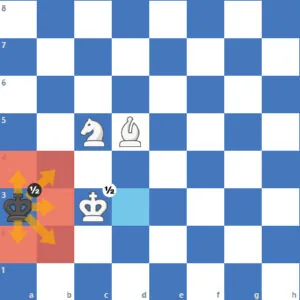
In the third example, Black again has no legal move. Normally, the a3-King has five possible squares: a4, a2, b2, b3, and b4. However, the c3-King takes all the squares in the b-file (b2, b3, and b4) and the two remaining squares are taken by the Knight and the Bishop. The c5-Knight covers the a4-square, and the d5-Bishop covers the a2-square. This also shows how Kings limit each other’s options once they are opposed.
Example #4
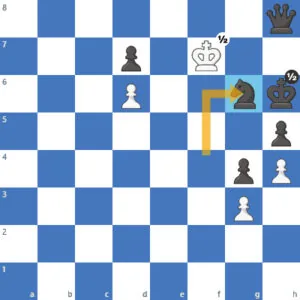
The diagram above shows a more unusual stalemate. The reason is that there are many pieces on the board. However, all the White pawns are fixed, meaning that they cannot move due to another pawn in front of them. This leaves only the King to move. Normally, f7-King could go to eight squares nearby (e6, e7, e8, f8, g8, g7, g6, and g5). But here, the Queen covers five of these squares (e8, f8, g8, g7, and f6), the d7-pawn covers the e6-square, and the g6-Knight covers the e7-square. The g6-Knight could be taken as the only remaining option; luckily, it is covered by the h5-King. Hence, White has no legal moves.
The named stalemate patterns every endgame player should know
Beyond ad-hoc traps, a handful of stalemates come up so often that strong players treat them as theory. King and rook-pawn versus king is the most common of all. If the defending king reaches the corner the pawn promotes on, the attacker can never evict it without giving stalemate. The wrong-bishop draw is closely related: a bishop plus an a- or h-pawn whose promotion square the bishop cannot control. That fortress holds no matter how much material is on the board. In queen against an advanced rook-pawn or bishop-pawn on the seventh rank, the defender keeps threatening to stalemate or to queen, and the lone queen cannot make progress. Rook versus rook-pawn is another standing draw. Learn these cornered-king fortresses and you will know at a glance when a material edge is really only a draw.
How Little Material Can Stalemate a Lone King?
A popular puzzle asks how few pieces you need to stalemate a bare King. The answer is surprisingly small: a King and a single minor piece are enough. Tuck the enemy King into the corner, cover its escape squares with your own King, and use the minor piece to take away the last square, without giving check.
How to Avoid Stalemate in Chess
Having a Stalemate in a completely winning position is quite frustrating. It often happens in fast time controls where both sides have seconds on the clock. The best safeguard is to stay alert and double-check the whole board. Always anticipate your opponent’s replies. With only a few pieces left, it is easier to calculate every reply and steer clear of it. Also, if many pawns exist on the board, players should be wary of the pawn structure. The fixed pawns often indicate some Stalemate tricks or checkmate patterns. If the opposing king is the only piece left, give it breathing room before you set up the mating threat. You can also string together a series of checks to force the mate.
The most common way amateurs blunder a stalemate
The win amateurs throw away most often is king and queen against a lone king, and the cause is nearly always the same. The queen drifts too close to the cornered king. With the black king on a8, a careless Qc7 leaves it no legal square and no check, turning a forced mate into an instant draw. The fix is to use the queen only to push the king toward the edge. Then walk your own king up the board until it supports the mate. The order matters: until your king has arrived, the queen confines but never corners. In my own blitz games I still catch myself reaching for that tempting square, and it is exactly the move that hands over the half point. Get the order right and the trap is gone.
How to Force Stalemate: Saving a Lost Game by Swindling a Draw
In a completely losing position in an endgame, the best way to set up a Stalemate is to fix all the pawns so that you have no legal moves with the pawns. Then, the players can put their King into a square that can be Stalemated. And at last, sacrificing the left-over material is a worthwhile trick to achieve a Stalemate.
The rampant stalemate: saving the game with a runaway checker
The rampant stalemate is one of the prettiest swindles around, and it has a name of its own as a defensive resource. The idea works like this. Your king is boxed in with no moves, so you offer a piece, usually a rook, that delivers check after check while begging to be captured. Take it, and you have no legal reply, so the game is drawn. Refuse it and keep running the king, and the rook chases forever, which again ends in a draw by repetition or stalemate. Think of it as the perpetual-check cousin of the ordinary swindle. The checking piece doubles as bait, and the stalemate springs the moment it is taken. From a lost position, setting up a rampant rook is often the only practical try you have left.
Stalemate Trap: a Worked Swindle That Forces Your Opponent to Take
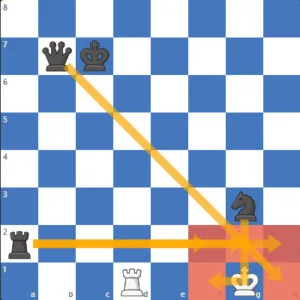
In the diagram above, we can see that White is down a ton of material. However, the g1-King has nowhere to go. If the Rook had vanished from this board, the game could have been a Stalemate. In times like these, we need to force our opponent to take. Rc1+ would not force our opponent and lose the game due to the many possible replies. Rd7+!, on the other hand, would either win the opponent’s Queen or draw the game. If your opponent runs out with the King to c8, the rook could keep checking on c-file (Rd8+ Kc7, Rd7+ Kc6), after king moved to c6, there is a tactical Rc7+! (and it turns out that neither the Queen nor the King can take the rook due to stalemate, so White Rook just keeps checking the Black’s King.).
But if, after the Rd7+! move, the king decides to move on b6-square (Kb6), Rxb7+, and the game is a draw by Stalemate. If King doesn’t take on b7, Rook vs Rook and Knight is a theoretical draw.
How Many Moves Until a Stalemate? (And Why People Confuse It With the 50-Move Rule)
There’s no fixed move count for a stalemate, it can happen on move 20 or move 120. The moment one side has no legal move and isn’t in check, it’s an immediate draw. People often mix this up with two other drawing rules: the 50-move rule (a draw can be claimed if 50 moves pass with no capture and no pawn move) and threefold repetition (the same position appearing three times). Those are separate ways to draw, a stalemate needs none of them and ends the game on the spot.
Where stalemate fits among the other ways to draw
Stalemate is one of several ways a game ends without a winner, and beginners often mix them up. A draw can also come from mutual agreement, from the 50-move rule (claimable when 50 moves pass with no capture and no pawn move), from threefold repetition (the same position occurring three times), or from insufficient material, meaning a dead position where no sequence of legal moves could ever produce checkmate, such as king versus king or king and bishop versus king. The difference is timing. Stalemate ends the game instantly and automatically the moment a player has no legal move, the 50-move and repetition rules usually have to be claimed, and insufficient material is recognized the instant the last mating force leaves the board. Knowing which rule applies keeps you from playing on in a position that is already drawn.
Stalemate is a particular drawing condition where one side has to move but has no legal move to make and their King is not under check. Players might Stalemate their opponents in winning positions when they are low on time. Watching your opponent’s replies usually prevents these blunders.
FAQ's
Is a stalemate a win, a loss, or a draw?
It is a draw. Neither side wins, and both players get half a point (½-½).
Is stalemate good or bad?
It depends which side you are on. If you are winning, a stalemate is bad, because you throw away a full point. If you are losing, it is good, since you save half a point from a lost game.
Can you stalemate on purpose?
Yes. From a losing position it is a legitimate defensive resource. You lock your pawns, box in your own king, and sometimes sacrifice material so your opponent is forced to leave you with no legal move.
What is the symbol for a stalemate?
It is recorded as a draw, ½-½ (sometimes written as “=”). There is no special symbol like the “#” used for checkmate.
Is stalemate the same as a draw?
A stalemate is one type of draw, but not the only one. Games can also be drawn by agreement, by the 50-move rule, by threefold repetition, or by insufficient material.
What’s the difference between stalemate and checkmate?
In checkmate the king is in check and cannot escape, so the game is lost. In stalemate the king is safe, but the side to move has no legal move at all, so the game is drawn.