
 By

Who Invented the Caro-Kann Defense?
The opening is named after two players who analyzed it in the 1880s: the English player Horatio Caro and the Austrian player Marcus Kann. Their early analysis appeared in print in 1886, and the defense slowly earned respect as a sound alternative to the more popular replies to 1.e4. Since then it has been trusted by world champions from Capablanca and Botvinnik to Karpov, Anand and Carlsen, which is why it carries a reputation as one of the most dependable openings in chess. In ECO terms it spans codes B10 to B19.
Study the Caro-Kann Defense as White or Black
The Caro-Kann Defense splits every game into two projects: White wants to open lines before the endgame arrives, Black wants to reach that endgame a shade better.
Take On the Caro-Kann Defense as White
Play too quietly and the Caro-Kann Defense steers you into the exact endgame Black wants. Learn the ideas holding Black's setup together, weigh what each main line offers White, and give the Panov-Botvinnik structure a serious look when you want an open fight against the Caro-Kann.
Play the Caro-Kann Defense as Black
Black gets the full case for the defense here: its origins and its real scoring record across rating bands. The review of White's most testing setups pulls double duty, prep for Caro players and an honest Caro-Kann counter guide for anyone deciding how to face the Caro-Kann Defense.
The Caro-Kann at a Glance
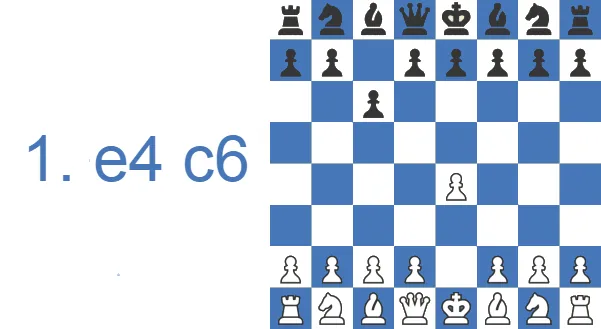
- The Caro-Kann starts with 1.e4 c6 and is one of the most reliable replies Black has against the King's Pawn. Instead of blocking the c8-bishop the way the French does, Black supports the ...d5 break with the c-pawn and keeps a healthy structure.
- White's main tries are the Advance (3.e5), the Exchange (3.exd5), the Classical or Main Line (3.Nc3), the Panov-Botvinnik Attack (4.c4) and the Fantasy (3.f3).
- Black usually gets a slightly cramped but solid position with a long-term endgame edge thanks to the better pawn structure.
- It is easy to learn and hard to break, and it is trusted from club level all the way up to the world championship.
- Starting moves: 1.e4 c6 2.d4 d5
How White and Black Actually Score
Here is how the opening performs in practice, first in master play and then across a much larger pool of amateur games. The numbers tell the same story at both levels: Black equalizes comfortably and the games are hard-fought.
Master games statistics:
| Results | Rate |
|---|---|
| Victory for White | 33% |
| Draw | 43% |
| Victory for Black | 24% |
Statistics from 161 million amateur games:
| Rating level (Lichess) | White wins | Draw | Black wins |
|---|---|---|---|
| 800, beginner | 49.3% | 3.9% | 46.8% |
| 1000, novice | 49.4% | 3.8% | 46.8% |
| 1200, improver | 48.9% | 3.7% | 47.4% |
| 1600, club | 48.3% | 4.4% | 47.4% |
| 1800, club | 48.3% | 5.1% | 46.6% |
| 2000, advanced club | 48.3% | 6.1% | 45.6% |
Source: Lichess opening explorer, blitz, rapid and classical games at the position after 1.e4 c6 2.d4 d5. Figures are win rates by Lichess rating band; draws are rare at these levels.
Watch the Caro-Kann in Action
If you prefer to see the ideas move by move first, the short video below walks through the basics before the deeper explanations in this article.
Caro-Kann's Key Ideas: Solid Now, Better Endgame Later
The Caro-Kann is solid and positional by nature. Both players get out of the opening safely and then compete on pawn structures and well-timed pawn breaks. Because the structures are rarely symmetrical, the endgames can be a real fight.
Black usually develops quickly and looks to roll the queenside pawns with a6 and b5, the minority attack, to damage White's pawns. Black then doubles rooks against the backward pawn. White, for his part, builds a space advantage in the center and often aims at the kingside. The maneuver Ne5 is a recurring theme and shows up in almost every line.
Caro-Kann Defense Theory: The Main Lines and What Each One Wants
The Exchange Variation gives both sides a safe structure. It tends to become a strategic battle in which Black works the queenside while White presses in the center and on the kingside.
The Advance Variation often produces a closed position where both players maneuver to their best squares. White usually targets Black's light-squared bishop, while Black prepares a freeing pawn break.
The Tal Variation is a sharp branch of the Advance where White expands on the kingside and tries to trap that same bishop.
The Main Line leads to a sound, strategic game built around piece development and control of key squares, and it often reaches the middlegame quickly.
The Fantasy Variation is an ambitious try to keep a big center and attack down the f-file. It can turn tactical, or, if both sides are accurate, settle into a positional struggle.
Exchange Variation: 3. exd5 cxd5 4. Bd3
The Exchange begins after 2.d4 d5 3.exd5 cxd5. It is one of the most common choices because it cuts down on the opening's complications. It also creates a non-symmetrical structure in which Black has no c-pawn and White has no e-pawn, which gives each side its own plan. After 3.exd5 cxd5, 4.Bd3 is one of White's main moves. The bishop almost always belongs on d3, where it takes the f5-square away from Black's c8-bishop.
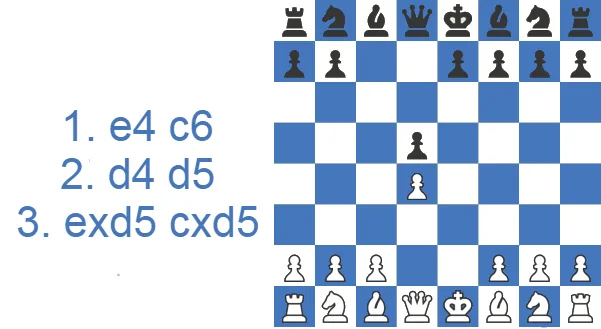
After 4.Bd3, Black most often plays 4...Nc6 to pressure d4. White defends with 5.c3, and since this is the structure White wants anyway, there is no reason to delay it.
Black then develops with 5...Nf6, after which White has several moves that can be played in different orders. 6.Nf3, 6.Bf4 and 6.h3 are all reasonable.
If 6.Bf4 is met by 6...Qb6, hitting the b2-pawn, White answers 7.Qb3. These Qb6 versus Qb3 standoffs are common once b7 or b2 comes under fire. The trade 7...Qxb3 8.axb3 looks ugly because of the doubled pawns, but the doubled pawn is often an asset: it opens the a-file for the a1-rook. After 8...a6, for example, White can play 9.b4 with the idea of b5 and a pin down the a-file.
After 6.Bf4, the most common reply is 6...Bg4, attacking the queen, which lands safely on b3 with 7.Qb3. White can then kick the bishop and develop the knight. The move h3 is a good start. If the bishop holds the d1-h5 diagonal, planning Nf3 then Bxf3 to wreck White's structure, then Nd2 covers f3 so that Nf3 can follow next.
To rule out ...Bg4 entirely, White can play 6.h3. The drawback is that Black equalizes at once with 6...e5.
6.Nf3 also stops 6...e5, but now Black pins with 6...Bg4. White continues 7.h3 Bh5, and 8.Bf4 grabs the important b8-h2 diagonal. That diagonal matters because Black's queen often wants the c7-square.
From here Black usually plays e6 and Bd6, trading dark-squared bishops, while White develops with Nbd2 and castles short. Black rolls the a6-b5 pawns with a rook behind them on b8 and aims to land b4 against the c3-pawn, then doubles rooks on the c-file to attack the backward c-pawn. White, meanwhile, heads for Ne5 and f4 to start play on the kingside.
Panov-Botvinnik Attack: 3. exd5 cxd5 4. c4
The Panov-Botvinnik Attack is White's most ambitious answer to the Caro-Kann. It begins like the Exchange with 3.exd5 cxd5, but instead of the quiet 4.Bd3, White hits the center with 4.c4. The idea is to trade the Caro-Kann's solidity for an open, IQP-style middlegame in which White's pieces come to life quickly.
After 4...Nf6 5.Nc3, Black must decide how to handle the pressure on d5. The most natural setup is 5...e6, when 6.Nf3 Be7 7.cxd5 gives White an isolated queen's pawn position with easy development. In return Black keeps a clean structure and the standard plan of blockading the d-pawn on d5 and steering toward a comfortable endgame.
The Panov often transposes into structures familiar to Queen's Gambit and Nimzo-Indian players, which is exactly why ambitious White players like it. Mikhail Botvinnik lent his name to the line from White's side.
Advance Variation: 3. e5 Bf5
The Advance Caro-Kann arrives after 2.d4 d5 3.e5. White grabs space and gains a free tempo. Black answers 3...Bf5 the great majority of the time. The point of 3...Bf5 is to get the bishop out before ...e6 shuts it in, since on c8 it can become a problem piece.
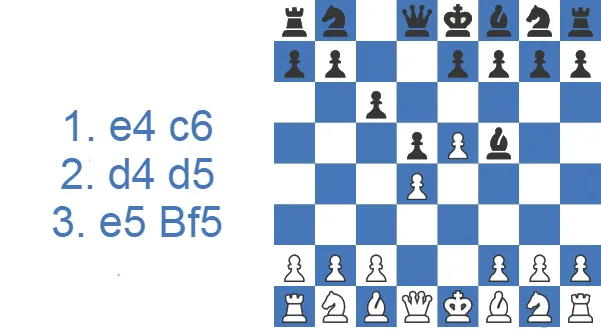
Here 4.Nf3 is the most common move. Black plays the natural 4...e6 and reaches a very solid structure. White usually develops with 5.Be2 to castle next, and 5...c5 is the typical break against d4.
Because the structure resembles the French Defense, White defends d4 the French way with 6.Be3. The reply 6...Qb6 is another French-flavored idea, met by 7.Nc3. The greedy 7...Qxb2 is a tricky try, and the only move that holds everything together is the odd-looking 8.Qb1. It allows 8...Qxc3, but then 9.Bd2 traps the queen. White is usually happy to trade queens and play an active endgame in these lines.
If after 5.Be2 Black chooses 5...Nd7, White castles with 6.O-O. Now 6...c5 runs into the strong 7.c4 break: after 7...dxc4 8.d5 exd5 9.Qxd5, the undeveloped black king is in serious trouble.
Most of these lines, including ...Qb6 by Black, force White to trade queens or push Black into concessions such as giving up a couple of pieces.
One sample line runs 4.Nf3 e6 5.Be2 c5 6.Be3, attacking c5, 6...Qb6, defending c5 and hitting b2, 7.Nc3. We have already looked briefly at 7...Qxb2. If Black instead piles up on d4 with 7...Nc6, White castles with 8.O-O. After 8...Qxb2, the key resource is 9.Qe1, threatening Rb1 against the queen followed by Nb5, hitting the queen on a3 and forking on c7. The try 9...cxd4 keeps the heat on the c3-knight, but White untangles with 10.Bxd4, still eyeing Rb1 and Nb5. Black can bail out into an endgame with 10...Nxd4 11.Nxd4 Bb4, pressuring c3, when 12.Rb1 simplifies: 12...Qxc2 13.Rxb4 Nxb4 14.Bd1 Qd3 15.Ba4+ Nc6 16.Bb5 Qc2.
Tal Variation: 3...Bf5 4. h4
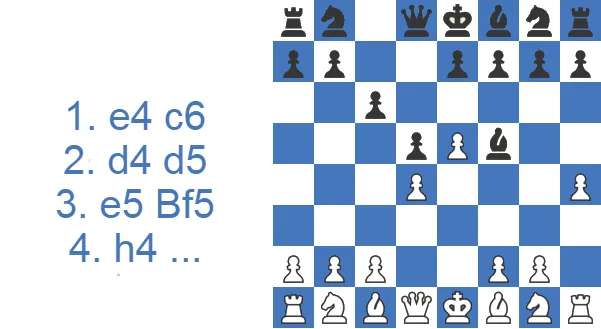
The Tal Variation begins when White throws in 4.h4 against the Advance. The most principled replies are 4...h5 or 4...h6. The move 4...h5 may be a touch better, because some 4...h6 lines can get unpleasant for Black.
If Black ignores the threat and plays a routine move like 4...e6, then 5.g4 traps the bishop after 5...Bg6 6.h5. The escape 6...Be4 fails to 7.f3.
If Black plays 4...h6, White can still try 5.g4 to force precise defense. After the bishop retreats to the newly created square with 5...Bh7, White has the thematic pawn sacrifice 6.e6. The light squares around the black king fall apart after 6...fxe6 7.Bd3. If Black trades on d3 with 7...Bxd3 8.Qxd3, the queen heads for the weak g6-square next move. If Black avoids the trade, White can capture on h7 and follow with Qd3 anyway. Black is a pawn up, but the position is grim and the king has nowhere to hide.
One nuance in the 4...h6 line is that after 5.g4, Black can play 5...Be4, attacking the h1-rook and forcing White to weaken the dark squares. In that exact line, after 6.f3 Bh7 and the e6 break to damage the structure, 7...Qd6 is a good defense for Black, planning to recapture on f7 with the king and threatening Qg3+.
Black sidesteps all of this with 4...h5. This forces White to swap the light-squared bishops without damaging Black's structure. A sample line is 5.Bd3 Bxd3 6.Qxd3 e6 7.Bg5, hitting the queen. After 7...Qb6 the game can head to a quick endgame once queens come off. Play might continue 8.Nd2 c5 9.c4 Qxb2 10.Rb1 Qxd4 11.Qxd4 cxd4 12.Ne2, reaching a roughly equal endgame full of imbalances.
The Most Common Caro-Kann Mistake at Club Level
One habit decides more amateur Caro-Kanns than any opening trap: do not trade your light-squared bishop too eagerly. The whole point of 1...c6 is to free the c8-bishop, so handing it off cheaply throws away Black's main asset. The contrast is clearest between the Advance and the Classical. In the Advance (3.e5 Bf5) the bishop gets out before ...e6 locks it in, which is why it is comfortable here. In the Classical (3.Nc3 dxe4 4.Nxe4 Bf5 5.Ng3 Bg6 6.h4 h6 7.Nf3 Nd7 8.h5 Bh7 9.Bd3) Black is invited to swap that same bishop and then play ...e6, ending up permanently passive with White owning every open line. The opponents who hang on to that bishop a few extra moves are noticeably harder for me to play against. Keep it active first, and trade only when the swap genuinely improves your position.
What Capablanca Did Instead (Atkins, London 1922)
The model for handling Black's problem piece comes from Capablanca's win over Henry Atkins at London 1922, cited below among the grandmaster games. Rather than rushing to liquidate the light-squared bishop, Capablanca kept it working, finished development without weakening his structure, and let his sound c6-d5 pawn chain set the terms. As the position simplified he leaned on the long-term endgame edge that the Caro-Kann is built to deliver, converting a small structural plus into a full point. So the practical point is concrete: equality in the Caro-Kann is a starting position, not a finish line. Activate your pieces, hold the better pawn structure, and exchange your good bishop only when you get something real for it. That one habit separates a passive Caro-Kann from a winning one.
Main Line (Classical Variation): 2…d5 3. Nc3/Nd2
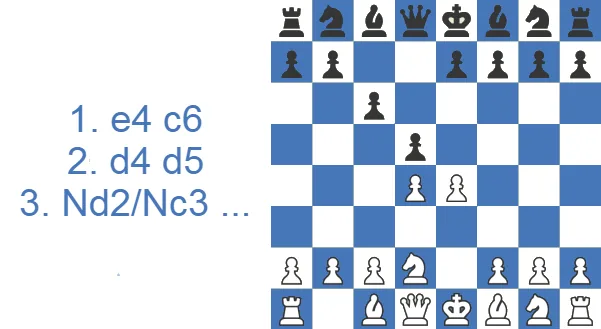
The Main Line begins after 2.d4 d5 with either 3.Nc3 or 3.Nd2. Both moves prepare to recapture on e4. By far the most common reply is 3...dxe4, met by 4.Nxe4. From here Black has three standard routes. 4...Bf5 is the most popular, developing the light-squared bishop on the b1-h7 diagonal. 4...Nd7 supports a later ...Nf6 so that Black does not have to ruin the pawn structure when developing the kingside knight; this setup is the Karpov Variation, named after Anatoly Karpov, who used it for years at the top level. 4...Nf6 accepts doubled pawns after 5.Nxf6, where 5...exf6 and 5...gxf6 lead to the Korchnoi and Bronstein-Larsen lines respectively.
Looking at the main try, 4...Bf5 hits the e4-knight, and the usual reply is 5.Ng3, defending the knight and chasing the bishop. Black keeps it with 5...Bg6. White often tries to trap that bishop with 6.h4: if Black is careless, h5 will catch it.
Black needs to make a square for the bishop, and here, unlike the Advance, 6...h5 and 6...h6 are not equivalent. 6...h6 is fine, but 6...h5 is slightly worse for Black, because White can plant the bishop on g5 where it cannot be kicked, the h5-pawn becomes a long-term weakness, and White can castle long and attack on the kingside.
So 6...h6 is the only good move. White then plays 7.Nf3, planning Ne5 and a capture on g6 that would damage Black's kingside. Black improves with 7...Nd7 and 8...Nf6 follows naturally. In these games White typically pushes h5 to nudge the g6-bishop, which hides on h7, then trades the f1-bishop for that h7-bishop and brings the queen to d3.
Meanwhile Black plays e6 and Be7 and castles short. White castles long, tucks the king on b1, and the two sides race: Black rolls the queenside pawns at the white king while White attacks on the kingside.
Fantasy Variation: 2…d5 3. f3
The Fantasy, sometimes called the Tartakower, starts like the Main Line, but instead of 3.Nc3 or 3.Nd2, White props up e4 with 3.f3. This sideline is rare because it creates long-term weaknesses near the white king. The point is to recapture on e4 with the f-pawn and keep a big center.
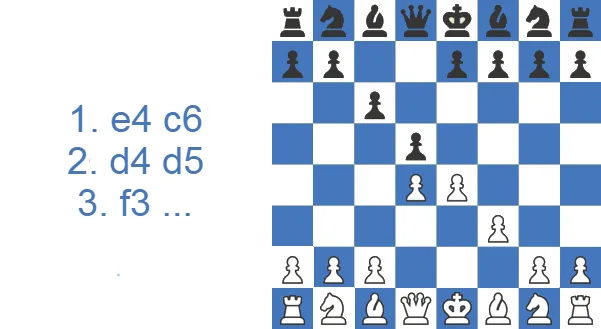
Black often plays 3...e6 to firm up the structure, followed by Qb6, using the queen on the now-fragile a7-g1 diagonal, and g6 to fianchetto the f8-bishop on g7 along the a1-h8 diagonal.
If 3...dxe4 4.fxe4, Black usually hits the center with 4...e5. Here 5.dxe5 is not advisable because of Qh4+ and ...Qxe4. Instead 5.Nf3 covers h4. Black then pins with 5...Bg4. White can set a trap with 6.Bc4, eyeing Bxf7 and Nxe5+. The only move that stops it is 6...Nd7, covering e5. White can then castle and keep the pressure with c3 and Bg5.
Another sample line runs 3...e6 4.Nc3 Nf6. Now White grabs space with 5.e5, reaching a French-type position where Black plays 5...Nfd7 and aims for the ...c5 break with Qb6. White usually reinforces with f4, brings the knight to f3, develops the bishop to e2 and castles. Black attacks d4 while White looks for the f5 break and a kingside attack.
Two Knights Attack: 2. Nc3 d5 3. Nf3
Not every White player commits to 2.d4. The Two Knights Attack keeps things flexible with 2.Nc3 d5 3.Nf3, developing both knights early and inviting Black to declare a plan first. It is a favorite of attacking players who want to avoid heavy theory. The most testing reply is 3...Bg4, pinning the f3-knight before White can clamp down on the center. After 4.h3 Bxf3 5.Qxf3, White owns the bishop pair and a small lead in development, while Black relies on the usual Caro-Kann sturdiness with 5...Nf6 and 6...e6. The position is calmer than it looks, but Black must know not to grab loose pawns and fall behind in development.
Move-Orders: How to Reach Each Variation
Every main line branches from the same two opening moves, 1.e4 c6 2.d4 d5, after which White's third move names the variation. Play 3.e5 and you are in the Advance. The move 3.exd5 cxd5 reaches the Exchange, and a follow-up 4.c4 turns it into the Panov-Botvinnik Attack. The Classical Main Line arrives via 3.Nc3 (or 3.Nd2) dxe4 4.Nxe4, where 4...Bf5 is the principal tabiya and 4...Nd7 is the Karpov Variation. The Fantasy, sometimes called the Tartakower, comes from 3.f3. White can also avoid 2.d4 altogether: 2.Nc3 d5 3.Nf3 is the Two Knights Attack, a flexible order that keeps the center fluid. Knowing these triggers helps Black recognize transpositions early and reach familiar structures by the intended route.
How to Play Against the Caro-Kann: White's Best Tries
- If you are the one facing 1...c6, the good news is that White is never worse; the question is only which kind of game you want.
- Want space and a long-term squeeze? Play the Advance Variation (3.e5) and aim your pieces at Black's light-squared bishop with ideas like h4-h5 or the Short System with Nf3, Be2, 0-0.
- Want a quiet, low-theory edge? The Exchange Variation (3.exd5) gives a structure where you slowly build with Bd3, c3, Qc2 and a minority or kingside plan.
- Want to fight for the full point? The Panov-Botvinnik (4.c4) turns the game into an open, piece-active middlegame that most Caro-Kann players are uncomfortable in.
- Want chaos? The Fantasy Variation (3.f3) sharpens everything at the cost of weakening your own king.
- The one thing to avoid is treating the Caro-Kann passively. It is built to outlast careless play, so a White player with no plan usually drifts into a worse endgame, which is exactly what Black is hoping for.
Engine Assessment of Each Main Line
Modern engines confirm what tournament practice has long suggested: the Caro-Kann holds up. Across the major lines Black sits close to equality, usually within a small fraction of a pawn for White. The Exchange Variation (3.exd5) is the quietest, evaluated as nearly level with chances for both sides. The Classical (3.Nc3) gives White a tiny, lasting pull from space and the bishop pair, but nothing Black cannot hold with accurate play. The Advance (3.e5) scores a similar small edge built on the extra space and a slightly cramped Black position. The Panov-Botvinnik (4.c4) is the most double-edged, since the isolated queen's pawn gives both sides something to play for. The Fantasy (3.f3) reads well for Black, who equalizes comfortably against the weakening of White's kingside.
Traps in the Caro-Kann Defense Every Player Should Know
Beginners with Black should know one famous trap in the Main Line: after 4...Nd7 5.Qe2, the careless 5...Ngf6?? runs into 6.Nd6#, a smothered mate in the opening. The simple fix is to develop the knight to f6 only once the Qe2-Nd6 idea is no longer available.
This one comes from the Exchange Variation. After 4.Nf3, Black develops 4...Nc6. White plays 5.Bd3 to keep the bishop off f5, and Black pins with 5...Bg4. The trap is set after 6.O-O. If Black greedily grabs with 6...Nxd4 to exploit the pin on the d1-h5 diagonal, White sacrifices the queen with 7.Nxd4. After 7...Bxd1, the zwischenzug 8.Bb5+ wins the queen back and nets a whole piece, followed by Bxd7 and Rxd1.
Test Yourself: Six Caro-Kann Positions
Make the move on the board. Hint gives you a nudge, Answer shows the move and why it works.
Exchange Variation. Black's ...Qb6 hits b2. Which queen move guards b2, pressures d5 and offers a queen trade?
Exchange Variation. White just played Nbd2 after Black's ...e6. Which bishop move offers a trade of the dark-squared bishops?
After 3.exd5 cxd5, White can play the quiet 4.Bd3. Which pawn move hits the center instead and starts the Panov-Botvinnik Attack?
Advance Variation. Black played 6...c5 while still undeveloped. Which pawn break hits d5 and opens the center?
Tal Variation. White's g4 has chased the bishop to h7. Which pawn sacrifice hits f7 and wrecks the light squares around Black's king?
Tal Variation, 4...h5 line. The light-squared bishops are traded. Which pawn move supports d5 and frees Black's dark-squared bishop?
Classical Variation. Black's bishop has gone to h7 after White's h5. Which developing move challenges it and offers a trade?
Fantasy Variation. Black took on e4 and White recaptured. Which e-pawn move hits d4 and challenges the center?
Fantasy Variation. White's Bc4 eyes f7 and Nxe5+ is in the air. Which knight move covers e5 and stops the trap?
Two Knights Attack. White has developed both knights. Which bishop move pins the f3-knight and tests White most?
The Caro-Kann in My Own Games
I play the Caro-Kann myself, and this is one of my own games in it, 1775 against 1746. After 1.e4 c6 2.Nf3 d5 3.Nc3 Bg4 the pieces came off in a hurry: 5.Bd3 dxe4 6.Bxe4 Nxe4 7.Nxe4 Bxf3 8.Qxf3, and I took the pawn with 8...Qxd4.

That is where I stopped playing the opening's own game. White developed with gain of time, and after 11.Rad1 my 11...Qb6 pushed the engine from +1.1 to +3.7 for him. He gave most of it back with 12.Bd2, +1.1 again, and the game turned my way from there. It ended 41...Qh1#.

The point of the Caro-Kann is that Black stays solid and collects later, often in the endgame. Taking on d4 with the queen spends that in one move. I would rather have the sound structure and a slightly passive position than a pawn and a queen that has to answer every developing move White makes.
Strengths and Drawbacks of the Caro-Kann
Here is the honest balance sheet before you commit to it.
Pros
- It is a solid opening for Black, leaving little room for an early blunder.
- Black usually remains with a healthy pawn structure.
- French players might like this opening because it has similar pawn setups in some variations.
- Black often gets early equality.
Cons
- White often gets the central space.
- In some variations, White can ruin Black’s pawn structure.
- Tactical players might find this opening dry.
- It’s hard to claim an advantage as Black.
Caro-Kann vs French, Sicilian and Slav
- Caro-Kann vs French Defense. Both support ...d5, but the Caro-Kann uses the c-pawn, which keeps the light-squared bishop free instead of locking it in behind the pawn chain. You pay for it with one less tempo on the queenside. If a bad bishop annoys you in the French, the Caro-Kann is the natural switch.
- Caro-Kann vs Sicilian Defense. The Sicilian fights for the advantage and accepts sharp, theory-heavy battles. The Caro-Kann aims for safety and a sound structure. Choose the Caro-Kann if you prefer to equalize cleanly rather than gamble for a win out of the opening.
- Caro-Kann vs Slav Defense. They share the same pawn skeleton (c6 + d5), just against different first moves: the Caro-Kann against 1.e4, the Slav against 1.d4. Many players run the pair together because the plans rhyme.
Grandmaster Games with the Caro-Kann Defense
Which Grandmasters Play the Caro-Kann?
The Caro-Kann's pedigree is a large part of its appeal. Anatoly Karpov leaned on it for years at the very top and lent his name to the 4...Nd7 line. Earlier world champions Jose Raul Capablanca and Mikhail Botvinnik both trusted it, with Botvinnik co-naming the Panov-Botvinnik Attack from White's side. Viswanathan Anand and Magnus Carlsen have used it at world-championship level, and among today's elite Fabiano Caruana and Ian Nepomniachtchi treat it as a dependable answer to 1.e4. That span from the classical era to current super-tournaments is why the opening keeps its reputation for soundness. It has survived a century of scrutiny from the strongest players alive, and the engine era has reinforced its standing rather than refuting it.
Case Study: Wei Yi vs. Gukesh D, Exchange Variation
The cleanest illustration of how the Caro-Kann really plays out is the Exchange game below between Wei Yi and Gukesh D from 2025. It is not a brilliancy; it is something more useful for a club player, a full-length game where the slightly worse side keeps holding the position together until it survives. That is the everyday reality of this opening.
The opening is the textbook Exchange setup we covered above: 4.Bd3 Nc6 5.c3, with White's bishop on d3 controlling f5. Gukesh chooses a slightly different development with 5...e6 and 6...Bd6, parking the bishop on the active b8-h2 diagonal instead of fighting over f5. The first practical lesson is in the next few moves. White expands with 9.c4 and 10.c5, gaining queenside space, and 10...Nxd3 11.Qxd3 trades off White's good bishop. Notice who gives up what: Black is happy to swap the knight for that strong d3-bishop, while keeping his own pieces flexible. That is the opposite of the club-level mistake of dumping your own light-squared bishop.
The middlegame turns into a slow squeeze, exactly the kind of position the Caro-Kann produces. White grabs space with b3-a3-b4-b5 and clamps the queenside, while Black regroups patiently with 19...b6, 20...Be8 and 21...Bc7, refusing to let the structure crack. The point for a practical player: when you are a touch cramped, do not lash out. Improve your worst piece and keep the position elastic.
The turning point is the central break 26...d4, which Gukesh uses to free his game right when White's queenside pressure looks most dangerous. After 27.Rd3 Rd7 28.b6, the position is bristling with passed-pawn threats for White, yet Black's pieces are coordinated enough to hold. The queens come off with 33.f4 exf4 34.Qxd4 Qxd4+ 35.Rxd4, and from there it is a long, accurate defensive grind. Black gives back material to liquidate White's dangerous c- and b-pawns, and the rook-and-minor-piece endgame peters out to a draw on move 74.
The takeaway for a club player is the whole point of the opening in one game. Black was never better and never tried to be. He equalized cleanly, found the freeing break at the right moment, defended precisely, and split the point against a 2750-rated opponent. If you adopt the Caro-Kann expecting to win in 25 moves, you will be disappointed; adopt it to reach sound positions you understand, and games like this one become routine.
Is the Caro-Kann Right for You?
The Caro-Kann is a solid opening that works at every level. It gives Black reliable equalization without flattening the position into a lifeless draw, because the structures are usually asymmetrical and leave both sides real plans. Black often presses on the queenside while White fights for the center and the kingside. If you value a sound structure, a clear long-term plan, and a defense that has held up for more than a century against the best players alive, the Caro-Kann earns its place in your repertoire.