
 By

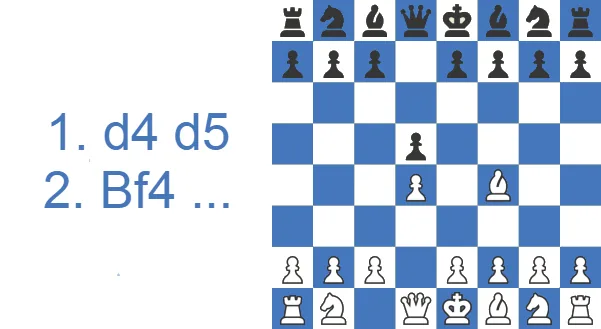
The name goes back to the London 1922 tournament, where the d4 and Bf4 formation showed up in seven games and was handled by some of the strongest masters of the day, including José Raúl Capablanca, Alexander Alekhine and Akiba Rubinstein. Magnus Carlsen, a former World Chess Champion, leans on the London regularly in faster time controls such as rapid and blitz.
The London System in a nutshell
If you only have a minute, here is the London System boiled down:
- What it is: a Queen's Pawn system where White builds the same setup against almost anything, with pawns on d4, e3 and c3 and the bishop developed to f4 outside the chain.
- Main move orders: the classical 1.d4 d5 2.Nf3 Nf6 3.Bf4 and the Accelerated London 1.d4 d5 2.Bf4, preferred today because it sidesteps some of Black's tricks.
- White's plan: finish the setup with Nbd2 and Bd3, then choose between the central break e4 or the kingside plan Ne5 followed by f4.
- Black's best tries: hit b2 with ...Qb6, trade off the passive bishop with an early ...Bf5, or strike the center with ...c5 and a King's Indian setup.
- Who it's for: every level. It is easy to learn, hard to face, and even Magnus Carlsen plays it.
- Approx. ECO: mainly D02, with A45/A46/A48 depending on move order.
Study the London System as White or Black
The London System promises White the same comfortable setup every game, which makes a prepared answer from Black worth double.
Build the London System as White
One structure, the c3-d4-e3 pawn triangle with the bishop already out on f4, carries the London System through nearly any Black reply. Learn what the triangle buys, assemble the setup piece by piece, and pick up the move-order details that separate a sharp London from a stale one.
Beat the London System as Black
Every club player needs to know how to face the London System, because it shows up in event after event. Skim the short primer, pick your counter from the strongest replies for Black, and enjoy the story behind the name as a bonus.
Where the London System name comes from
The London System is named after the London 1922 tournament, where the d4 and Bf4 setup appeared in seven games and was handled by some of the era's strongest masters, including José Raúl Capablanca, Alexander Alekhine and Akiba Rubinstein. For decades it sat quietly in the shadow of the Queen's Gambit, a respectable sideline and little more. Then came the revival. The Accelerated move order with an early 2.Bf4, the rise of the sharp Jobava London, and a run of top-level outings in faster time controls turned a label from the 1920s into one of the most-played systems anywhere. The history is worth knowing, because it tells you the London was always a serious opening rather than a beginner's crutch.
Win, Draw and Loss Rates
The numbers below come from a large pool of club games on Lichess, grouped by rating band. They sketch the practical picture: draws stay uncommon, and the results run close, with Black holding its own and even edging ahead once you reach the stronger club bands.
| Rating level (Lichess) | White wins | Draw | Black wins |
|---|---|---|---|
| 800, beginner | 48.6% | 2.9% | 48.5% |
| 1000, novice | 49.3% | 3.4% | 47.3% |
| 1200, improver | 49.3% | 3.5% | 47.2% |
| 1600, club | 47.4% | 4.5% | 48.2% |
| 1800, club | 45.8% | 5.6% | 48.5% |
| 2000, advanced club | 44.9% | 6.8% | 48.3% |
Source: Lichess opening explorer, blitz, rapid and classical games at the position after 1.d4 d5 2.Bf4 Nf6 3.e3 c5 4.c3. Figures are win rates by Lichess rating band; draws are rare at these levels.
Watch the London System in action
For a five-minute walkthrough of the main ideas before you read on, the video tutorial below covers the setup at a glance.
The video is just the start. Scroll down for deeper analysis, the transpositions into the middlegame, and practical tips for handling the London on both sides.
Key Ideas in the London System: the three-pawn triangle and what it buys White
The London is friendly to learn because you can aim for the same structure against a wide range of Black's replies. Whatever Black does, White can almost always reach the thematic London setup with the pawn chain on d4, c3 and e3. That chain gives White a structure that is hard to break, and the opening also comes with attacking patterns that are easy to pick up. Those two qualities together explain why players at every level reach for it.
Think of the setup in three stages. First, get the bishop out to f4 so it is not buried behind the pawn chain. Next, close the chain with e3 and then c3. Finally, White wants Nbd2 and Bd3. With the minor pieces placed like that, Qe2 and Re1 usually follow, in support of one of White's main ideas in this opening: the central break with e4. A second active plan is to plant the knight on e5 with the thematic Ne5, sometimes backed up by f4. Thanks to dark-square control and a space edge, White can swing the queen or a rook over to the kingside for a dangerous attack.
White's middlegame levers: the Ne5 outpost and the e3-e4 break
Past the pawn triangle, the London gives White two recurring plans worth naming. The first is the Ne5 outpost. The knight lands on e5 supported by the d4-pawn, often backed up by f4, and from there White swings the queen and a rook toward the kingside for an attack on the dark squares. The second is the central e3-e4 break, prepared by Nbd2, Bd3, Qe2 and sometimes Re1. Once it lands, White's pieces spring to life and the f4-bishop's diagonal opens up. A third, quieter job is managing the light-squared bishop, usually routed to d3 aiming at h7. Which plan you choose depends on Black. Go for the kingside attack with Ne5 and f4 against quiet setups, and use the e4 break when Black commits to ...e6 and a solid center.
How to Play the London System: Step by Step
The appeal of the London is that you follow almost the same plan no matter what Black does. Here is the move-by-move blueprint for White:
- Step 1: Free the bishop. Play 1.d4 and develop the bishop to f4 before locking it in; this is the whole idea behind 2.Bf4.
- Step 2: Build the triangle. Support the center with e3 and c3, giving you the solid d4-e3-c3 pawn chain.
- Step 3: Develop naturally. Bring out the knights with Nbd2 and Ngf3, then the bishop to Bd3 aiming at h7.
- Step 4: Make luft and pick a plan. A useful h3 controls g4 and gives the f4-bishop a retreat to h2 after ...Nh5. Then choose: the central break with Qe2 and e4, or the kingside attack with Ne5 and f4.
A clean illustration of White's dream setup runs 1.d4 d5 2.Bf4 Nf6 3.e3 c5 4.c3 e6 5.Nd2 Nc6 6.Ngf3 Bd6 7.Bg3 0-0 8.Bd3 b6 9.Qe2 Bb7 10.e4, when White is fully developed and ready to expand in the center. Burn this picture into memory: most of your London games will look a lot like it.
London System Theory: setups and move orders that matter
London theory is more about the setup than precise move orders, which is why variations transpose into each other so often. Two main move orders reach the London setup: 1.d4 d5 2.Nf3 Nf6 3.Bf4 and 1.d4 d5 2.Bf4 Nf6 3.e3 c5 4.c3. The second, with 2.Bf4, is the Accelerated London System, and it is usually preferred over 2.Nf3 because of a difference in finesses. White can also borrow an idea from the Chigorin Defense and play the Rapport-Jobava System, named after the Richard Rapport and Baadur Jobava games: 1.d4 Nf6 2.Nc3 d5 3.Bf4. Since White poses no real questions in the opening phase, Black is free to choose a counter-system. Black can aim for a King's Indian setup with 1.d4 Nf6 2.Bf4 g6 3.e3 Bg7 4.Nf3 0-0 5.Be2 d6, or skip the calm development and pressure d4 at once with 1.d4 Nf6 2.Bf4 c5, denying White the time to complete the thematic triangle.
The Jobava London (2.Nc3): the aggressive cousin
The sharpest modern relative of the London is the Jobava London, also called the Rapport-Jobava System, reached after 1.d4 Nf6 2.Nc3 d5 3.Bf4. By developing the knight to c3 instead of pushing the c-pawn, White gives up some solidity in exchange for attacking bite. The point is twofold. Nb5 hits the c7-square if Black is careless (3...Nc6? 4.Nb5 already wins a pawn), and Nc3 supports a later f3 and e4 to grab the center. Baadur Jobava and Richard Rapport made it popular, steering the game away from mainstream London theory and toward unbalanced, double-edged positions. There is a cost: the c3-knight blocks the c-pawn, so Black can strike at d4 directly with ...c5. For players who find the standard London too tame, the Jobava is the obvious step up.
Main Line (Accelerated London System): 2.Bf4 Nf6 3.e3 c5 4.c3
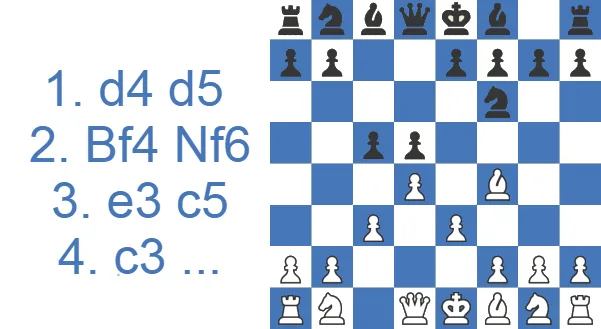
The classical way to play the London starts with 1.d4 d5 2.Nf3 Nf6 3.Bf4. By playing 2.Nf3, White keeps his cards close to his chest, since he is not yet committed to any one system. But the move also delays the core setup, which can cause trouble in certain lines. That tempo is better spent on Nd2 than Nf3, since the knight on f3 is not an essential part of the London setup. One line shows the problem with 2.Nf3 clearly: 1.d4 d5 2.Nf3 Nf6 3.Bf4 c5 4.e3 Nc6 (2.Nf3 also allows 4...Bg4, pinning the knight) 5.c3 Qb6, hitting the undefended b2-pawn, 6.Qb3 c4 7.Qc2, and now Black has the annoying 7...Bf5, forcing the queen back with 8.Qc1, because 8.Qxf5 Qxb2 wins the rook.
The Accelerated London with 2.Bf4 sidesteps Black's ...Bf5 idea. After 1.d4 d5 2.Bf4 Nf6 3.e3 c5 4.c3 Nc6 5.Nd2 Qb6 6.Qb3 c4 7.Qc2 Bf5?? White just grabs the bishop with 8.Qxf5. Here is the heart of the difference between 2.Nf3 and 2.Bf4: with the knight on d2, the rook can sidestep after ...Qxb2, so Black's tactical trick evaporates. So instead of 5...Qb6, Black usually plays 5...e6 to continue kingside development or 5...Bf5 to stop Bd3. After 5...e6, White carries out the e4 plan smoothly: 6.Ngf3 Bd6 7.Bg3 0-0 8.Bd3 b6 9.Qe2 Bb7 10.e4, threatening the fork with e5 next. This is the model setup for White in the London.
The other try, 5...Bf5, gives Black better chances to equalize and sometimes even a small edge: 6.Qb3 hitting the undefended b7-pawn, 6...Qd7 7.Ngf3 c4 8.Qd1 e6 9.Be2 b5, with Black seeking queenside play via ...a5 and ...b4, 10.0-0 Bd6 11.Ne5 Qc7, and the position is balanced. White presses on the kingside while Black expands on the queenside to create weaknesses and undermine the pawn chain.
King's Indian Variation: 1.d4 Nf6 2.Bf4 g6 3.e3 Bg7
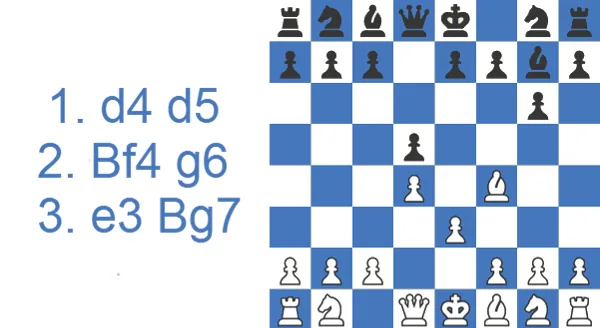
A reliable option for Black is to head for a King's Indian setup: 1.d4 Nf6 2.Bf4 g6 3.e3 Bg7 4.Nf3 0-0 5.Be2 d6. That last move, ...d6, prepares the ...e5 break and also threatens ...Nh5 to swap off White's strong dark-squared bishop, since ...d6 now rules out Be5. So White plays 6.h3 to make a retreat square. Then 6...c5 is the thematic counterplay in this structure. After 7.c3 Qb6 8.Qb3, Black can harass the queen with 8...Be6, possible because there is no longer a pawn on d5. 9.Qxb6 axb6 saddles Black with doubled pawns, but it also opens the a-file for the rook, and after 10.a3 the position is relatively quiet.
White can also take a sharper line against the King's Indian structure with 1.d4 Nf6 2.Bf4 g6 3.Nc3, intending e4 since Black has not played ...d5. If Black presses ahead with the fianchetto and ignores White's active development, White gets a comfortable attack: 3...Bg7 4.e4 d6 5.Qd2, planning to castle queenside and trade off Black's key defender with Bh6. 5...0-0 6.0-0-0 c6 7.Bh6 b5 8.f3 Qa5, and the position resembles a Pirc Defense, except White's attack here is more dangerous. The practical conclusion is that Black should not allow 4.e4 and should play 3...d5 instead.
Rapport-Jobava System: 1...Nf6 2.Nc3 d5 3.Bf4
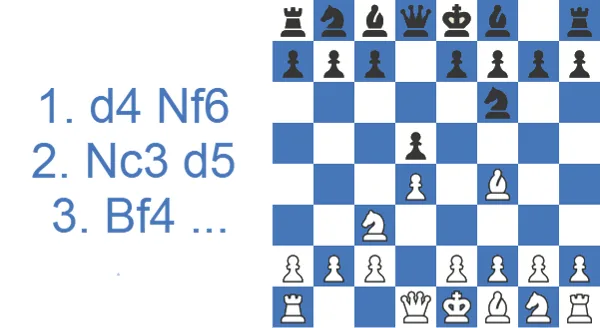
In the Jobava-Rapport System, White develops with Nc3 (instead of the c3-pawn) and Bf4 no matter what Black does, and the result is a more aggressive take on the London. It dodges main-line theory and gives White good attacking chances. If Black is careless, the c7-square can become a target after Nb5: 1...Nf6 2.Nc3 d5 3.Bf4 Nc6? 4.Nb5 and Black drops a pawn. But the bigger point behind Nc3 is to support e4 after f3 and grab the center. A sensible reply is 3...Bf5, and after 4.f3 e6 5.g4 Bg6 6.h4 h5 7.g5 Nfd7 8.e4 White has finally pushed through. White has space and central control but a badly weakened kingside, so the game can still go either way.
Because the knight on c3 blocks the c-pawn, Black can also challenge the pawn chain directly: 3...c5 4.e3 cxd4 5.exd4 a6, stopping Nb5, 6.Nf3 Nc6 7.Ne5 Bd7 8.Be2 e6 9.0-0 Qb6, hitting both d4 and b2, so 10.Nxc6 Bxc6 11.Rb1 with a roughly balanced position.
Putting pressure on d4: 1...Nf6 2.Bf4 c5
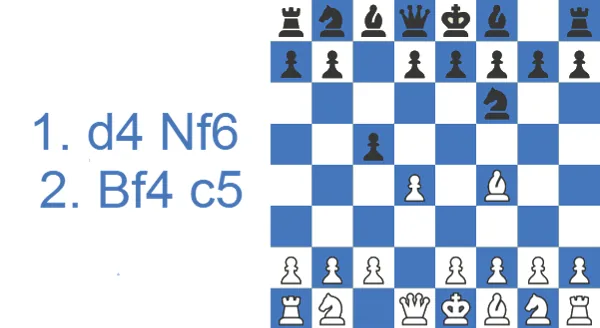
Black can speed up the strike at the center with 1.d4 Nf6 2.Bf4 c5, without waiting for Nc3 or c3. With 2...c5, Black not only pressures d4 and the London triangle but also sets up ...Qb6 to punish White's early bishop move, which leaves b2 undefended. 3.e3 Qb6. Rather than defend b2, White can seek counterplay with 4.Nc3, since after 4...Qxb2 5.Nb5 becomes a real problem for Black. So Black needs 4...d6 or 4...a6 to take the sting out of those ideas. 4...d6 closes the diagonal for White's bishop. A standard continuation is 5.Bb5 Bd7 6.a4 a6 7.a5 Qc7 8.Bxd7 Nbxd7, and now White grabs space with 9.d5 g6 10.e4 Bg7.
Note that 2...c5 can lead to Benoni-type structures. If White prefers, he can force that transposition directly with 3.d5 rather than sticking to the London setup.
Accelerated London System vs. Standard London System: which move order to choose (2.Bf4 vs 2.Nf3)
| Standard London (2.Nf3) | Accelerated London (2.Bf4) | |
|---|---|---|
| Move order | 1.d4 d5 2.Nf3 Nf6 3.Bf4 | 1.d4 d5 2.Bf4 Nf6 3.e3 c5 4.c3 |
| Knight's first job | Committed to f3 early | Flexible, usually Nd2 first |
| The …Qb6 + …Bf5 trick | Works for Black (White must play the passive Qc1) | Refuted, White just plays Qxf5 |
| Best for | Players who like classical, low-commitment development | Players who want the most accurate, modern setup |
| Verdict | Perfectly playable, slightly less precise | Preferred at every level today |
The difference between the two London move orders comes down to a single decision: whether White commits the knight to f3 early (the standard London, 1.d4 d5 2.Nf3 Nf6 3.Bf4) or develops the bishop first (the Accelerated London, 1.d4 d5 2.Bf4). It looks like a tiny nuance, but it changes which of Black's resources actually work.
The whole point of the Accelerated version is that it keeps the f3-square free for the moment and lets White meet the ...Qb6 and ...Bf5 plan with Nd2. With the knight on d2, the rook can step aside after ...Qxb2, and Black's tactical trick is gone.
In short, the standard London is not wrong, but the Accelerated London removes a concrete problem for free, which is why it has become the default. If you are building a repertoire from scratch, start with 2.Bf4.
How to Play Against the London System: Black's Best Responses
Because White is not asking Black any direct questions in the opening, Black gets a free hand to choose a counter-plan. The London is solid, but it is far from a free advantage. Here are the most reliable antidotes for Black.
1. Hit the b2-pawn with ...Qb6
The most annoying idea against the London is the early ...Qb6, attacking the undefended b2-pawn and pressuring d4 at the same time. A typical sequence is 1.d4 d5 2.Bf4 Nf6 3.e3 c5 4.c3 Qb6 5.Qb3 Nc6 6.Nd2 Bf5, when Black is already comfortable and White has to spend energy keeping the queenside in order.
2. Free your bishop first with ...Bf5
Black's main long-term problem in the London is the passive light-squared bishop, so the cleanest fix is to develop it before playing ...e6. After 1.d4 d5 2.Bf4 Nf6 3.e3 Bf5, Black mirrors White's structure and often follows up with ...e6, ...Bd6 and ...0-0, reaching a rock-solid position.
3. Trade the dark-squared bishops with ...Bd6
White's bishop on f4 is the star of the opening, so taking it off the board removes a lot of the venom from White's attack. The main line 1.d4 d5 2.Bf4 Nf6 3.e3 e6 4.Nf3 Bd6 offers the trade on g3 or f4 and gives Black one of the most respected setups against the London.
4. Go for a King's Indian setup
If you prefer a fighting, double-edged game, fianchetto with 1.d4 Nf6 2.Bf4 g6 3.e3 Bg7 and aim for the ...c5 and ...e5 breaks. (We cover this in detail in the King's Indian Variation section above.)
The takeaway: you do not need to memorize a refutation. Free your bad bishop, challenge d4 with ...c5, and look for the ...Qb6 hit. Do those three things and you will get a healthy game against any London player.
London vs the King's Indian and Grunfeld (...g6 setups)
When Black fianchettoes with ...g6 and ...Bg7, you are facing a King's Indian Defense setup against the London. After 1.d4 Nf6 2.Bf4 g6 3.e3 Bg7 4.Nf3 0-0 5.Be2 d6, Black eyes the ...e5 and ...c5 breaks and may try ...Nh5 to swap off your f4-bishop, so h3 can prepare a Bh2 retreat if ...Nh5 attacks the bishop. Against a quicker ...d5 and ...g6 (a Grunfeld-flavoured structure), White is happy to keep the triangle intact and play for the e4 break, since Black's fianchettoed bishop bites on the granite d4-pawn. The practical rule against all these ...g6 systems is simple: don't let your dark-squared bishop get traded cheaply, and prepare h3 so the bishop can retreat to h2 after ...Nh5, when the position allows it.
London vs the Slav, Stonewall and Queen's Indian (...c5 and ...d5 setups)
Classical defenders who answer with ...d5 and ...c5 are essentially playing Slav and Queen's-Gambit-style structures against the London, and the key resource is the early ...Qb6 hitting b2. Move order matters here. Meet it with Nd2 (the Accelerated London point) so the rook can escape after ...Qxb2. If Black sets up a Stonewall with ...d5, ...e6, ...f5 and ...Bd6, offer the trade of dark-squared bishops on g3 and aim for the e4 break to challenge Black's clamped center. A Queen's Indian flavor with ...b6 and ...Bb7 is comfortable for White too, since the e4 push gains space and the b7-bishop has little to bite on. Across all these structures the recipe stays the same: keep the triangle, complete Nbd2, Bd3 and Qe2, and time e4.
Common Traps in the London Opening: the Bxh7 Greek Gift and the Ba6 Fork
1.d4 Nf6 2.Bf4 e6 3.c3 c5 4.e3 d5 5.Nd2 Nc6 6.Ngf3 Bd6 7.Bg3 0-0 8.Bd3 Re8, intending to support an ...e5 break, 9.Ne5 Qc7 10.f4. Here it is easy to blunder with the natural-looking 10...Nd7, which aims to challenge the e5-knight with ...f6. White then has the thematic Greek Gift sacrifice: 11.Bxh7+! Kxh7 12.Qh5+ Kg8 13.Qxf7+ Kh7 14.Qh5+ Kg8 15.Qxe8+ with a decisive advantage.
1.d4 d5 2.Bf4 Nf6 3.e3 c5 4.c3 Nc6 5.Nf3 Bg4, pinning the knight, 6.Nbd2 e6 7.Qa4, breaking the pin and pinning Black's knight in return. Now the natural-looking 7...Bd6?? is a blunder due to 8.Ba6! 0-0 (8...bxa6 9.Qxc6+ Ke7 10.Qb7+ Qd7 11.Bxd6+ Kxd6 12.Qxa6+) 9.Bxb7 Bxf4 10.Bxc6, winning material as Black's bishop and rook both hang.
Facing the London System as Black: A Game of Mine
Black against the London, and I went for the straightforward setup: 1...e6, 2...Nf6, 3...c5 and 5...Qb6 against b2. He answered 6.b3, I took with 6...cxd4 7.exd4 and built the center with 7...d5. He got the a3 and b4 space and the outpost with 17.Ne5, which is exactly what the system is after.

Then it went wrong for me. 21.Qa8+ Kh7 reads +3.4 for White. He played 22.Nf3 and it was +0.5 again, and from that point the pawns he had pushed became the targets: 28...Bxb4, then 30...Bxc3. He resigned after 41...Qh1+.

What I take from it is that the London's plan and its weakness are the same thing. The b4 and c3 pawns buy White space, and the dark squares behind them are where Black's pieces belong. Keep the ...c5 and ...d5 center, let him spend moves on the queenside, and aim at what he left behind.
London System: strengths and weaknesses
PROS
- Easy to learn, so it is great for quick, short term improvements.
- Solid pawn structure and risk-free attacking chances on the kingside
CONS
- Black gets to choose the setup they want and can dictate the trajectory of the game.
- Sometimes regarded as slow and passive.
Rating-band reality check: who the London actually beats
The London quietly overperforms below about 1800, and the reason is plain. It removes the one thing weaker players struggle with most, memorizing sharp forcing theory. You get a familiar setup move after move and bank rating points while opponents burn clock and patience. The most common club-level mistake is autopilot. Black plays ...Qb6 expecting to snatch the b2-pawn and instead walks into Qb3, or in the Jobava lines a Nc3 and Nb5 counter that leaves Black worse. The fix is easy to state: check how ...Bf5 and ...Qb6 fit the exact position instead of treating either move order as automatic. At master level the London bites less, because strong defenders neutralize it with precise ...c5 and ...Bf5 play and settle for a slightly worse but rock-solid game. Even so, Carlsen's use of it shows it is far from harmless at the very top.
Case Study: White's Model e4 Break
The cleanest game to model your own London on is the main-line Accelerated setup, where Black plays the solid ...e6 and White is allowed to complete the dream formation and break with e4. I keep coming back to this line whenever I want to remind myself what the opening is actually trying to do.
Here is what each phase teaches.
- 1.d4 d5 2.Bf4 Nf6 3.e3 c5 4.c3: White builds the triangle in the most accurate order. The bishop is already out on f4, and 4.c3 props up d4 so the c5-pawn cannot chip it away. Nothing fancy yet, and that is the point.
- 5.Nd2 (not 5.Nf3): this is the move that separates the Accelerated London from the older one. The parenthetical line shows why it matters. After the greedy 5...Qb6 6.Qb3 c4 7.Qc2 Bf5, the knight on d2 means 8.Qxf5! works, because after 8...Qxb2 9.Qb1 the rook has a flight square. In the 2.Nf3 version that same trick costs White the exchange. So the takeaway for a club player is to keep the f3-square free until you have seen whether Black goes for the ...Qb6/...Bf5 plan.
- 5...e6 6.Ngf3 Bd6 7.Bg3: Black chooses the solid path and offers a bishop trade with ...Bd6. White declines it by tucking the bishop back to g3, where it still eyes the b8-h2 diagonal and stays on the board. This is the standard way to keep your best minor piece.
- 8.Bd3 b6 9.Qe2 Bb7: both sides finish development. White's pieces are all aimed at the center and kingside; Black's light-squared bishop goes to b7, where it stares at the d5-pawn but bites on little else.
- 10.e4: the turning point of the plan. White has spent every move preparing this break, and now it lands with full support from Nd2, Bd3 and Qe2. The threat of e5, forking the d6-bishop and the f6-knight, gives White the initiative, and the f4-bishop's old diagonal springs open once the center clears.
The practical takeaway is straightforward. In the London you are not looking for a knockout in the opening; you are looking to reach this exact picture and then push e4 under good conditions. Develop in the order Nd2, Ngf3, Bd3, Qe2, keep the dark-squared bishop alive with Bg3 when offered a trade, and treat e4 as the goal you have been building toward all along.
Should you add the London to your repertoire?
The London System is quieter than the Queen's Gambit, but it offers structural stability, a comfortable middlegame, and clear attacking patterns built around dark-square control. Its simplicity and ease of learning make it appealing at every level, letting you spend your energy on understanding plans rather than memorizing move orders. If you want a dependable d4 system you can play for years, it earns its place.
Notable games: the London at the top
The most influential modern London game is Magnus Carlsen's choice in the 2018 World Championship match against Fabiano Caruana. He reached for the system precisely to dodge his opponent's deep computer preparation and fight on understanding rather than memory. That game captured what the London does best at the elite level: low theoretical risk, a familiar middlegame, and a long fight in which the stronger player can outplay the weaker one. Hikaru Nakamura, Gata Kamsky and Baadur Jobava have all used London setups regularly, the last of them giving his name to the aggressive 2.Nc3 version. So much for the lazy-opening caricature. World champions reach for it on purpose, not as a shortcut for players who refuse to study.
Test Yourself: London System Positions
Set up each position and find the best move. Use Hint for a nudge or Answer to reveal the engine’s top move.
Find the best move.
Find the best move.
Find the best move.
Find the best move.
Find the best move.