
Chess notation cheat-sheet (for new readers)
Pieces: K king · Q queen · R rook · B bishop · N knight · (a pawn move has no letter)
Actions: x takes · + check · # mate · O-O short castles · O-O-O long castles · e8=Q pawn promotes to queen
Annotations: ! good move · !! brilliant · ? mistake · ?? blunder
Reading the corner trap behind arabian mate chess puzzles
The solving read is two questions, asked in order. First: is the rook edge-adjacent, sitting on the square right next to the cornered king on the same file or rank? Second: does one knight cover both that rook and the king's last flight square? If both answers are yes, the check is already mate before you play it.
Run it on a king jammed at h8 (the corner square on the kingside back rank for Black). A rook on h7, the square directly in front of the king, checks and seals the g7 and h-file run. By itself the rook would just be grabbed, so you scan for the guard. A knight on f6 sits a knight's-move from the king, defends h7, and plugs the g8 escape. When you practice, train the eye to land on the guarding knight first; if it is loose or missing, the king walks out at g8 and the pattern is a mirage.
Knight and rook geometry that locks the king in
Picture the king on h8 again. The rook on h7 takes the whole h-file and the g7 square. The one hole left is g8, the diagonal escape square next to the king. A knight on f6 plugs exactly that hole, since f6 strikes both g8 and h7. So one piece seals the flight square and shields the checker at the same time. Pull the knight back to h6 and the net breaks: it still covers g8, but it no longer defends the rook on h7, so the king just takes the rook and there is no mate.
That h6 slip is the fastest drill on the board. Before you commit the rook check, ask whether the knight still touches the rook, not just the escape square. The positions here are real and computer-verified from real games, and a slider runs from about 400 to 2400 so the geometry shows up at a difficulty that suits you. The mate flips cleanly to a1, a8, or h1 (the other three corner squares), and to either color, so practice it from each corner until the read is automatic.
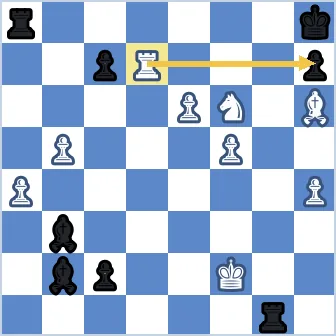
Where the arabian mate chess puzzles hide on the board
This finish lives at the edges, almost always after the king has been driven into a corner with thin cover. While solving, watch for two cues: a knight already parked near the enemy king, often through Nf6 ideas (a white knight jumping to f6, three squares from the corner), and a free rook that can reach the seventh rank or the h-file. When both are present, look for the edge-adjacent rook check before any quieter move; the knight is usually already doing the guarding.
It is one of the oldest recorded mates, traced to early Arabic shatranj manuscripts. The puzzles here also feed you near-relatives, so train to recognize the family, not one frozen picture. A queen stands in for the rook on an adjacent square. Edge mates wall the king in with its own pawns. Back-rank versions run along the rank instead of the file. Same read every time: find the knight guard, confirm the rook strike, check that the corner is shut.