
Chess notation cheat-sheet (for new readers)
Pieces: K king · Q queen · R rook · B bishop · N knight · (a pawn move has no letter)
Actions: x takes · + check · # mate · O-O short castles · O-O-O long castles · e8=Q pawn promotes to queen
Annotations: ! good move · !! brilliant · ? mistake · ?? blunder
Inside the smothered mate chess puzzles you'll drill here
Every position in this set ends the same blunt way: a knight gives check, and the enemy king has nowhere to go because its own pieces, usually pawns and a rook, wall it in. The check can't be blocked, since a knight's check never has a square to interpose on, and the king can't grab the knight either. That single fact is what you train your eye to trust, and it is the first thing to test when you open one of these puzzles.
The positions come straight from real games, and each one is checked by an engine to confirm the mate exists. Slide the rating from 400 up to 2400 and the board meets you near a 75% solve rate, so you stay just past comfortable. When a line stalls you get three free hints: first the motif, then the piece that carries it, then the move. Take the hint, solve it, then try to reach the next position without one.
Smothered mate chess puzzles: caging the king on h8 with the Nf7 check
Picture the classic shape so you can match it fast at the board. The black king sits on h8. A knight lands on f7 (knight jumps to the f7 square, giving check) and calls check. Now count the escape squares: g8 holds a rook, g7 and h7 each hold a pawn, and f7 is too far for the king on h8 to capture, since the two squares are not adjacent. Every door is shut by Black's own army. That is the shape your eye should flag the instant you see a king boxed against the edge.
The mirror runs for White: king tucked on h1, a black knight dropping to f2 (the mirror square), the same suffocation. Corners are where these mates breed, because a king pinned to the edge needs fewer walls to seal it. In this set, scan the corner and the f7 or f2 square first, then ask which knight hop touches it. That habit alone solves a surprising share of these puzzles before I calculate a single line.
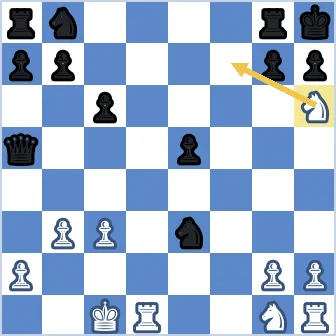
Working Philidor's Legacy backward when a puzzle drops you mid-sequence
When you see a knight near f7 and an enemy rook on g8, calculate the queen sacrifice first. The drilled order, long known as Philidor's Legacy, runs 1.Nf7+ (knight to f7 with check), the king is forced to g8, then 2.Nh6+ delivers a double check that herds the king back to h8, then 3.Qg8+ (the queen offers herself on g8 with check), Rxg8 (the rook is forced to capture the queen), and 4.Nf7# returns the knight for smothered mate. The move that wins games is 3.Qg8+: you hand over the queen so the rook is forced to capture onto g8, which plugs the king's last flight square and lets the knight come back for mate. Train yourself to look for that offer the moment the corner is crowded.
The double check is the other cue to drill. On 2.Nh6+ the knight checks while the queen behind it also bears on g8, so the king cannot capture the knight, cannot interpose, and cannot flee to f8, which leaves only Kh8. Many of these puzzles drop you in right at the queen sacrifice, others at the final Nf7# picture. Read the forcing order backward each time: find the mating square, see which friendly piece blocks each exit, then work out the check that herds the king there. Spot the cage and the queen sac stops looking like a gift.