
 By

It was popularized in the early 1900s by a Brazilian chess master of the same name. With it, White sidesteps the deep theory and home preparation that Black may have ready. Today it is played by many of the best players in the world, including former World Champion Magnus Carlsen.
The Trompowsky in Sixty Seconds
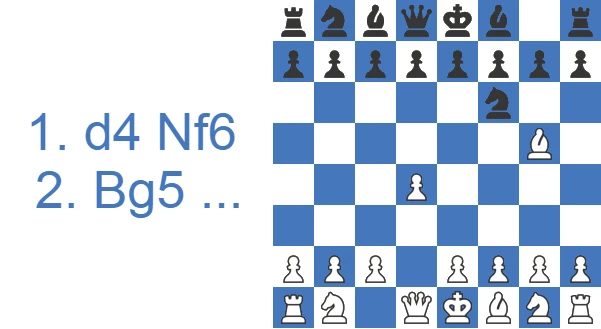
The line starts with 1.d4 Nf6 2.Bg5 (ECO code A45). White immediately attacks the f6-knight and threatens to double Black's pawns with Bxf6. The point is simple: skip the heavy theory of the Queen's Gambit, the Nimzo-Indian and the King's Indian, and steer the game toward positions where understanding beats memorization.
- Main idea: pressure the f6-knight, keep the position flexible, and play for a small structural or central edge.
- Black's main replies: 2…Ne4 (most popular), 2…d5, 2…e6, 2…c5 and 2…g6.
- Most aggressive line: the Raptor Variation with 3.h4, expanding on the kingside.
- Who plays it: Magnus Carlsen, Hikaru Nakamura and Jan-Krzysztof Duda all use it, especially in rapid and blitz.
- Verdict: sound and practical, good for club players and faster time controls, though Black equalizes with accurate play.
Study the Trompowsky Attack as White or Black
By move two the Trompowsky Attack is already threatening to double Black's pawns, which is precisely why White plays it and precisely what Black must prepare for.
Play the Trompowsky Attack as White
White commits the bishop before the knight for a reason: 2.Bg5 carries a double threat and pulls the game away from every Indian defense Black may have prepared. Start below with where the Trompowsky Attack came from, then learn what the bishop move really threatens and how its main branches lead to completely different structures.
Counter the Trompowsky Attack as Black
Two counters to the Trompowsky Attack hold up at every level: strike the d4 pawn with 2...c5, or play 2...e6, when any exchange on f6 hands Black the bishop pair. Check the win-rate table first, then decide how you want to face the Trompowsky based on the structures each line produces.
How White and Black Score
The win-rate numbers tell two different stories depending on the level of play. Among master games, where Black defends accurately, the split is close and draws are common.
| Results | Rate |
|---|---|
| Victory for White | 34% |
| Draw | 37% |
| Victory for Black | 29% |
Drop down to amateur play and the picture changes sharply. Decisive games far outnumber draws, which is exactly what you would expect when neither side knows the theory cold.
| Rating level (Lichess) | White wins | Draw | Black wins |
|---|---|---|---|
| 800, beginner | 45.2% | 4.8% | 50.0% |
| 1000, novice | 47.8% | 4.0% | 48.2% |
| 1200, improver | 48.6% | 3.8% | 47.6% |
| 1600, club | 48.0% | 4.2% | 47.8% |
| 1800, club | 48.8% | 4.8% | 46.4% |
| 2000, advanced club | 50.1% | 5.8% | 44.1% |
Source: Lichess opening explorer, blitz, rapid and classical games at the position after 1.d4 Nf6 2.Bg5. Figures are win rates by Lichess rating band; draws are rare at these levels.
A45 at a Glance: The Trompowsky by the Numbers
In the ECO index the Trompowsky sits under code A45, the catch-all for 1.d4 Nf6 lines where White avoids 2.c4 and 2.Nf3. After 1.d4 Nf6 2.Bg5, Black's most-played answer by some margin is 2…Ne4, followed by 2…d5, 2…e6, 2…c5 and the King's-Indian-flavored 2…g6. The leading practitioners read like a roll call: Englishman Julian Hodgson, who turned the line into a real fighting choice in the 1980s and 1990s, plus modern players Magnus Carlsen, Hikaru Nakamura and Richard Rapport, who all use it to dodge preparation. If you want one structured fact to anchor your study, take this one. A45, 2…Ne4 most common, Bxf6 the recurring structural threat.
Watch the Trompowsky in Action
There is a short video walkthrough on our YouTube channel if you prefer to see the lines played out on a board before reading the move-by-move breakdown below.
Origins of the Trompowsky Attack
The opening is named after Octavio Trompowsky, a Brazilian champion who used 2.Bg5 regularly in the 1930s and 1940s. The same early bishop sortie was explored independently by other players, which is why older sources sometimes list it under names like the Ruth or Opovcensky Opening. In modern databases it sits under the ECO code A45.
For decades it was treated as a sideline, until English grandmaster Julian Hodgson made it a serious fighting weapon in the 1980s and 1990s, scoring heavily against strong opposition. Today it is firmly part of elite practice, with Magnus Carlsen, Hikaru Nakamura and Jan-Krzysztof Duda all reaching for it when they want to dodge preparation and get an original game from move two.
Key Ideas in the Trompowsky Attack: The Two Threats Behind 2.Bg5
The first goal is the obvious one: double Black's pawns by capturing the f6-knight with Bxf6. Behind that sits the deeper point, which is to avoid heavy theoretical battles and let both sides develop flexibly. Black usually aims for the …d5 and …c5 breaks to open files for the rooks. These games often turn strategic, rewarding a feel for pawn structures and slow positional play over rote memorization.
Trompowsky Attack Theory: How the Main Branches Differ
The main line often leads to positions where both sides make reactive moves and wait for the opponent to err. White can claim a space advantage, while Black can strike at White's central pawn chain.
The Raptor Variation pushes the game in a different direction. White expands on the kingside, while Black tries to harass White's pieces and cramp them.
The 2…c5 line lets White double Black's pawns with Bxf6. Here White usually expands in the center while Black aims at the dark squares that the missing bishop leaves behind.
The Classical Variation tends to produce slow maneuvering, with both sides angling for the pawn break that opens attacking lines.
The Main Line: 2…Ne4 and the Bf4 Retreat
The main line begins after Black chooses 2…Ne4. By jumping the f6-knight into e4, Black attacks the bishop and keeps the pawn structure intact.
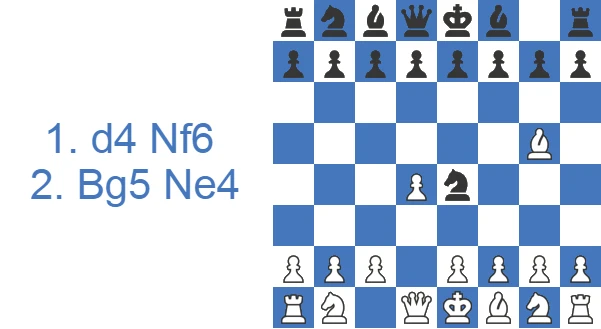
White normally plays 3.Bf4 to save the bishop.
After 3.Bf4 Black has two principal replies, 3…d5 and 3…c5, both playable and reachable by different move orders.
3…c5 gives White an aggressive route with 4.f3, kicking the e4-knight. White often comes out with a central edge after a sequence like 4…Qa5+ 5.c3 (blocking the check) 5…Nf6 (guarding the knight) 6.d5 (expanding in the center). White usually follows with e4, and Black tries to undermine d5 with …e6. Black can also try 6…Qb6 to hit the undefended b2-pawn, at which point White covers it with b3 or simply retreats the bishop to c1.
From there both sides develop quickly. White looks to ride the central advantage, while Black tries to punish White by hitting the overextended pawns.
The Modern Tabiya: 2…Ne4 3.Bf4 d5
After 2…Ne4 the critical retreat is 3.Bf4, the move that defines the modern main line. Black's most testing reply is 3…d5, claiming the center and asking White to show the early bishop sortie was worth a tempo. From here 4.e3 is the natural follow-up. It keeps the f4-bishop comfortably outside the pawn chain, after which 4…c5 opens the c-file and challenges d4. White's standard handling runs 5.Bd3, prodding the e4-knight. If Black ignores it, the doubled e-pawns after Bxe4 are real, so 5…Nf6 is usual, returning the knight and keeping the structure clean. This 2…Ne4 3.Bf4 d5 tabiya is where most top-level Trompowsky games now live. Both sides know the plan. White builds toward a timely e4 break with Nd2-f3, while Black expands on the queenside with c4 and b5.
One sample line from 5…Nf6 runs 6.c3 (defending d4) 6…Nc6 (developing) 7.Nd2 (setting up the d2-f3 knight maneuver for a later break) 7…Bg4 (placing the bishop outside the pawn chain and eyeing the d1-queen) 8.Ngf3 8…e6 (solidifying) 9.O-O 9…Rc8 (lifting the rook to the soon-to-open c-file) 10.Qa4.
In the final position White aims for the e4 break after Re1 and Ne5. Black typically either closes the queenside with …c4 and …b5 or simply improves the pieces.
The Raptor Variation: 3.h4 and a Kingside Storm
The Raptor starts from the main line, but instead of retreating the bishop White plays 3.h4, beginning a kingside expansion. The line shares its predatory naming with cousins like the Pterodactyl and Vulture.
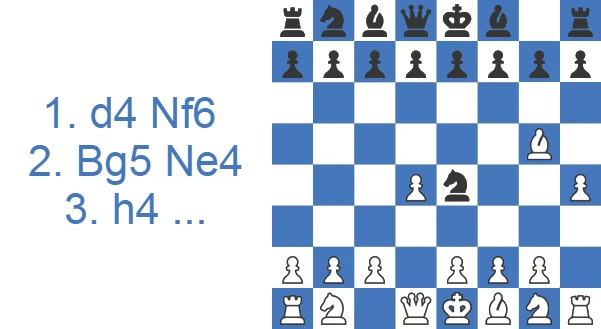
If Black grabs the bishop with 3…Nxg5, White recaptures 4.hxg5 and looks to create light-square weaknesses around the enemy king. One sample line is 4…d5 5.Nf3 (guarding the g5-pawn) 5…c6 6.g6 (sacrificing a pawn to weaken the e8-h5 diagonal) 6…fxg6 (…hxg6 fails to the pin) 7.Nbd2 7…e6 8.Ne5. White plants a strong knight on e5 and supports it with Ndf3. Black tries to trade queens, and White keeps the pressure on.
If Black declines the bishop, White generally expands on the kingside and castles long. A sample line is 3…d5 (fixing the pawns) 4.Nd2 (attacking the e4-knight) 4…Bf5 (defending it and preparing …e6) 5.Nxe4 5…Bxe4 6.f3 (kicking the bishop). From here White pushes the kingside pawns and castles queenside.
The 2…c5 Line: Counterattacking the d4-Pawn
This arises after 2…c5, hitting d4 at once.
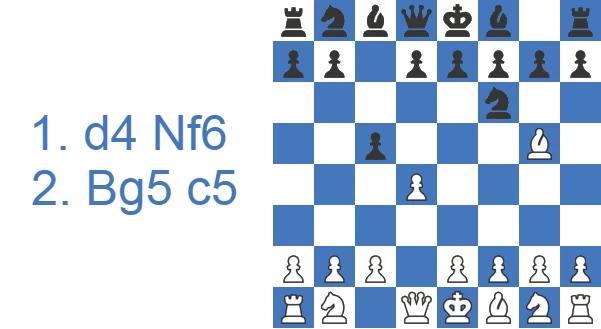
White can double Black's pawns with 3.Bxf6, though the resulting lack of a dark-squared bishop is a real concern in many lines. A sample sequence runs 3…gxf6 4.d5 (expanding in the center) 4…Qb6 (the standard hit on b2 now that White's dark-squared bishop is gone) 5.Qc1 (defending b2) 5…f5 (stopping e4 and opening the f8-bishop's diagonal) 6.c4. Black will fianchetto with …Bg7 and try to exploit White's weakened dark squares, while White maneuvers the knights, fights for the center, and untangles without dropping the b2-pawn.
White can also play 3.Nc3 and head for the Poisoned Pawn Variation after 3…Qb6 (eyeing …Qxb2).
White may then push 4.d5 and offer the b2-pawn. The pawn is poisoned if Black is careless. After 4…Qxb2 the sneaky 5.Bd2 prepares Rb1 and Nb5, with the dual threat of Nc7+ forking king and rook. Black's best is 5…Qb6, after which White enjoys a strong center with a coming e4 and the semi-open b-file once the a1-rook swings to b1.
If Black blunders with 5…e6, then 6.Rb1 (hitting the queen) 6…Qa3 7.Nb5 is winning, since Nc7+ cannot be stopped.
The Classical Defense: 2…e6 Trades the Bishop Pair
The Classical Variation arises after 2…e6. White usually gives up the bishop pair in return for central control, and the games often settle into quiet positions where both sides develop and wait.
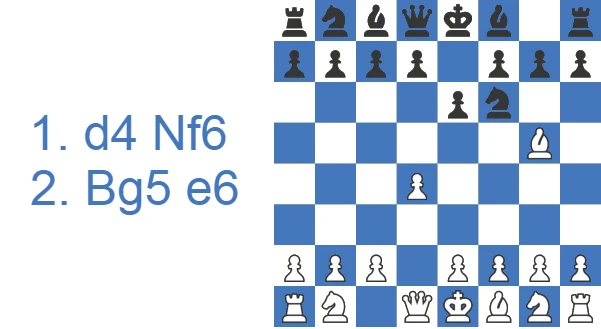
3.e4 is the most common move at every level. Black typically kicks the bishop with 3…h6, and White takes on f6. Note that 4.Bh4 is a mistake: 4…g5 5.Bg3 5…Nxe4 simply wins the e4-pawn.
So White usually plays 4.Bxf6, and Black recaptures 4…Qxf6.
A sample line is 5.Nc3 (developing) 5…Bb4 (pinning the knight) 6.Qd3 (defending the knight with the queen to avoid doubled pawns) 6…Nc6 (developing) 7.Nf3. The position is roughly balanced. White can castle either side, while Black sets up a d6-e6 structure and tries to make the bishop pair count by opening the game. White looks to expand further and push Black's pieces back.
Other Black Replies: 2…d5 and 2…g6
Two more setups appear often enough to be worth knowing, especially at club level where Black avoids the sharper 2…Ne4 and 2…c5 lines.
2…d5 line
This arises after 2…d5, supporting the center right away. White's most direct try is 3.Bxf6, doubling Black's pawns at the cost of the dark-squared bishop. A sample line runs 3…exf6 4.e3 4…Bd6 5.c4 (challenging d5) 5…dxc4 6.Bxc4 and 7.Nc3. White ends up with the healthier pawn structure, while Black relies on the bishop pair and the half-open e-file.
Black can also recapture with 3…gxf6 to keep the pawns flexible for an early …f5 and active piece play on the kingside.
2…g6 line
This occurs after 2…g6, where Black heads for a King's-Indian-style fianchetto. White usually clarifies the structure with 3.Bxf6, and a typical continuation is 3…exf6 4.e3 4…Bg7 5.c4 5…d6 6.Nc3. White is happy to trade the dark-squared bishop here, since the g7-bishop now bites on its own f6-pawn, and White develops comfortably and presses on the half-open files. Black, in return, keeps the bishop pair and a solid, familiar setup.
Best Ways for Black to Meet the Trompowsky: Three Reliable Setups
If you are facing the Trompowsky and want a dependable plan rather than a memorized line, these are the soundest choices:
- 2…Ne4: the most principled reply. It challenges the g5-bishop immediately and keeps Black's structure intact, which is why it is the main line.
- 2…e6: a calm, flexible setup. Black accepts the bishop trade after 3.e4 h6 and gets the bishop pair in a quiet position.
- 2…c5: the most combative answer, striking at the center and inviting White into double-edged play. Just be ready for the Poisoned Pawn lines.
Whatever you pick, two rules of thumb hold. Do not grab the b2-pawn unless you have calculated the follow-up, and watch the loose g5-bishop, which can sometimes be won with an early …Qa5+.
Trompowsky vs London System vs Torre Attack
The Trompowsky is often grouped with two other low-theory 1.d4 systems. They look alike because White develops the dark-squared bishop early, but the timing changes the character of the game.
| Opening | Move order | Bishop | Typical style | Theory to learn |
|---|---|---|---|---|
| Trompowsky Attack | 1.d4 Nf6 2.Bg5 | Bg5, hitting the Knight at once | Flexible, can turn sharp | Low |
| Torre Attack | 1.d4 Nf6 2.Nf3 e6 3.Bg5 | Bg5, but only after Nf3 | Positional and solid | Low to moderate |
| London System | 1.d4 Nf6 2.Bf4 | Bf4, outside the pawn chain | Solid, system-based | Very low |
The practical difference is this. The Trompowsky is the most provocative of the three. By committing the bishop to g5 on move two, White forces Black into an early decision about the f6-knight, while the Torre and London let White set up a safe structure first and decide later.
Grandmaster Games with the Trompowsky Attack: Three Instructive Wins
The Duda–Carlsen 2022 game is the most instructive of the three, for a telling reason. Playing Black, the reigning World Champion did not try to refute the Trompowsky at all. He was content to neutralize it, trading down into a dry, balanced position and steering toward an equal endgame rather than chasing a theoretical advantage. That says a lot about the opening as a practical choice. Its main pull is psychological rather than theoretical. It forces an early independent decision and pulls the opponent out of prepared lines from move two. Even the best player in the world treats it as something to defuse carefully rather than something to punish. For White that is encouraging. For Black it points to the right mindset, which is to equalize soundly instead of overreaching for a refutation that is not there.
Why Play It, and Where It Falls Short
Pros
- White usually avoids the main theory of d4 openings.
- White can trick Black on many occasions, such as in the Poison Pawn Variation.
- White can castle on both the Kingside and the Queenside in different variations.
- White can play against doubled pawns.
Cons
- This opening might not be advisable for beginner players because they might need to break the main opening principles on many occasions.
- Black usually equalizes easily if they are precise.
- Black can play with the Bishop pair if White takes the f6-Knight.
- Black can have extra pawns in many lines, and White might need to prove their advantage.
Trompowsky by Rating: When It's Worth It
How well the Trompowsky performs depends a lot on who is across the board. Between roughly 1200 and 1800, it scores heavily as a surprise. Most club opponents have no prepared answer, blunder into the b2 poison or misplace pieces against the early bishop, and the amateur statistics, where decisive games far outnumber draws, reflect exactly that. From 1800 to 2200 it stays a fine practical choice that saves study time, though Black starts equalizing more reliably with 2…Ne4 or 2…e6. Above 2200, against prepared opposition, the Trompowsky rarely promises an objective edge. That is precisely why elite players bring it out as a one-off prep-dodge rather than a steady choice. Treat it as a sharp surprise below master level and as a flexible change of pace above it.
The Defining Trompowsky Trap: Winning the Loose g5-Bishop
One recurring trap exploits White's loose g5-bishop. After the opening moves 1.d4 Nf6 2.Bg5, Black can open the queen's diagonal with a move like 2…c6. It looks harmless, but it sets a real trap. If White fails to defend the bishop or capture the knight and plays something like 3.e3, Black wins the bishop with 3…Qa5+.
Trompowsky tactics cluster around two recurring themes, and naming them is the quickest way to stay safe. The first is the poisoned b2-pawn. In the 2…c5 lines Black is tempted by …Qb6 hitting b2, but grabbing it can be fatal. After 4…Qxb2 White answers 5.Bd2, preparing Rb1 and Nb5 with the threat of Nc7+ forking king and rook. Best is 5…Qb6 back, after which White has a free hand in the center. The second theme is the hanging bishop on g5. Because the bishop commits so early, an alert Black can sometimes win it outright with a quick …Qa5+ when White carelessly plays a move like e3 without first defending it or capturing on f6. Of the two, the second is the one I meet far more often. Most opponents have heard about the b2 trap, but they forget the bishop is just sitting there. Remember both names, b2 poison and the loose g5-bishop, and most Trompowsky accidents stop happening.
Case Study: Artemiev vs. Lagno, 2021
The longest of our three model games is the best teaching tool, because it shows the Trompowsky's quieter side and what Black can do when White's dark-squared bishop disappears.
This is a Trompowsky played in the quiet, modern style rather than the gambit style. White opts for 2.Bg5 d5 3.Nd2, the Pseudo-Trompowsky setup that supports a future e4 break without committing to an early Bxf6. Notice that Artemiev never doubles Black's pawns here. He keeps the bishop and plays a normal Queen's-Pawn middlegame.
Black's plan is clean and worth copying. With 3…c5 4.e3 Nc6 5.c3 cxd4 6.exd4 Lagno trades on d4 to leave White with a slightly loose central pawn, then develops naturally with 6…Bf5 and 7…e6. The light-squared bishop on f5, outside the pawn chain, is the kind of piece that justifies an early …c5 in these structures.
The turning point of the opening battle is the bishop dance on moves 9 to 11. White spends time with 9.Nh4 to trade off Black's good bishop, and after 9…Bg6 10.g3 Be7 11.Nxg6 hxg6, that trade hands Black the half-open h-file. For a club player this is the takeaway from the first phase: do not chase a trade that opens a file toward your own king, especially once you have committed to castling on that side.
Both sides castle queenside, and the game becomes a slow maneuvering fight, exactly the strategic territory the Trompowsky tends to produce. White's attack with 21.h4 and 23.Ng5 looks threatening, but it is Black who finds the more concrete play. The exchange sacrifice starting with 25.Bxf5 exf5 26.Qxe8 Rxe8 27.Rxe8+ leaves material roughly level while Black's passed kingside pawns and active queen do the talking.
From there the practical lesson is about coordination under pressure. White's knight goes hunting with 31.Nf7 and 33.Nd8, but Black's queen and dark-squared bishop work together, pushing the passed pawns to h2 and tying White's rooks to defense. The repetition around moves 53 to 57 is Black gaining time on the clock before the final break, 65.Rxe6 Qxc3+, when White's exposed king finally collapses.
The model takeaway for the everyday player: against the Pseudo-Trompowsky, develop simply, get the light-squared bishop out before …e6, and do not be afraid of slow maneuvering positions. The side that keeps its pieces working together usually wins these, regardless of which way the kings have castled.
How I Answer the Trompowsky Attack as Black
I met 2.Bg5 with 2...d5, one of the replies covered above, and got my light-squared bishop outside the chain with 3...Bf5. The queens came off early after 7.Qb3 Qb6 8.Nf3 a6 9.Ne5 e6 10.Qxb6 Nxb6, and the engine had the position close to level, with the g5-bishop still the piece both sides were playing around.

So I went after it: 14...h6 15.Bh4 g5 16.Bg3. Then I got greedy. 20...Nxg3 21.hxg3 threw away most of my edge, from -1.94 to -0.04, because it fixed his structure and opened the h-file toward my own king. I got the game back when 30.Rdc1 cost him -0.75 to -3.41, and he resigned soon after.

That is the part worth keeping about the Trompowsky bishop. Chasing it with ...h6 and ...g5 is normal, but on g3 it was already doing very little. Trading a good knight for it, and opening a file at my king to do so, was a worse deal than simply leaving it there.
Test Yourself: Trompowsky Attack Positions
Set up each position and find the best move. Use Hint for a nudge or Answer to reveal the engine’s top move.
Find the best move.
Find the best move.
Find the best move.
Find the best move.
Find the best move.