
 By
By 
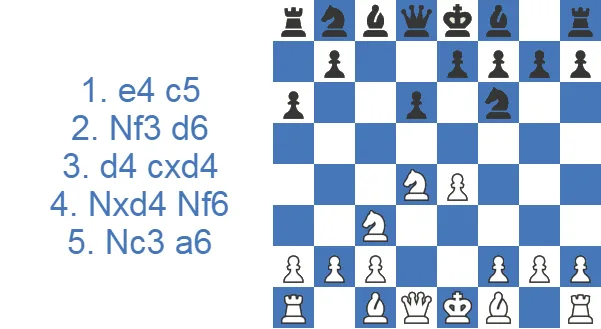
The Najdorf is named after the Polish-Argentine grandmaster Miguel Najdorf, who developed it in the mid-20th century. Though it had been tried earlier, it only earned respect at the top after leading players adopted it. Most lines offer a full-blooded fight, which is exactly why the opening has stayed popular for eighty years.
The Najdorf at a Glance
- What it is: a fighting answer to 1.e4 that runs 1.e4 c5 2.Nf3 d6 3.d4 cxd4 4.Nxd4 Nf6 5.Nc3 a6. The modest move 5…a6 covers b5 and prepares both …e5 and …b5.
- Who plays it: a favorite weapon of Bobby Fischer and Garry Kasparov, and still a main line at the top level today.
- White's main tries on move 6: 6.Bg5 (Main Line, home of the Poisoned Pawn), 6.Be3 (English Attack), 6.Bc4 (Sozin), and the quieter 6.Be2 (Opocensky / Classical).
- The plans: White attacks the d6-pawn or castles long and pushes the f-, g- and h-pawns. Black hits back on the queenside with …a6, …b5 and rooks on the c-file.
- Who it suits: players who want sharp, double-edged games and are willing to learn some theory.
Study the Sicilian Najdorf Variation as White or Black
The Sicilian Najdorf is a fight both players sign up for on purpose: White commits to an attacking scheme on move six, and Black bets that the queenside counterplay behind 5...a6 lands first.
Attack the Sicilian Najdorf as White
Results against the Sicilian Najdorf come down to picking one sixth move and knowing it cold. Work through the move-by-move walkthrough, compare the plans available at that fork, and give extra time to the 6.Bg5 pin, still the sharpest way to fight over the f6 knight.
Hold the Black Side of the Najdorf
Black's half of the guide is about speed: ...b5, ...Bb7, and pressure on e4 while White storms the other wing. The score tables show how that race goes in practice, and the two-race framework doubles as a study of every Sicilian Najdorf counter, since knowing how to face the Najdorf from White's chair is exactly what a well-prepared Black needs.
5...a6: Why This Quiet Move?
The whole opening is named after one little pawn move, so it pays to understand exactly what 5...a6 does. The main job is prophylaxis. It takes the b5-square away from White's pieces, ruling out the awkward Nb5 (hitting d6) and the pinning Bb5. With that settled, Black can pick a central plan without being harassed. The move also prepares the two breaks that define Black's whole game: ...e5, which kicks the d4-knight and grabs central space, and ...b5, which launches the queenside expansion behind Black's counterplay. Compared with the Classical 5...Nc6, the Najdorf keeps the knight flexible and the structure uncommitted. Black decides later whether to head for an ...e5 setup or an ...e6 Scheveningen. That flexibility is the move's real point.
The Najdorf's Origins and Naming
The variation is named after Miguel Najdorf (1910-1997), a Polish-Argentine grandmaster and a famous optimist at the board. He stayed in Argentina after the 1939 Olympiad when war broke out in Europe, and the opening that carries his name slowly grew into one of the most respected replies to 1.e4. Players who knew him simply called him Don Miguel.
What turned the Najdorf into a legend was the players who trusted it. Bobby Fischer used it in his most important games and scored heavily as Black in the Sicilian. Garry Kasparov later made it a main weapon at the very top, and it is still seen in elite practice today. When you learn the Najdorf, you are also learning a piece of chess history.
Who Plays the Najdorf
Few openings carry a stronger pedigree. Beyond its inventor Miguel Najdorf, the line became the trademark of Bobby Fischer, who scored heavily with it through the 1960s and 70s, and of Garry Kasparov, who made it a cornerstone of his elite repertoire and produced some of its most influential games. The list of high-level practitioners reads like a who's-who. Judit Polgar used it to attack, Veselin Topalov and Viswanathan Anand carried it into World Championship play, and Hikaru Nakamura has kept it sharp in the engine era. That breadth matters for a student. When an opening survives from the 1940s into modern super-tournament practice and still holds up under engine scrutiny, you can trust that the underlying ideas are sound rather than fashionable.
How White and Black Actually Score
As one of the most heavily analyzed openings, the Najdorf scores roughly evenly for both colors. The two tables below show the split in master practice and in a large amateur database.
In master games, draws dominate as both sides play the critical lines accurately.
| Results | Rate |
|---|---|
| Victory for White | 28% |
| Draw | 49% |
| Victory for Black | 22% |
In amateur play the picture changes completely: draws nearly vanish and the result swings decisively one way or the other, which fits an opening built on opposite-side attacks.
| Rating level (Lichess) | White wins | Draw | Black wins |
|---|---|---|---|
| 800, beginner | 45.6% | 3.5% | 50.9% |
| 1000, novice | 46.9% | 3.3% | 49.7% |
| 1200, improver | 47.3% | 3.4% | 49.3% |
| 1600, club | 47.1% | 4.0% | 48.9% |
| 1800, club | 47.2% | 4.5% | 48.3% |
| 2000, advanced club | 47.9% | 5.1% | 47.0% |
Source: Lichess opening explorer, blitz, rapid and classical games at the position after 1.e4 c5 2.Nf3 d6 3.d4 cxd4 4.Nxd4 Nf6 5.Nc3 a6. Figures are win rates by Lichess rating band; draws are rare at these levels.
Watch the Najdorf in Action
If you prefer to see the ideas first, the video below walks through the opening and its main plans before you read the detailed analysis here.
Below the video you will find in-depth coverage of every main line, the typical transpositions into the middlegame, and practical tips for handling the Najdorf as Black.
Main Ideas: The Two Races (Black's Queenside vs White's Kingside)
The Najdorf usually leads to opposite-side castling, which sets up a race: each player attacks where the other king lives. That makes for tense, tactical positions and rewards precise calculation.
White has two broad approaches. In quieter, positional lines, the plan is to pile heavy pieces on the d-file and chew on the backward d6-pawn. In sharper lines, White castles long and marches the f-, g- and h-pawns up the board to open files in front of Black's king.
Black usually counterattacks on the queenside by pushing the a- and b-pawns. This expansion is supported by rooks on the c-file, and Black often castles kingside while staying off that wing entirely. Whoever's attack arrives first tends to win, so neither side can afford a wasted move.
How to Play the Sicilian Najdorf: Step by Step
If you are new to the opening, here is a short road map for the Black side before you look at the individual lines.
- Reach the tabiya. Play 1…c5, 2…d6, 3…cxd4, 4…Nf6, 5…a6. This is the starting picture of every Najdorf.
- Understand 5…a6. It takes the b5-square away from White's pieces and prepares two key breaks: …e5 (hitting the d4-knight) and …b5 (queenside expansion).
- Look at White's 6th move. It sets the tone: 6.Bg5 and 6.Be3 are sharp, 6.Be2 is quiet, 6.Bc4 targets f7.
- Pick your plan. Usually …e5 or …e6, then …Be7, …O-O, …b5, …Bb7 and rooks to the c-file.
- Know where you attack. Black plays on the queenside, White on the kingside. Whoever is faster often wins, so do not waste moves.
...e5 or ...e6: The Central Fork That Defines Your Game
Once Black reaches the tabiya, almost every plan flows from a single decision: ...e5 or ...e6. Playing ...e5 grabs space and chases the d4-knight away. The cost is the d5-square, which becomes a permanent outpost, and a slightly backward d6-pawn. Both sides then fight over whether White can plant a knight on d5 or trade off the pieces that guard it. Playing ...e6 keeps a small, solid center and very often transposes into a Scheveningen structure, where Black sits behind d6- and e6-pawns and waits to break with ...d5 or ...b5. Plenty of Najdorf games drift into a Hedgehog-style middlegame from these ...e6 lines, with Black coiled on the back three ranks ready to spring. Neither choice is objectively better. The ...e5 lines suit sharper, more concrete players; ...e6 rewards those who like maneuvering. Knowing which you prefer tells you which move-six replies to study hardest.
Sicilian Najdorf Theory: Choosing a Plan on Move Six
White's sixth move sets the character of the whole game. The Main Line, 6.Bg5, invites both sides to create imbalances and castle on opposite wings: White typically castles queenside and attacks Black's king, while Black castles kingside and counters on the other wing.
The English Attack, 6.Be3, is a flexible choice that waits for Black to commit. These games can turn very sharp after a direct assault or quite strategic once the pieces start coming off.
The Opocensky, 6.Be2, is a calmer attempt to limit the tactics. These games can run long and reward positional understanding.
There are also more committal sidelines. White can grab kingside space at once with 6.f4, or keep things flexible and shore up e4 with 6.f3.
The Main Line: 6.Bg5 and the Battle for f6
The Main Line begins with 6.Bg5, pinning and pressuring the f6-knight. In most lines White tucks the king away on the queenside, after which the rook lands naturally on d1 to bear down on the d-file. Black's reply to 6.Bg5 is important, because only a handful of moves make sense.
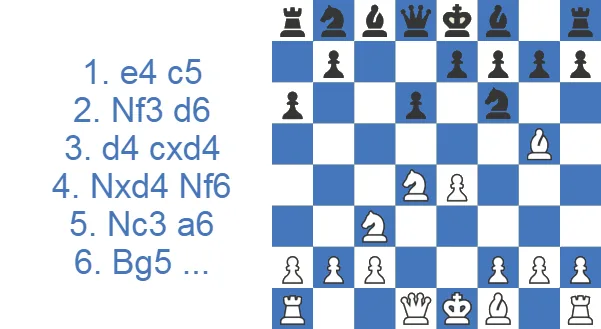
6…e6 is the most common choice, since it avoids the wrecked pawns that follow Bxf6. White then ratchets up the tension with 7.f4, which defends the g5-bishop and lets the queen come to f3 later without blocking the f-pawn.
Now Black faces a critical fork. This choice often defines the whole game. The most aggressive try is 7…Qb6, hitting d4 and b2 at the same time. The calmer options are 7…h6 (kicking the g5-bishop), 7…Be7 (defending f6 so the queen no longer has to), and 7…Nbd7 (the same idea as Be7).
After 7…Qb6 White typically sacrifices a pawn: 8.Bxf6 gxf6 9.Qd2 (guarding c3 and the d4-knight) 9…Qxb2 10.Rb1. Black's kingside pawns are now damaged in the very area where the king wants to shelter, the b1-rook is active on the half-open b-file, and Black's queen is far from home. White claims full compensation, plays Be2 and castles short to get the king safe, then attacks. Black, meanwhile, tries to consolidate the extra pawn and trade into a favorable endgame.
In the quieter replies such as 7…Be7, White usually plays 8.Qf3, clearing the back rank for long castling, defending b2 and sidestepping …Qb6 ideas. From there White can either storm the kingside with g4-h4-h5 or play positionally and double rooks on the d-file against d6. Black castles short, plays …b5, …Nbd7 and …Bb7, and swings the rooks to the c-file to harass White on the queenside.
The Poisoned Pawn Variation: 7...Qb6 Grabbing b2
The b2-grab has its own name: the Poisoned Pawn Variation. The cleanest move order is 6.Bg5 e6 7.f4 Qb6 8.Qd2 Qxb2 9.Rb1 Qa3. Black is a pawn up, but the queen is offside and development lags, so White plays for fast activity with e5, f5 and quick castling. This is some of the sharpest, most heavily analyzed theory in all of chess, and you should not enter it without preparation. Fischer trusted it in critical games, which is exactly why it earned its reputation.
How to Meet the Poisoned Pawn as White
If you are the White player and your opponent reaches for the b2-pawn, do not panic and do not try to defend everything. The point of allowing 6.Bg5 e6 7.f4 Qb6 8.Qd2 Qxb2 is that Black's queen leaves the kingside and development stalls while she goes pawn-grabbing. Your job is speed. The standard recipe is to clamp the center with e5, prise open lines with f5, and get your king to safety fast so your rooks and minor pieces can pile in before Black untangles. After 9.Rb1 Qa3 the queen sits offside on a3, and a well-timed e5 break combined with active piece play usually gives full compensation for the pawn. The practical point at club level is blunt: in these positions the player who knows the attacking patterns tends to beat the player who is busy counting material.
The English Attack: 6.Be3 (the Modern Top Choice)
This line begins when White picks a flexible setup with 6.Be3. It is very common at the highest level today because it keeps options open and waits for Black to show a hand.
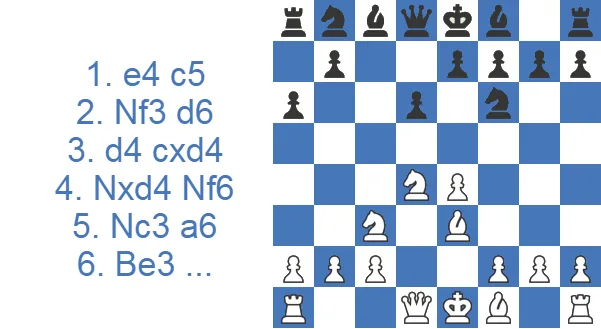
The most common reply puts an immediate question to the bishop on e3: 6…Ng4, planning to capture it next move. Retreating the bishop is the only good answer. 7.Bf4 runs into 7…e5, winning a piece, so the bishop must go to g5, much as in the Main Line. The difference is that the knight is awkwardly placed on g4, and if it returns to f6 White gains a tempo. That nuance is why the line is fashionable at the top. After 7.Bg5, the meek 7…Nf6 walks into 8.Bxf6, which wrecks Black's kingside pawns. The better try is 7…h6, hitting the bishop. After 8.Bh4 g5 9.Bg3 Bg7, Black must place the bishop on g7 because the h4-pawn push is a serious threat (it menaces g5, and the h-pawn is effectively pinned while the h8-rook is undefended).
After 9…Bg7, White looks to defend c3 and d4 with Qd2 or to challenge the g4-knight with h3. Following 10.h3 and …Nf6, White brings the queen to a useful square (often f3) and castles long, Black castles short, and each side attacks the other's king.
The Opocensky / Classical Variation: 6.Be2
This variation arises after 6.Be2, a move designed to rule out the …Ng4 ideas seen in the English Attack. It is a solid, dependable choice, though less popular than the Main Line or the English Attack.
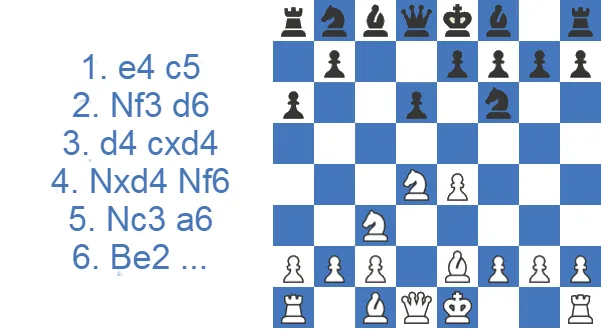
After 6.Be2 the soundest reply is 6…e5, kicking the d4-knight for good and staking a claim in the center. This does concede the d5-square and leaves a target on d6. The knight has two retreats: 7.Nb3 tends toward sharper play, while 7.Nf3 is more positional. The ambitious 7.Nb3 is usually met by quiet development. Black can mix …Be7, …Be6 and …Nbd7 in various move orders to get the king safe.
One typical sequence runs 7…Be7 (clearing the back rank for short castling), 8.O-O O-O, 9.Be3 (improving the bishop), 9…Be6 (a developing move) and 10.Qd2 (linking the queen and bishop and preparing Rd1).
From here Black aims for …Nbd7, finishes development, and starts a queenside minority attack by pushing the b-pawn to b5. Putting a rook on c8 and the queen on c7 to press the c-file are standard ideas. White, for their part, can plant a knight on d5 supported by the c-pawn, or build pressure on the d-file by trading off Black's defenders.
Other Variations and Modern Tries: 6.Bc4, 6.f3, 6.f4 and 6.h3
The Main Line, English Attack and Opocensky cover most games, but several other sixth moves matter at every level. Alongside the Sozin (6.Bc4) and the 6.f3 and 6.f4 lines below, you will sometimes meet the modern Adams Attack, 6.h3, which simply prepares g4 and a fast kingside push, as well as the space-grabbing 6.a4 that clamps down on Black's …b5.
The Sozin / Fischer Attack: 6.Bc4, Aiming at f7
This line begins with 6.Bc4. The bishop points straight at f7, the soft spot in Black's camp. Bobby Fischer loved this setup and won many games with it, which is why it is often called the Fischer Attack.
The standard route is 6…e6 to blunt the bishop, then White tucks it away with 7.Bb3. After 7…b5, 8.O-O Be7 9.Qf3 Qc7 10.Qg3, White keeps the bishop trained on f7 and prepares f4-f5 against the king. Black replies with the usual Najdorf plan: …Nbd7, …Bb7 and counterplay on the c-file and the queenside. It is less fashionable than the English Attack at the very top, but at club level the pressure on f7 is genuinely dangerous.
White's Sidelines: the 6.f3 and 6.f4 Lines
This line begins with 6.f3. It appears even at the highest level and is treated as a respectable sideline. Because e4 is under constant pressure, f3 props it up and frees the c3-knight for later Nd5 ideas.
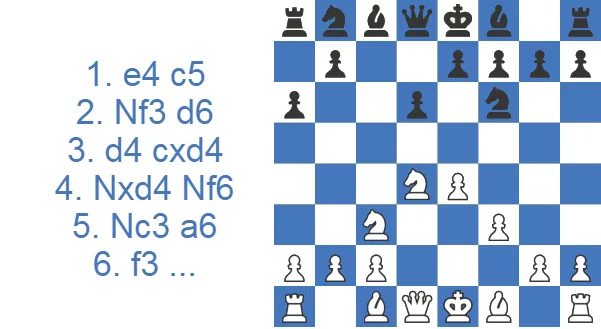
After 6.f3, the most common reply is 6…e5. One drawback of f3 is that Black can later equalize with the …d5 break. After 7.Nb3, the move 7…Be6 prepares exactly that, and 8.Be3 covers the sensitive a7-g1 diagonal. The …d5 push is hard to prevent, and trades often follow on d5.
After the exchanges, White usually castles long and fights for the d-file, while Black castles short and pushes the a- and b-pawns.
6.f4 Line
This line begins with 6.f4. It is less popular than the others because Black can hit back at once with 6…e5 and equalize.
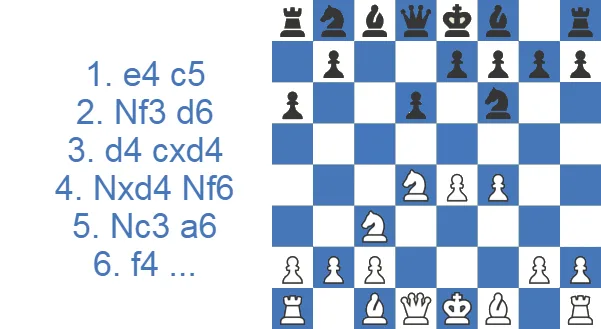
Grabbing the e-pawn would be a strategic error because of the resulting pawn structure. After 7.fxe5 dxe5 8.Nf3, Black simply trades queens with 8…Qxd1+, reaching a better endgame: White is left with the worse pawn structure and no activity.
After 6…e5 the best reply is 7.Nf3, dropping the knight back. These positions can be a touch loose for White. Black can expand on the queenside with …b5, while White tries to use the extra kingside space. Both sides usually castle short and play a dynamic middlegame.
Honest Trade-offs of Playing the Najdorf
Before you commit to it, weigh what the Najdorf asks of you against what it gives back.
Pros
- A very valuable tool to increase the pawn structures’ values on positional understanding.
- Games can transition to both sharp and solid positions.
- Pawn structure and piece placements are similar in different variations.
- Ideas are mostly straightforward.
Cons
- Sicilian Najdorf requires profound studies and careful calculations not to fall behind.
- White can overextend with the pawns in some lines.
- Black can end up with a ruined Kingside pawn structure.
- In some variations, White may need to sacrifice a pawn for the long-term positional advantage.
Najdorf vs Other Sicilians: How It Compares
All these systems start the same way up to 5.Nc3, then split on Black's fifth move. The Najdorf is the most flexible of the family.
| Variation | Black’s move | Character | Best for |
|---|---|---|---|
| Najdorf | 5…a6 | Flexible, sharp, deep theory | Players who want a full fight |
| Dragon | 5…g6 | Direct, opposite-side races | Aggressive attackers |
| Scheveningen | 5…e6 | Small but solid center | Positional players |
| Classical | 5…Nc6 | Quick development | Beginners learning the Sicilian |
The Najdorf often transposes into Scheveningen setups after an early …e6, so the ideas you learn here will carry over to more than one Sicilian.
The Najdorf by ECO Code (B90-B99)
The Najdorf is catalogued under ECO codes B90 through B99, and the sub-codes line up neatly with White's sixth move. That makes them handy shorthand when you are browsing a database or buying a course. B90 is the general Najdorf and the home of the English Attack (6.Be3) and modern sidelines such as the Adams Attack (6.h3). B92 covers the Opocensky / Classical Variation (6.Be2), B93 the 6.f4 line, and B94 to B95 the early 6.Bg5 systems. The big main-line block runs B96 to B99, where 6.Bg5 e6 7.f4 and the whole Poisoned Pawn complex live. You do not need to memorize the numbers to play well. But spotting "B97" on a game header tells you right away that razor-sharp Poisoned Pawn theory is coming, so you know what kind of fight you are walking into.
Famous Sicilian Najdorf Games Worth Replaying
The fastest way to feel the opening is to watch strong players handle it. These three games are classics worth replaying move by move.
- Robert Fischer vs Boris Spassky, World Championship 1972: a sharp Sicilian battle from the most famous match in chess history.
- Garry Kasparov as Black: Kasparov used the Najdorf as a main weapon at the top and showed how dangerous Black's counterplay can be.
- A modern English Attack game: a clean example of White castling long and racing on the kingside while Black storms the queenside.
The Fischer Game That Killed His Own Poisoned Pawn
The best argument for treating the Poisoned Pawn with respect is the one Najdorf game Fischer lost. In Game 11 of the 1972 World Championship in Reykjavik, Fischer grabbed b2 against Boris Spassky. After 8.Qd2 Qxb2 9.Nb3 his queen got hunted on the queenside, his development never caught up, and Spassky landed a crushing attack in just 31 moves. The line's greatest champion never touched it again for the rest of the match. Set that against the other face of the variation. In his sharper Najdorf wins, Fischer showed that when Black is booked up and the queen escapes, the extra pawn is real and White's attack runs out of fuel. So the Poisoned Pawn is not free material. It is forcing theory 20-plus moves deep, and one inaccuracy turns it into a Game-11 disaster. Below 1800 I have hardly ever seen it played accurately, which is exactly why I would tell a club player to decline the pawn there with 7...Be7 or 7...h6 and play the natural ...b5, ...Bb7, ...Rc8 plan. You keep all the Najdorf's dynamism without betting the game on memorization.
Should You Add the Najdorf to Your Repertoire?
The Najdorf is one of the cornerstones of the Sicilian Defense, with both tactical and positional lines to suit players at every level. Because the two sides usually castle on opposite wings, it is a committed opening that tends to produce sharp, double-edged games rather than quiet draws. If you enjoy fighting chess and are willing to learn a handful of plans for each of White's main sixth moves, the Najdorf will reward you for years. Play it as a win-or-lose tool, much like the rest of the Sicilian family.
Test Yourself: Sicilian Najdorf Positions
Make the move on the board. Hint gives you a nudge, Answer shows the move and why it works.
Najdorf, English Attack. Which bishop move develops actively, guards the d4-knight and prepares Qd2 and long castling?
Main line, 6.Bg5. White's bishop eyes the f6-knight. Which pawn move controls d5 and opens the f8-bishop?
Main line, 6.Bg5 e6. Which pawn push supports an e4-e5 break against the f6-knight?
Najdorf, 6.f4 e5 7.Nf3. Which move of the queenside knight supports e5 and eyes c5 and b6?
Najdorf, English Attack. Which pawn move guards e4 and prepares g4?
Poisoned Pawn. Black's queen took on b2. Which rook move attacks it at once?
Poisoned Pawn. Black's queen on b2 is attacked by the rook. Which retreat to the a-file keeps her safe and keeps pressure on the c3-knight?
Opocensky Variation. White's queen came to d2. Which knight move finishes Black's development and eyes the c5-square?
Najdorf main line. White has castled long. Which pawn move begins the kingside storm by controlling f5 and h5?
Opposite-castled Najdorf. White's king is on c1. Which pawn push attacks a2 and c2?