
 By

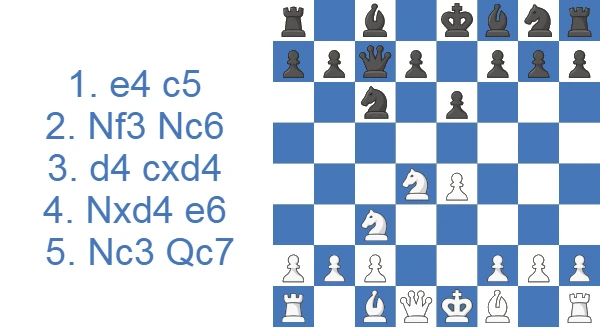
Do not confuse the Taimanov with the Kan Variation, which uses a similar early ...e6 setup but with 1.e4 c5 2.Nf3 e6 3.d4 cxd4 4.Nxd4 a6. The two are close cousins, and many ideas carry over from one to the other.
Taimanov Sicilian in Brief
Short on time? Here is the whole variation at a glance before we go deeper.
- What it is: an Open Sicilian for Black that arises after 1.e4 c5 2.Nf3 Nc6 3.d4 cxd4 4.Nxd4 e6 5.Nc3 Qc7. The line with 5...Qc7 is also called the Bastrikov, and the whole ...e6 complex is often grouped under the name Paulsen.
- Why Black plays it: far less forcing theory than the Najdorf, an active dark-squared bishop on b4 or c5, and counterplay on both wings.
- The main battle: White's English Attack with 6.Be3 and opposite-side castling. Quieter tries are 6.Be2 and the fianchetto 6.g3, while 5.Nb5 steers toward a Maroczy Bind.
- Black's plan in one line: ...a6, ...b5, ...Bb7, ...Nf6, pressure down the c-file, and a queenside pawn avalanche.
- Verdict: solid, flexible, and club-friendly, yet trusted at the top by Carlsen, Caruana, Anand, Giri, and Ivanchuk.
Study the Taimanov Sicilian Defense as White or Black
Flexibility is the Taimanov Sicilian's product: Black shelters the queen on c7 behind an e6-c5 shell, keeps every pawn commitment open, and makes White declare intentions first.
Choose Your Weapon Against the Taimanov
The theory survey below compares White's main systems against the Taimanov Sicilian, from quiet Be2 development through the English Attack's pawn avalanche. Start with the key-ideas piece on which bishop belongs outside the pawn chain and why, since that one point explains what every White setup is trying to punish.
Play the Taimanov Sicilian as Black
Preparation beats memorization here. The scoring section shows where Black's points actually come from at each level, and the survey of White's schemes amounts to a catalog of every Taimanov Sicilian counter you will meet; read that catalog from Black's chair, and the opponent who studied how to face the Taimanov Sicilian will find you already know the plan.
How the Taimanov Scores: White vs Black
At the club and online level the Taimanov is a comfortable Sicilian for Black, who outscores White in every rating band, often by seven points or more. White stays in the low-to-mid 40s while Black sits above 50%, and draws are rare, staying in the low single digits. Here is the breakdown by rating.
| Rating level (Lichess) | White wins | Draw | Black wins |
|---|---|---|---|
| 800, beginner | 41.8% | 2.8% | 55.4% |
| 1000, novice | 45.0% | 2.7% | 52.3% |
| 1200, improver | 45.6% | 2.9% | 51.5% |
| 1600, club | 44.3% | 3.8% | 51.9% |
| 1800, club | 43.1% | 4.5% | 52.4% |
| 2000, advanced club | 43.5% | 5.3% | 51.2% |
Source: Lichess opening explorer, blitz, rapid and classical games at the position after 1.e4 c5 2.Nf3 Nc6 3.d4 cxd4 4.Nxd4 e6 5.Nc3 Qc7. Figures are win rates by Lichess rating band; draws are rare at these levels.
Watch: A 5-Minute Walkthrough
If you prefer to see the ideas in motion before reading, the short video below covers the basics.
Key Ideas in the Taimanov Sicilian: Bishop Outside the Pawn Chain
Many Sicilians have Black play ...d6 and then develop the bishop to e7 or fianchetto it on the kingside. The Taimanov takes a different route. The central idea is to place the dark-squared bishop outside the pawn chain. By starting with ...e6 and holding back ...d6, Black aims for the more aggressive squares c5 or b4. This lets Black press against White's setup before it gets going. If White tries f4 to launch a kingside attack, for example, the g1-a7 diagonal weakens, and Black pounces with ...Bc5 and ...Ng4.
The queen on c7 earns its keep by covering e5 and shutting down White's e4-e5 break. Alternatively, Black can generate play on the queenside with the typical pawn march ...a6, ...b5, ...b4, followed by ...Bb7. The appeal of the Taimanov is its flexibility: Black can operate on either wing, which keeps the play varied and full of options.
Taimanov vs Kan: How to Tell Them Apart
The two are constantly confused, and for good reason: both are ...e6 Sicilians with a similar pawn structure, and ideas often bleed from one into the other. The difference is one move. In the Taimanov, Black commits the knight early with ...Nc6, whereas in the Kan, Black keeps maximum flexibility with ...a6 and leaves the queen's knight at home for now.
That single choice changes the character of the game. The early ...Nc6 lets Black fight for the d4-square and lean on White's center at once with ...Bb4 and ...Nxe4 ideas, which is why the Taimanov feels more concrete and piece-driven. The Kan trades some of that immediate pressure for elasticity, but it also hands White an easier route to the Maroczy Bind with c2-c4. In the Taimanov, the knight on c6 makes that bind harder for White to set up cleanly.
| Taimanov | Kan (Paulsen) | |
|---|---|---|
| Move order | 1.e4 c5 2.Nf3 Nc6 3.d4 cxd4 4.Nxd4 e6 | 1.e4 c5 2.Nf3 e6 3.d4 cxd4 4.Nxd4 a6 |
| Defining move | early …Nc6 | early …a6, knight stays home |
| Dark-squared bishop | active on b4 or c5 | flexible, often e7 or b4 |
| Core idea | pressure c3 and e4 with the extra piece | keep options open, strike later |
| White’s main try | English Attack, 6.Be3 | 5.Bd3 and the 5.c4 Maroczy |
| Maroczy Bind | harder for white to achieve | easy for white with c2-c4 |
A practical rule of thumb: choose the Taimanov if you want to put your pieces to work straight away and contest the initiative, and lean toward the Kan if you prefer to keep the position fluid and avoid early forcing lines. Because the structures overlap, time spent on one is rarely wasted on the other.
The Szen Variation: Meeting 5.Nb5
Before the queen even settles on c7, White can lunge with 5.Nb5, the Szen Variation, hoping the knight will reach the c7- or d6-outpost. Black is never obliged to panic. The thematic resource is ...a6, the move that does most of the heavy lifting against the whole Taimanov. It shoos the knight back at once and gains a tempo for the queenside expansion Black wants anyway. After 5.Nb5 d6 White typically tries 6.c4, clamping the center and steering into a Maroczy Bind, where pawns on c4 and e4 deny Black the freeing ...d5 and ...b5 breaks. This is the one structure that genuinely tests the Taimanov. Black answers with ...Nf6, ...Be7, ...0-0 and a patient ...b6/...Bb7 hedgehog setup, then waits to unwind with a timely ...b5 or ...d5 once White overextends. The same 6.Ndb5 sortie a move later runs into 6...Qb8 and simply loses time.
Sicilian Taimanov Theory: Main Lines After 5...Qc7 (6.Be2, 6.f4, 6.g3, 6.Ndb5, English Attack)
Compared with other Sicilian variations such as the Najdorf, the Taimanov is easier to absorb, because it can be learned through recurring ideas rather than move-by-move memorization. The main branching point comes at move six. After 1.e4 c5 2.Nf3 Nc6 3.d4 cxd4 4.Nxd4 e6 5.Nc3 Qc7, White chooses between 6.Be2, 6.f4, 6.Ndb5, and the English Attack with 6.Be3, which deserves the most attention as the toughest test of the line.
6.Be2 a6 7.0-0 Nf6 8.Be3 Bb4
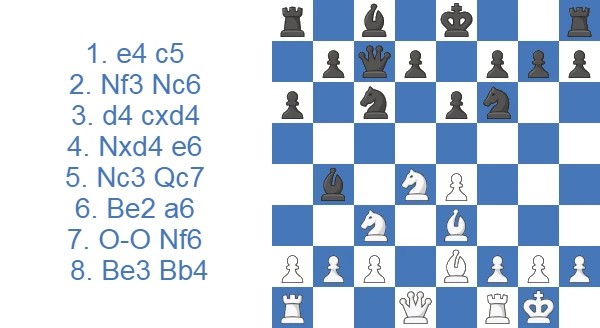
With 6.Be2, White signals a calmer approach and intends to castle kingside. That gives Black a free hand to place the pieces actively. First, though, 6...a6 shuts the door on any knight jump to b5 and prepares the queenside expansion with ...b5. After 7.0-0, Black can play 7...Nf6 without fear of e4-e5 thanks to the queen on c7. Then 8.Be3 Bb4 already puts the squeeze on White, threatening to capture on c3 and snatch a pawn with ...Nxe4. After the enigmatic 9.Na4, however, Black should calmly retreat with 9...Be7, because 9...Nxe4?! invites fireworks: 10.Nxc6 Qxc6 11.Nb6 Rb8 12.Bf3 f5 (pinning the knight) 13.Qd4, hitting both the b4-bishop and the g7-pawn. After 13...Bf8 14.Bh5+ Kd8 15.Rad1, all of White's pieces pile into the attack.
To dodge that storm, Black prefers 9...Be7, keeping the pieces coordinated. White's same plan is far less effective here, because after 10.Nxc6 bxc6 11.Nb6 Rb8 12.Nxc8 Qxc8 13.e5 Nd5 14.Bc1 (defending b2), Black unfolds again with 14...Bc5. By pinning White's f-pawn and ruling out f2-f4, Black sets up ...Qc7 to target the e5-pawn next.
6.f4
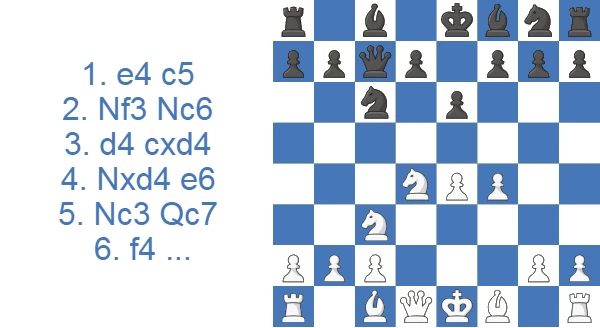
The ambitious-looking 6.f4 comes at the cost of weakening the g1-a7 diagonal. After the standard 6...a6, White first covers the diagonal with 7.Be3. Against this setup, Black keeps the bishop in a more defensive position on e7: 7...b5 8.Bd3 Bb7 9.Nb3 d6 10.0-0 Nf6 11.Qf3 Be7 12.Qh3. White's piece arrangement on the kingside may look intimidating, but Black has several defensive resources, including 12...h5, 12...Rd8, 12...Nb4, capturing on d3, or even 12...Nb8 to reroute the knight to d7 and prepare ...b4 to dislodge the c3-knight that defends e4.
Alternatively, White can castle queenside after f2-f4, but this leads to an attacking race on opposite wings that gives Black practical chances: 7.Nxc6 Qxc6 8.Bd3 b5 9.Qe2 Bb7 10.Bd2 (10.Be3 Nf6 and the e4-pawn is attacked three times) 10...Bc5, putting the bishop on its most active diagonal, 11.0-0-0 Ne7 12.a3 0-0, followed by ...b4 next.
6.Ndb5
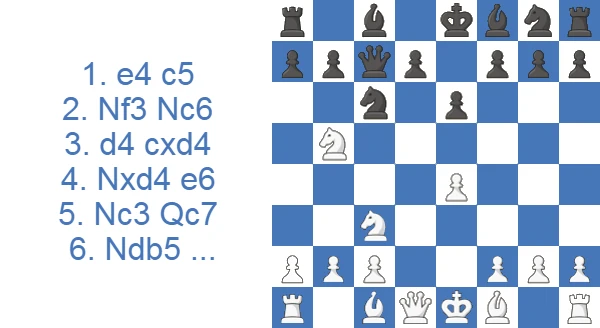
Black has no reason to fear the premature attack on the queen with 6.Ndb5, because after 6...Qb8, everything is under control. The b5-knight will be kicked away with ...a6 next, exposing White's idea as a loss of time. Anticipating ...a6, White may go for a tactical sequence that reaches an imbalanced material position, three minor pieces against a queen, starting with 7.Be3 to grab the b6-square: 7...a6 8.Bb6 axb5 9.Nxb5 (threatening the Nc7+ fork) 9...Bb4+ (Black's only defensive idea) 10.c3 Ba5 11.Nc7+ Qxc7 12.Bxc7 Bxc7.
The resulting position is arguably a touch better for Black thanks to the solid structure and the potential harmony of the minor pieces. It is worth trying out with both colors against a human or an engine for training purposes; positions like this are excellent for developing a feel for piece coordination.
Move-Order Traps and Transpositions
Few openings reward move-order awareness as richly as the Taimanov Sicilian, and a little care here saves a lot of grief. The flexible ...e6/...Qc7 setup routinely transposes. If Black later adds ...d6, the game can slide into Scheveningen waters, and an ...a6 with ...d6 can edge toward Najdorf-style positions, so a Taimanov player should know which doors these moves open. The most important practical point is timing ...a6, the move that denies White every Nb5 and Bb5 idea before it can become annoying. Delay it and you invite the Szen leap to b5 or an awkward Bb5 pin. Play it promptly and you keep the queenside expansion on schedule. Conversely, rushing ...Nf6 before the queen sits on c7 can expose Black to e4-e5 tempo gains. The order is the whole point.
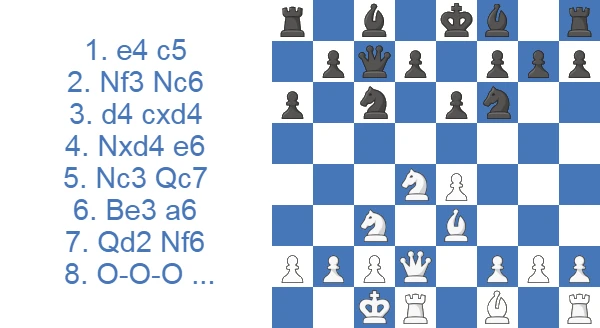
The English Attack, marked by 6.Be3, is the main line of the Taimanov and arguably the most thrilling for both sides because of the opposite-side castling. White hurries the queenside pieces out: 6.Be3 a6 7.Qd2 Nf6 8.0-0-0 (8.f3 is also playable, but after 8.0-0-0 Ng4?! White has nothing to fear thanks to 9.Bf4) and prepares to roll the kingside pawns with f3-g4-h4-h5.
To meet the attack, Black has to play energetically and create as many problems as possible, starting with 8...Bb4, pinning the c3-knight and pressing e4. After 9.f3, reinforcing the e4-pawn and supporting g2-g4, Black usually replies 9...Ne5, tying White's d4-knight to the defense of f3 once 10.g4 arrives. Both sides race to attack first: 10...b5 11.g5 Nh5, the typical square for the knight in these pawn storms.
With ...Nh5, the black knight blocks White's h4-h5 and slows the attack considerably. Black now has ...Bxc3 followed by ...Qxc3 on the agenda to wreck White's structure and exploit the weakness in the endgame. For instance, 12.Kb1 Bxc3 13.Qxc3 Qxc3 14.bxc3 Bb7, followed by ...0-0 and ...Rfc8 to pile up on the c3-pawn.
White need not always rush the attack and may prefer 10.Nb3. Now Black must watch for a tactical idea after 10...b5 11.Qe1, setting up the Nxb5 discovery against b4 and c7.
If White's queen still stood on d2, this would not work because of ...Bxd2+ with check. The standard remedy is to retreat with 11...Be7, and play may continue 12.f4 Ng6 13.e5 Nxg4, hitting the bishop on e3, with ...Bb7 or ...0-0 to follow as usual.
It is also worth keeping in mind 9...Ne7, intending an immediate central strike with ...d5: 10.Nb3 d5 11.e5 Nd7 (11...Qxe5 12.Bf4 Qf5 13.g4 would be devastating) 12.f4 b6 13.Bd4 Nc5, a fresh way to pressure White's queenside, as in the game between Magnus Carlsen and Vassily Ivanchuk, which Black won.
How White Plays Against the Taimanov
It helps to see the position from the other side of the board, because that is what most opponents are trying to do to you. White's most ambitious plan is the English Attack: 6.Be3, Qd2, 0-0-0 and a kingside pawn storm with f3-g4-h4-h5, racing to open lines before Black's ...a6-...b5 counterplay lands. Tempo decides these positions, and a single slow move can hand Black the initiative. The calmer alternatives aim to neutralize rather than overrun. With 6.Be2 and short castling, White invites a quiet maneuvering game; 6.g3 fianchettoes to over-defend e4 and dispute the long diagonal; and the c2-c4 setups, reachable via 5.Nb5, try to impose a Maroczy Bind and squeeze Black for space. The recurring engine verdict is near-equality, so White's practical edge comes from being first to act: develop quickly, castle, and start the attack before Black is coordinated.
The Fianchetto System: 6.g3
White's fianchetto does little in some Sicilians, but against the Taimanov it is one of the more respected systems. By dropping the bishop to g2, White gives the e4-pawn a natural defender and contests the long diagonal that Black's queenside expansion relies on, so it should not be treated casually. The most reliable answer is a forcing simplification: 6...a6 7.Bg2 Nf6 8.0-0 Nxd4 9.Qxd4 Bc5, hitting the queen with tempo. After 10.Bf4 d6 11.Qd2 h6 12.Rad1 e5 13.Be3 Be6, Black has untangled cleanly and the middlegame is comfortable to handle. Exchanging on d4 robs the g2-bishop of its best target before White can build pressure, and ...Bc5 plus the ...e5 clamp leaves Black with a sound, free-piece structure.
Pawn Structures You Should Recognize
More than any single line, the Taimanov is defined by the handful of structures it produces, and knowing them in advance tells you what to aim for. The hedgehog is the signature. With pawns on a6, b6, d6 and e6, Black coils behind the third rank and waits to uncoil with the freeing ...b5 or ...d5 break the moment White overreaches. Against the c2-c4 setups you reach a Maroczy Bind, where White's space advantage is real but static, and Black's job is patient regrouping rather than panic. When Black does land ...d5 and White captures, an isolated queen's pawn (IQP) middlegame can appear, trading a structural weakness for active piece play. And the thematic ...Bb4 pin on the c3-knight, often followed by ...Bxc3 to inflict doubled c-pawns, hands Black a long-term endgame target. These doubled c-pawns have decided more of my endings than any tactic from the opening.
Reasons to Play the Taimanov Sicilian: Should You Play It?
The Taimanov offers counterplay across the whole board, which makes it a fine answer to 1.e4. It has stood the test of time as a sound, reliable choice, and it carries real bite: the line is full of tactical traps and unusual patterns that an unprepared White player can walk straight into.
Common Taimanov Sicilian Traps and Tactics to Know
1.e4 c5 2.Nf3 Nc6 3.d4 cxd4 4.Nxd4 e6 (Taimanov Sicilian) 5.Nc3 d6 (a less popular alternative to 5...Qc7) 6.Be3 Be7 7.Qg4?? chasing the undefended g7-pawn is a fatal blunder: 7...Nxd4! 8.Bxd4 e5, and White's bishop and queen are both attacked; 9.Qxg7 Bf6 and White loses material by force.
Test Yourself: Find the Best Move
Set up each position and find the best move. Use Hint for a nudge or Answer to reveal the engine’s top move.
Find the best move.
Find the best move.
Find the best move.
Find the best move.
Find the best move.
Living With the Doubled c-Pawns: A Taimanov Game of Mine
This game landed in the structure the line is known for, the one after 5.Nxc6 bxc6: 1.e4 e6 2.Nf3 c5 3.d4 cxd4 4.Nxd4 Nc6 5.Nxc6 bxc6 6.Nc3 d5. The doubled c-pawns are a concession, but they also support ...d5 and they hand me the half-open b-file.

The b-file is what decided this game. My opponent, rated 1720 to my 1660, went wrong with 19.Rfe1, which moved the engine from level to -1.70. I replied 19...Rab8, and once the first pair of rooks came off I took the pawn with 21...Bxb2. My own worst moment came later: 26...a4 ran from -2.28 to -0.83. I won anyway.

The strength and the weakness of this structure are the same fact. You take a permanent flaw in the pawns and you get open lines and a target on b2 for it. That is usually a good trade, but only if you have a concrete plan for the b-file. Without one, doubled pawns are just doubled pawns.
Strengths and Weaknesses of the Taimanov
PROS
- An active expansion on the queenside characterized by a pawn avalanche.
- The dynamic positioning of black s dark-squared bishop on b4.
CONS
- Potential weaknesses on the dark-squares for black
- Vulnerable kingside as most pieces are regrouped on the queenside.
Who Was Mark Taimanov?
The variation carries the name of Soviet grandmaster Mark Taimanov (1926-2016), one of the most cultured figures the game has produced. He twice shared first place in the brutally strong Soviet Championship and represented the USSR at Olympiads and European team events, yet his chess reputation has always been overshadowed by a single result: a 0-6 loss to Bobby Fischer in their 1971 Candidates match.
What is less often mentioned is the life outside the 64 squares. Taimanov was a concert pianist of real standing who toured in a celebrated duo with his wife, and he became a father to twins at the age of 78. The opening he popularized reflects the man: flexible, resourceful, and never content with a passive role.
Grandmaster Games with the Taimanov Sicilian: The Opening in Elite Practice
Case Study: Spassky Crashes Through in the Fianchetto Line
The clearest way to feel the Taimanov's counterattacking pulse is to watch a future world champion handle it. Savon-Spassky from 1962 is a model game against the 6.g3 fianchetto: Spassky absorbs White's setup, grabs the center with ...e5, and then converts a kingside initiative into a direct attack on the king.
The opening follows the standard fianchetto recipe. With 6...a6 7.Bg2 Nf6 8.0-0 Be7, Black develops soundly, and 9...0-0 10...b5 11...Bb7 sets up the queenside and aims the light-squared bishop at White's center and king. So far this is exactly the structure from the 6.g3 section above, only with both sides choosing a slower, maneuvering treatment.
The first real decision comes at move 12. Spassky lifts the knight with 12...Ne5, eyeing the g4- and c4-squares and provoking White to commit. White obliges with 13.f4, which gains space but loosens the kingside, and after 13...Neg4 the knight lands on an aggressive post. The turning point is 14...e5, a thematic central break: Black challenges f4 and rips the position open while White's pieces are still sorting themselves out. The check 15...Bc5+ is the move that makes everything work, because it forces 16.Kh1 and pins White to an awkward king.
From there Spassky plays with great energy. 16...d5 opens lines toward the white king, and after 17.exd5 e4 the central pawns become a battering ram. The pawn reaches e3, the knight crashes in with 21...Nf2+, and after 22.Rxf2 Bxd4 23.Qxd4 exf2 the f2-pawn one step from queening, combined with the threats around White's king, is decisive. White resigned after 24.Nh6+ because the attack cannot be met.
For a club player the practical takeaways are concrete. First, the ...e5 break is the heart of Black's play against the fianchetto and many quieter Taimanov lines: when White cannot quickly punish it, grabbing the center is almost always right. Second, the small intermezzo ...Bc5+ shows how a single check can fix the enemy king and gain the tempo an attack needs. Third, notice that Spassky never hurried his queenside pawns into a race; he simply developed, waited for White to weaken the kingside with f4, and then struck in the center. That patient-then-explosive rhythm is the Taimanov in a nutshell.