
 By

Through the 20th century the Semi-Slav stayed a favorite of the world's best, and it still draws elite players today. Its practitioners include former World Champions and famous attackers like Garry Kasparov and Vishy Anand.
The Semi-Slav in One Minute
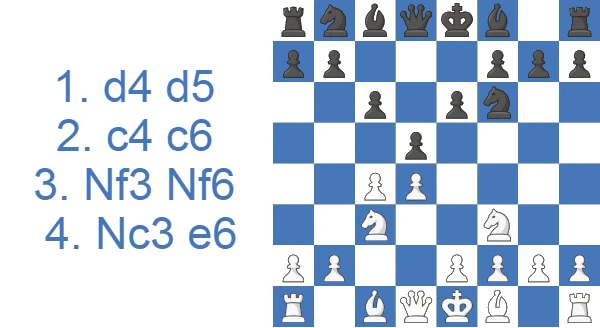
- The Semi-Slav Defense arises after 1.d4 d5 2.c4 c6 3.Nf3 Nf6 4.Nc3 e6, combining the solid …c6 of the Slav with the …e6 of the Queen's Gambit Declined.
- Black builds the c6-d5-e6 pawn triangle, accepts a temporarily passive c8-bishop, and works to free it with …c5 or …b5 while fighting for the initiative.
- White's two main tries are the positional 5.e3, leading to the Meran (6.Bd3) and Anti-Meran (6.Qc2), and the aggressive 5.Bg5, leading to the razor-sharp Botvinnik (5…dxc4) and the modern Moscow (5…h6).
- It is solid enough for World Champions yet theory-heavy, so most players start with the Meran.
- The guide below covers every main variation, the typical pawn structures, the most common trap, and how the Semi-Slav differs from the Slav.
Study the Semi-Slav Defense as White or Black
The Semi-Slav Defense sets Black's pawns on c6, d5, and e6 like a locked triangle, and White must choose between slow pressure and some of the sharpest gambits in chess.
White's Path Through the Semi-Slav Defense
Pick your weapon early: the variation guide below compares the Marshall Gambit, the Meran complex, and the quieter systems White can aim at the Semi-Slav Defense. Once you choose, the main line walkthrough takes you move by move into the 5.e3 tabiya.
Hold the Black Side of the Semi-Slav Defense
Black's setup is a coiled counter, and the pawn structure chapter shows how the triangle transforms into active play against White's center. Check the practical score tables too, then learn the fork between 5.e3 and 5.Bg5, because which branch White picks decides what you will face in the Semi-Slav Defense.
How White and Black Score in Practice
Across club play the Semi-Slav produces very few draws, with the large majority of games decided. White comes out a bit ahead from the opening, while Black stays within striking distance. Here is the rough split.
| Rating level (Lichess) | White wins | Draw | Black wins |
|---|---|---|---|
| 800, beginner | 52.7% | 3.5% | 43.8% |
| 1000, novice | 52.2% | 3.6% | 44.1% |
| 1200, improver | 52.0% | 3.7% | 44.3% |
| 1600, club | 50.7% | 4.6% | 44.7% |
| 1800, club | 50.7% | 5.3% | 44.0% |
| 2000, advanced club | 51.3% | 6.1% | 42.6% |
Source: Lichess opening explorer, blitz, rapid and classical games at the position after 1.d4 d5 2.c4 c6 3.Nf3 Nf6 4.Nc3 e6. Figures are win rates by Lichess rating band; draws are rare at these levels.
Watch: A Quick Guide to the Semi-Slav
If you prefer to see the ideas in motion first, the short video below walks through the Semi-Slav.
The Three Things That Define a Semi-Slav: the Triangle, the Bad Bishop, and the c4 Tension
Whether the game turns into a hyper-aggressive battle or settles into a slower struggle is shaped mostly by Black's choices. White's fifth move (5.e3 or 5.Bg5) also signals which kind of game White is willing to play.
Two features of the Semi-Slav stand out. First, Black's solid pawn triangle on e6-d5-c6; second, the passive c8-bishop, hemmed in behind its own pawns. The opening is highly adaptable and can take on many different structures depending on the variation, but Black's plan always circles back to one goal: freeing that light-square bishop, usually with a …c5 break and sometimes with …e5.
The third defining factor is the tension between Black's d5-pawn and White's pawn on c4. Deciding when to release it with …dxc4, or to hold it as long as possible, does more to shape both players' plans than any single piece move.
Semi-Slav Defense Pawn Structure: From the Triangle to Hanging Pawns
The backbone of the opening is the c6-d5-e6 pawn triangle. It gives Black's center unusual resilience: the d5-pawn is defended twice, White cannot easily blow the center open, and Black keeps a stable base for piece play. The price is the bishop on c8, which sits behind its own pawns until Black manages one of the freeing breaks.
From this triangle, three typical structures arise. After …dxc4 and an eventual …c5, Black often reaches a position with hanging pawns or an open c-file, trading the solid triangle for piece activity and queenside expansion. This is the spirit of the Meran, and the …b5 and …c5 advances together form what players call the Meran wedge on the queenside. If White answers …c5 with d5, the center locks and the game revolves around pawn breaks and piece maneuvering on the wings. In the Botvinnik and Moscow lines the structure can shatter completely, with Black accepting doubled or weakened pawns, even an isolated or backward pawn, in exchange for the bishop pair and concrete play against White's king.
Knowing which structure you are steering toward is more useful than memorizing moves, because it tells you where your pieces belong and which break, …c5 or …e5, you are playing for.
Semi-Slav Defense Theory: The Great Fork of 5.e3 vs 5.Bg5
Semi-Slav theory is vast, and each major branch sends the game off in its own direction. The key crossroads comes after 1.d4 d5 2.c4 c6 3.Nf3 Nf6 4.Nc3 e6, where White usually chooses between 5.e3 and 5.Bg5.
5.e3 shuts in White's dark-squared bishop for the moment and leads to more positional games. The two main lines after 5.e3 are the Meran Variation, 5.e3 Nbd7 6.Bd3 dxc4 7.Bxc4 b5, and the Anti-Meran, 6.Qc2 instead of 6.Bd3, which sidesteps Black's tempo-gaining capture on c4.
5.Bg5 tells a completely different story, where complications like in no other opening can arise. The Botvinnik Variation, 5…dxc4 6.e4 b5, is the wildest option of all, while the Moscow Variation, with 5…h6 first, tries to reach an improved version of the Botvinnik for Black.
Semi-Slav Variations: Marshall Gambit (4.e4), Main Line, Meran, Anti-Meran, Cambridge Springs, Botvinnik, Moscow, and Exchange Sidelines
Marshall Gambit: 4.e4
Before Black even reaches the main triangle, White can sidestep everything with the aggressive Marshall Gambit, arising after 1.d4 d5 2.c4 c6 3.Nc3 e6 4.e4. White sacrifices a central pawn to rip the position open while Black is still undeveloped. The principled reply is to grab it: 4…dxe4 5.Nxe4 Bb4+ 6.Bd2 Qxd4 7.Bxb4 Qxe4+ 8.Be2 Na6 9.Bd6, when White keeps the bishop active and gets long-term compensation in the form of the two bishops and Black's exposed king. Black is up material but cannot castle comfortably, so accurate defense is required. Players who would rather not walk this tightrope can decline with 4…Bb4, keeping the position closer to normal Semi-Slav waters.
Semi-Slav Main Line: 5.e3 Nbd7 6.Bd3 dxc4 7.Bxc4 b5
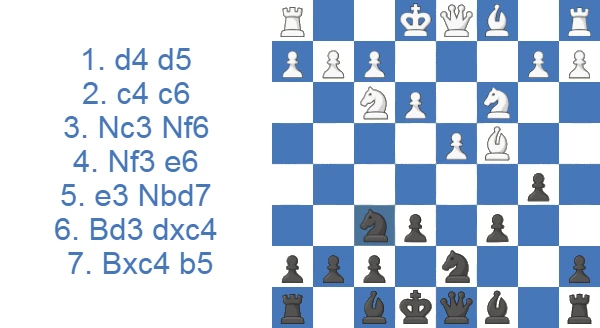
The main starting position can be reached through several move orders: 1.d4 d5 2.c4 c6 3.Nf3 Nf6 4.Nc3 e6, or 3.Nc3 Nf6 4.Nf3 e6, or even the Nimzo-Indian route 1.d4 Nf6 2.c4 e6 3.Nf3 (3.Nc3 Bb4) d5 4.Nc3 c6.
Both 5.Bg5 and 5.e3 are popular, with 5.e3 the top choice of players who prefer a calmer game. The point of 5.e3 is to recapture on c4 after …dxc4 with Bxc4 in one move, and it is almost always met by 5…Nbd7. Now White can allow the Meran with 6.Bd3 or try to avoid it with 6.Qc2.
Semi-Slav Meran Variation: 6.Bd3
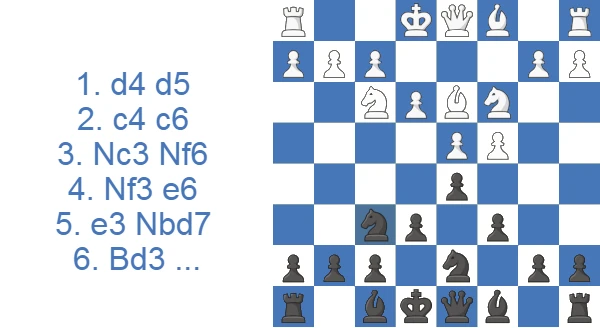
6.Bd3 prepares to castle and supports the e4-break. If Black plays routinely, White may also tuck in b3 to back up c4 before pushing e4. But Black's main move is to capture on c4 with tempo, entering the Meran: 6…dxc4 7.Bxc4, and Black gains another tempo with 7…b5 8.Bd3.
The idea behind the Meran is to fianchetto the light-square bishop on the queenside, expanding with tempo and solving the problem of the bad bishop. To fully free the bishop on b7, Black needs …c5 at some point, so the b5-pawn must be supported first: 8…a6 9.e4 c5 (or 8…Bb7 9.0-0 a6 10.e4 c5).
White must answer the central tension at once, choosing between 10.e5 and 10.d5, each leading to its own complications. After 10.e5, a heavily theoretical sequence follows: 10…cxd4 11.Nxb5 axb5 12.exf6 gxf6 13.0-0 Qb6.
Here Black's pawn structure is rough and the b5-pawn often falls, but Black's pieces spring to life and press on White's kingside with …Bb7, …Bd6 and …Rg8.
10.d5 is an older line and somewhat out of fashion. It hands Black a 3-to-2 pawn majority on the queenside, and play might continue 10…c4 11.dxe6 fxe6 12.Bc2 (or 11.Bc2 Qc7 12.0-0 Bb7 13.dxe6 fxe6), with enough practical chances for Black.
Semi-Slav Anti-Meran Variation: 6.Qc2
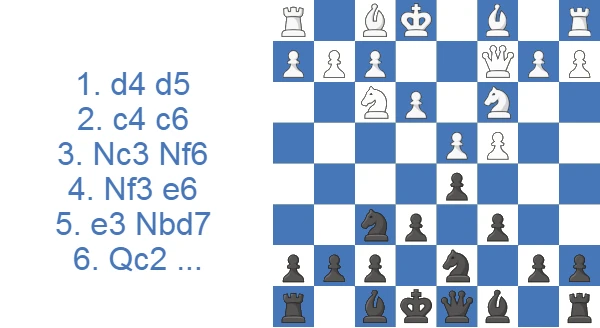
The theory and complications of the Meran can be overwhelming, which leads some White players to look for a calmer setup. 6.Qc2 avoids a great deal of theory and delays the light-square bishop's development as long as possible, so White can recapture on c4 after …dxc4 in a single move. Because this works directly against the Meran's idea of gaining tempi with …dxc4 and …b5, 6.Qc2 is called the Anti-Meran. Black will hold the capture back until White develops the kingside bishop, while White tries to delay moving it. A typical continuation runs 6…Bd6 7.b3 0-0 8.Be2 b6 (8…dxc4 is no longer attractive because of 9.bxc4) 9.0-0 Bb7 10.Bb2 Qe7, with …c5 coming soon.
5.Bg5 line
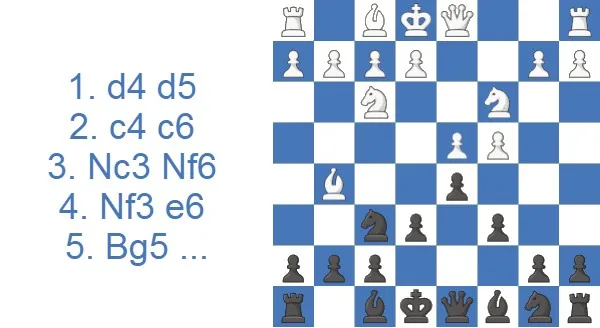
White's ambitious choice, 5.Bg5, pins the f6-knight at once, undermining Black's grip on e4 so White can fight for the center with e4. The flip side is that Black can grab on c4 and hang on to the extra queenside material. Black now picks between 5…dxc4 and 5…h6, both leading to wildly imbalanced positions.
Cambridge Springs Variation: 5…Nbd7 6.e3 Qa5
A clever positional alternative to the Botvinnik chaos is the Cambridge Springs, reached after 5.Bg5 Nbd7 6.e3 Qa5. Black pins White's knight against the king and threatens …Ne4, hitting the g5-bishop and the c3-knight at once. White has to react immediately, and any solution reshapes the position so it no longer feels like a normal Queen's Gambit. A typical line runs 7.cxd5 Nxd5 8.Qd2 Bb4 9.Rc1 e5, where Black uses the …e5 break to free the position before White finishes development. It is a practical, lower-theory way to meet 5.Bg5 without memorizing forced Botvinnik tactics.
Semi-Slav Botvinnik Variation: 5…dxc4
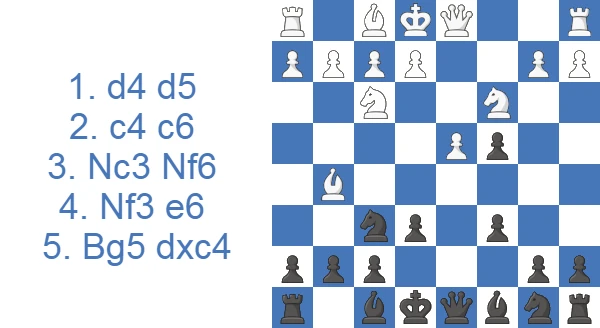
The Botvinnik Variation, 5…dxc4, produces one of the sharpest battles in all of chess. Black gives up control of e4 for material and counterplay on the queenside, and the clash turns completely concrete. The next moves are almost a single forced line of theory: 6.e4, threatening e5 and Bxc4, 6…b5 7.e5 h6 8.Bh4 g5 9.Nxg5 hxg5 10.Bxg5 Nbd7. With the kingside in ruins, the black king cannot shelter there, so Black either castles queenside or leaves the king in the center.
From here the play is usually long and strictly tactical. To give a sense of the possibilities: 11.g3 Bb7 12.Bg2 Qb6 13.exf6 0-0-0 14.0-0 c5 15.d5 b4 16.Na4 Qa6 17.a3 (17.dxe6 Bxg2 18.e7 Qc6 19.exd8=Q+ Kxd8, and Black has enormous compensation on the light squares) 17…Bxd5 18.Bxd5 Ne5 19.axb4 Rxd5 20.Qe2 cxb4 21.Nc3 Qd6 22.Nxd5 Qxd5 23.f3 Bc5+ 24.Kg2 Nd3, where White has the material edge while Black keeps pressing on the king and the queenside with a potential passed pawn.
The other main branch, 11.exf6, is every bit as wild as 11.g3: 11…Bb7 12.g3 c5 13.d5 Nxf6 14.Bg2 Be7 15.0-0 Nxd5 16.Bxe7 Kxe7 17.Nxb5 Qb6 18.Na3, and now Black can try a remarkable passive sacrifice with 18…Rh4. After 19.gxh4, Black builds threats along the g-file with 19…Rg8 and the …Nf4 discovery. It is wiser for White to decline with 19.Qd2. These two lines after 11.g3 and 11.exf6 show the depth of tactical complication in the Botvinnik and only scratch the surface of its theory.
The Most Beautiful Idea in the Semi-Slav: Botvinnik's Passive Sacrifice
The variation is named for Mikhail Botvinnik, who pioneered its material-for-initiative sacrifices in the 1940s and 50s, and the spirit of his idea survives in one unforgettable resource. Deep in the 5.Bg5 dxc4 lines, Black can offer a whole rook with the quiet …Rh4, hanging the piece just to rip open the g-file. After White captures, …Rg8 floods the file. The long-range bishops, paired with a …Nf4 discovery, then crash into White's king. It is a passive sacrifice in the truest sense: nothing is threatened immediately, yet declining is often safer than accepting. This is the Botvinnik philosophy in one move, where Black hands over a shattered structure and even material for raw attacking energy against a king that has nowhere safe to hide.
Semi-Slav Moscow Variation: 5…h6
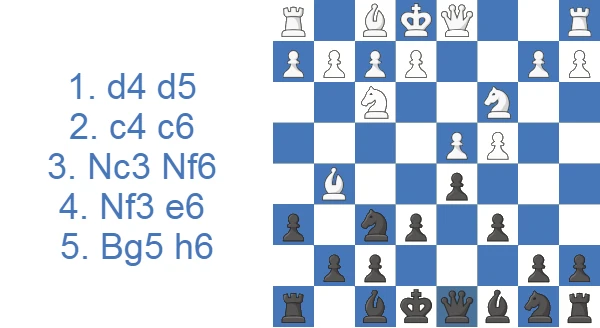
The modern response to 5.Bg5 is the intermezzo 5…h6, forcing White to decide what to do with the bishop. Capturing with 6.Bxf6 Qxf6 gives up the bishop pair and heads for a positional battle based on the minor-piece imbalance, while keeping the pin with 6.Bh4 leads to an improved version of the Botvinnik for Black after 6…dxc4 7.e4 g5 8.Bg3 (8.Nxg5 no longer works because of 8…hxg5 9.Bxg5 Be7) 8…b5.
White's Sidelines: the Exchange and 5.cxd5
Not every White player heads for the main battlegrounds. The most common detour is the Exchange approach, 5.cxd5 exd5, which dissolves the central tension and leads to an Exchange Queen’s Gambit Declined structure, with White’s pawns on a2, b2 and d4 facing Black’s a7, b7, c6 and d5. It has a drawish reputation, yet Black should still know the handling, since careless play can leave the c8-bishop passive without the usual …c5 counterplay. White can also try a Catalan-style 5.g3, fianchettoing the bishop and pressuring d5 from g2 rather than fighting for e4. None of these sidelines refutes the Semi-Slav, but being ready for them is part of playing the opening with confidence.
White's Deviations: When the Main Battle Never Happens
Plenty of d4 players have no wish to walk into sharp Semi-Slav theory, so be ready for the quieter detours. The most common is the Exchange approach with 5.cxd5 exd5, which dissolves the central tension and reaches the Exchange Queen’s Gambit Declined pawn structure rather than a symmetrical Exchange Slav. White can also adopt a Catalan-style fianchetto with 5.g3, pressing on d5 from g2 rather than fighting for e4, or play a quiet 4.e3 setup that sidesteps both the Botvinnik and the Marshall. An early 5.Qb3 prods the queenside before Black is fully developed. None of these refutes anything. Each one just changes the character of the game, and spotting the move order early keeps you out of a passive position where the c8-bishop never finds work.
Move Orders and Transpositions: How You Actually Reach It
The Semi-Slav is a transposition minefield, and move order matters as much as the lines themselves. The triangle can arise from a Slav move order with 3.Nf3 Nf6 4.Nc3 e6, from 3.Nc3 Nf6 4.Nf3 e6, or through a Nimzo-Indian sequence beginning 1.d4 Nf6 2.c4 e6 3.Nf3 d5 4.Nc3 c6. The subtle part is timing: when Black commits to …e6 and when White commits a knight to c3. Playing …Nf6 before …e6, or choosing 3.Nf3 over 3.Nc3, can sidestep the immediate Marshall Gambit move order, while certain orders let White force or avoid the Botvinnik. This is where the Slav-versus-Semi-Slav distinction bites in practice rather than in theory. The exact instant you play …e6 decides whether your light-square bishop stays free or gets locked inside the triangle.
Grandmaster Games in the Semi-Slav: Three Modern Battles
A Common Semi-Slav Defense Trap to Avoid
After 1.d4 d5 2.c4 c6 3.Nf3 Nf6 4.Nc3 e6 5.cxd5 exd5 6.Qc2 g6, the natural-looking 7.Bg5 Bf5? is premature because of 8.Qb3. Black's queen cannot defend b7 thanks to the pin on f6, so the bishop has to retreat with 8…Bc8 (8…b6 9.e4! dxe4 10.Ne5 comes in strong). Then 9.e4 threatens e5, and after 9…h6 10.Bxf6 Qxf6 11.exd5 White simply wins a pawn. The takeaway is to finish development before reaching for …Bf5, or the pin on f6 turns the early activity into a free pawn for White.
Anand vs Kramnik: The Semi-Slav at the Summit
No two players did more to shape the modern Semi-Slav than Vishy Anand and Vladimir Kramnik, whose duels in the 2006 to 2008 period turned the Anti-Meran and Botvinnik into a theoretical battleground at the very top. Kramnik in particular became the defining elite practitioner of these sharp queenside structures, defending the Black side of razor lines that most players would never risk. Their 2008 World Championship match in Bonn featured several Semi-Slavs where Anand's deep home preparation in the Meran and Anti-Meran produced strikingly direct attacking wins with Black. It showed the opening could win games outright at the highest level. For a student of the opening, replaying these games is the fastest way to absorb where the pieces belong and why the …c5 and …b5 breaks are worth so much risk.
Semi-Slav vs Slav Defense: What's the Difference and Which to Choose
Both defenses start the same way with 1.d4 d5 2.c4 c6, and the fork comes a few moves later. In the Slav Defense, Black develops the light-square bishop outside the pawn chain before closing it in, typically with 3.Nf3 Nf6 4.Nc3 dxc4 5.a4 Bf5, so the c8-bishop never becomes a problem piece.
In the Semi-Slav Defense, Black instead plays …e6 early (4…e6), locking the bishop behind the e6-d5-c6 triangle and accepting that piece's passivity in return for a sturdier center and sharper, more tactical play.
The practical consequence is a difference in character. The Slav stays calmer and more positional, which suits players who like clear structures and slow maneuvering. The Semi-Slav is more double-edged: the same triangle that makes Black solid also invites the wild Botvinnik and Anti-Meran complications, and Black often has to spend several tempi later on …c5 or …b5 just to bring the c8-bishop to life. If you enjoy the initiative and don't mind memorizing theory, the Semi-Slav gives more winning chances with Black; if you prefer to avoid forcing lines, the pure Slav is the lighter load.
How I Meet the Semi-Slav Defense as White
I had White in this one, 1676 against 1662. Black built the triangle with 1.d4 e6 2.c4 d5 3.Nc3 c6, and after 4.e3 he resolved the c4 tension himself: 4...dxc4 5.Bxc4 b5 6.Bb3.

Those two pawn moves cost time, and then the bishop came out before the knight. 6...Bd6 7.Nge2 Bd7 8.Ne4 attacked it, and 8...Nf6 left it where it stood: the reading went from +1.02 to +6.99, and 9.Nxd6+ took it. My own 10.Nxf7 was greedy and gave a lot of that straight back, +7.25 to +3.60, since 10...Kxf7 simply won the knight. The game was decided in the center instead, with 15.d5 exd5 16.exd5 cxd5 17.Nxd5 Nxd5 18.Qxd5+ Kf8 19.Qf7#.

Taking on c4 and holding the pawn with ...b5 is a real Semi-Slav plan, and it is the branch this guide separates from the lines where Black keeps the tension. It asks for an accurate move order. Here the dark-squared bishop went to d6 before the king's knight came out, so Ne4 hit it with nothing defending it.
Strengths and Weaknesses at a Glance
Pros
- A solid structure: the c6-d5-e6 pawn triangle makes Black's center hard to break.
- Perfect for tactical players, who seek a sound counterplay against the Queen’s Gambit.
Cons
- Substantial amount of opening theory, which can be daunting for players who prefer more intuitive or straightforward openings.
- If black fails to liberate the bishop on c8, it becomes a problem piece.
How Black Can Get Crushed (and How to Avoid It)
The Semi-Slav rewards preparation and punishes improvisation. In the Marshall Gambit, 4.e4 invites Black to grab a central pawn, but a player who snatches material without knowing the follow-up soon finds the king stranded in the center while White's two bishops and lead in development do the talking. The Botvinnik is even less forgiving. If Black mishandles the forcing sequences after 5…dxc4, the shattered kingside turns into a liability instead of an asset, and White's initiative simply rolls through. So match the line to your knowledge. If you have not memorized the forcing tactics, decline the Marshall with 4…Bb4 and steer the Botvinnik toward the calmer Cambridge Springs or Moscow waters, where understanding counts for more than recall.
Case Study: Praggnanandhaa vs Sindarov, 2025
This is a clean illustrative model of how White handles a Semi-Slav structure when Black grabs queenside space, and how a single passed pawn can decide the game. Black is fine for a long stretch, then a few imprecise moves let White's queenside majority run.
A few moments are worth slowing down on, because they teach the recurring themes of this structure.
White avoids the main 5.e3 and 5.Bg5 roads and plays 5.Qd3 with 6.Bf4, a flexible setup that keeps options open. This is the kind of sideline the earlier section warned about: nothing forcing, just a fight for e4 on White's terms. Black reacts in true Semi-Slav style with 6…a6 and 7…dxc4 8.Qxc4 b5, gaining tempo on the queen and grabbing space, exactly the …b5 expansion the Meran is built around.
The freeing break comes with 12…c5, the standard way Black frees the position and the light-square bishop. After 13.Nxc5 Nxc5 14.dxc5, though, White has a protected passed c-pawn. That is the turning point of the whole game. Black's structure is not bad, but that c5-pawn never goes away, and the entire ending revolves around it.
Black tries to round it up and stays active with 15…Nxe4 16.Nxe4 Bxe4, even winning back the material, but 17.Qg4 and 18.Qxb4 keep White a clean pawn up while the c-pawn lives. The repetition on moves 24 to 28 (Qe5, Qf5, Qd3, Qc3) is both players catching their breath before the time control, not a sign of a draw.
The practical lesson lands in the final phase. White does not rush. With 31.b4 and the maneuvering that follows, White builds a connected queenside majority, and once 35.b5 and 38.b6 roll forward, Black's pieces simply cannot blockade two advancing pawns and defend the king at the same time. By 42.c6 and 44.c7 the pawn is one step from queening, and 45.Qc5 ends it.
For a club player the takeaway is direct: in Semi-Slav structures, the …c5 break is your friend until it leaves White with a passed c-pawn. When you commit to …c5, count whether the recapture hands your opponent a passer, and if it does, have a concrete plan to blockade it before it gets rolling. A passed pawn that you cannot stop will outvalue a lot of piece activity.
Should You Add the Semi-Slav to Your Repertoire?
The Semi-Slav Defense asks you to be ready for both tactical fireworks and slow strategic maneuvering, and it carries a heavy theoretical load. You can fairly call it an advanced opening for that reason. But the work you put into learning it will pay off as you grow into a well-rounded player, because few openings teach pawn structure and the value of the initiative as clearly as this one.
Which Semi-Slav Line Should You Actually Play?
Your choice should follow your rating and how much theory you are willing to carry. For club players, the Meran is the natural home: sound structure, healthy piece development, and the thematic …b5 and …c5 breaks, all without single-line memorization. If you want a low-theory answer specifically to 5.Bg5, the Moscow Variation with 5…h6 is a practical, modern repertoire choice that skips the heaviest Botvinnik labyrinths while keeping imbalanced play. Reserve the Botvinnik itself for heavily booked, attacking players who genuinely enjoy preparing forcing tactics deep into the middlegame. The Cambridge Springs offers a clever, lower-theory middle path against 5.Bg5. My own choice is almost always the Meran, since it can be played on understanding when the clock runs low. Build your repertoire around the line that fits your temperament, and you will get far more from the Semi-Slav Defense than from chasing the sharpest variation you cannot fully trust.
Test Yourself: Semi-Slav Defense Positions
Set up each position and find the best move. Use Hint for a nudge or Answer to reveal the engine’s top move.
Find the best move.
Find the best move.
Find the best move.
Find the best move.
Find the best move.