
 By

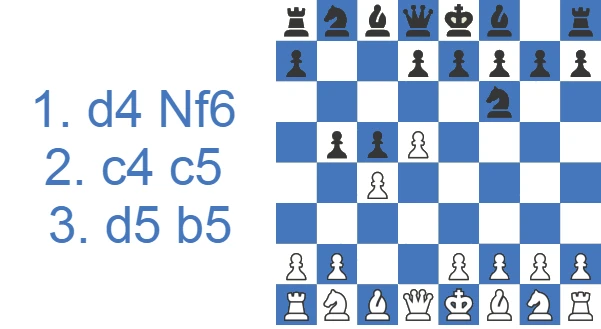
Although the underlying idea is much older, the gambit only became popular in the mid-20th century, and it took its name from the chess master Pal Benko. It holds up as a sound gambit because of the lasting strategic pressure it gives Black.
Benko Gambit in 30 Seconds
Short on time? Here is the whole opening in a nutshell before we go deeper.
- Move order: 1.d4 Nf6 2.c4 c5 3.d5 b5, and Black offers the b-pawn on move three.
- Black's idea: give up the b-pawn to open the a- and b-files, fianchetto the bishop to g7, and pile the rooks and queen onto White's queenside.
- White's choice: accept with 4.cxb5 (the main line) or sidestep the pressure with 4.Nf3 or the 5.b6 pawn return.
- Why it works: even a pawn up, White often struggles in the endgame, because Black's pressure does not disappear when the pieces come off.
- Is it sound? Yes. The Benko has never been refuted and is a respected, positional way to fight 1.d4, though White scores well in some modern lines with an early a4.
Study the Benko Gambit as White or Black
In the Benko Gambit Black spends a queenside pawn on two open files and pressure that lasts into the endgame, a bargain White has to know how to refuse or exploit.
Facing the Benko Gambit as White
Before picking a setup against the Benko Gambit, understand what Black bought with the pawn; the ideas and plans sections below map the file pressure you will be defending for the next thirty moves. The variation overview then compares taking, returning, and declining the pawn so you can choose the anti-Benko line that fits how you like to play.
Play the Benko Gambit as Black
Club players score above fifty percent with the Benko Gambit, and the statistics sections below show where those points actually come from at each rating band. Add the named core maneuvers, the standard piece routes every Benko player repeats, and you will keep squeezing White's queenside a full pawn down.
How White and Black Score in Practice
Here is how the opening performs in master play versus the amateur pool. The split between the two tables is the single most useful thing on this page.
Master games:
| Results | Rate |
|---|---|
| Victory for White | 40% |
| Draw | 34% |
| Victory for Black | 26% |
Across roughly three million amateur games:
| Rating level (Lichess) | White wins | Draw | Black wins |
|---|---|---|---|
| 800, beginner | 49.6% | 5.9% | 44.4% |
| 1000, novice | 46.4% | 3.4% | 50.2% |
| 1200, improver | 46.1% | 3.3% | 50.6% |
| 1600, club | 43.5% | 4.1% | 52.4% |
| 1800, club | 43.4% | 5.1% | 51.5% |
| 2000, advanced club | 45.0% | 6.0% | 49.0% |
Source: Lichess opening explorer, blitz, rapid and classical games at the position after 1.d4 Nf6 2.c4 c5 3.d5 b5 4.cxb5 a6. Figures are win rates by Lichess rating band; draws are rare at these levels.
Benko at Your Rating: Why Black Scores 50% Below Master Level
The dual win-rate table is the most honest thing on this page. Master games favor White 40-26 because strong players know the antidote: take the pawn, but plug b5 with a4 followed by Nb5, or simply give the pawn back with 5.b6, and the queenside pressure dries up. Amateurs do the opposite. They hoard the extra pawn, leave the a- and b-files open, and let Black's rooks, queen, and g7-bishop grind them down. That is why Black outscores White 50-45 across three million amateur games.
There is a practical takeaway on both sides. As Black, the Benko runs on a handful of repeatable plans, so it travels well at club level even against opponents who have not prepared for it. As White, the move that wins is the clamp on b5, not the count of pawns.
Watch the Benko Gambit in Action
If you prefer to see the ideas move by move, the video below is a quick visual walkthrough of the main plans before you read on.
Key Ideas of the Benko Gambit: Why Sacrificing the b-Pawn Works
The core idea of the Benko is to give up a queenside pawn so the a- and b-files open for Black. The rooks then sit on those semi-open files and lean directly on White's queenside.
Black typically fianchettoes the f8-bishop to g7, and that diagonal adds even more weight against the a1 corner. Even though Black is down a pawn, the resulting structure makes these endgames very hard for White to win. White usually tries to consolidate the extra pawn and press for a win in the endgame.
History and the Volga Gambit Name
The b5-pawn sacrifice is older than its name. The idea showed up as early as the 1930s, often by transposition from the King's Indian Defense, and the first games with the modern move order appeared in the late 1940s. For a long time it had no single owner.
That changed when the Hungarian-American Grandmaster Pal Benko (1928–2019) adopted it as a main weapon, played it consistently at the top level, and published his analysis in his 1974 book The Benko Gambit. The opening has carried his name ever since.
You will also see it called the Volga Gambit, especially in Eastern Europe, after the Volga river. Benko originally drew a line between the two: the Volga being 3...b5 with an early ...e6, and the Benko being 3...b5 4.cxb5 a6. Today the names are used for the same opening, and it is sometimes written as the Volga-Benko Gambit.
Key Plans and Maneuvers for Black: Pressure Down the a- and b-Files
The Benko is not about memorizing twenty moves of theory. It is about a handful of plans that come up again and again. Learn these and you will know what to do in almost every Benko position.
The Rook Lift to b8 and the Open Files
This is the heart of the opening. Black keeps one rook on a8, swings the other to b8, and adds the queen on a5 or b6. With the g7-bishop raking the long diagonal, White's a- and b-pawns come under heavy fire.
The Knight Tour: Ng4-e5-d3
When White has a pawn on e4 and the light-squared bishops are off the board, Black can route a knight to e5 through g4. From e5 the knight eyes d3, a dream outpost in White's camp. If the knight lands on d3, Black usually gets excellent play, even down a pawn.
The c5-c4 Break
Pushing c5-c4 has two points: it can hand Black a permanent outpost on d3, and it can break up White's queenside by trading the c-pawn for White's b-pawn, leaving the a-pawn weak. Before playing it, check that White cannot reply with Nd4-c6 or rebuild with b3-b4.
Black's Core Maneuvers, Named
The Benko is a plan-based opening, and four named motifs cover almost every position. First is the rook lift to b8: one rook stays on a8, the other swings to b8, and the queen joins on a5 or b6 to triple the pressure. Second is the ...Ng4-e5 (or ...Nd7-e5) reroute, parking a knight on e5 where it eyes the d3 outpost deep in White's camp. Third is the ...c5-c4 break, which fixes a permanent outpost on d3 and can fracture White's queenside by trading the c-pawn for the b-pawn, leaving the a-pawn weak. Fourth are the knight outposts on b5 and c4, the squares Black's pieces and the Benko pawn chain are built to occupy. The g7-bishop on the long diagonal ties them together. What decides whether White's queenside ever gets organized, in the games I have played, is usually that bishop rather than any single tactic.
Benko Gambit Theory: the Main Variations at a Glance
The 7.e4 variation leads to positions where Black attacks the queenside by lining up the rooks on the a- and b-files. Both sides need to watch the tactical potential.
The Fianchetto Variation of the Benko Gambit Accepted (7.g3) often reaches positions similar to the 7.e4 line, where Black works the semi-open a- and b-files and White tries to shut them down.
The main line of the Benko Gambit Declined begins with 4.Nf3, after which White can transpose into the accepted variation by switching move orders or keep the position closed and play from the center.
The Pawn Return Variation tends to give White a space advantage, with the game decided by strategic maneuvering.
Benko Gambit Accepted: 7.e4 (King Walk Variation)
This is the most popular setup, often called the King Walk Variation because White ends up walking the king to g2 by hand.
The line begins with the Benko Gambit and White accepting the offered b-pawn (4.cxb5). Black then offers a second pawn to open the a- and b-files for the rooks (4...a6), and White takes again (5.bxa6). Once Black recaptures with the bishop (5...Bxa6), White develops the b1-knight (6.Nc3) and aims for the center. Black wants to fianchetto the f8-bishop to g7 and castle short, so 6...g6 comes next, and White plays 7.e4 to force a trade of the light-squared bishops.
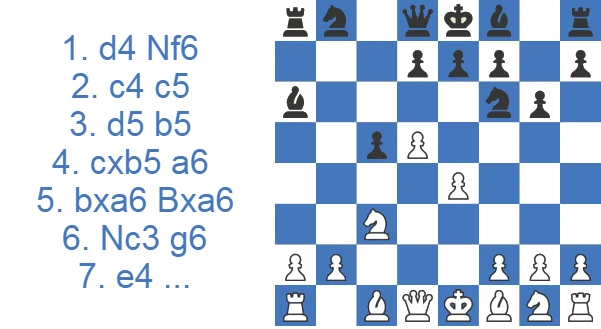
By offering that trade, White accepts giving up the right to castle normally and instead castles by hand with g3 and a king move to g2.
Once e4 is on the board, Black has to take the f1-bishop; otherwise White grabs the a6-bishop, pushes e4-e5, and kicks the f6-knight back to g8.
After 7...Bxf1, White recaptures with the king (8.Kxf1). Black then plays 8...d6 to stop the e5 push.
From here White wants Nf3 and a safe home for the king. Both Nf3 and g3 can come in different move orders. Black generally fianchettoes the dark-squared bishop and castles short.
One sample line runs 9.g3 Bg7 10.Kg2 (tucking the king away) 10...O-O 11.Nf3 (developing the knight) 11...Qb6 (preparing to connect the rooks and add to the b-file pressure) 12.Re1 (developing the rook with an eventual e5 push in mind) 12...Nbd7 (finishing development).
Now Black can bring the f8-rook to b8 and open up the g7-bishop's scope on the a1-h8 diagonal. White usually tries to slow Black down and trade pieces.
Benko Gambit Accepted: 7.g3 (Fianchetto Variation)
This line is known as the Fianchetto Variation, since White develops the bishop to g2 instead of giving it up on f1.
It begins like the 7.e4 variation, but instead of pushing e4, White fianchettoes the f1-bishop to g2 and castles short. The move is 7.g3.
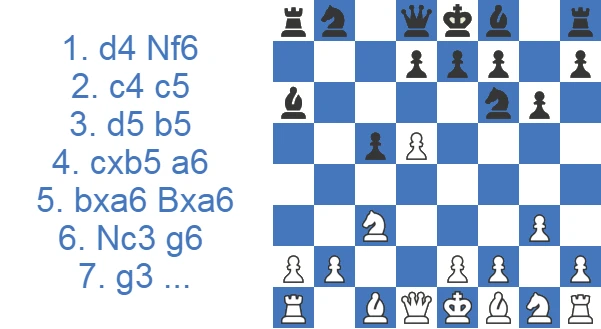
Black usually replies 7...d6, making a square for the b8-knight and discouraging a d6 push. White can develop the knight with 8.Nf3, Black answers 8...Bg7, White completes the fianchetto with 9.Bg2, Black plays 9...Nbd7, and both sides castle (10.O-O O-O).
Once both sides have castled, Black aims to connect the rooks and bring the f8-rook to b8. White can lift the a1-rook to b1 (11.Rb1) to step it off the dangerous a1-h8 diagonal. Black replies 11...Qa5, finishing development, and will follow with ...Rfb8, leaning on the a- and b-pawns just as in the 7.e4 line above.
The main difference between the two accepted setups is that in the fianchetto line the light-squared bishops are still on the board. That keeps more pieces in play and gives Black extra dynamic chances. Since the g2-bishop is not hitting anything down the a8-h1 diagonal, Black's light-squared bishop can be more useful in the short term.
Benko Gambit Declined: 4.Nf3 - Main Line
The main line of the Benko Gambit Declined starts after White refuses the b-pawn and develops with 4.Nf3.
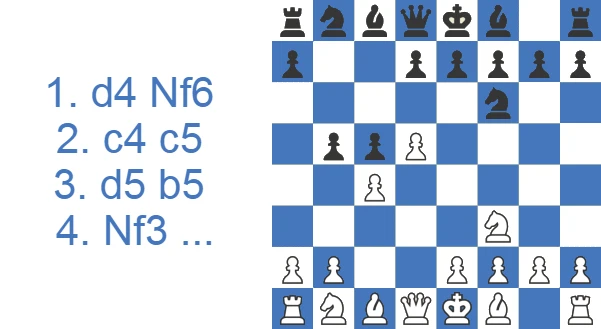
Here Black has two main moves: fianchetto the c8-bishop with 4...Bb7, or fianchetto the f8-bishop with 4...g6.
Since we have already covered the cxb5 lines, we will focus on the declined paths here. If Black plays 4...Bb7, White can try to shut down the queenside and take the center with a later e4.
A sample line runs 4...Bb7 5.a4 (if Black takes on a4, the a-pawn is weak for the rest of the game) 5...b4 6.Nbd2 (improving the knight) 6...d6 7.e4 (taking the center) 7...g6 (preparing the dark-squared bishop) 8.Bd3 (preparing to castle short) 8...Bg7, and both sides castle (9.O-O O-O).
In a position like this, White wants to roll a central pawn storm and smother Black.
If Black chooses 4...g6, White can try to force the queens off or damage Black's queenside pawns.
A sample line runs 4...g6 5.Nbd2 b4 6.a3, hitting the b4-pawn. If Black takes on a3, the a-pawn becomes a lasting weakness. After 6.a3 Black can continue developing with 6...Bg7. White plays 7.e4, Black answers 7...d6 (stopping ideas of e5), and then 8.axb4 cxb4 9.Qa4+ puts Black under pressure. Black blocks with 9...Nfd7 (opening the g7-bishop's scope), and White grabs the pawn with 10.Qxb4. White is up a pawn and can offer a queen trade next with Qa5. Even so, these are not easy endgames to win, because Black's solid pawn structure and strong bishops give real compensation for the missing pawn.
The a6 Recapture: Bxa6, Nxa6, or Leaving the Pawn
Before any 7.e4 or 7.g3 battle begins, Black faces a small but defining choice on a6. In the fully accepted line, 4.cxb5 a6 5.bxa6, the standard recapture is 5...Bxa6. That brings the light-squared bishop to an active diagonal aimed at White's f1-bishop and the e2 and d3 squares. It is the trade of a passive bishop for an active one that underpins Black's compensation. Black can instead recapture with the knight, 5...Nxa6, rerouting it toward c7-b5 or c5, though the bishop recapture is far more common. A third path is to decline the recapture entirely and meet 4.cxb5 with a quick ...g6 and ...Bg7, leaving the pawn on b5 for later. Knowing which recapture you want shapes every accepted line that follows.
Benko Gambit Accepted: 5.b6 - Pawn Return Variation
This variation reaches the Benko Gambit Accepted after 4.cxb5, but then White returns the pawn with 5.b6 in answer to 4...a6. The point is that Black can no longer strike down both the a- and b-files.
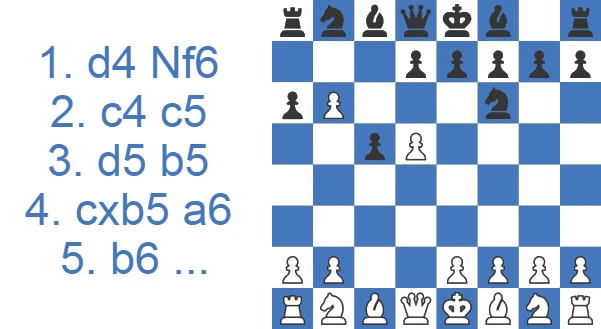
After 5.b6, Black has three reasonable replies: 5...Qxb6, 5...g6, or 5...d6, in various move orders. White usually plays Nc3, pushes e4, and prepares to castle with Nf3 and Be2. A common path is 5...Qxb6 6.Nc3 d6 7.e4 g6 8.Nf3 Bg7 9.Be2: Black has taken the b6-pawn and fianchettoed the bishop, and castling short comes next.
These positions reward positional understanding and good maneuvering. Both sides shuffle their minor pieces to ideal squares and try to grab key outposts while cramping the opponent.
Other Ways to Decline the Benko: 5.e3 and the Dlugy Variation (5.f3)
Beyond 4.Nf3 and the 5.b6 pawn return, White has two more independent tries. With 5.e3, White keeps things solid and simply props up the queenside; after 5...axb5 6.Bxb5 Qa5+ 7.Nc3 Bb7, Black goes after the d5-pawn.
The sharper choice is 5.f3, the Dlugy Variation. White allows Black to recapture on b5 but plans e4 to build a broad pawn center. A typical start is 5...axb5 6.e4 Qa5+ 7.Bd2 b4 8.Na3, when Black cannot grab the knight without losing the queen, and White heads for the c4-square.
How to Play Against the Benko Gambit as White: Clamp b5 or Give the Pawn Back
If you are the White player, the Benko can feel like you defend all game for one extra pawn. You have two sensible ways to handle it.
The first is to accept and consolidate. Take the pawn, finish development, and aim for the a4 plan. The key idea is a4 followed by Nb5, which seals the b-file and kills most of Black's counterplay. To keep the a1-rook safe from the g7-bishop, White often lifts it with Ra3 first. Once the queenside is under control, White looks to break with e4-e5 in the center.
The second is to decline and refuse the structure Black wants. The 5.b6 pawn return is the most popular, handing the pawn back so Black cannot open both files. Quieter tries like 5.e3 keep things solid, while 5.f3, the sharp Dlugy Variation, lets Black recapture but builds a big pawn center with e4 to follow.
The bottom line: do not cling to the extra pawn for its own sake. A clamp on b5 or a timely return of the pawn is usually worth more than the material.
Common Benko Gambit Traps: the 7.Nb5 Nd6# Mate
This one shows up in the Benko Gambit Accepted (4.cxb5). After 4...a6, White develops with 5.Nc3, Black takes the pawn with 5...axb5, White plays 6.e4, and Black kicks the knight with 6...b4. Now 7.Nb5 sets the trap. If Black snatches the e4-pawn with 7...Nxe4, the knight is in trouble, and 8.Qe2 wins. After 8...Nf6 the game ends with 9.Nd6#.
Facing the Benko Gambit as White: One of My Games
My opponent met 1.d4 with the Benko, and after 3...b5 4.cxb5 a6 5.Nc3 e6 6.dxe6 fxe6 I gave the pawn straight back: 7.e4 axb5 8.Bxb5 Ba6 9.Bxa6 Nxa6. That is the give-it-back approach described above. Once the light-squared bishops come off, the pressure down the a- and b-files loses most of its bite.

He kept working the b-file with 14...Rb8 and 17...Rb7, but the extra rook moves did not produce anything, and he opened lines on the other wing as well. 15...h6 16.Bh4 g5 17.Bg3 Rb7 18.f4 g4 was where the engine turned, from +0.70 to +2.65, and 19.f5 got my break in first. My 21.f6 was inaccurate, +4.12 down to +3.07, but the evaluation never came back toward him and he resigned on move 37.

The takeaway for White is that holding the extra b-pawn is usually not the point. Return it to trade the a6-bishop and Black keeps the structure without the compensation. A Benko player whose queenside pressure leads nowhere then has to find a second plan, and that is a harder ask than it looks.
Benko Gambit: Strengths and Drawbacks
Here is the trade-off at a glance, weighing what the gambit gives Black against the practical demands it puts on both players.
Pros
- If White can consolidate, they can enter an endgame with a pawn advantage.
- This opening gives a great example of the coordination of the Bishops and Rooks.
- Once Queen’s off the board, Black cannot claim too much in a stable position.
- White usually keeps solid control of the center.
Cons
- Benko Gambit for Black often puts extreme pressure along the a- and b-files on the enemy.
- Certain variations require deep positional understanding.
- It can be hard to win the endgames as White, even though they would be up one pawn.
- Both sides need to make long maneuvers in certain variations.
Is the Benko Sound? A Correctness and Playability Verdict
The honest verdict is rating-dependent. At club and intermediate level the Benko holds up well, arguably better than most gambits, because it runs on plans rather than forcing lines and the compensation survives the queen trade. At the top engine level it sits under more pressure. White scores well in modern lines with an early a4, and precise play can hold the extra pawn while damping Black's counterplay. That is the gap the win-rate table shows: respected and practical for humans, marginally dubious against perfect defense. The gambit has never been refuted, and repertoire authors such as Srinath Narayanan continue to recommend it in Chessable's Lifetime Repertoires series. It remains a serious, well-mapped opening rather than a trap.
Benko Gambit vs Benoni Defense: Which Queen's Pawn Defense Suits You?
The two openings are cousins. Both come from 1.d4 Nf6 2.c4 c5 3.d5, and the Benko appears when Black follows up with 3...b5 instead of the Benoni's 3...e6. The difference is the kind of game you get. In the Benoni, Black accepts a space disadvantage and plays for a central and kingside break with ...e6 and ...f5. In the Benko, Black gives up a pawn instead of space and plays almost entirely on the queenside. If you like long-term pressure and clear plans, the Benko is often the friendlier of the two to learn.
Notable Benko Gambit Games
The fastest way to absorb Benko ideas is to watch them work in real games. These are well-known examples worth replaying move by move.
- Szabo–Lundin, Saltsjobaden 1948: often cited as the first game with the modern Benko treatment, where Black opened the a- and b-files in the now-standard way.
- Pal Benko's games from the 1960s: the games that put the opening on the map and gave it his name.
- Aseev–Khalifman: a clean model game for how Black builds queenside pressure after White accepts.
- Top-level Benko battles from players such as Judit Polgar and Veselin Topalov, who used the Black side to create the dynamic counterplay the gambit is famous for.
Building a Benko Repertoire: What to Study Next
If you want the Benko as a main opening, learn plans before lines. Start with the accepted 7.e4 King Walk and 7.g3 Fianchetto setups, since they define the standard structures and the rook-lift-to-b8 plan. Then learn White's declines, namely the 5.b6 pawn return, 4.Nf3, and the sharp 5.f3 Dlugy Variation, so you are never surprised when White refuses the structure you want. Replay model games such as Aseev-Khalifman and Szabo-Lundin to see how Black converts file pressure, and pair them with a structured course such as a Lifetime Repertoires Benko by an author like Srinath Narayanan for engine-checked move orders. The payoff is a repertoire you can play on understanding, where leaving theory early costs your opponent more than it costs you.
Case Study: White's a4/Nb5 Clamp
Theory is easier to trust once you see the antidote in motion. The line below is the textbook accepted main line where White plays the consolidating a4 plan rather than sitting passively on the extra pawn. I am presenting it as a model line, not a game of my own, because it shows exactly how each side tries to win the queenside argument.
A few moments are worth pausing on.
- 5...Bxa6 and 7...Bxf1: this is the Benko bargain in two moves. Black trades the light-squared bishop for White's, accepting that White loses normal castling. In return Black gets the open files and a target-rich queenside. Do not be shy about giving up this bishop; it has done its job once White's king is stuck walking to g2.
- 8.Kxf1 and 9.g3 10.Kg2: the King Walk. White spends three tempi tucking the king onto g2 by hand. Those are slow moves, and they are the price White pays for grabbing two pawns. Black uses the time to fianchetto and castle.
- 11...Nbd7 and 12...Qb6: Black sets up the standard machine. The queen on b6 supports the b-file, the knight heads for ideas on e5 or c5, and the rooks are about to double.
- The turning point is 12.a4. This is the whole point of White's plan and the move amateurs forget. Instead of clutching the pawn, White prepares a4-a5 and Nb5, which would plug the b-file and freeze Black's pressure. 13.Ra3 is the quiet companion move: it lifts the rook off the a1-h8 diagonal so the g7-bishop is not staring straight at it, and it readies the rook to defend along the third rank.
- 13...Rfb8 14.Qc2: both ideas are now on the table. Black has the rooks doubled and the queen-and-bishop battery aimed at b2; White has the rook safely lifted and is one move from Nb5.
The practical takeaway for a club player cuts both ways. If you have Black, your job is to get the rooks to a8 and b8, the queen to b6 or a5, and never let White's knight settle on b5 for free. If you have White, copy this exact sequence: walk the king, lift the rook with Ra3, and play a4 with Nb5 in mind. Win the b5 square and you usually win the game; ignore it and the extra pawn will not save you.
Test Yourself: Benko Gambit Positions
Set up each position and find the best move. Use Hint for a nudge or Answer to reveal the engine’s top move.
Find the best move.
Find the best move.
Find the best move.
Find the best move.
Find the best move.