
 By
By 
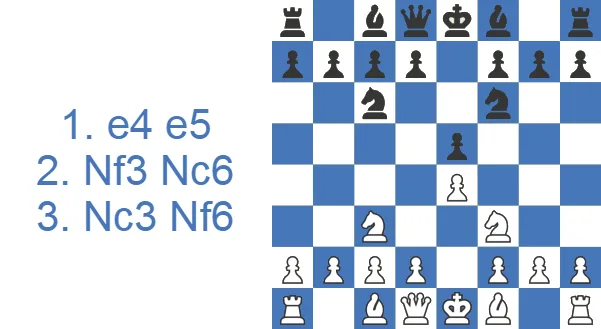
The opening appeared almost as early as the game itself and was taken up by many strong players after the 1800s. Its positional, principled character appealed to players like Capablanca, who handled it with real confidence. For a long time the Four Knights was written off as symmetrical and unambitious for White. These days it shows up at every level because the lines are sound, and it can also turn surprisingly sharp.
Four Knights Game in 30 Seconds
- The move order is 1.e4 e5 2.Nf3 Nc6 3.Nc3 Nf6. Both sides simply develop their knights before committing to anything else.
- From here White picks one of three main roads: 4.d4 (the Scotch Four Knights, open and direct), 4.Bb5 (the Spanish Four Knights, slow and positional), or 4.Bc4 (the Italian, harmless once Black knows the ...Nxe4 trick).
- If you remember nothing else, remember this: develop, castle short, and play the d4 or d5 break at the right moment.
Study the Four Knights Game as White or Black
Symmetry defines the Four Knights Game, and whoever breaks it on better terms, White with a central strike or Black with a timed counter, takes over the play.
Learn the Four Knights Game as White
White's edge in the Four Knights Game comes from knowing two pawn structures better than the opponent does. Watch the walkthrough for the move-order basics, learn which structure to steer toward and why, and keep the Glek setup with g3 ready for days when you want a fight without heavy theory.
Face the Four Knights Game as Black
Copying White forever is not a plan. Check where each side actually scores in the Four Knights Game, then follow Black's counter plan for how to face the Four Knights Game: level the position out of the opening, refuse the mirror, and steer toward play White did not prepare.
How White and Black Actually Score
At master level the results are close to even, with a high draw rate. Here is the master-game split.
| Results | Rate |
|---|---|
| Victory for White | 27% |
| Draw | 48% |
| Victory for Black | 25% |
And here is how the same opening performs across a much larger amateur pool.
| Rating level (Lichess) | White wins | Draw | Black wins |
|---|---|---|---|
| 800, beginner | 49.5% | 5.4% | 45.1% |
| 1000, novice | 49.3% | 4.8% | 45.9% |
| 1200, improver | 49.1% | 4.5% | 46.3% |
| 1600, club | 49.1% | 4.7% | 46.2% |
| 1800, club | 49.1% | 5.3% | 45.7% |
| 2000, advanced club | 48.7% | 6.1% | 45.2% |
Source: Lichess opening explorer, blitz, rapid and classical games at the position after 1.e4 e5 2.Nf3 Nc6 3.Nc3 Nf6. Figures are win rates by Lichess rating band; draws are rare at these levels.
How to Play the Four Knights Game (Video Walkthrough)
This short video walks through the main ideas in real time if you'd rather see them on a board than read them.
Got the overview from the video? The rest of the article takes you through the tactical and strategic detail.
What Both Sides Are Actually Trying to Do
Because the starting position is symmetrical, the Four Knights doesn't hand you a single forcing plan the way sharper openings do. Players often choose it precisely to keep the most dangerous lines off the board. White wants to make the first-move advantage count and stake a claim in the center. The main goal is to keep your opponent from activating their pieces, and trading pieces usually suits Black more than White. Black, for their part, equalizes quickly: a solid setup and a quick route to the endgame is the natural plan. As long as the king is safe, Black is hard to crack.
Strategic Plans and Pawn Structures: the Two Structures That Decide Every Game
Most of the long-term play in the Four Knights is decided by two recurring pawn structures, and understanding them is far more useful than memorizing moves. The first arises in the Scotch lines after 6.Nxc6 bxc6: Black gets doubled c-pawns and a half-open b-file, while White keeps the bishop pair in an open position. White's plan is straightforward: finish development, pin the f6-knight with Bg5, pile up on the f6 and d5 squares, and try to trade into a favorable ending. Black uses the half-open b-file against the b2-pawn and pushes the c- and d-pawns to claim space.
The second structure appears in the Spanish lines after 7...Bxc3 8.bxc3. Now it is White who carries the doubled c-pawns, but in a closed center the bishop pair more than compensates. White's typical plan is Qf3, connect the rooks, and prepare the d4 break to open the position for the two bishops. Black keeps things closed, reroutes the c6-knight to e6 via d8 (the classic Metger idea), and looks for the ...f5 counter-break on the kingside. The rule of thumb is the one Capablanca followed: whoever opens the position at the right moment hands the bishop pair its targets.
Four Knights Game Theory: the Three Main Roads (Scotch, Spanish, Italian)
1. The Scotch Variation usually leads to open positions. White aims to unbalance the pawn structure and restrict the squares available to Black's pieces.
2. The Spanish Variation is the more positional approach, pressuring the c6-knight. These games carry a lot of strategic nuance.
3. The Italian Variation is the principled, classical try. The games can be symmetrical and positional, but it has dropped out of top-level play because Black equalizes almost immediately.
Move Orders and Transpositions
One practical strength of the Four Knights is how often it lets White sidestep Black's preparation. The most useful transposition is against the Petroff (Petrov) Defense: after 1.e4 e5 2.Nf3 Nf6 3.Nc3, Black's healthiest reply is 3...Nc6, which walks straight back into the Four Knights. If Black instead tries 3...Bb4, White can claim a small edge with 4.Nxe5 O-O 5.Nd3 Bxc3 6.dxc3 Nxe4 7.Be2, keeping the bishop pair.
The opening also overlaps with the Scotch Game: the position after 4.d4 exd4 5.Nxd4 is identical to the Scotch line 1.e4 e5 2.Nf3 Nc6 3.d4 exd4 4.Nxd4 Nf6 5.Nc3. And if either side skips the fourth knight move (say 3...g6) the game becomes the Three Knights, which White meets energetically with 4.d4. Knowing these doorways means you reach familiar Four Knights positions from several different move orders.
Three Knights Game and the Anti-Petroff Transposition
The Four Knights' best practical feature is the way it lets White sidestep an opponent's preparation through move order. The most useful doorway is the anti-Petroff. After 1.e4 e5 2.Nf3 Nf6 3.Nc3, a Petroff player's healthiest reply is 3...Nc6, which transposes straight back into the Four Knights and quietly denies Black the symmetrical Petroff structures they were after. If Black instead tries 3...Bb4, White gets a pull with 4.Nxe5 O-O 5.Nd3 Bxc3 6.dxc3 Nxe4 7.Be2, keeping the bishop pair. When Black declines the fourth knight move entirely, for example with 3...g6, the game becomes the Three Knights Game, which White meets with 4.d4. Know these siblings and you reach familiar Four Knights positions from several different opening orders, instead of treating each one as its own system to memorize.
Scotch Variation: 4.d4
White starts by claiming the center with 4.d4. From that moment Black has to take on d4 (4...exd4) rather than let White keep the big center. A common high-level alternative is to pin the c3-knight with 4...Bb4.
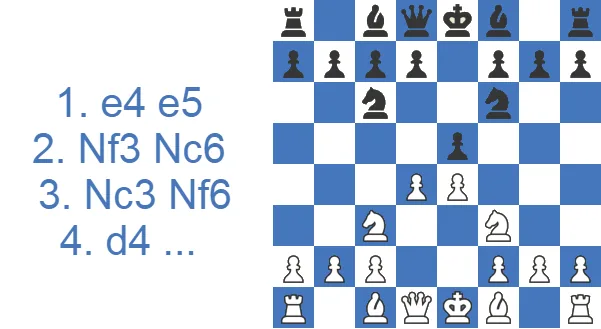
Take the pinning try 4...Bb4 first. White can answer 5.Nxe5, grabbing the e5-pawn. Now the natural-looking 5...Nxe4 is a mistake because of 6.Qg4, hitting e4 and g7 at once. If Black tries to relieve the pin on the e1-h5 diagonal with 6...Nxc3, then 7.Qxg7 is a double attack on h7 and f7 with deadly threats. Black has no good discovered attack with the c3-knight and b4-bishop. They can throw in 7...Ne4+, but 8.c3 leaves the b4-bishop, the f7-pawn, and the h8-rook all hanging.
After 4...Bb4 5.Nxe5, Black can also try to remove the e5-knight with 5...Nxe5 6.dxe5 and then 6...Nxe4. That runs into the same idea, 7.Qg4: after 7...Nxc3 the b4-bishop drops (8.Qxb4) and Black's c3-knight is stranded.
Beyond those, 5...Qe7 ramps up the pressure on the e-file. White meets it with 6.Qd3, where the queen stands ready to recapture and keep the structure intact. White is usually a touch better thanks to the open bishops.
To avoid all this, Black usually just takes on d4 with 4...exd4. Then 5.Nxd4 is the only sensible recapture, and 5...Bb4 is the standard follow-up, aiming to wreck White's structure. Here White should not waste time defending c3. Instead, take on c6 with 6.Nxc6. Otherwise Black castles short, drops a rook to e8, and White is left behind in development with a king stuck on e1.
After 6.Nxc6, the recapture 6...bxc6 is forced, because 6...dxc6 gives White a clear edge after the queen trade 7.Qxd8+ Kxd8 and a quick queenside castle (8.Bd2 defends c3 and prepares O-O-O).
Once 6...bxc6 is played, the tension is nearly gone. White needs to guard e4, since the knight is pinned, and 7.Bd3 is the usual choice for the job. If Black ever takes on c3 (Bxc3 bxc3), they hand White the bishop pair in an open position, so they normally castle short instead (7...O-O). White answers in kind with 8.O-O.
Black's main plan here is 9...d5, hoping White fixes the structure by capturing. White can take (10.exd5 cxd5) and pin the f6-knight with 11.Bg5.
From here White typically lifts the queen to f3, connects the rooks, and leans on the f6-knight, hoping Black takes on c3 and surrenders the bishop pair. Black, in turn, brings the rooks to b8 and e8, pressures the b2-pawn, and looks to push the c- and d-pawns.
Spanish Variation: 4.Bb5
This one opens with White attacking the c6-knight (4.Bb5) to damage Black's pawn structure. The line is flexible, so Black has several reasonable replies.
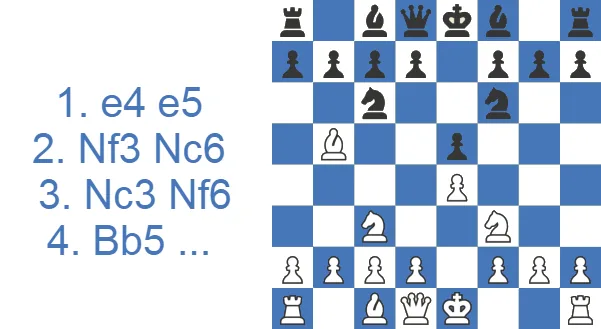
The most popular tries are 4...Bc5 (developing the bishop to a good diagonal and preparing to castle), 4...Nd4 (sidestepping the capture on c6), and 4...Bb4 (the symmetrical approach).
4...Bb4 is the most common of the three. White usually keeps the tension and castles (5.O-O), Black mirrors it (5...O-O), White props up e4 with 6.d3, and Black does the same with 6...d6. Then 7.Bg5 nudges Black to break the symmetry. If Black insists with 7...Bg4, then 8.Bxf6 Qxf6 9.Nd5 gives White an edge, forking the f6-queen and the b4-bishop; Bxc6 and Nxb4 are hard to prevent.
So after 7.Bg5 Black has to make a decision. They can take on c3 with the bishop (7...Bxc3 8.bxc3) and wreck White's queenside pawns. But that hands White the bishop pair, and Re1 and d4 become serious plans.
Black can also reroute the c6-knight with 7...Ne7. That leaves Black with a damaged kingside after 8.Bxf6 gxf6, though it's not as bad as it looks: the center is closed, Black's pieces regroup quickly, and the ...f5 break gives Black a kingside attack of their own.
The line 4...Nd4 is the Rubinstein Defense, considered one of Black's most reliable tries because it forces a wave of trades. After 5.Nxd4 exd4 6.e5 dxc3 7.exf6 Qxf6 8.dxc3, the position is close to a dead draw, which is exactly why ambitious players avoid it as White and prefer 5.Ba4 or 5.Bc4 to keep tension on the board.
When Black replies 4...Bb4 and the play stays mirrored, the result is the Symmetrical Variation, and the key follow-up 8...Qe7 is the Metger Defense. The idea is elegant: Black reroutes the c6-knight to e6 through d8, deals with the Bg5 pin, and frees the c-pawn for the center. Johannes Metger introduced it back in 1883, and it was later trusted by Capablanca, Karpov, Anand, and Nakamura.
4...Bc5 is the third option, and it's still seen at the very top. Black usually plays ...d6 to hold e5, ...Bd7 to guard the c6-knight, and castles short. White castles kingside and works toward the d4 break. These positions tend toward a draw and reward strong positional judgment.
The Symmetrical Variation: Why Carlsen-Nakamura 2025 Ended in a Draw
The fully mirrored line 4.Bb5 Bb4 5.O-O O-O 6.d3 d6 is the Symmetrical Variation, and it is the engine room of the Four Knights' reputation for equality. When both sides copy each other move for move, neither can build an imbalance, and the position drifts toward a +0.00 engine evaluation. That is exactly what happened in Carlsen-Nakamura 2025, shown in the games section below. White tried 6.Bxc6 dxc6 7.Nxe5 to win a pawn, Black regained it with 7...Re8 and 9...Nxe4, and the two best players in the world were reduced to a 21-move repetition. So if you want to play for a win with White, you have to break the symmetry yourself. The usual way is an early Bg5 and a well-timed d4 to give the bishop pair something to attack. Copy Black and hope for an edge, and you hand the game to the draw.
Italian Variation: 4.Bc4
4.Bc4 has a poor reputation because a simple tactic equalizes for Black. After 4...Nxe4 5.Nxe4 d5, the pawn forks the c4-bishop and the e4-knight.
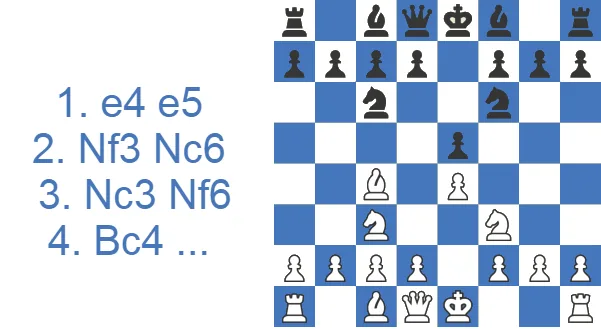
From there, 6.Bd3 (recapturing on e4 after ...dxe4) is the only move that doesn't lose; otherwise ...dxe4 kicks the f3-knight back to g1.
If White tries 6.Bb5 instead, Black plays 6...dxe4. Then 7.Nxe5 (eyeing f6) loses to 7...Qg5: after 8.Nxc6 Qxb5 the knight can only crawl to d4, and 9.Nd4 Qg5 piles everything back onto White's kingside (the b2-pawn is loose). Even 10.O-O fails to 10...Bh3, since g2 can't be held without g3 and a rook falls.
So White is reduced to playing without the first-move advantage after 6.Bd3 dxe4 7.Bxe4. Black develops easily with the bishops on d6 and e6. One sample line runs 7...Bd6 (developing and preparing to castle short), 8.O-O O-O, 9.Re1 (improving the rook), 9...Re8 in reply, and 10.d3 to support the e4-bishop. Then 10...h6 stops Bg5 ideas while Black's queen isn't ready to move. From here Black can follow with ...f5, finish development with ...Be6, and start a kingside push of their own, while White fianchettoes the c1-bishop to b2 with b3.
These positions are open and tactical, but they're also solid, and it's genuinely hard for White to find a plan.
Other Variations: Glek, Halloween, and the Naroditsky Variation
Beyond the three main roads, White has a few offbeat weapons. The Glek Variation begins with 4.g3, fianchettoing the light-squared bishop and steering toward King's-Indian-style positions with a later f4 break. It was the trademark of Igor Glek, once a top-20 player, and it's a clean way to dodge theory while keeping a clear plan.
The boldest try is the Halloween Gambit, 4.Nxe5, where White sacrifices a knight to chase Black's pieces backward with d4 and e5. Objectively White is simply worse, but at club level the shock value wins plenty of games. Just know that a calm defender keeps the extra piece.
A more modern line is the Naroditsky Variation, 4.Nd5. White offers the e4-pawn at once, intending c3 and d4 to take over the center while the knight sits actively on d5. Black's main replies are 4...Nxe4 (grabbing the pawn) and the solid 4...Be7. The line owes its name and much of its popularity to Daniel Naroditsky, whose teaching speedruns featured the Four Knights (especially the Scotch) as a model of sound, principled development. It's a friendly, instructive way to play the opening for a win.
The Glek Variation (4.g3): Sidestep Theory With a Plan
The Glek Variation, 4.g3, is the most respected of White's offbeat fourth moves. Instead of fighting for the center head-on, White fianchettoes the light-squared bishop to g2, castles short, and prepares the d2-d3 and f2-f4 advance that gives the system its King's-Indian-in-reverse flavor. It was the trademark of Igor Glek, once a top-20 player, who showed it could be played for a win without memorizing a single forcing line. The pull is practical. You reach a clear, plan-based middlegame and skip the heavy theory of the Spanish and Scotch. Black usually replies with the natural 4...d5 or keeps things solid with 4...Bc5, and in both cases White's setup is easy to play and hard to refute. If you'd rather learn one repeatable plan than a tree of variations, the Glek does the job.
How to Play Against the Four Knights Game as Black: Equalize and Break the Symmetry
If you're facing the Four Knights as Black, the aim is to equalize comfortably and, where you can, take the symmetry away from White. Against the Spanish 4.Bb5, the most ambitious answer is the Rubinstein Defense 4...Nd4, which forces trades and removes White's first-move pull. If you prefer a calmer route, the Symmetrical 4...Bb4 with the Metger plan (...d6, ...Bxc3, ...Qe7, and ...Nd8-e6) is rock-solid.
Against the Scotch 4.d4, just take the center pawn with 4...exd4 5.Nxd4 Bb4, pinning the c3-knight and pressing on White's structure. The recipe is the same one in the FAQ below: challenge the center with ...d5 at the right moment, avoid pointless symmetry, and keep your king safe. Do that and White's tiny opening edge usually evaporates.
Which Four Knights Variation Should You Play? Choosing by Level and Style
| Your level / style | Best choice | Why |
|---|---|---|
| Beginner, wants simple plans | Scotch (4.d4) | Open, natural, low theory |
| Positional, likes the bishop pair | Spanish (4.Bb5) | Slow squeeze, two bishops |
| Wants to dodge prep | Glek (4.g3) | Fresh, plan-based |
| Loves chaos at club level | Halloween (4.Nxe5) | Shock value, tricky |
| Modern, principled study | Naroditsky (4.Nd5) | Active knight, central break |
Common Traps: the Two Bishop-on-c5 Traps Every Player Should Know
Starting in the Scotch Variation, after 4...exd4 5.Nxd4 Black develops the bishop to c5 (5...Bc5). The attacked d4-knight is protected by 6.Be3, which also sets a sharp trap. If Black misses the threat and plays a casual move like 6...O-O, White springs the trap with 7.Nxc6, exploiting the loose bishop on c5. Because the knight attacks the d8-queen, it must be taken (7...bxc6 or dxc6), and then the hanging bishop on c5 falls to 8.Bxc5.
This one starts the same way. Instead of blundering on move six, Black takes on d4 (6...Nxd4), met by Bxd4. Here 7...Qe7 prepares ...Qc5 if the bishop is captured. White calmly develops with 8.Be2, ready to castle short, and this quiet move sets a strong trap of its own. If Black castles next (8...O-O), then 9.e5 is a crushing blow. The knight has to retreat (9...Ne8), and 10.Nd5 breaks the link between Black's queen and bishop, winning the bishop next move.
Two famous gambits give the Four Knights its sharp reputation. The Halloween Gambit, 4.Nxe5, sacrifices a knight outright, intending d4 and e5 to chase Black's pieces backward and grab the center. Objectively White is simply worse, but at club level the shock value wins plenty of games, as long as you remember that a calm defender who tucks the pieces back keeps the extra material. The Belgrade Gambit branches from the Scotch move order after 4.d4 exd4 5.Nd5, offering the e-pawn to plant a knight on d5 and open lines fast. Both are high-risk, high-reward tries, better used to surprise an under-prepared opponent than as the backbone of a serious repertoire. From what I have seen firsthand, the Halloween still scores well below 1800, then dries up once people learn to retreat and consolidate. If you face either as Black, decline the greedy continuation, give material back when it defuses the attack, and convert the structural edge you're left with.
Strengths and Weaknesses You Should Weigh
Pros
- Most variations lead to a solid scene where both sides can prove themselves.
- Most moves are parallel to the basic chess openings.
- A gained advantage can quickly be snowballed.
- Most lines give a favorable ending for White once they get the Bishop pair.
Cons
- Most lines do not possess a straightforward plan, leading beginners to get stuck after the Four Knights Game.
- Black can quickly equalize if White is not precise.
- Gaining a slight edge might be difficult.
- Black can ruin the opponent’s Queenside pawn structure in some variations.
Four Knights Spot-Check: Four Positions to Solve
№1
The position appears after 1.e4 e5 2.Nf3 Nc6 3.Nc3 Nf6 4.d4 exd4 5.Nxd4 Bb4 6.Nxc6 bxc6 7.Bd3 Bxc3+ 8.bxc3 O-O 9.O-O d5 10.exd5 cxd5:
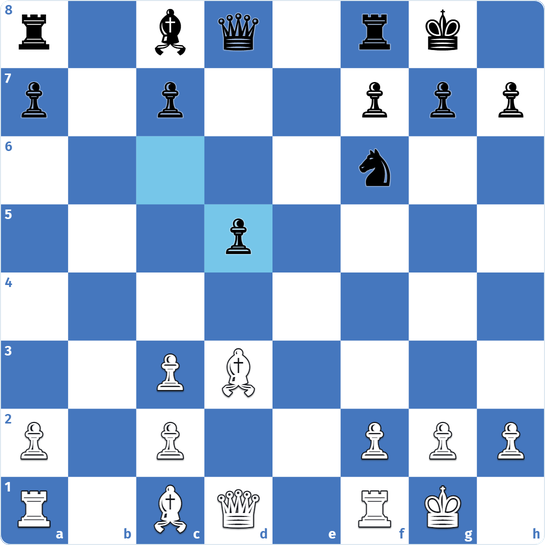
Note: White to play.
Hint: Pin Black's f6-knight.
№2
The position appears after 1.e4 e5 2.Nf3 Nc6 3.Nc3 Nf6 4.d4 Bb4 5.Nxe5:
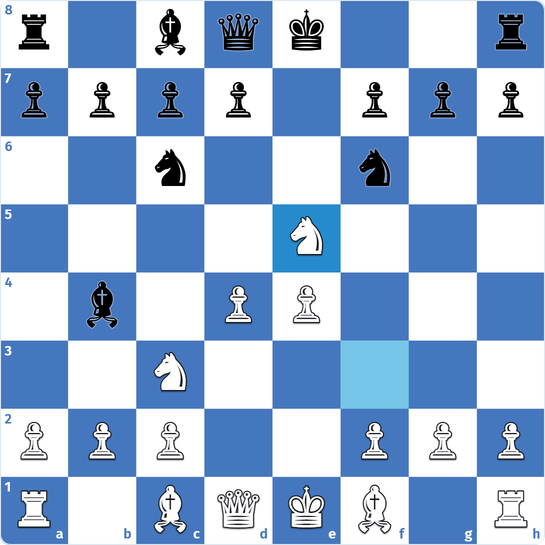
Note: Black to play.
Hint: Your queen is the key to creating tension in the center.
№3
The position appears after 1.e4 e5 2.Nf3 Nc6 3.Nc3 Nf6 4.Bb5:
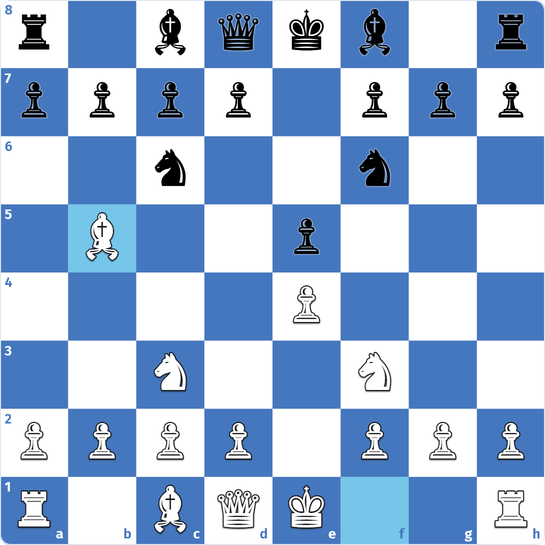
Note: Black to play.
Hint: Exchange the knights.
№4
The position appears after 1.e4 e5 2.Nf3 Nc6 3.Nc3 Nf6 4.Bc4 Nxe4 5.Nxe4 d5:
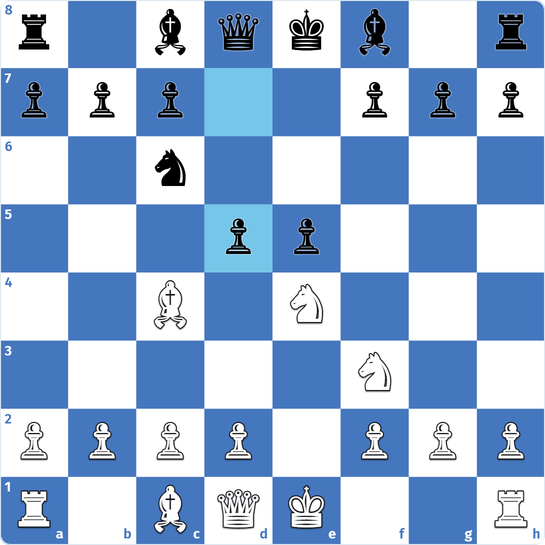
Note: White to play.
Hint: Let Black win the minor piece back, but on your terms.
Case Study: The Italian Refutation, Move by Move
The cleanest way to understand why 4.Bc4 has fallen out of favor is to follow the punishing line all the way through. This isn't a game I played; it's a model line that shows exactly how Black turns the ...Nxe4 trick into a winning attack when White answers 5...d5 with the careless 6.Bb5.
A few teaching points stand out.
- 4...Nxe4 5.Nxe4 d5 is the whole point of the variation. The pawn hits the c4-bishop and the e4-knight at the same time, so White is already scrambling to stay equal. The lesson for a club player: a single well-timed central pawn fork can undo a careless piece placement.
- 6.Bb5 is the mistake the line is built to punish (6.Bd3 is the only move that holds). After 6...dxe4 Black simply wins back the piece and keeps the extra structure.
- 7.Nxe5 is White's last attempt at activity, going after f6 and c6, but it walks into 7...Qg5. This is the turning point. The queen hits both g2 and the loose e5-knight, and suddenly it's Black who is attacking.
- 8.Nxc6 Qxb5 9.Nd4 forces the knight into a sad retreat, and 9...Qg5 returns to the attack with the b2-pawn and the white king both feeling the heat.
- 10.O-O looks like safety but loses to 10...Bh3. White can't defend g2 without g3, and after 11.g3 Bxf1 12.Qxf1 Black has the bishop pair, a safe king after 12...O-O-O, and a clean structural plus.
The practical takeaway: against 4.Bc4 you don't need to memorize a long forcing sequence. Just remember the ...Nxe4 and ...d5 fork, then punish any inaccurate bishop retreat with ...Qg5 and quick development. White's whole problem is that the Italian gives up the initiative the moment Black knows the trick.
Final Thoughts Before You Play It
The Four Knights is a balanced opening where both sides try to outplay each other from a sound starting point. Most games turn into a strategic battle without a single forcing plan, which is part of why beginners gravitate to it: the move order follows the basic principles almost by itself. Some lines are demanding at the lower levels precisely because they're so positional. And the Italian remains the weak sister of the three main roads, thanks to that quick ...Nxe4 refutation. Learn the two pawn structures, pick the road that matches your style, and you'll have a reliable opening for the rest of your chess life.
Test Yourself: Four Knights Game Positions
Make the move on the board. Hint gives you a nudge, Answer shows the move and why it works.
Both sides have mirrored each other. Which pawn move breaks the symmetry with a central strike and starts the Scotch Variation?
Black's Bb4 pins the c3-knight. Don't waste time defending it. Which capture trades the c6-knight and keeps the initiative?
Scotch Variation. White's Qg4 attacks your e4-knight and the g7-pawn. Which pawn move defends the knight and opens the c8-bishop against the queen?
Both sides have castled. Black's c8-bishop wants g4 to harass your queen. Which rook-pawn move takes that square away?
Black has an isolated d5-pawn and White has doubled c-pawns. Which queen move adds pressure to both d5 and f6?
Spanish Variation, 4.Bb5. Which knight move is the Rubinstein Defense, a reliable try that forces a wave of trades?
Symmetrical Variation: both sides have castled and played d3 and ...d6. Which bishop move pins the f6-knight to the queen?
Italian Variation. White played 4.Bc4 without preparing d3. Which knight capture grabs the center pawn?
Italian Variation. White played 6.d4, forking your bishop and knight. Which capture of White's c4-bishop keeps the material level?
Italian Variation trap. White grabbed e5 with 7.Nxe5. Which queen move attacks the knight and the g2-pawn at once?