
 By

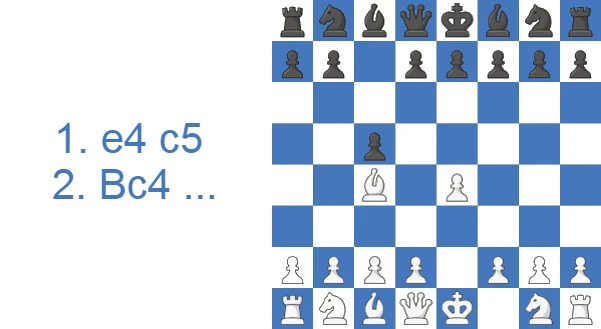
The line was seen among leading players back in the early 1800s, but it has long since fallen out of fashion precisely because Black has such an easy time reaching a good game.
The Bowdler Attack at a Glance
- What it is: a sideline of the Sicilian Defense after 1.e4 c5 2.Bc4 (ECO code B20), where White aims the bishop at f7.
- Is it good? Playable at club level and useful as a surprise, but harmless against an informed opponent. Black equalizes from move two.
- Best counter for Black: play 2...e6, prepare ...d5, and expand on the queenside with ...a6-b5 to harass the c4-bishop.
- White's idea: develop quickly, castle, and look for a d4-break or pressure on f7 if Black plays passively.
- Verdict: a practical try below master level, but not a real test of the Sicilian.
Study the Bowdler Attack as White or Black
One move defines the Bowdler Attack: 2.Bc4 against the Sicilian, a shortcut White loves at club level and Black should be glad to see.
Play the Bowdler Attack as White
White's plan is not subtle: bishop to c4, pressure on f7, castle quickly. Get a fast read on the Bowdler Attack, see why 2.Bc4 keeps its club-level following, and learn how White should handle each of Black's three main defenses.
Beat the Bowdler Attack as Black
A reliable Bowdler Attack counter starts with the scoreboard, and the numbers on 2.Bc4 already lean Black's way. Work through the move-by-move plan for how to face the Bowdler Attack, then see why White's thematic f4 lunge simply drops a pawn.
How White and Black Score with 2.Bc4
Here is how the line has performed in practice. The first table covers master games, where Black's score is healthy; the second draws on a much larger pool of club games.
Master Games Statistics
| Results | Rate |
|---|---|
| Victory for White | 30% |
| Draw | 26% |
| Victory for Black | 44% |
Statistics from 47 Million Amateur Games
| Rating level (Lichess) | White wins | Draw | Black wins |
|---|---|---|---|
| 800, beginner | 47.7% | 3.4% | 48.9% |
| 1000, novice | 46.8% | 3.2% | 50.0% |
| 1200, improver | 46.2% | 3.3% | 50.5% |
| 1600, club | 45.0% | 3.8% | 51.1% |
| 1800, club | 44.9% | 4.3% | 50.7% |
| 2000, advanced club | 44.7% | 4.8% | 50.5% |
Source: Lichess opening explorer, blitz, rapid and classical games at the position after 1.e4 c5 2.Bc4. Figures are win rates by Lichess rating band; draws are rare at these levels.
The pattern is consistent at both levels: Black comes out ahead, and the gap only widens once you reach players who know the equalizing plan.
Watch: The Bowdler in Two Minutes
If you would rather see the main ideas in motion first, the short video walks through the opening before you read on.
Prefer to read? The rest of this guide covers every tactical and strategic detail of the Bowdler.
Reason Why the Bowdler Attack Is Played by White: Why Club Players Still Reach for 2.Bc4
The Sicilian Bowdler is dubious at a high level because the light-squared bishop ends up misplaced. Even so, club players like to drop the bishop on c4, where it bears down on the a2-f7 diagonal and eyes f7. Black can blunt that pressure, but the plain appeal is obvious: develop a piece fast, castle, and start looking for an attack on the enemy king, ideally around f7.
Who Was Bowdler? The Name Behind the Opening
The opening is named after Thomas Bowdler, an English chess enthusiast from the late 18th and early 19th century. He was not a leading master of his day, but the move 2.Bc4 against the Sicilian carried his name into modern opening books, where it sits under ECO code B20 alongside the other offbeat second moves for White.
The historical footnote matters in a practical way. The Bowdler Attack belongs to the romantic era of fast development and direct attacks on f7. That spirit still explains why amateurs reach for it, since it feels natural and aggressive, even though modern theory shows that 2.Bc4 hands Black an easy path to equality.
Where the Bowdler Fits Among the Anti-Sicilians
The Bowdler Attack belongs to the Anti-Sicilian family: any system where White declines the main-line 2.Nf3 and 3.d4 of the Open Sicilian in favor of a quieter or more independent setup. It is catalogued under ECO code B20, the bucket for White's offbeat second moves against 1...c5, where 2.Bc4 sits beside better-regarded siblings like the Alapin (2.c3) and the Grand Prix Attack (2.Nc3 and f4). What separates the Bowdler from those is purpose. The Alapin fights for a full center, the Grand Prix keeps the bishop on a useful diagonal, while 2.Bc4 commits the light-squared bishop early to a square Black is happy to attack. Knowing the parent category pays off, since the standard antidotes against Anti-Sicilians (fast development and a timely central break) are exactly what neutralizes the Bowdler.
Bowdler Attack Theory: The Three Main Replies (2...e6, 2...Nc6, 2...d6)
The 2...e6 reply shuts down White's ideas on the a2-f7 diagonal and usually leads to closed positions where White, short of space, hunts for the right pawn break to loosen Black's center.
The 2...Nc6 reply often transposes into the same lines you get after 2...e6.
The 2...d6 reply gives White a few more options, such as opening the position at once with d4 and steering the game toward sharper, tactical play.
2...e6 response
The most popular answer to 2.Bc4 begins with 2...e6. The aim is simple: play ...d5, grab a strong center, and gain a tempo by hitting the c4-bishop. This break equalizes for Black right away, because White has no clean way to stop it.
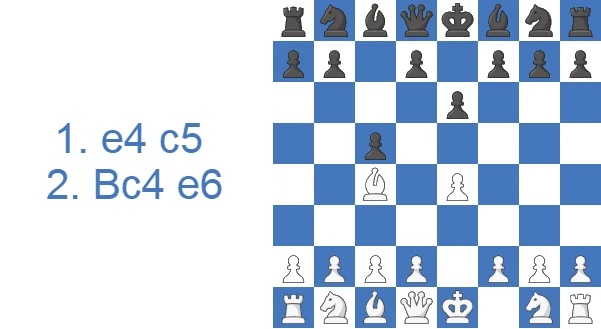
After 2...e6, White usually tries to prevent the immediate ...d5. Two candidate moves stand out: 3.Qe2 and 3.Nc3. Qe2 discourages the break because Black's queen would sit on the same file as the e8-king after a capture. 3.Nc3 takes control of d5 and holds up the advance.
Both moves come with drawbacks. Bringing the queen out so early is generally a poor idea, since pieces still need to be developed and the king tucked away. Nc3 also does little for White's pawn structure, since Black will keep pressing along the c-file and the backward c2-pawn becomes a standing target.
The next two sections look at each candidate move in more detail.
3.Nc3 line
This line starts with the knight jump 3.Nc3. Most club players use it to stop the immediate ...d5. White's follow-up depends on Black's reply, but the plan is usually Nf3 and a d4-break to open the position. That break matters, because Black typically expands on the queenside with ...a6-b5 to harass the misplaced c4-bishop. The d4-break frees the bishop and opens dark-square attacking chances near Black's king. Black, in turn, usually heads off the idea by completing the standard setup.
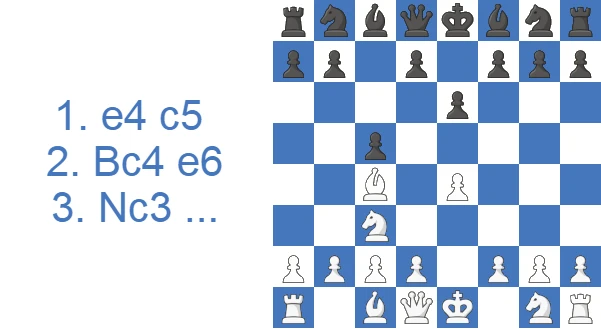
One sample line runs 3...a6 (planning ...b5 to hit the c4-bishop and expand on the queenside), 4.a4 (stopping that expansion), 4...Nc6 (keeping control of d5 and holding up d4 for now), 5.Nf3 (developing and preparing to castle), 5...Nf6 (developing and eyeing the ...d5 break), 6.d3 (6.d4 would be worse, since Black gets ...d5-c4 with tempo and shuts the light-squared bishop behind the pawn chain), 6...d5 (hitting the bishop and building a strong center), 7.Bb3 (taking the pawn would be a mistake, leaving Black an unchallenged center), 7...Be7 (preparing to castle), after which both sides castle short.
In the resulting position, Black aims to harass White's pieces and exploit the misplaced light-squared bishop, while White hopes Black overextends so he can hit the advanced pawns with timely breaks.
3.Qe2 line
This line begins with the queen move 3.Qe2.
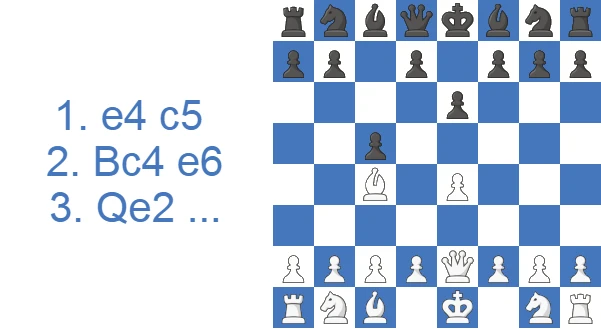
It stops the ...d5-push because 3...d5 runs into 4.exd5, and Black cannot recapture with the e6-pawn thanks to the pin on the e-file.
Black usually replies 3...Nc6, grabbing control of d4. White has several tries here, but 4.Nf3 is the most common, since it covers d4 and prepares kingside castling.
Black still wants to expand with ...a6-b5, and White looks to improve his pieces and slow that plan down.
One sample line continues 4...a6 5.d3 (since we already looked at the a4 setup, let's see what happens when Black gets in ...b5), 5...b5 (expanding on the queenside and attacking the c4-bishop), 6.Bb3 (saving the bishop), 6...Na5 (with the b3-bishop short of squares, Black wins the bishop pair by trading it off with the knight), 7.O-O Nxb3, and 8.axb3.
In the resulting position, Black has the bishop pair and White has doubled b-pawns, a small but lasting edge for Black. Black develops quickly and presses those advantages, while White looks for pawn breaks like c4 and central blows with d4 and e4.
How White Should Actually Play the Position
If you insist on 2.Bc4, the sound approach is restraint rather than the early f4 lunge. The most constructive plan pairs Qe2 with c3 and quick castling. Qe2 supports e4 and discourages an immediate ...d5, c3 prepares a later d4 while giving the bishop the b3 retreat, and short castling gets the king to safety before Black's queenside expansion arrives. Treat the c4-bishop as a piece that may need to step back to b3 the moment ...a6 and ...b5 appear, not as a battering ram against f7. Played this way, White reaches a slightly passive but solid Italian-flavored structure where the worst outcome is equality. The two errors that lose games are committing the center too early and chasing f7 while Black is already developing smoothly.
2...Nc6 response
This variation starts with Black calmly developing the knight to c6 (2...Nc6). Compared with 2...e6, it gives White a few more options, but most lines fold back into the ones we already saw, because Black usually heads for the ...e6/...d5 plan while White goes for Nc3 and a d4-break.
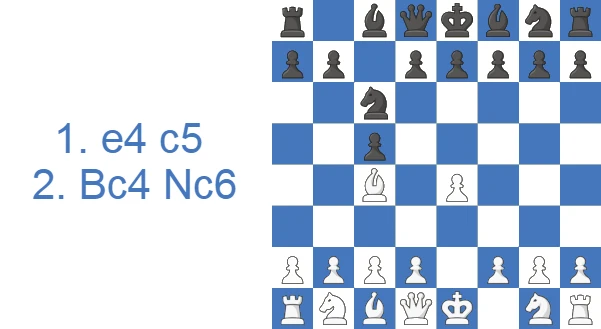
The next sections cover the two most popular tries against this move: 3.Nc3 and 3.d3.
3.Nc3 variation
This line starts with 3.Nc3, just as in the 2...e6 lines, aiming to hold up ...d5 for now.
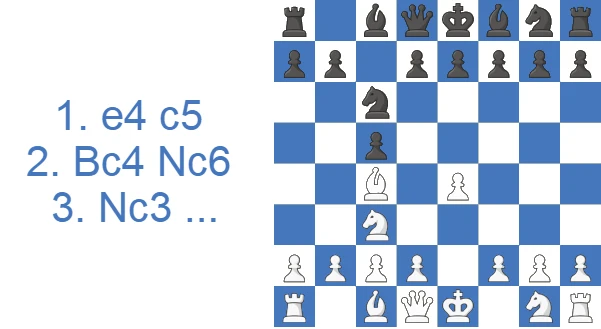
The most popular reply is 3...e6, which transposes straight into the lines we already analyzed.
The second main option is 3...g6, preparing to fianchetto the f8-bishop on g7 and work the long a1-h8 diagonal. White finishes developing and improves the position slowly with sensible maneuvers and pawn play. Black does not rush ...e6/...d5, but that break stays the key idea in this setup too.
One sample line runs 4.d3 Bg7 5.Nf3 d6 (opening the c8-bishop's diagonal), 6.O-O e6 (preparing ...d5), 7.Bb3 (a prophylactic move against ...d5), 7...Nge7 (completing kingside development), 8.Re1, and 8...O-O.
The resulting position is a slow, maneuvering battle. White looks to route his pieces to ideal squares, while Black tries to make the most of the a1-h8 diagonal.
3.d3 line
This line opens with 3.d3 and often transposes into the lines above, since the most common reply is 3...e6.
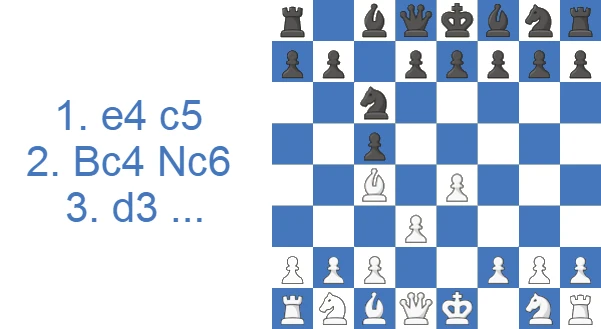
For this variation, let's look at a slightly unusual way for White to grab the initiative if Black plays 3...a6, intending 4...b5. White answers 4.Bd5, keeping the idea of landing the bishop on c6 and doubling Black's pawns. If Black plays 4...e6, White gets a clear edge with 5.Bxc6 bxc6, where Black is saddled with doubled pawns and White has the cleaner structure.
If Black tries 4...Nb4 instead, White retreats with 5.Bb3, and the game can take on a French structure after a sample line like 5...e6, 6.c3 (kicking the b4-knight and preparing d4), 6...Nc6 7.Nf3 Nf6 8.O-O d5 9.e5 (hitting the f6-knight), 9...Nd7, and 10.d4.
The resulting position resembles a French Defense, where Black looks to strike on the queenside and White attacks on the kingside.
2...d6 response
This variation begins with 2...d6, a move that rules out ...e5 ideas and props up the c5-pawn. Since we have already covered a lot of setups, let's look instead at the open game that can arise here.
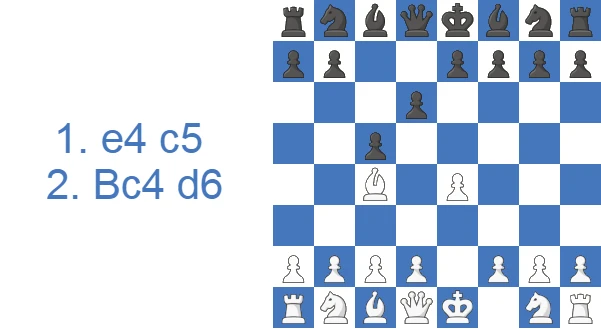
White can act at once with 3.d4 to open the position. Black takes with 3...cxd4, and White recaptures with the queen, 4.Qxd4. Positions like this are very typical of the Sicilian, both sides have plenty of plans, and the play often turns sharp.
One sample line continues 4...Nf6 5.Nf3 g6 (preparing the fianchetto and the bishop on the a1-h8 diagonal), 6.Nc3 Bg7, 7.Qd3 (tucking the queen away and sidestepping a discovered attack from the g7-bishop), 7...O-O, and 8.O-O.
In the resulting position, Black wants to finish developing and press the c-file with ...Rc8 and ...Qc7, while White tries to provoke ...e5 so he can target the backward d6-pawn.
Move Orders and Transpositions to Know
Although the article treats 2...e6, 2...Nc6 and 2...d6 as separate replies, in practice they bleed into one another. After 2...Nc6 3.Nc3, Black's most popular continuation is 3...e6, transposing straight into the main ...e6 lines; the independent try is 3...g6, fianchettoing the bishop to g7 to fight on the a1-h8 diagonal. The quieter Bowdler structures with d3 and a restrained center often transpose into Italian-like positions you would otherwise reach via 1.e4 e5, just with Black's pawn on c5 instead of e5. If White opens with an early d4 against 2...d6 (3.d4 cxd4 4.Qxd4), the game can slide into Open Sicilian territory. Spotting these transpositions saves memorization, because you learn the ...e6/...d5 plan once and it covers nearly every move order.
How to Counter the Bowdler Attack: A Step-by-Step Plan for Black
If you face the Bowdler Attack as Black, you do not need to memorize long lines. The refutation is a plan, not a forced sequence. Follow these four steps and Black is comfortable in almost every game.
- Blunt the bishop with 2...e6. This takes the sting out of the c4-bishop on the a2-f7 diagonal and prepares the central break.
- Strike the center with ...d5. Played at the right moment, ...d5 hits the bishop with tempo and gives Black two strong central pawns while White has none.
- Harass the bishop with ...a6 and ...b5. Queenside expansion chases the misplaced bishop and can win the bishop pair after ...Na5xb3.
- Develop naturally and castle. With ...Nc6, ...Nf6, ...Be7 and short castling, Black finishes development and keeps a lasting space edge.
The short version: take the center, question the bishop, and develop. Against this simple plan, White rarely gets the f7-attack the opening promises.
A Model Game: The ...e6/...d5 Refutation in Action
It helps to see the refutation flow as one continuous game rather than scattered tips. A representative sequence runs 1.e4 c5 2.Bc4 e6, blunting the bishop, then 3.Nc3 a6, beginning the queenside plan. After 4.a4 Nc6 5.Nf3 Nf6, Black develops naturally while keeping a grip on d5. White settles for 6.d3, since 6.d4 allows ...d5 with tempo, and now 6...d5 strikes the center and hits the c4-bishop. White retreats with 7.Bb3, Black completes development with 7...Be7, and both sides castle. The picture is already telling. Black owns a broad pawn center with pawns on c5, d5 and e6, while White's bishop is reduced to a spectator on b3. No piece has been won, yet Black sits on a comfortable, risk-free edge.
Bowdler Attack Traps and Tactics: Punishing the Misplaced Bishop
Because the Bowdler is built on a misplaced bishop, most of the tactical tricks favor Black. Below are the three patterns worth knowing: two that win material for Black, and one trap Black should avoid against an alert White player.
When White's bishop retreats to b3 after ...a6 and ...b5, Black can simply collect it. The knight comes to a5 and takes on b3, leaving White with doubled b-pawns and Black with the bishop pair, a small but lasting edge that defines many Bowdler middlegames.
If White overextends with an early 4.f4, a concrete tactic appears. After 4...Nf6 5.Nf3, Black plays 5...Nxe4, and once White recaptures with 6.Nxe4, the move 6...d5 forks the knight on e4 and the bishop on c4. White can only save one piece, and Black emerges a clean pawn ahead.
After 3.Qe2, the natural-looking 3...d5 runs into trouble: 4.exd5, and Black cannot recapture with 4...exd5 because the e6-pawn is pinned against the king on the e-file. Black has to spend a move with the queen instead, so against 3.Qe2 prepare ...d5 carefully, castle first and break the pin before pushing the pawn.
The f7 Mirage: How 4.f4 Hands Black a Clean Pawn
The sharpest refutation in the whole opening punishes the very idea that makes White play the Bowdler. Tempted by visions of an attack on f7, club players often follow 2...e6 with the impatient 4.f4, hoping to roll the kingside pawns forward. It backfires at once. After 4...Nf6 5.Nf3 Nxe4, White recaptures with 6.Nxe4, and then 6...d5 forks the knight on e4 and the bishop on c4 at the same time. White can rescue only one piece and emerges a clean pawn down, often with a ruined position on top. Over and over I have watched the same pattern: the instant White over-extends to chase f7 with the bishop still loose on c4, a central ...d5 break wins material.
The Honest Verdict: Strengths and Weaknesses of 2.Bc4
Pros
- White develops according to the main principles.
- If Black overextends with the central pawns, White can launch an assault to the base of the pawn chain and gain initiative.
- The better player with a grasp of position can prevail because the games are frequently strategic.
- The games can transition to different and favorable structures if Black is unfamiliar with the Bowdler Attack counter.
Cons
- The light-squared Bishop often finds itself in trouble because it is misplaced.
- Black can equalize quickly and expand on the Queenside or in the center.
- Black’s ideas and structures are easy to generate, while White needs to be precise to avoid falling behind.
- Black has better results at both the master and amateur levels.
What to Play Instead: Stronger Anti-Sicilians for White
If the Bowdler keeps running into the same equalizing plan, it is usually a sign to switch to a more testing anti-Sicilian. Each of the lines below keeps White's setup simple but asks Black far harder questions than 2.Bc4 does.
- Alapin Sicilian (2.c3): the most solid alternative, fighting for a full center with d4 and giving White a real opening edge to play for.
- Grand Prix Attack (2.Nc3 and f4): the aggressive choice, aiming for a direct kingside attack while keeping the bishop on a more useful diagonal.
- Closed Sicilian (2.Nc3, g3 and Bg2): a low-theory system where White fianchettoes and attacks on the kingside, ideal if you want a plan rather than memorization.
All three avoid the Bowdler's core problem, a bishop that Black chases with ...a6-b5, while keeping the practical, easy-to-learn feel that drew you to 2.Bc4 in the first place.
Case Study: The French-Type Bd5 Line (3.d3)
This is one of the better practical tries for White, drawn straight from the 2...Nc6 3.d3 lines above. Rather than fight the ...e6/...d5 plan head-on, White uses the bishop actively before retreating, then steers the game into a French-style structure where the misplaced piece is no longer the story. It is the most complete line in this guide, so it makes a good model game to study.
A move-by-move read of what each step teaches:
- 1.e4 c5 2.Bc4 Nc6 3.d3. White keeps it modest. The d3-pawn supports e4 and clears the way to castle, exactly the restrained approach that keeps White out of trouble.
- 3...a6. Black starts the standard queenside plan, intending ...b5 to chase the c4-bishop.
- 4.Bd5. The key independent idea. Instead of waiting to be kicked, the bishop jumps forward, threatening Bxc6 to double Black's pawns. This is the move that gives the line its bite.
- 4...Nb4. The accurate reply. Black hits the bishop and avoids 4...e6 5.Bxc6 bxc6, which would hand White a clean structure against Black's doubled pawns. The turning point of the whole line is right here: if Black answers passively, White is genuinely better, but the active knight jump keeps the balance.
- 5.Bb3 e6 6.c3. White tucks the bishop back to b3 and gains a tempo on the b4-knight while preparing d4.
- 6...Nc6 7.Nf3 Nf6 8.O-O d5. Both sides finish developing, and Black gets the thematic ...d5 break in anyway.
- 9.e5 Nd7 10.d4. White closes the center with e5 and d4, reaching a French-type structure. Now the c4-bishop is no longer a liability behind its own pawns, since the position is closed and White attacks on the kingside while Black plays on the queenside.
The practical takeaway for a club player: if you are White and committed to 2.Bc4, this Bd5 idea is the most testing way to play, because it sidesteps the bishop's usual fate by transforming the position into a French. If you are Black, remember that the correct answer to 4.Bd5 is the active 4...Nb4, not the natural-looking 4...e6, which is exactly the kind of small but decisive choice that decides equal-looking openings.
Should You Play the Bowdler Attack?
The Bowdler Attack is mostly the choice of players who have not yet studied the Sicilian closely. Black has several straightforward responses, all of which equalize in short order. None of this matters much at the club level, where 2.Bc4 is still a perfectly playable surprise weapon. Once your opponents know the ...e6 and ...d5 plan, though, it is worth graduating to a sterner anti-Sicilian like the Alapin or the Grand Prix.
Test Yourself: Bowdler Attack Positions
Make the move on the board. Hint gives you a nudge, Answer shows the move and why it works.
White's bishop on c4 eyes f7. Which pawn move blocks that diagonal and prepares ...d5?
White answered 2...d6 with 3.d4. Which capture trades off the center pawn and opens the c-file?
Black's ...a6 prepares ...b5 to hit your bishop. Which pawn move guards b5 and stops that plan?
Black's knight on c6 controls d4. Which knight move covers d4 for White and gets ready to castle kingside?
Black's 4...d5 hit the bishop, and White answered 5.e5. The bishop is still on c4. Which capture wins it?
White's 5.e5 attacked the f6-knight, and it jumped to g4. The knight now stands alone. Which capture wins it?
Black's knight on b4 is annoying. Which pawn move kicks it away and prepares the d4 push?
White's bishop sits on b3 after Black's ...b5. Which knight move goes to the edge of the board and attacks it?
White is castled. Black's ...e6 prepares ...d5, which would hit the c4-bishop. Retreat one step along the diagonal that points at f7.
Your d5-pawn forked the knight and the bishop. White moved the knight to g3. Which capture wins the bishop?