
 By

The Berlin Defense at a Glance
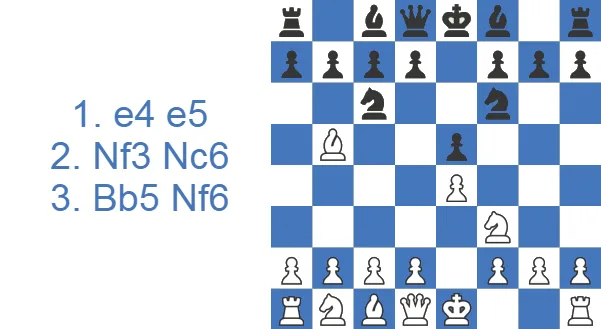
- The Berlin Defense (1.e4 e5 2.Nf3 Nc6 3.Bb5 Nf6), often called the Berlin Wall, is Black's rock-solid answer to the Ruy Lopez.
- After 4.0-0 Nxe4 5.d4 Nd6 6.Bxc6 dxc6 7.dxe5 Nf5 8.Qxd8+ Kxd8 the queens come off and the famous Berlin endgame appears. Black gives up the right to castle but gets the bishop pair and a fortress that is brutally hard to crack.
- Across 25,458 master games White scores just 23% and Black 16%, with 61% draws, which is exactly why it earned its drawing-weapon reputation.
- White players who want a real fight usually dodge the endgame with the Anti-Berlin 4.d3 (or the rarer 5.Re1, 5.Qe2 and the sharp 4.d4 Berlin Gambit).
- Black is comfortable in every one of them, which is why the Berlin shows up at world-championship level again and again.
Study the Berlin Defense as White or Black
The Berlin Defense meets the Ruy Lopez with 3...Nf6 and drags both colors into one long argument: White presses a structural edge in the queenless middlegame while Black bets the position simply holds.
Pressing the Berlin Defense with White
White's edge in the Berlin Defense lives in the famous endgame, so walk through the main line one move at a time and see where the pressure actually comes from. Then check what changes when Black ducks the endgame with the bishop development or the quiet ...d6 setup.
Holding the Black Side of the Berlin
Club players hunting a Berlin Defense counter usually settle for trading into the endgame, which is exactly where your preparation pays. Read the overview and the score data below, then learn how to face Berlin Defense pressure from the Black side and turn that endgame into a winning attempt.
How Black and White Score in the Berlin
The database numbers tell the story at a glance.
| Rating level (Lichess) | White wins | Draw | Black wins |
|---|---|---|---|
| 800, beginner | 51.1% | 4.5% | 44.4% |
| 1000, novice | 52.4% | 4.2% | 43.4% |
| 1200, improver | 52.4% | 4.2% | 43.4% |
| 1600, club | 52.5% | 4.3% | 43.2% |
| 1800, club | 51.8% | 5.0% | 43.2% |
| 2000, advanced club | 50.6% | 6.0% | 43.4% |
Source: Lichess opening explorer, blitz, rapid and classical games at the position after 1.e4 e5 2.Nf3 Nc6 3.Bb5 Nf6. Figures are win rates by Lichess rating band; draws are rare at these levels.
Out of 25,458 games, White wins only 23% and Black only 16%, while 61% end in a draw. That very high drawing rate is the statistic behind the Berlin's reputation as a drawing weapon.
Watch the Berlin in Action
If you prefer to watch first, the video below gives a quick overview of the Berlin.
The video covers the basics; from here, the article digs into the deeper lines and the sidelines White can use to keep the game lively.
Main Line of the Berlin: 3.Bb5 Nf6 and the Road to the Endgame
We reach the Berlin Defense from the Ruy Lopez after 1.e4 e5 2.Nf3 Nc6 3.Bb5. Black's most common reply here is 3...a6 (the Morphy Defense), which forces White to decide between retreating the bishop or giving up the bishop pair. Black can instead head straight into Berlin territory with 3...Nf6:
In the main line, White finishes development with 4.0-0 and lets Black grab the e4-pawn. After 4...Nxe4, White opens the position quickly with the logical 5.d4, putting the development lead to work; this is a standard idea when one side still has its king in the center and is well behind in development. So Black answers with a tempo move, 5...Nd6.
There is an important nuance here that explains the difference between 3...a6 (the Morphy Defense) and 3...Nf6 (the Berlin). By skipping 3...a6, Black leaves the white bishop on b5, where it can attack with tempo, and that detail matters in line after line.
As we are about to see, especially in the main line with the Berlin endgame, the whole opening is about exactly this kind of subtlety. The main Berlin battle is a clash of small details, which produces a highly positional, slow-burning game. That character demands precise move orders and piece placement, and it is why you see the line far more often at the top level than in club play.
With the spirit of the opening in mind, let's look at concrete lines after 5...Nd6. White can grab the e5-pawn with 6.dxe5, relying on the tactic 6...Nxb5 7.a4, which traps the knight. This is not really how White plays for an advantage, though; at the top level, 6.dxe5 is treated as a quiet draw offer. After 7...Nbd4 8.Nxd4 Nxd4 9.Qxd4 d5 10.exd6 Qxd6 we reach the famous quick-draw position that turns up now and again on streams of elite tournaments.
From here players usually just repeat the position three times with 11.Qe4+ Qe6 12.Qd4 Qd6 13.Qe4+ Qe6 14.Qd4 Qd6 ½-½ and call it a day.
The Berlin Draw Line (and Why It Happens So Often)
The quick-draw sequence above has a name of its own; players simply call it the Berlin Draw. It is the line elite teams keep in their back pocket for must-not-lose games with Black, and you will see it in rapid and blitz when a player is happy to split the point and move on. In this line the queens stay on the board, and the players repeat the position rather than trade into an endgame.
It is worth stressing the flip side, because it is widely misunderstood. The Berlin is not an automatic draw. The full Berlin Wall endgame still has bishops, rooks and knights on the board, and a stronger player wins it from either color more often than the 61% draw figure suggests. The boring-draw reputation comes from this one very specific forcing line, not from the opening as a whole.
The Berlin as a Winning Weapon for Black
The Berlin's reputation as an automatic draw is the very thing that makes it dangerous below master level. The 61% draw figure comes from elite play, where both sides handle the endgame flawlessly. Among club opponents, most Whites do not know the technique. They push the e5-pawn too far, hand Black the permanent f5 outpost, and let the bishop pair open up in a position that quietly favors the two bishops. From there Black presses without risk, because there are no weaknesses for White to counterattack, so every inaccuracy compounds.
The aggressive route runs through the Anti-Berlin, where 4...Bc5 keeps the pieces on and invites a real fight rather than a forced simplification. Treat the Berlin not as a peace treaty but as a slow squeeze: solid enough that you almost never lose, and full enough of play that a stronger player wins it from the Black side far more often than the draw statistics suggest.
So, to get a real game as White, instead of 6.dxe5 White usually captures on c6 with 6.Bxc6. This main line leads quickly to a queen trade after 6...dxc6 7.dxe5 Nf5 8.Qxd8+ Kxd8.
Now we have finally reached the main starting position of the so-called Berlin endgame. White could try to keep the queens on with 8.Qe2, but after 8...Nd4 9.Nxd4 Qxd4 Black is doing fine; a queen plus the bishop pair in a fairly open position even gives Black something to play for.
The Berlin Wall: Black's Endgame Fortress
The position after 8...Kxd8 is what most people mean when they say the Berlin Wall. The nickname is not just folklore; it captures the feel of the position exactly. Black has voluntarily given up castling and accepted doubled c-pawns, yet the structure is almost impossible to storm. The bishop pair covers the light squares White would love to use, f5 is a permanent home for Black's pieces, and White's extra kingside pawn is hard to push without loosening his own king. White is the one who has to prove something here, not Black. That reversal of roles, with Black calm and White searching, is the whole point of the Berlin Wall, and it is why elite players reach for it when a draw with Black is a perfectly good result.
In the Berlin endgame there are three main moves to consider.
1) 9.Rd1+ was popular until the Kramnik-Kasparov match in 2000 but is rare today. The game usually continues 9...Ke8 10.Nc3 Ne7, rerouting the knight toward g6 to attack e5.
11.h3 Ng6 12.b3 Be7 13.Bb2. The drawback of 9.Rd1+, and the main reason it fell out of fashion, is that the d1-square is taken by the f1-rook rather than the a1-rook. After that it is not clear how to develop the a1-rook usefully.
2) 9.h3 is the second most common move. The idea is to prepare a kingside pawn avalanche right away, and it often transposes into the lines with 9.Nc3.
3) 9.Nc3 is the main continuation, met by 9...Ke8. White starts advancing on the kingside with 10.h3, and Black plays 10...h5, ready to meet g4 with ...hxg4 and also activating the rook on the h-file. After 11.Bf4 Be7 12.Rad1 Be6 13.Ng5 White hits the bishop, and now the second point of ...h5 appears: 13...Rh6.
Let's weigh up both sides to pin down the key ideas in the Berlin endgame.
Advantages for White:
1) The kingside pawn majority is White's main asset.
2) White therefore wants to trade pieces and win a pawn endgame by manufacturing a passed pawn on the kingside.
Disadvantages for White:
1) The e5-pawn is over-advanced and can become a liability.
2) The e5-pawn also blocks the scope of the dark-squared bishop.
3) White has lasting weaknesses on the light squares (f5, e4, d5).
Advantages for Black:
1) The bishop pair.
2) Control of f5, the key square in the position.
Disadvantages for Black:
1) A poor queenside pawn structure. The doubled c6/c7 pawns make Black's queenside majority almost meaningless, so exchanges tend to favor White.
2) Black has lost the right to castle in either direction, so the king can get stuck in the center, and connecting the rooks takes care.
The Anti-Berlin (4.d3): How White Really Plays for a Win
When club Whites want to avoid the famous endgame and keep pieces on the board, the modern main choice is the Anti-Berlin with 4.d3, quietly propping up the e4-pawn and steering toward an Italian-style middlegame. After 4...Bc5, White builds with 5.c3, threatening to push d4 for central space. A standard run is 5...0-0 6.0-0 d6 7.Nbd2 a6 8.Ba4 b5 9.Bc2, and here the point of 5.c3 shows: the bishop swings to c2 via a4 directly, rather than retreating to b3 as in many Ruy Lopez lines. White can also exchange first with 5.Bxc6 and reroute with 6.Nbd2, keeping a small, durable pull. Because these lines avoid mass trades, the play stays sharp and double-edged. This is where the opening becomes a genuine fight rather than a quick split.
Black's Other Tries: 4...Bc5 and 4...d6 Setups
The Berlin gives Black flexible ways to meet White's fourth move beyond the famous 4...Nxe4. Against the Anti-Berlin 4.d3, the most popular reply is 4...Bc5, developing the bishop to its most active diagonal and eyeing the f2-square; Black follows with ...d6, ...0-0 and ...a6, reaching a comfortable Italian-flavored middlegame where the bishop pressures White's center. A quieter, more strategic option is 4...d6 with a kingside fianchetto, ...g6 and ...Bg7, where Black accepts a slightly passive but rock-solid setup and aims to undermine White's center later. Both avoid the queen trade entirely, so they suit players who want a fuller middlegame without memorizing the endgame's move-order subtleties. For a Black repertoire, knowing one of these alongside the main 4...Nxe4 keeps you ready whether White heads for the Wall or sidesteps it.
Berlin Endgame Technique: The 9.Nc3, 9.h3 and 9.Rd1+ Roadmap
Once the Wall is reached after 8...Kxd8, White's plans branch at the ninth move. 9.Nc3 is the main line: Black replies 9...Ke8, tucking the king toward safety, and after 10.h3 h5 Black prepares ...Bd7 or ...Be6, regroups the knight, and contests White's kingside expansion. 9.h3 aims to launch the pawn avalanche immediately and usually transposes back into 9.Nc3 lines. 9.Rd1+ was popular until the 2000 match but fell out of favor: by committing the f1-rook to d1, White struggles to develop the a1-rook usefully. Across all three, Black's recipe is the same. Finish the king-walk with ...Ke8 (sometimes ...Kc8 behind the c-pawns), activate the rook via the open files, and use the doubled c-pawns as a wall while the bishop pair patrols the light squares. What decides the Berlin Wall far more often than anything else, at least for me, is technique rather than memorized moves.
Lines to Avoid the Berlin Endgame: 5.Re1, 4.d4 and 4.Nc3
White has several other ways to keep more pieces on the board and stay out of the Berlin endgame. When White needs to win on demand because of the tournament situation, staying in the middlegame longer gives both sides much more to play with.
4.0-0 Nxe4 5.Re1
White can still castle on move four, 4.0-0 as in the main line; but after 4...Nxe4, instead of 5.d4, which opens the d-file and steers toward the queen trade, White can play 5.Re1, taking aim at the e-file. After 5...Nd6 6.Nxe5 (threatening Nxc6 with a discovered check) Be7 7.Bf1 Nxe5 8.Rxe5 we reach a very balanced position with a highly symmetrical pawn structure.
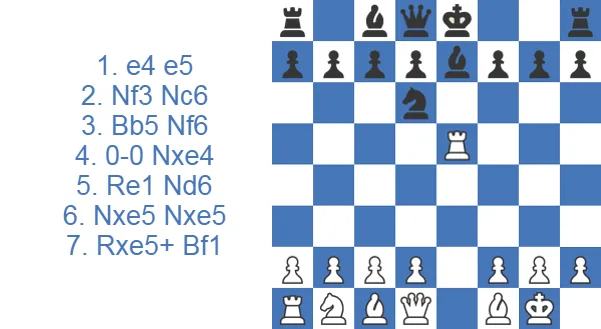
White does avoid the Berlin endgame this way, but given the 81% drawing rate in this variation, it is fair to say it leads to an even drier position than the endgame itself.
White has one more way to keep the queens on the board: 5.Qe2 instead of 5.Re1. The idea is to win the e4-pawn back without trading queens, so Black never reaches his comfortable endgame. One well-known line runs 5...Ng5 6.Nxg5 Qxg5 7.d4 Qe7 8.dxe5 a6, when Black kicks the bishop and stands perfectly well. Like 5.Re1, this is a play-it-safe choice rather than a try for an opening edge.
4.d3 (also known as the Anti-Berlin)
Playing 4.d3 is the most popular choice for players who want to keep as many middlegame options open as possible. Black usually continues 4...Bc5 and is not worried about 5.Bxc6 dxc6 6.Nxe5?? because 6...Qd4 wins material back with interest.
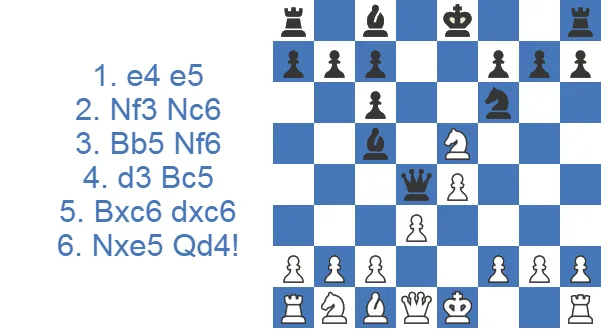
After 4...Bc5 White plays 5.c3, planning d4 to grab central space. A standard continuation is 5...0-0 6.0-0 d6 (now protecting e5) 7.Nbd2 a6 8.Ba4 b5 9.Bc2, and we see another benefit of 5.c3: the bishop can reach c2 via a4 directly, instead of being chased to b3 by ...a6 and ...b5 as in so many Ruy Lopez lines.
9...Bb6 and 10.Re1 are typical, preparing the standard knight maneuver to f5 via f1 and g3.
The 4.d3 lines avoid mass exchanges as much as possible, so the game can turn quite sharp and double-edged for both sides. If you find it hard to picture the Berlin producing a genuinely exciting game, play through this model encounter between Levon Aronian and Vladimir Kramnik:
4.d4: the Berlin Gambit
Some players, especially online, meet the Berlin with the immediate 4.d4, a line you will often see labeled the Berlin Gambit. The name is informal; White is not really sacrificing material for long, but the intention is genuinely aggressive: blow the center open before Black settles in. After 4...exd4 5.e5 Black's knight has to move, and the modern choice is 5...Ne4, keeping the piece active in White's camp.
White regains the pawn with 6.0-0 Be7 7.Nxd4, reaching a position with a space-gaining e5-pawn but no real advantage; Black is fine after rerouting the knight with ...Nc5. The practical point for Black is simple: do not panic when you see 4.d4. It looks like a knockout attempt and plays like a quiet, equal middlegame. If anything, the open lines suit Black's bishop pair once the dust settles.
4.Nc3: transposing to the Four Knights
The quietest way for White to sidestep the whole Berlin debate is 4.Nc3, which simply transposes into the Four Knights Game. It is rarely seen at the top because it hands Black an easy, comfortable game, but you will meet it at club level. Black has two good replies: the solid 4...Bb4, pinning the knight and mirroring White's setup, or the sharper 4...Nd4, the Rubinstein idea, inviting complications around the center. In both cases Black equalizes without much theory to memorize, which is exactly why ambitious White players look elsewhere.
Playing the White Side Against the Berlin
If you have White and the Berlin appears, your choice comes down to how hard you want to push. For a small, safe edge, head into the endgame with 5.d4, where the kingside pawn majority gives you a long-term target. To keep things symmetrical and low-risk, 5.Re1 or 5.Qe2 hold the queens on without conceding the famous fortress. The modern try for a real win is the Anti-Berlin 4.d3 followed by c3 and a later d4. Kramnik himself admitted he was surprised Kasparov never tested it in 2000. Whichever you pick, the one mistake to avoid is expecting a knockout. The Berlin is engineered to absorb pressure, so play for a slow positional buildup, restrain Black's bishop pair, and aim to convert your structural pluses in a long game rather than a sharp attack.
The Mortimer Trap: A Swindle Worth Knowing
The Berlin has one genuinely famous trap, the Mortimer Trap, and it is worth ten seconds of your attention because club players fall for it constantly. After 4.d3 Ne7 Black deliberately retreats his knight to a worse square, apparently hanging the e5-pawn. If White grabs it with 5.Nxe5??, Black hits back with 5...c6, and now the b5-bishop is attacked while ...Qa5+ is in the air, forking the king and the e5-knight. After 6.Bc4 Qa5+ 7.Nc3 Qxe5+ Black simply wins a piece.
There is even a trap inside the trap: if White tries 6.Nc4 instead, Black must not rush with 6...cxb5?? because of 7.Nd6# (a smothered mate out of nowhere). The clean route is 6...d6 first, and after 7.Ba4 b5 the fork wins material anyway. Two honest caveats: 4...Ne7 is objectively a slightly inferior move, since it moves the same piece twice, and a sober White player just answers 5.c3 and keeps a small pull. So treat the Mortimer as a swindle to spring, not a main weapon.
Berlin Defense and Other Ruy Lopez Game Examples
Case Study: Gukesh Grinds Down the Anti-Berlin
The best illustration of how the Anti-Berlin actually wins is this full game, Gukesh D vs. Magnus Carlsen from 2025. It is a model of the 4.d3 plan: no early queen trade, a slow build-up, and a long technical fight that runs all the way to a pawn race. Play through it to see how White keeps the pieces on and turns small advantages into a full point.
The opening is textbook Anti-Berlin. With 4.d3 Bc5 5.c3 0-0 6.0-0 d6 7.h3 a6 8.Ba4 White refuses the endgame and plays a slow Italian/Ruy hybrid, keeping every piece on the board. Note 10.Bc2 after 9...b5: this is the c3-bishop retreat the section above flagged, the bishop reaches its best diagonal without losing time. By move 13, White has the setup he wanted, and 13.d4 finally claims the center.
The middlegame turns on space. After 13.d4 Ng6 14.Nf1 c5 15.Ng3 White rerouted the knight toward f5/h5, and the thrust 18.d5 grabbed a big space advantage that cramped Black's pieces. Watch how Carlsen tried to muddy the water with the bishop sortie 25...Bd3, planting a piece deep in White's position. Gukesh's reply was the practical decision of the game: 27.Qxa5 Qxa5 28.Rxa5, trading into a position where his extra activity and the loose black queenside pawns gave him something concrete to grind.
The turning point is the rook invasion. 31.Ra7 put the rook on the seventh, and from there the technical phase is a clinic in converting an edge: White keeps the rooks active, swaps the right pieces, and never lets Black coordinate. Black's pieces look busy with ...Bxe4 and ...Rd1, but they are grabbing pawns while White's structure and active king do the real work.
The finish is the lesson a club player should take away. Once it reduced to a knight-and-pawns race after 47.Rxd2+, White calculated the pawn endgame cold: 48.Ne4+ and the king march 49.Kg3 collected Black's loose pawns just in time, and the 58.h5 break created the decisive runner. The practical takeaway: the Anti-Berlin does not win with fireworks. It wins by keeping the pieces on, claiming a small structural or space edge, and then outplaying the opponent in a long game. If you want to beat the Berlin rather than draw it, this is the model to copy.
Should You Play the Berlin? Final Thoughts
The Berlin Defense gives Black stability and a clean, consolidating structure. Its slow nature means you need a real feel for the nuances to squeeze out any advantage with either color, which is why it is not the most popular choice among amateurs. White is never forced into the endgame, though, and can keep a full middlegame with sidelines like 4.d3. I think players at every level should try both sides at least once: the opening teaches a lot about handling slow, strategic positions, and that skill carries over to the rest of your chess.
Test Yourself: Berlin Defense Positions
Make the move on the board. Hint gives you a nudge, Answer shows the move and why it works.
Berlin: White castled and left the e4-pawn undefended. Which capture wins it?
Black's knight on d6 challenges your b5-bishop. Which bishop capture trades it for the c6-knight and doubles Black's pawns?
Mortimer Trap: Black's 5...c6 kicks your b5-bishop. Which knight move sets a smothered mate on d6?
Anti-Berlin: White grabbed e5 with 6.Nxe5. Which queen move hits the loose knight and eyes f2 together with the c5-bishop?
Mortimer Trap: White played 6.Bc4?? Which check wins a piece?
Four Knights transposition. Black's bishop on b4 faces your c3-knight. Which knight move starts the regrouping toward g3?
Your b5-knight is under fire from the a4-pawn. Which jump takes it to a strong central square?
Berlin endgame line: Black's knight just landed on f5. Which queen capture with check trades queens?
Anti-Berlin: Black's ...b5 kicks your a4-bishop. Which retreat keeps it on the b1-h7 diagonal?
Berlin endgame: White's h3 prepares g4. Which pawn move stops it?