
 By

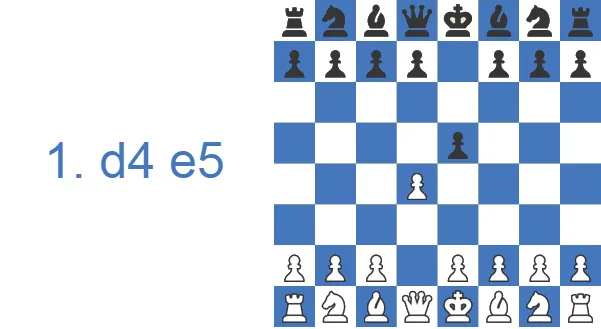
- The Englund Gambit (1.d4 e5) is a counter-gambit in which Black sacrifices a pawn for fast development and tactical chances.
- It is objectively unsound and White scores well with accurate play, yet it remains a dangerous surprise weapon in blitz and rapid, full of one-move traps.
- If you play Black, head for 2...Nc6 and the 3...Qe7 lines.
- If you face it as White, the cleanest antidote is to accept the pawn and play 4.Qd5, sidestepping Black's traps and keeping the extra material.
How Often Each Side Wins
From the gambit's starting position, the scoring tells the whole story before you read a single line of theory.
| Rating level (Lichess) | White wins | Draw | Black wins |
|---|---|---|---|
| 800, beginner | 45.4% | 3.5% | 51.0% |
| 1000, novice | 43.9% | 3.1% | 53.0% |
| 1200, improver | 44.7% | 3.1% | 52.3% |
| 1600, club | 47.5% | 3.7% | 48.8% |
| 1800, club | 49.8% | 4.3% | 45.9% |
| 2000, advanced club | 52.3% | 5.1% | 42.6% |
Source: Lichess opening explorer, blitz, rapid and classical games at the position after 1.d4 e5 2.dxe5 Nc6 3.Nf3 Qe7. Figures are win rates by Lichess rating band; draws are rare at these levels.
Study the Englund Gambit as White or Black
One pawn buys the Englund Gambit instant open lines against 1.d4, and whether that trade works depends on which side knows it better.
Punish the Englund Gambit as White
Facing the Englund Gambit gets easy once you know what Black wants for the pawn. Start with the ideas behind the sacrifice, check the win rates by rating band, and let the two-minute video pull it all together.
Try the Englund Gambit as Black
As a counter to 1.d4, the Englund Gambit trades a pawn for open lines and immediate tricks. See where it stands among the 1...e5 counter-gambits, then dig into the rare sidelines for when opponents start expecting the main trap.
Watch: The Englund in Two Minutes
If you would rather see the ideas in motion before reading the lines, this short video walks through the gambit move by move.
Finished the video? Read on for the full move-by-move explanations and practical examples below.
Key Ideas in the Englund Gambit: Why Black Gives Up the e5 Pawn
By playing 1...e5, Black challenges White's central d4 pawn at once and opens lines for the queen and the dark-squared bishop. This pawn sacrifice changes the character of the opening from a semi-closed, positional struggle into an open game full of tactics. Through the opening and into the early middlegame, White has to stay tactically alert to avoid Black's traps.
If White accepts the gambit, Black's main idea is to win the e5 pawn back on favorable terms. A sloppy way of defending e5 often hands Black tactical chances on the queenside, usually with motifs revolving around b2 and the e1-b4 diagonal. If Black regains the pawn cleanly, Black has effectively removed White's d4 pawn, the base of White's central structure in the Queen's Pawn Opening.
Where the Englund Fits Among 1.d4 e5 Counter-Gambits
The Englund belongs to a small family of pawn sacrifices Black throws at the Queen's Pawn Opening, and it sits at the riskiest end. Its better-behaved relatives, the Albin Countergambit (1.d4 d5 2.c4 e5) and the Budapest Gambit (1.d4 Nf6 2.c4 e5), both wait for White to commit c4 before striking. That wait gives Black a concrete structural target in return for the pawn. The Englund grabs the center a move earlier with 1...e5 and gets less for it. Theory rates it as unsound for exactly that reason, while the Albin and Budapest stay respectable surprise choices. Think of the Englund as the trappiest cousin. You reach for it in a blitz game to win fast, not against a prepared opponent who simply plays 4.Qd5 and banks the pawn.
Englund Gambit Theory: Accept or Decline, White's Two Choices
There is no way to avoid the Englund Gambit, so White can either accept it with 1.d4 e5 2.dxe5 or decline it with moves like 2.d5 or 2.e4. If White is prepared, though, there is no reason to decline, because the declining lines hand White nothing.
Named Variations of the Englund Complex
The Englund Gambit is really an umbrella name for a whole family of second moves after 1.d4 e5 2.dxe5. Knowing the names helps when you read databases or annotate your own games:
- Main Line (Englund Gambit proper): 2...Nc6 3.Nf3 Qe7, the most principled try and the one covered in detail below.
- Soller Gambit: 2...f6, an immediate strike at the e5 pawn instead of developing first.
- Blackburne-Hartlaub Gambit: 2...d6, opening the f8-bishop's diagonal and inviting White to overextend.
- Felbecker Gambit: 2...Bc5, the move behind the famous deflection trap shown later in this guide.
- Zilbermints Gambit: 2...Nc6 3.Nf3 Nge7, a rarer route that keeps the queen flexible.
All of them share the same DNA: Black trades a pawn for speed and tries to lure White into grabbing too much. The main line with 3...Qe7 is where the theory matters most, so that is where we go next.
A Short History of the Englund Gambit
The opening is named after the Swedish player Fred Englund, who in 1932 organized a thematic tournament in which every game began from the gambit position 1.d4 e5 2.dxe5 Nc6. The first recorded experiments with the line reach back further, to the mid-19th century, an era fascinated with every kind of romantic pawn offer. Several of the named sidelines carry their inventors' surnames. The best known is the Blackburne-Hartlaub Gambit, partly attributed to the English attacker Joseph Henry Blackburne. The opening never earned a serious theoretical reputation, but online blitz gave it a second life. Its one-move traps suit fast time controls, and that, far more than any tournament pedigree, is why people still play it.
Englund Gambit Accepted: 1.d4 e5 2.dxe5
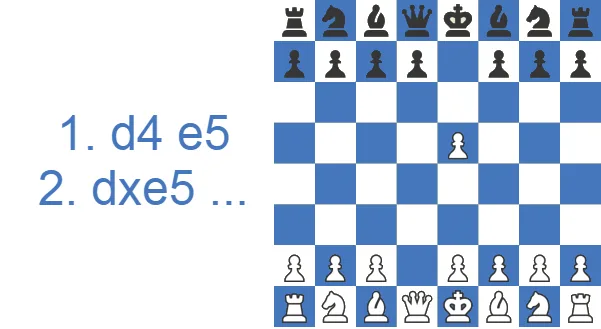
The old saying that the best way to refute a gambit is to accept it has some wisdom here, so White should grab the pawn with 2.dxe5. Black almost always continues 2...Nc6, trying to win it back. White should defend the pawn, and there are two ways to do that. One is 3.Bf4, against which Black can keep gambiting with 3...f6, the point being that after 4.exf6 Qxf6 the queen hits both the bishop and the b2 pawn. A typical continuation showing how Black wants to develop runs 5.Qc1 d5 6.e3 Bf5 7.Nf3 Bd6 8.Bxd6 Qxd6 9.Be2 O-O-O 10.O-O. White is a pawn up, but Black enjoys a space advantage and a more comfortable position to handle.
The more standard way for White to defend e5 is 3.Nf3, after which Black keeps the pressure on with 3...Qe7 and we reach a branching point. White can defend the pawn again with 4.Bf4 or 4.Qd5, or simply hand it back and develop with 4.Nc3.
3...Qe7 4.Bf4
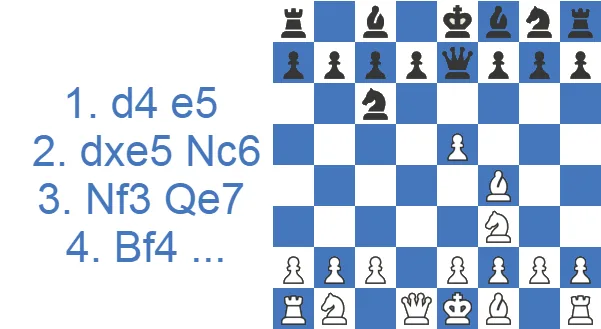
Defending the pawn with 4.Bf4 is not inaccurate in itself, but in practice it opens the door to several of Black's traps, so White must tread carefully. White can go badly wrong after the cheeky 4...Qb4+, hitting the bishop and the b2 pawn at the same time. If White blocks with 5.Bd2, Black plays 5...Qxb2 and attacks the rook. Now 6.Bc3?? looks like a clever way to defend the rook, but it is a serious blunder because of 6...Bb4!, pinning the bishop, and material loss is unavoidable. Clinging to the material can even end in mate in eight: 7.Qd2 Bxc3 8.Qxc3 Qc1#.
A similar trap arises when White blocks the check with 5.Qd2?? and, after 5...Qxb2, tries to defend the rook with 6.Qc3??. Black pins and wins the queen with 6...Bb4.
So the correct response to 4...Qb4+ is 5.Bd2, and after 5...Qxb2 White should simply develop with 6.Nc3 instead of 6.Bc3??. Black may set a trap with 6...Nb4, attacking c2, and the natural 7.Rc1 would drop a pawn for nothing: 7...Nxa2 8.Nxa2 Qxa2. Instead of 7.Rc1, White should hold c2 with 7.Nd4 and keep the threat of Rb1.
If Black attacks the knight with 6...Bb4, White can play 7.Rb1 Qa3 (7...Qxc3 is an interesting queen sacrifice to consider: 8.Bxc3 Bxc3+ 9.Nd2 Bxe5, and it is not so easy for White to find a target) 8.Nd5, threatening the Nxc7+ fork, 8...Ba5 9.Rb5!, a strong move that prevents a recapture with the queen after Bxa5, 9...Bxd2 10.Qxd2. White should not get greedy here and walk into the thematic trap 10...Kd8 11.Qg5+? f6 12.Qxg7 Qc1#.
3...Qe7 4.Qd5
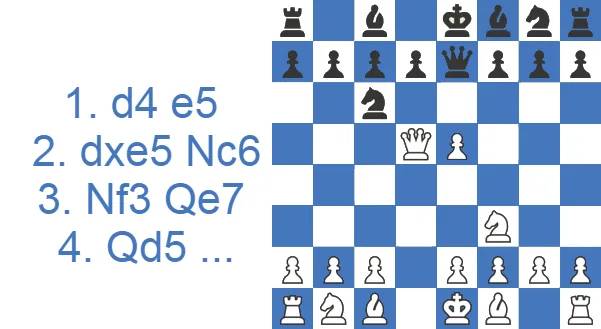
The cleanest way to defend e5 is 4.Qd5. White's centralised queen cannot be kicked easily, and this line dodges the many traps Black has after 4.Bf4. Black's best try is to gambit again with 4...f6. After 5.exf6 Nxf6, White can retreat the queen to d3 or b3. The move 6.Qb3 keeps pressure on Black's b7 pawn. Play may continue 6...d5 7.Bg5 Bd7 8.Nbd2 (8.Qxb7?? would be fatal because of 8...Rb8 9.Qa6 Qb4+ 10.Nbd2 Qxb2 and Black is crushing) 8...O-O-O 9.c3 h6 10.Bxf6 Qxf6 11.e3 g5, reaching a rich middlegame with chances for both sides.
3...Qe7 4.Nc3
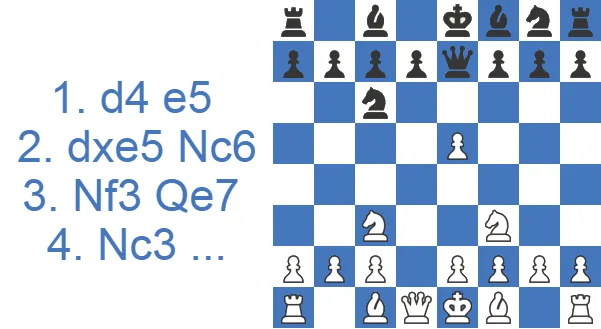
White can also build a pawn center by first returning the pawn and continuing to develop with 4.Nc3 Nxe5.
Here 5.Bf4, 5.Nd5 and 5.e4 are all sound options. For example, White can aim for comfortable queenside castling with 5.Bf4 Nxf3+ 6.gxf3 d6 7.e4 Be6 8.Qd4, exploiting the absence of a knight on c6, 8...Nf6 9.O-O-O.
Englund Gambit Declined: 1.d4 e5 2.d5
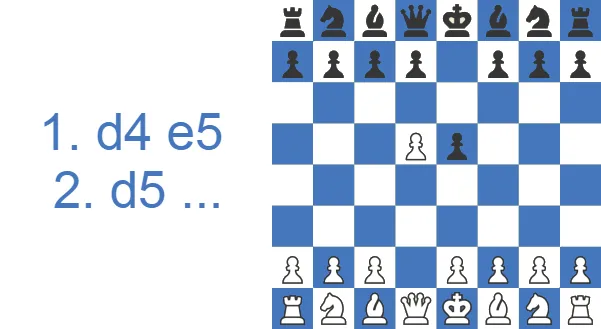
Declining with 2.d5 lets Black develop freely, leaving Black with an easy, comfortable game. Both 2...Nf6 and 2...Bc5 are fine. For example, 2...Nf6 3.c4 Bb4+ 4.Bd2 Qe7 and Black is arguably even slightly better thanks to the lead in development. Black can complete development by putting the light-squared bishop on f5 after ...d6 and routing the b8-knight to c5 via a6 or d7. The move 3.Nc3 makes little sense, since after 3...Bb4 White gains nothing from the opening. This declined setup, where Black often answers ...Nf6 and ...Bb4+, is sometimes called the reversed French structure.
Englund Gambit Declined: 1.d4 e5 2.e4
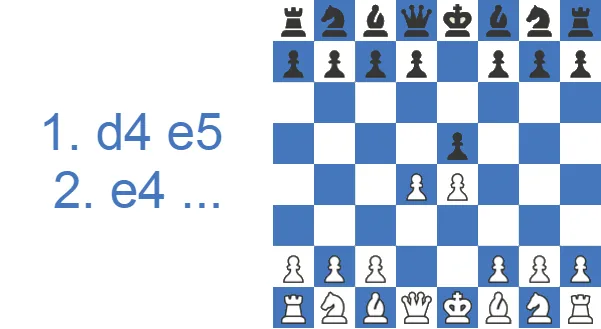
White can switch sides and become the gambiteer with 2.e4, aiming to transpose into the Danish Gambit after 2...exd4 3.c3 dxc3 4.Bc4 (or 4.Nc3).
After 2...exd4, White also has the option of a standard Center Game by recapturing with 3.Qxd4 Nc6 4.Qe3, reaching a sharp game with opposite-side castling after 4...Nf6 5.Nc3 Bb4 6.Bd2 O-O 7.O-O-O.
Sidelines and Rarer Black Tries
Beyond the main 3...Qe7 line, Black has a handful of lower-volume tries worth recognizing. After 2.dxe5, the Soller Gambit (2...f6) and the Blackburne-Hartlaub (2...d6) both offer a second pawn at once instead of developing, hoping White overextends. A trickier independent path is 1.d4 e5 2.dxe5 Nc6 3.Nf3 Nge7, sometimes called the Zilbermints, which keeps the queen flexible and eyes ...Ng6 to hit e5. There is also the entirely separate 1.d4 e5 2.Nf3 e4 line, where Black pushes rather than recaptures and sets the ...Qh4+ mating trap shown later. None of these change the verdict. White stays better with accurate play. Still, knowing the names helps you find the right setup when an opponent deviates early instead of marching into the famous lines.
How to Refute the Englund Gambit as White: Accept, Play 4.Qd5, Don't Get Greedy
If you are on the white side of 1.d4 e5, the good news is simple: the Englund Gambit does not work against accurate play. You do not need to memorize everything. You need one clean path and an awareness of the traps you must not walk into.
The practical recipe is to accept the pawn and refuse to get greedy. After 1.d4 e5 2.dxe5 Nc6, defend the pawn with 3.Nf3 and, once Black plays 3...Qe7, choose 4.Qd5. This move takes most of the venom out of the gambit. The queen sits in the center where Black cannot easily kick it, the e5 pawn is safely defended, and the typical ...Qb4+ tricks against b2 simply do not exist here.
Black's best is to gambit a second pawn with 4...f6, but after 5.exf6 Nxf6 6.Qb3 White keeps the extra material and a healthy position.
The one thing White must avoid is the natural-looking 4.Bf4. It is not bad by itself, but it invites 4...Qb4+, hitting the bishop and b2 at the same time, and from there a single careless move can end the game. The rule of thumb against the Englund is to develop, return the pawn if you have to, but never grab material with your king still in the center. Castle, finish development, and Black's compensation evaporates.
If you would rather not memorize queen moves, the safe alternative is to give the pawn straight back with 4.Nc3 Nxe5 5.e4, building a broad center. White is not fighting for an advantage with the gambit pawn here, but the position is comfortable and trap-free, a sensible choice in a must-not-lose game.
Englund Gambit Traps: The Two That Win Its Games (...Nd4 and ...Qb4+)
1.d4 e5 2.dxe5 Bc5 3.Nf3 d6, where Black gambits another pawn to open lines, 4.exd6 Ne7, which looks like a blunder but is really a decoy to open the d-file, 5.dxe7?? Bxf2!, the deflection Black has been setting up for several moves. 6.Kxf2 Qxd1 7.e3, and now White threatens a Bb5+ discovered attack to win the queen back, so Black has to watch out for the trick and play 7...Qxc2+.
1.d4 e5 2.Nf3 e4 3.Nfd2 e3, sacrificing a pawn to open the king's short diagonal, 4.fxe3 Bd6 5.Nc3??, a natural-looking developing move that is a fatal blunder because of 5...Qh4+ 6.g3 Qxg3+ (or 6...Bxg3+) 7.hxg3 Bxg3#.
Grandmaster Games with the Englund Gambit
Who Actually Plays the Englund Gambit?
You will not find the Englund in many elite tournament databases, which tells its own story. It lives almost entirely in online blitz and bullet, club play, and the repertoires of dedicated trap enthusiasts. Its best-known modern champion is Lev Zilbermints, an American player who has spent decades analyzing and defending the gambit and even has a sideline named after him. In the streaming era it surfaces most often as a quick-win novelty, with content creators such as Alexandra Botez featuring it for exactly the reason it works at speed: it forces an unprepared opponent to solve sharp problems with the clock ticking. Treat it the way its practitioners do, as a practical surprise choice for fast time controls rather than a serious answer to 1.d4 across a long game.
My Own Game Against the Englund Gambit as White
In this game I did not take the pawn, and that is where it started. 1.d4 e5 2.Nf3 e4 3.Ng5 d5 4.e3 h6 5.Nh3 Bxh3 6.gxh3 left me with doubled h-pawns and a black queen on h4 by move 6. That is close to what the Englund player is hoping for.

It was still perfectly good for me. On move 12 my opponent played 12...Kf8 and the engine read +5.40. My reply, 13.O-O-O, dropped it to +0.12 in a single move. I never got it back and I lost the game.

Two things I keep from that. Declining a gambit does not punish it by itself: here declining is what handed Black the trades and the early queen play the line is chosen for. And an advantage that size is only worth whatever the next move does with it, which is why the dangerous moment in these positions usually arrives just after you think you are safe.
Is the Englund Gambit Any Good?
Pros
- Black’s pieces come out quickly, especially the queen and dark-squared bishop, giving early control over key squares.
- It leads to open positions full of traps, pins, and double attacks. Perfect for players who enjoy sharp and unpredictable games.
- Many opponents will be caught off guard and may fall into one of several classic traps.
- In fast time controls, opponents don’t have enough time to find the best defense, so practical results can be great.
- It’s an excellent way to sharpen tactical awareness and learn about counter-attacks.
Cons
- If White knows the theory and plays accurately, Black’s position often collapses with no real compensation for the pawn.
- Black sacrifices a pawn right from the first move.
- One inaccurate move and the counterplay disappears, leaving Black with a weak structure and no initiative.
- Even if Black equalizes early, the middlegame often becomes difficult to handle.
- Against strong or patient opponents, the Englund quickly loses its sting and turns into a one-sided struggle.
The honest answer has two halves. Objectively, no: the Englund is unsound. The position carries the ECO code A40, and after the critical 1.d4 e5 2.dxe5 Nc6 3.Nf3 Qe7 4.Qd5, Stockfish hands White a clean edge of roughly +1.5 to +2, the full value of the extra pawn with no real compensation. From the starting position White scores about 61%. Practically, though, soundness is not the same as scoring. Map it by strength. Below about 1800 online blitz, the 6.Bc3?? and 6.Qc3?? blunders into ...Bb4 are the norm and the gambit racks up quick mates. From roughly 1800 to 2200, White usually survives but often stumbles into an awkward ...Qxb2 grab and an uncomfortable game. At master level White simply plays 4.Qd5 and the whole thing fizzles. Even now the gambit catches more of my opponents than its reputation suggests, so pick your battles by who is sitting across the board.
Case Study: Averjanov Punishes the b2 Grab
This game between Alexey Averjanov (2688) and GM Aman Hambleton (2511) is the most instructive full game on this page. It shows both sides of the coin: Black gets genuine practical chances out of the opening, then White's calm refutation of the b2 raid grinds the extra material home. Treat it as a model game rather than something I played myself.
Here is what the key moments teach a club player.
The opening goes straight into the main argument. After 4.Bg5 Qb4+ 5.Bd2 Qxb2, Black plays the thematic raid on b2, exactly the idea the traps section warns White about. Against a weaker player this often wins on the spot. Hambleton even wins back the e5 pawn after 6.Nc3 Bb4 7.Rb1 Qxc3 8.Bxc3 Bxc3+ 9.Nd2 Nxe5, so for a few moves it looks like the gambit has done its job: material is level and Black's pieces are active.
The turning point is what Black gave away to grab b2. Trade by trade, White untangles. By move 16 White wins a clean pawn with 16.Bxd5, and 17.Qxd5 followed by 18.Qxb7 turns the position into a healthy extra-pawn endgame with the queens still on. The lesson for the practical player is the cost of the queen excursion: Black spent five or six tempi on a pawn that White calmly returned, then White used the extra development to win material back with interest. The gambit's compensation is real only while White is disorganised. Once White completes development and castles, the initiative drains away.
From there Averjanov shows the technique. He does not rush. The slow 23.h3, 24.Ra3 and 26.f4 improve the position before the kingside break 28.f5 and 29.e4 crack open Black's king. The final sequence from 30.Qg5+ is a clean mating-net finish.
The takeaway is the same rule from the refutation section, seen in a real game: against the Englund, do not panic when Black snatches b2. Return material if you must, finish development, castle, and let the structure decide. Against accurate play the extra pawn is just an extra pawn.
Should You Add the Englund to Your Repertoire?
The Englund Gambit is not an opening to build your repertoire around, but it can be fun to try, especially in fast time controls where White has little time to untangle the tactical tricks and traps. As a high-risk, high-reward choice it can produce quick wins, sometimes checkmating in seven or eight moves. It is also played rarely enough to work as a surprise, putting opponents in front of unusual tactical patterns they have not prepared for.
Test Yourself: Englund Gambit Positions
Set up each position and find the best move. Use Hint for a nudge or Answer to reveal the engine’s top move.
Find the best move.
Find the best move.
Find the best move.
Find the best move.
Find the best move.