
 By

The gambit carries the name of a New Orleans player from the 1800s, but it only became a real system in the early 1900s once a German master rebuilt its theory. You will not find it at the top level: with precise play, Black holds the extra pawn and can even push for an advantage.
Blackmar-Diemer Gambit: Quick Summary
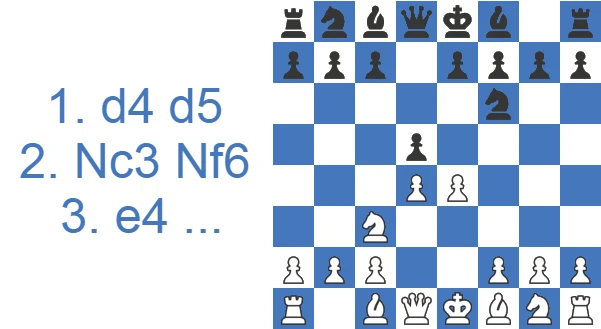
- Moves: 1.d4 d5 2.Nc3 Nf6 3.e4 dxe4 4.f3. White gives up the e4-pawn for fast development and an attack down the f-file.
- Type: aggressive Queen's Pawn gambit (ECO code D00).
- Best for: club and online players who want sharp, tactical games and quick attacking chances.
- Is it sound? Not at master level; with accurate play Black keeps the pawn and stands better. Below 2000 it scores very well and catches unprepared opponents flat.
- Main line: 4...exf3 5.Nxf3, where Black picks one of five named defenses (Teichmann, Bogoljubov, Euwe, Gunderam, Ziegler).
- Famous trap: the Halosar Trap, reached through the Ryder Gambit (5.Qxf3), which ends in a queen sacrifice and mate on c7.
Study the Blackmar-Diemer Gambit as White or Black
In the Blackmar-Diemer Gambit White pays a pawn on move four for open files and fast development, and Black spends the rest of the game deciding whether the price was real.
Attack with the Blackmar-Diemer Gambit as White
Every Blackmar-Diemer Gambit attack runs through the half-open f-file: study the queen's swing toward the kingside and the standard mating pattern against h7 in the main-ideas section. Then work through the accepted main line to see how White's pieces flow after Black captures on f3.
Defend Against the Blackmar-Diemer as Black
Anyone learning how to face the Blackmar-Diemer Gambit should start with the practical results, which explain why this gambit keeps winning below master level despite its shaky reputation. The quick summary gives you a reliable Blackmar-Diemer counter in a few minutes, and the video section shows the attack you will need to absorb.
How the Blackmar-Diemer Scores in Practice
The split between master and amateur results tells you almost everything about this gambit. In master databases, Black does well; in the amateur pool, White's score jumps. Here are the master numbers.
| Results | Rate |
|---|---|
| Victory for White | 25% |
| Draw | 32% |
| Victory for Black | 43% |
And here is the same gambit across roughly 17 million amateur games.
| Rating level (Lichess) | White wins | Draw | Black wins |
|---|---|---|---|
| 800, beginner | 50.7% | 4.0% | 45.3% |
| 1000, novice | 52.1% | 3.7% | 44.2% |
| 1200, improver | 53.5% | 3.2% | 43.4% |
| 1600, club | 54.2% | 3.4% | 42.4% |
| 1800, club | 54.1% | 3.9% | 42.0% |
| 2000, advanced club | 53.1% | 4.5% | 42.3% |
Source: Lichess opening explorer, blitz, rapid and classical games at the position after 1.d4 d5 2.Nc3 Nf6 3.e4 dxe4 4.f3 exf3 5.Nxf3. Figures are win rates by Lichess rating band; draws are rare at these levels.
Watch the Blackmar-Diemer Gambit in Action
For a quick visual walkthrough of the main ideas, the video below covers the gambit move by move before we get into the detailed lines and examples here.
Main Ideas: the f-File Attack, Qe1-h4, and the h7 Mating Net
The plan is simple to state. White wants to open the f-file, develop as quickly as possible, and make life difficult for Black. When Black grabs the e4-pawn, White answers with f3, opening lines and clearing the way for the queen to swing out via e1 to h4 against the black king. Black, for his part, tries to consolidate, trade pieces, and press for a win in the endgame with the extra pawn.
The Halosar Trap in Its Founding Game: Diemer vs. Halosar, 1934
The trap is named after Hermann Halosar, who walked into it against Emil Josef Diemer, the gambit's own evangelist, in 1934. It springs not from the usual main line but from the Ryder Gambit, the double-pawn sacrifice 5.Qxf3 instead of 5.Nxf3. After 5...Qxd4 6.Be3 Qb4, White castles long with 7.O-O-O, lining the d1-rook up against the black king. The greedy 7...Bg4, snatching at the queen, is the losing move. Now 8.Nb5 ignores the threat, and after 8...Bxf3 9.Nxc7 is checkmate, the d1-rook covering every escape square. It is one of the prettiest miniatures in gambit play, and it is the exact pattern that lets the BDG roll over an unprepared club opponent.
A Short History of the Blackmar-Diemer Gambit
The opening carries two names because two players shaped it. Armand Blackmar, a New Orleans player of the late 1800s, was the first to publish the idea, but his original move order (1.d4 d5 2.e4 dxe4 3.f3) had a hole: Black could hit back with 3...e5 and leave White with nothing for the pawn.
In 1889, Ignatz von Popiel patched the problem by inserting 3.Nc3 first, planning to meet 3...Nf6 with 4.Bg5. His version is sometimes called the von Popiel Gambit, and he was also the one who looked hard at Black's sharp 3...e5 reply, known today as the Lemberger Counter-Gambit.
The modern form belongs to the German master Emil Josef Diemer (1908–1990), who built his whole chess career around 3.Nc3 Nf6 4.f3 and gathered his analysis in a book whose title translates roughly as "Toward Mate From the First Move!" That attacking spirit is still what draws players to the gambit.
Blackmar-Diemer Gambit Theory: Three Ways Black Answers 3.e4 (dxe4, Nxe4, e6)
The 3...dxe4 4.f3 line is the main road: White goes for quick development and a kingside attack, while Black tries to consolidate. These games turn tactical fast, and White has to prove the compensation before the initiative fades.
The 3...Nxe4 line lets Black hang on to a pawn on e4. White usually aims to win it back or to punish the weaknesses Black creates while defending it.
The 3...e6 variation steers the game into the Classical French Defense, where Black plans the freeing ...c5 break. Black often chooses it to sidestep the gambit's sharp theory altogether.
Blackmar-Diemer Gambit Accepted: the 4.f3 Main Line (3...dxe4)
After the gambit moves, Black takes the e-pawn with the d-pawn (3...dxe4) and White answers with the f-pawn push (4.f3), aiming for fast development and attacking chances.
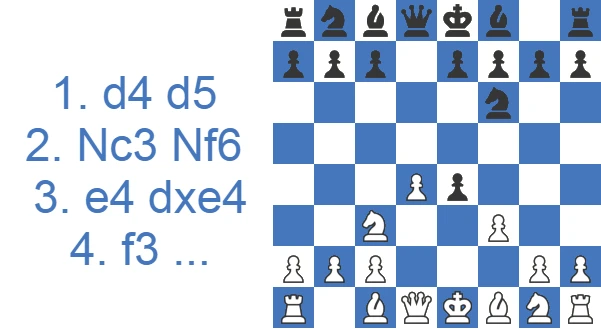
Black usually meets this by capturing on f3 (4...exf3). Black can instead try 4...Bf5 to keep the e4-pawn. In that case White pushes the g-pawn with tempo (5.g4 and 6.g5), drives the f6-knight away, and recaptures on e4 with the c3-knight.
Once Black plays 4...exf3, White recaptures with the knight (5.Nxf3) and then develops the f1-bishop, ideally to c4 (6.Bc4), so that the king can castle short next move (7.O-O). Black often answers with a solid setup: 5...g6, 6...Bg7, and 7...O-O to keep the king safe.
Once both sides have castled, White has to move quickly. With the semi-open f-file for the rook and open diagonals for the pieces, the standard plan is Qe1-h4 to swap off the dark-squared bishop with Bh6, then pile up on the king: Ng5 hits h7 alongside the queen, the f6-knight is removed (often by Rxf7) to peel away the last defender of h7, and Qh7 finishes the job.
If Black defends accurately, though, the attack can be held, and Black keeps the extra pawn into a better endgame.
Blackmar-Diemer Gambit Accepted: the Knight Capture 3...Nxe4
This starts like the 3...dxe4 line, but here Black grabs the e4-pawn with the f6-knight (3...Nxe4).
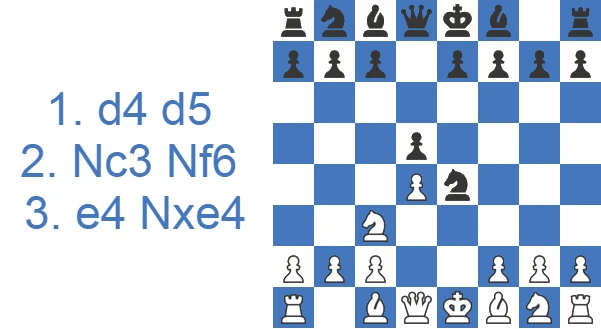
White usually trades off Black's well-placed knight (4.Nxe4), and Black recaptures with 4...dxe4. Black is objectively better, but the fight over that e4-pawn keeps the position imbalanced and full of play.
White's normal choice is 5.Bc4, developing the bishop and eyeing f7. One point is to follow up with Qb3, hitting both the b7- and f7-pawns at once as soon as the f8-bishop steps aside to defend the e4-pawn.
Against 5.Bc4, Black has two main replies: 5...Bf5 (guarding the e4-pawn and getting the bishop outside the pawn chain before ...e6) or 5...Nc6 (which gets messy once White goes for d5 and f3 to exploit Black's lag in development).
A sample of the 5...Nc6 line: 6.c3 (clearing a path for the queen to the queenside and supporting d4), 6...e5 (challenging the center and opening lines for the bishops, Black's best), 7.d5 (gaining space and kicking the c6-knight), 7...Ne7 (rerouting the knight), 8.f3 (the e4-pawn is cramping White's kingside, so White hurries to develop while Black's pieces sit awkwardly), 8...exf3, 9.Nxf3, 9...Ng6 (freeing the f8-bishop to castle), and 10.h4. White intends to use the light-squared bishop and the h-pawn together with the semi-open f-file to pressure the kingside.
A model line for 5...Bf5: 6.c3, 6...e6 (opening the f8-bishop), 7.g4 (kicking the bishop), 7...Bg6, 8.Qb3 (hitting b7 and setting up a hidden threat on the b1-h7 diagonal), 8...Qc8 (defending b7), and 9.Ne2. White wants Nf4, h4, and h5, forcing Black's h-pawn forward to make a square for the bishop, then trading on g6 with the knight to wreck Black's kingside pawns.
Black's Five Main Defenses in the Accepted Gambit
After the main line 1.d4 d5 2.Nc3 Nf6 3.e4 dxe4 4.f3 exf3 5.Nxf3, Black has to decide how to handle White's lead in development. Five replies turn up so often that each has its own name. Knowing them lets you recall the right plan instead of solving the position from scratch.
| Defense | Black’s 5th move | White’s main plan |
|---|---|---|
| Teichmann | 5 Bg4 | h3, break the pin, push g4 |
| Bogoljubov | 5 g6 | Bc4, O-O, Qe1-h4 attack |
| Euwe | 5 e6 | Bg5, Bd3, castle and target h7 |
| Gunderam / Tartakower | 5 Bf5 | Ne5 and g4 to trade the Bishop |
| Ziegler | 5 c6 | Bc4, O-O, Ne5 with f7 ideas |
Teichmann Defense: 5...Bg4
Black's most popular try. The bishop pins the f3-knight and adds pressure on White's center. White usually challenges it at once with 6.h3; after 6...Bxf3 7.Qxf3 c6, the aggressive 8.g4 throws in another pawn to tear open lines against Black's king. This is one of White's better-scoring lines in practice.
Bogoljubov Defense: 5...g6
Black fianchettoes with 6...Bg7 to fight for the long diagonal and the d4-pawn. The main line runs 6.Bc4 Bg7 7.O-O O-O 8.Qe1, when White sets up the typical Qe1-h4 attack against h7. Because it is a solid setup for Black, White often varies early with 6.Bf4 or 6.Bg5 to keep the initiative. The Bogolyubov is one of Black's most reliable answers.
Euwe Defense: 5...e6
A calm, French-style setup where Black simply finishes developing a pawn up. After 6.Bg5 Be7 7.Bd3, White prepares to castle and swing the queen toward the kingside. Black's most testing answer is the immediate 7...c5, hitting the center before White's attack gets going.
Gunderam Defense: 5...Bf5 (also called the Tartakower Defense)
Black develops the light-squared bishop outside the pawn chain before locking it in with ...e6. White's main idea is 6.Ne5, followed by g4 to harass the bishop and trade it off with Nxg6, damaging Black's kingside pawns. Play often continues 6...e6 7.g4 Bg6 8.h4 with a sharp race.
Ziegler Defense: 5...c6
Black treats the position like a Caro-Kann a pawn up and keeps things solid. The main line is 6.Bc4 Bf5 7.O-O e6 8.Ne5 Bg6, where Black must avoid the greedy 8...Bxc2 because of 9.Nxf7!. Statistically this is one of Black's most reliable choices, so it is worth studying carefully.
Other Defenses and the Full BDG Taxonomy
Beyond the five most common replies, the BDG has a deep naming tradition worth knowing for spotting plans by name. The Vienna Defense (an early ...Bf5 and ...e6 setup, sometimes reached via ...Bf5 lines) and the Langeheinecke Defense (5...e6 intending ...c5 and a French-style structure) round out the accepted picture, while the Gunderam is also catalogued under the Tartakower name. Each label simply tags a different fifth move for Black: Teichmann (5...Bg4), Bogoljubov (5...g6), Euwe (5...e6), Gunderam (5...Bf5), and Ziegler (5...c6). Memorizing the names is not pedantry. It lets you recall White's standard plan the moment you recognize Black's setup, instead of solving the position from scratch each game.
Blackmar-Diemer Gambit Declined: 3...e6 and the French Transposition
Black plays 3...e6, sidestepping the gambit and steering toward the Classical Variation of the French Defense.
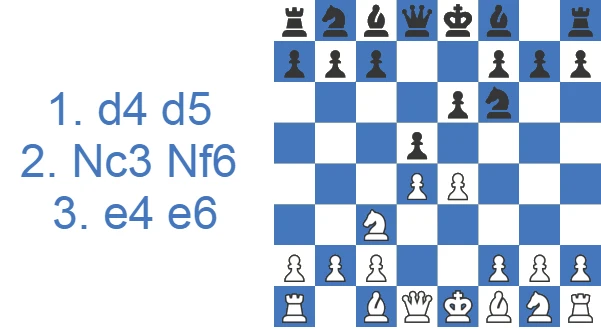
White can push the e-pawn forward (4.e5) and play for central space.
4.Bg5 is also possible, leading to a simplified French if the pieces come off after 4...dxe4, 5.Nxe4, 5...Be7 (unpinning the f6-knight), 6.Nxf6, 6...Bxf6, 7.Bxf6, and 7...Qxf6.
If Black had played ...c6 instead of ...e6, the opening would transpose to the Caro-Kann Defense. A sample line in the 4.e5 setup: 4...Nfd7 (defending the knight and preparing the typical ...c5 break), 5.f4 (grabbing kingside space), 5...c5 (pressuring d4), 6.Nf3, 6...Nc6, and 7.Be3.
In these French-type positions, Black usually attacks the d4-pawn and expands on the queenside, while White expands on the kingside.
Lemberger Counter-Gambit: 3...e5
Instead of grabbing on e4 and defending, Black can strike back in the center with 3...e5 (in the move order 1.d4 d5 2.e4 dxe4 3.Nc3 e5). Many strong players rate this as one of Black's best answers to the whole gambit. White's safest reply is 4.dxe5 Qxd1+ 5.Nxd1, heading for a level endgame where White has at least regained the pawn.
Players who want to keep the fight sharp prefer 4.Nxe4, aiming for 4...exd4 5.Nf3 with active, Scotch-like play.
How You Actually Reach the BDG: Move Orders and Transpositions
The Blackmar-Diemer is famous for the number of doors that open into it. The main route is 1.d4 d5 2.Nc3 Nf6 3.e4, but the older order 1.d4 d5 2.e4 dxe4 3.Nc3 reaches the same ground, and is in fact how the Lemberger Counter-Gambit (3...e5) is usually catalogued. Because the structures overlap, the very same positions can be steered into from 1.e4: a Caro-Kann (1.e4 c6 2.d4 d5 3.Nc3 dxe4) or a Scandinavian can transpose straight into BDG territory. There are two practical points to take from this. First, a BDG player can use these orders to dodge anti-gambit prep. Second, your opponent can decline by transposing to a Classical French with 3...e6 or to a Caro-Kann with 3...c6, so know which structures you are happy to enter.
Strengths and Weaknesses of the Blackmar-Diemer
The honest balance sheet looks like this.
Pros
- White can create tactical opportunities and win early if the opponent is unprepared.
- White can attack from both Queenside and Kingside in diverse variations.
- This opening can catch the enemy off-guard.
- It is a useful tool to improve tactical and calculation abilities at the beginner level.
Cons
- White is objectively worse.
- Black can avoid the gambit and transpose the opening to another variation.
- If the Queen’s are traded-off, Black is usually significantly better.
- To attack, White typically creates long-term weaknesses near their King.
Is the Blackmar-Diemer Gambit Sound? The Engine Verdict
Objectively, the BDG is unsound, or more politely, dubious. Modern engines hand Black a steady edge of roughly half a pawn to a full pawn after the accurate 4...exf3 5.Nxf3, simply because the extra pawn is real and White's compensation is initiative rather than material. Black can take the pawn, calm the attack with a sound defense, and steer toward a better endgame. That is exactly why you will never see the gambit at elite level. The honest summary is that the BDG is theoretically refuted but practically dangerous. The number an engine flashes on the screen has very little to do with how hard the resulting positions are for a human to defend with the clock ticking.
What Top Players Think of the BDG
No elite grandmaster uses the Blackmar-Diemer as a serious weapon, and most strong players treat it as a club-level surprise rather than a respectable opening. The figure most associated with it remains Emil Josef Diemer, who built an entire career around 3.Nc3 Nf6 4.f3 and titled his collected analysis with a phrase that translates roughly as "Toward Mate From the First Move!" That attacking spirit is its reputation today: admired for fighting chess and instructive tactics, dismissed as objectively dubious by theory. Correspondence and engine analysis have only hardened that view. You are adopting the BDG for the games you will win on initiative below master level, not for theoretical approval.
How the BDG Fits Into a White Repertoire
If you open 1.d4 and want a sharp, low-theory attacking line, the BDG slots in neatly, but only against 1...d5. You need a plan for everything else. The reply 1...Nf6, the King's Indian and Grünfeld setups, the Dutch, and so on all sidestep the gambit, so the BDG is a partial repertoire choice, not a complete one. Many BDG players pair it with the Veresov (2.Nc3 followed by 3.Bg5) or simply transpose into mainstream Queen's Pawn lines when Black declines. The same f3 and Qe1-h4 attacking ideas recur across the accepted lines, so the study cost stays low for the sting you get in return below 2000.
The Halosar Trap: the Blackmar-Diemer's Signature Queen Sacrifice
The best-known trap in the whole opening is the Halosar Trap, named after Hermann Halosar, who was caught by it against Diemer himself in 1934. It comes from the Ryder Gambit, the double-pawn sacrifice 5.Qxf3 instead of the usual 5.Nxf3.
The trap starts from the accepted gambit (1.d4 d5 2.Nc3 Nf6 3.e4 dxe4 4.f3 exf3). Instead of the usual Nxf3, White recaptures with the queen (5.Qxf3). Black grabs the loose d4-pawn (5...Qxd4), and White plays 6.Be3, developing with tempo, planning to castle long (7.O-O-O) next move. The black queen drops back with 6...Qb4. After White castles, the d1-rook eyes the black king down the file. If Black now plays 7...Bg4 to win the queen, it is a fatal blunder: White answers 8.Nb5, ignoring the threat, and after 8...Bxf3 the move 9.Nxc7 is checkmate, because the d1-rook covers every escape square.
The trap only works if Black walks into it. The accurate reply is 6...Qg4 instead of 6...Qb4, offering to trade queens while keeping the extra material. Even after 6...Qb4 7.O-O-O, Black survives with 7...Na6 rather than the greedy 7...Bg4. So treat the Halosar Trap as a practical weapon against unprepared opponents, not as a refutation. If Black knows the way through, the two extra pawns usually decide the game.
The One Move That Busts the Halosar Trap
Here is what a templated trap list never tells you: the Halosar only works if Black cooperates. The move that refutes the whole thing is 6...Qg4, offering to trade queens while pocketing both extra pawns. Once the queens come off, there is no king hunt left, and Black is simply winning. Even after the inferior 6...Qb4 7.O-O-O, Black survives cleanly with 7...Na6 rather than the fatal 7...Bg4. This matters because the most common mistake amateurs make as White is assuming the trap is a refutation. It is not. It is a practical bet. Against anyone who knows 6...Qg4, the Ryder Gambit's second sacrificed pawn is just gone, and two extra pawns usually decide the game.
Related Openings: Blackmar, von Popiel, and Diemer-Duhm Gambits
If you enjoy the Blackmar-Diemer, a few neighboring gambits share its attacking ideas and are worth a look:
- The original Blackmar Gambit: 1.d4 d5 2.e4 dxe4 3.f3, the un-patched version that 3...e5 refutes.
- The von Popiel Gambit: the 3.Nc3 with 4.Bg5 treatment that made the modern gambit possible.
- The Diemer-Duhm Gambit: a cousin from 1.d4 d5 2.c4 e6 3.e4, also offering a center pawn for fast development.
Compared with 1.e4 gambits like the King's Gambit or the Scotch Gambit, the Blackmar-Diemer gives White a similar open-file attack, but from a Queen's Pawn move order that often surprises 1.d4 players expecting a quiet game.
Case Study: Diemer vs. Halosar, 1934
The clearest illustration of why the gambit works below master level is the very game that gave the famous trap its name. It is short, it is forcing, and the whole point of the BDG is packed into nine moves. Treat it as a model game, not a recommendation to bank on the trap every time.
Moves 1 through 4 are the standard gambit: White hands over the center pawn for development, and Black takes both offered pawns. The first decision point is 5.Qxf3, the Ryder Gambit. Recapturing with the queen rather than the knight develops a piece toward the kingside and dares Black to grab the d4-pawn.
Black does grab it: 5...Qxd4. This is the natural human move, and it is not even bad on its own. The problem is what comes next. White plays 6.Be3, gaining a tempo by attacking the queen while developing the bishop and clearing the back rank for queenside castling. The retreat 6...Qb4 keeps the queen active but leaves it slightly exposed, and after 7.O-O-O White has completed the setup: rook on d1 pointing down the open d-file, every minor piece in play, king tucked away. Black has two extra pawns and a lead in material on paper, and a king still in the center.
The turning point is 7...Bg4. It looks like it wins the queen outright, and that is the lure. White answers 8.Nb5, which does two things at once: it threatens Nxc7 forking king and rook, and it does not bother to save the queen. If Black takes with 8...Bxf3, then 9.Nxc7 is checkmate. The black king on e8 has no flight squares, the d1-rook seals the d-file, and the knight on c7 delivers the blow.
The takeaway for a club player is twofold. As White, the practical value of the BDG is exactly this kind of forcing tactical shot that appears when an opponent grabs material and forgets about king safety. As Black, the lesson runs the other way: when you are up two pawns in a gambit, the job is to trade pieces and reach the endgame, not to win a third piece. The accurate 6...Qg4, offering a queen trade, leaves Black two pawns ahead with no attack to fear. Opponents keep showing me the same pattern: they grab the pawn, then go pawn-hunting again instead of consolidating, and that second bite is usually where the gambit collects its payment.
Should You Play the Blackmar-Diemer? A Rating-Band Verdict
The Blackmar-Diemer trades a pawn for a strong initiative and quick development. If White can stir up problems in the first ten moves, the opponent often cracks; if Black consolidates calmly, Black usually emerges better in the endgame with the extra material. You will not see it among elite players, and it shows up most often in club and online play, which is exactly where it belongs. Below roughly 2000, the practical scoring and the easy-to-play attacking plans make it a fine choice and a great way to sharpen your tactics. Above that, expect a prepared opponent to take the pawn and grind. Go in knowing you are buying activity, not a guaranteed edge.
Test Yourself: Blackmar-Diemer Gambit Positions
Set up each position and find the best move. Use Hint for a nudge or Answer to reveal the engine’s top move.
Find the best move.
Find the best move.
Find the best move.
Find the best move.
Find the best move.