
 By

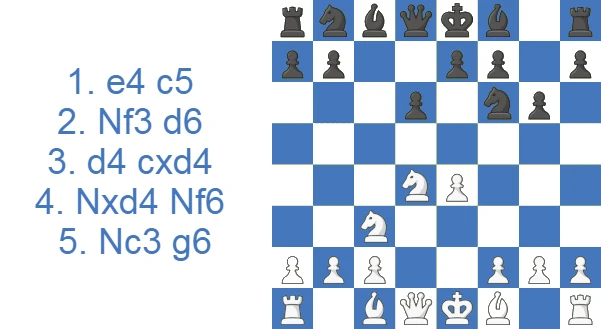
The opening took its modern form near the end of the Romantic era, in the late 1880s, but it only picked up its present name in the 1950s. The Russian master Fyodor Dus-Chotimirsky, who also coached Alexander Alekhine for a time, is credited with naming the opening. He had a keen interest in astronomy and saw a resemblance between the stars of the Draco constellation and the shape of Black's kingside pawns in this line.
The Sicilian Dragon in a nutshell
The Sicilian Dragon, the Dragon Variation of the Sicilian Defense, is one of Black's sharpest answers to 1.e4. It arises after 1.e4 c5 2.Nf3 d6 3.d4 cxd4 4.Nxd4 Nf6 5.Nc3 g6, when Black fianchettoes the famous Dragon bishop with 6…Bg7.
- Main idea: opposite-side castling, with Black storming the queenside down the c-file while White rolls the kingside pawns.
- Critical line: the Yugoslav Attack (6.Be3 with f3, Qd2 and 0-0-0), the only try that truly tests the Dragon.
- Quieter tries: the Classical Variation (6.Be2) and the Levenfish Attack (6.f4).
- Signature idea: the exchange sacrifice …Rxc3, tearing open White's king.
- Verdict: theory-heavy but perfectly sound, a fighting opening for players who want to win with Black.
Study the Sicilian Dragon as White or Black
In the Yugoslav Attack, opposite-side castling often creates a race between White's kingside attack and Black's queenside counterplay. The Classical Variation usually brings both kings to the same wing.
Slay the Sicilian Dragon as White
Queenside castling, the h-pawn lever, and a direct assault on Black's king define White's approach to the Sicilian Dragon. Survey the three main systems before committing, then go deep on the Yugoslav main line with 10.0-0-0, and be ready for the exchange sacrifice on c3 that Black uses to change the subject.
Play the Sicilian Dragon as Black
Counterplay down the c-file arrives fast enough to make the Sicilian Dragon a genuine counter rather than a gamble: the g7 bishop and a rook on c8 carry real threats. Study the Soltis defensive scheme and the thematic sacrifice against long castling, then review which weapons White reaches for when working out how to face the Sicilian Dragon.
Move orders and how to reach the Dragon
The Dragon is reached through the Open Sicilian: 1.e4 c5 2.Nf3 d6 3.d4 cxd4 4.Nxd4 Nf6 5.Nc3 g6, and only now 6…Bg7. The move order matters more than it looks. By committing to …d6 and …Nf6 before …g6, Black sidesteps the Maroczy Bind. Once the knight stands on c3, White can no longer clamp the center with c4, the very structure that haunts the Accelerated Dragon. The price is that Black must reckon with the Levenfish Attack (6.f4), which only appears in this classical move order. A common practical try is to keep the king's knight flexible and meet an early f4 with …Nc6 rather than rushing …Bg7, so White's hoped-for e5 break never gains real force. Played in this order, you reach a pure Dragon with White's most testing anti-Maroczy resource off the table.
Avoiding the Maroczy Bind
The Maroczy Bind is the pawn duo on c4 and e4, and it is the single biggest practical reason players choose the classical Dragon over its accelerated cousin. The bind cramps Black, smothers the freeing …d5 break and leaves the Dragon bishop biting on granite. Against the Accelerated Dragon (1.e4 c5 2.Nf3 Nc6 3.d4 cxd4 4.Nxd4 g6) White simply plays 5.c4 and clamps down. In the classical move order this is impossible: after 5.Nc3 the knight already occupies c3, so the c4 advance can never set up the bind. That is what inserting …d6 and …Nf6 first buys you. You trade a little speed for a guarantee that White must come at you with a concrete attacking scheme (the Yugoslav, the Classical or the Levenfish) rather than squeezing you positionally for forty moves.
How the Dragon scores in practice
The numbers below tell the story of a tense, double-edged fight, and at club level it is actually Black who comes out a shade ahead, with draws rare and most games decided one way or the other.
| Rating level (Lichess) | White wins | Draw | Black wins |
|---|---|---|---|
| 800, beginner | 45.8% | 4.1% | 50.1% |
| 1000, novice | 46.3% | 3.9% | 49.8% |
| 1200, improver | 46.9% | 3.9% | 49.2% |
| 1600, club | 46.1% | 4.3% | 49.6% |
| 1800, club | 46.0% | 4.8% | 49.2% |
| 2000, advanced club | 45.9% | 5.5% | 48.5% |
Source: Lichess opening explorer, blitz, rapid and classical games at the position after 1.e4 c5 2.Nf3 d6 3.d4 cxd4 4.Nxd4 Nf6 5.Nc3 g6. Figures are win rates by Lichess rating band; draws are rare at these levels.
A two-minute Dragon refresher (video)
The clip below walks through the basics in a couple of minutes if you prefer to see the ideas on a board first.
The video covers the fundamentals; read on to master the deeper lines and the Dragon's hidden resources.
The Dragon plan: opposite-side castling and the …Rxc3 sac
The Sicilian Dragon gives Black a genuine, practical way to seize the initiative against 1.e4 and play for a win. Because the positions are so dynamic, accurate calculation and a sharp tactical eye count for a lot. The catch is the workload: playing the Dragon for a win means memorizing a heavy body of theory.
In most Dragon lines both sides castle on opposite wings. Each side then attacks the wing where the enemy king has castled. White launches a pawn storm with g4 and h4, often sacrificing a pawn with h5 to open the h-file, and looks for a chance to trade off Black's fianchetto bishop, the key defender on g7. Black, in return, presses down the open c-file with a rook. The exchange sacrifice on c3 (the rook takes the knight) is the most thematic way to demolish White's camp, and Black often follows up with …b5 to drive away White's main defender on c3.
Where every piece belongs in the Dragon
If you are wondering how to play the Sicilian Dragon in practice, the plan stays consistent no matter what White throws at you:
- Dark-squared bishop to g7. This is the Dragon bishop, the soul of the opening; it rakes the long diagonal straight at White's queenside.
- King castles short. Black almost always tucks the king away with 0-0; only White gets to choose a wing.
- Queenside knight to c6, ready to reroute to c4 via e5 or a5 and trade off one of White's key defenders.
- Light-squared bishop to d7, occasionally e6, supporting the queenside play and the …Rxc3 ideas.
- Rooks to the half-open c-file, backed by …a6 and …b5 to pry the position open.
Learn these five reference points and you will rarely feel lost in the Dragon, even before the concrete theory below is committed to memory.
How to play the Sicilian Dragon: Theoretical Lines (the three main White tries)
Once the standard tabiya is reached after 1.e4 c5 2.Nf3 d6 3.d4 cxd4 4.Nxd4 Nf6 5.Nc3 g6, which is also the main branching point, White has three main tries: 6.Be3 (the Yugoslav Attack), 6.f4 (the Levenfish), or the quieter 6.Be2 (the Classical). The Yugoslav is by far the most popular choice. The Levenfish leads to an atypical Sicilian structure because of the early 7.e5 after 6.f4 Bg7. If White wants to keep things as positional as possible, the natural choice is the Classical Variation, 6.Be2, where both sides castle kingside after 6…Bg7 7.0-0 0-0.
Sicilian Dragon Yugoslav Attack: 10.0-0-0
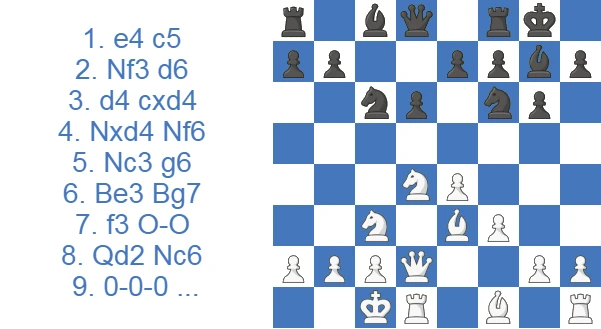
With 6.Be3, White already shows the intention of going into the Yugoslav Attack. The idea is straightforward: develop the queenside with Be3, Qd2 and 0-0-0, then roll the kingside pawns forward for an attack. Black fianchettoes with 6…Bg7, the Dragon bishop. The premature 6…Ng4?? fails to 7.Bb5+, costing Black material. Then 7.f3 is a multi-purpose move: it reinforces the center and prepares g4, so the g-pawn won't hang once the queen lands on d2. Black gets ready to attack the enemy king after tucking the king away with 7…0-0. After 8.Qd2 Nc6, White's two main options are 9.Bc4 and 9.0-0-0, played roughly equally often. The point of 9.0-0-0 before Bc4 is that it allows Black to hit back with 9…d5.
For example, 10.exd5 Nxd5 11.Nxc6 bxc6 12.Nxd5 cxd5 13.Qxd5 Qc7! and Black has full compensation thanks to active pieces. The bishop pair in such an open position will be a nightmare for White's king, so White should head for an endgame with 14.Qc5 rather than grabbing material with 14.Qxa8?! Bf5!, when Black has the double threat of …Qxc2# and …Rxa8.
To avoid all this …d5 business, White can play 9.Bc4 instead, which is the main move. The bishop on c4 not only controls d5 but also bears down on f7, which can matter in the later stages of the attack. With …d5 off the table, Black continues developing: 9…Bd7. After 10.0-0-0 we reach the classic Yugoslav setup. The immediate 10.h4 is playable, but tucking the king away first is the more principled choice here.
Yugoslav Attack Main Line: 12…Nc4
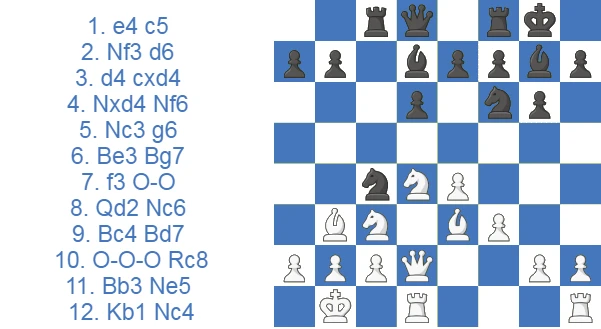
Black usually opens proceedings with 10…Rc8, setting up various discovered attacks down the c-file, for instance the …Nxd4 Qxd4 Ng4 idea, overloading the queen's defense of both bishops. Since the bishop on c4 is now loose, 11.Bb3 is a necessary precaution. The main line runs 11…Ne5, though the sideline 11…Nxd4 is also worth a look: 12.Bxd4 b5 13.h4 a5 14.h5 a4 15.Bxf6 exf6 16.Bd5 b4 17.Ne2 f5, reaching a thoroughly double-edged position.
The point of 11…Ne5 is to reach c4 and break up one of White's bishops. Whether White plays 12.h4 or 12.Kb1, Black follows with 12…Nc4.
One illustrative line: 12.h4 Nc4 13.Bxc4 Rxc4 14.h5, opening the h-file, 14…Nxh5 15.g4 Nf6 16.Bh6, trading off Black's key defender and weakening the dark squares, 16…Nxe4, the only move to stay in the game, 17.Qe3 (17.Nxe4 Rxd4) 17…Rxc3!, the thematic exchange sacrifice, 18.bxc3 Nf6 19.Bxg7 Kxg7 20.Qh6+ Kh8 (20…Kg8?? would be fatal: 21.g5 Nh5 22.Rxh5! gxh5 23.Rh1 Qc8 24.Rxh5 Bf5, defending h7, 25.Nxf5 Qxf5 26.g6! Qxg6 27.Rg5, pinning and winning the queen).
The resulting position is objectively equal, but Black has to stay alert to White's attacking shots, such as 21.Nf5! Bxf5 (the only move; 21…gxf5 22.g5 with unstoppable mate on h7, or 21…Rg8 22.Qxh7! Nxh7 23.Rxh7+ Kxh7 24.Rh1#) 22.gxf5 gxf5 23.Rdg1 Rg8, and Black holds.
Yugoslav Attack Soltis Variation: 12…h5
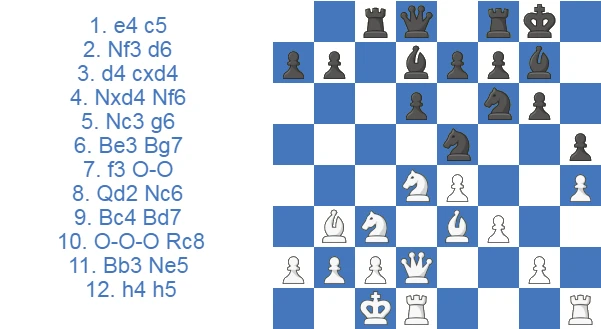
The most effective answer to 12.h4 is 12…h5, a move popularized by American grandmaster Andrew Soltis, played at once instead of 12…Nc4. It slows White's attack down before Black seeks counterplay. A pawn break is now much harder for White, who may try 13.Bh6 to remove the fianchetto bishop: 13…Bxh6 14.Qxh6. Here Black can surprise the opponent with the thematic 14…Rxc3 exchange sacrifice, and after 15.bxc3 Qa5 Black hammers the ruined pawn structure and grabs the initiative. White is forced onto the defensive with 16.Kb1 b5 or 16…Rc8 with the idea of …Nc4.
The Chinese Dragon: …Rb8 and a quick …b5
A modern wrinkle that has caused White plenty of headaches is the so-called Chinese Dragon. Instead of the automatic …Rc8, Black lifts the other rook with 10…Rb8, keeping the a8-rook behind a rolling b-pawn. After 11.Bb3 b5, Black is ready to sacrifice the b-pawn and blast open the b-file straight at White's king, while the familiar c-file pressure and …Qa5 ideas stay in reserve. It is a refreshingly direct way to handle the Yugoslav, and well worth a look if you find the main lines over-analyzed.
Black's defenses against 9.0-0-0: the Soltis and the …Rxc3 plans
Against the Yugoslav main line, Black has a clear defensive toolkit. The most respected modern setup is the Soltis Variation, named after American grandmaster Andrew Soltis: meet 12.h4 with 12…h5 rather than the immediate 12…Nc4, planting a pawn on h5 to jam White's storm before it gets rolling. With the kingside frozen, Black switches to queenside counterplay built around the …Ne5-c4 knight hop, the …a5/…b5 pawn storm, and above all the thematic …Rxc3 exchange sacrifice followed by …Qa5, hammering White's shattered queenside pawns and seizing the initiative. The same …Rxc3/…Qa5 idea recurs after 13.Bh6 Bxh6 14.Qxh6, where 14…Rxc3 15.bxc3 Qa5 forces White onto the defensive. Once these named plans become reflex, the Black side of the Yugoslav stops feeling like raw memorization.
Sicilian Dragon Classical Variation: 7.0-0
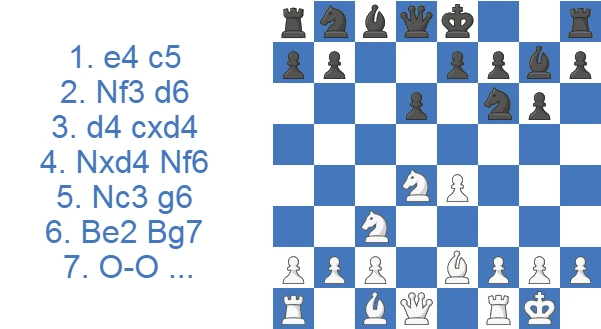
Not every White player wants the wild complications of the Yugoslav Attack, or they may simply prefer to limit Black's counterattacking chances. The Classical Variation, 6.Be2 Bg7 7.0-0, suits players after a quieter game. After 7…0-0, White has to decide where the dark-squared bishop belongs. The natural 8.Bg5 is possible, but a line like 8…Nc6 9.Nb3 Be6 10.f4 b5 11.Bxb5 Nxe4 12.Nxe4 Qb6+ shows why White often prefers e3 to g5.
So 8.Be3 Nc6, and White chooses between 9.Nb3 and 9.Qd2, each with its own pluses and minuses.
9.Nb3
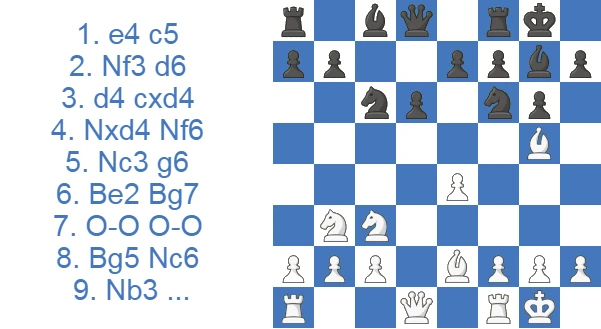
White may reasonably want to keep more pieces on the board to preserve attacking chances. The main question for Black is where the light-squared bishop belongs, and a case can be made for each option: 1) 9…a6 10.f4 b5 11.Bf3 Bb7.
2) 9…Bd7, or 3) 9…Be6, which is the most played move. The point of 9…Be6 is to control c4. For example: 10.f4 Na5 11.f5 Bc4, or 10…Rc8 11.Kh1 Na5 12.f5 Bc4.
The pawn structure carries certain imbalances, and both sides will work to exploit the weak squares it creates.
9.Qd2
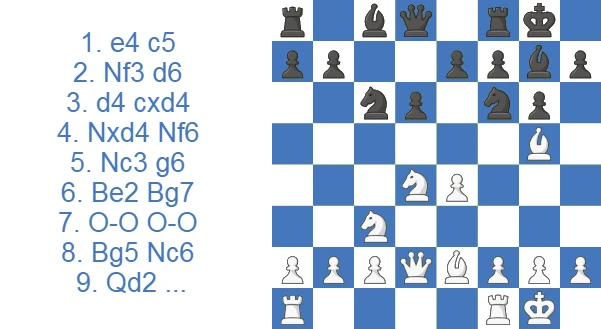
The move 9.Qd2 mainly connects the rooks and hints at Bh6 ideas to come. Its drawback is that it allows 9…d5, simplifying after 10.exd5 Nxd5 11.Nxd5 Qxd5 12.Nxc6 bxc6 13.Qxd5 cxd5 14.Rad1.
Levenfish Variation: 6.f4
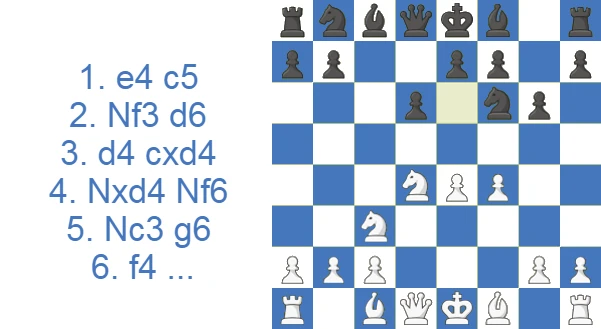
The Levenfish Variation with 6.f4 aims to back up the e5 push, kicking Black's kingside knight. Black would rather not allow that, so 6…Nc6 and 6…Nbd7 come into consideration. The more active 6…Nc6 is the better choice, as it also keeps the light-squared bishop's diagonal clear.
6…Nc6
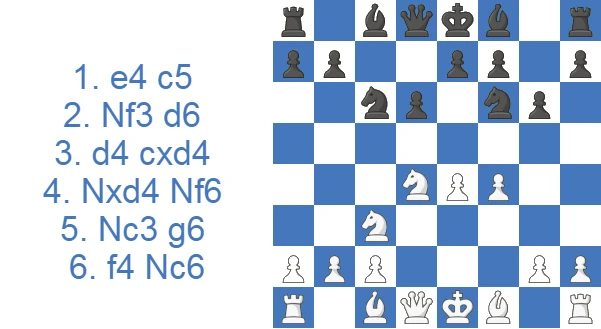
White has several tries here: capturing the knight, retreating it to f3, or pinning Black's knight. The direct 7.Nxc6 bxc6 8.e5 falls short, because Black holds with 8…Nd7, hitting e5, and after 9.Be3 Rb8 10.Qd2 Rxb2 Black is doing well.
The alternative 7.Nf3 poses no real problems either: 7…Bg7 8.Bd3 Qb6, and the downside of f4 starts to show. The weakened g1-a7 diagonal is a long-term headache for White.
After 7.Be2, Black equalizes with ease: 7…Bg7 8.Be3 (8.0-0 Nxe4, followed by …Nxd4) 8…0-0 9.0-0 Qb6 10.Qd3 Ng4. The Levenfish holds no terrors for Black, since White has nothing ambitious after 6…Nc6.
6…Bg7
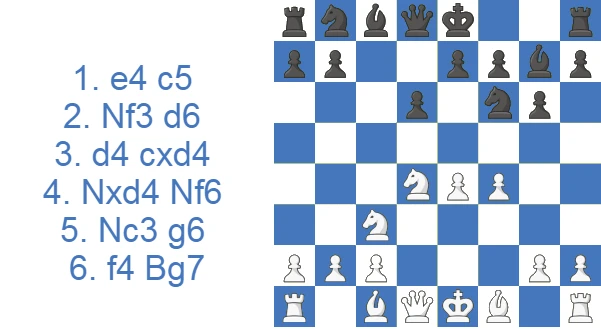
Ignoring White's e5 idea is the wrong approach for Black. For instance, 6…Bg7 7.e5 dxe5 8.fxe5 Nfd7 (8…Nh5 9.Bb5+ Bd7 10.g4 traps the knight) 9.e6!, wrecking Black's structure, 9…Ne5 10.exf7+ Nxf7 11.Be3, and Black is left in an unpleasant spot. The isolated e7-pawn is likely to be a long-term target.
How to Play Against the Sicilian Dragon as White: which weapon to pick
If you are the one facing the Dragon, the good news is that you hold the initiative and the choice of battlefield. The bad news is that only one approach really fights for an advantage, so it pays to know what you are signing up for.
- The Yugoslav Attack (6.Be3 with f3, Qd2, 0-0-0) is the critical test. Castle long, throw the h-pawn forward, and aim for the classic sac-sac-mate down the h-file. Everything else lets Black breathe.
- The Classical Variation (6.Be2) keeps the kings on the same wing and the game positional. It is safe and sound, but Black equalizes comfortably with accurate play.
- The Levenfish Attack (6.f4) is a one-idea bid for a quick e5 break; well met by 6…Nc6, it promises little against a prepared opponent.
- Sidelines such as 6.g3 sidestep the theory at the cost of ambition.
In short: choose the Yugoslav if you want to punish the Dragon, and the Classical if you simply want a sound, low-maintenance game.
White's quieter and sideline tries: Levenfish, Classical and the Alapin
The Yugoslav Attack is the only line that truly fights for an advantage, but a Dragon player has to be ready for the alternatives. The Classical Variation (6.Be2) keeps both kings on the kingside and steers toward a positional middlegame; Black equalizes comfortably with accurate play, typically by contesting the c4-square with …Be6 and …Na5 or breaking with a timely …d5. The Levenfish Attack (6.f4) is a one-idea bid for a quick e5 push, well met by 6…Nc6, after which White's loosened g1-a7 diagonal becomes a liability. Outside the Open Sicilian altogether, the Alapin (2.c3) and the King's Indian-style fianchetto (g3) sidestep Dragon theory entirely at the cost of ambition, denying Black a target but rarely promising White anything concrete. Which of these you face tells you whether to brace for a brawl or settle in for a maneuvering game.
The Dragon at club level versus the top
Here is the honest modern picture. Decades of engine analysis and correspondence testing have shown that White holds a small but persistent edge in the sharpest Yugoslav lines, which is why the Dragon has all but vanished from elite over-the-board play. Super-grandmasters simply will not walk into preparation that an opponent can verify to move thirty with a strong engine. The same opening thrives in blitz, rapid and club chess, where almost nobody recalls the critical novelty and where the attacker who races faster usually wins outright. The rule that keeps winning me material is simple: if you are not at least one tempo ahead on the queenside, stop storming, play the …Rxc3 exchange sacrifice straight away and tear open White's king before the h-file does the same to yours.
Sicilian Dragon vs Accelerated Dragon: What's the Difference? (Classical, Accelerated and Hyper-Accelerated)
Newcomers often confuse the classical Sicilian Dragon with its faster cousins, and the distinction matters, because each invites a completely different response from White. The line covered on this page, 1.e4 c5 2.Nf3 d6 3.d4 cxd4 4.Nxd4 Nf6 5.Nc3 g6, is the true Dragon, where Black has already committed to …d6 and …Nf6.
The Accelerated Dragon (1.e4 c5 2.Nf3 Nc6 3.d4 cxd4 4.Nxd4 g6) delays …d6 in order to play the freeing …d5 break in a single move. The catch is that White can clamp the center with 5.c4, the Maroczy Bind, a structure that is simply unavailable against the classical Dragon because 5.Nc3 rules it out. There is even a Hyper-Accelerated Dragon with an early 2…g6, though it hands White extra options such as 3.c4 and is rarely seen at the top level.
| Line | Move order | White’s critical try | Character |
|---|---|---|---|
| Sicilian Dragon (Classical) | 2 d6 and 5 g6 | Yugoslav Attack | Razor-sharp, theory-heavy |
| Accelerated Dragon | 2 Nc6 and 4 g6 | Maroczy Bind (5.c4) | Positional, less forcing |
| Hyper-Accelerated Dragon | 2 g6 | 3.c4 or 3.d4 cxd4 4.Qxd4 | Flexible but concedes space |
If you enjoy clamp-and-squeeze structures, the Maroczy Bind is well worth studying alongside the Dragon. For the purposes of this guide, every line below assumes the classical move order.
Three modern grandmaster Dragons to learn from
1. Fabiano Caruana vs. Vladimir Kramnik, 2023
Caruana meets an early …h5 sideline by castling by hand with Kf2, then cashes in a queen trade and a clean extra pawn that he converts in a long technical grind.
2. Magnus Carlsen vs. Gawain Jones, 2021
A model Yugoslav against one of the Dragon's leading specialists: Carlsen keeps the bishop on the f2-square, defuses Black's counterplay, and squeezes the endgame to nothing.
3. Richard Rapport vs. Wang Hao, 2022
Rapport allows Black the thematic …Nc4 and …Rxc2 raid, then untangles with cool piece play and shows how White converts when the queenside storm runs out of fuel.
Sicilian Dragon Traps to Know (for Both Colors): the four you'll actually meet
1.e4 c5 2.Nf3 d6 3.d4 cxd4 4.Nxd4 Nf6 5.Nc3 g6 6.f4 Bg7 7.e5 dxe5 8.fxe5 Ng4?? is a decisive blunder, because Black has no good answer to 9.Bb5+!. The reply 9…Bd7 hangs the knight to 10.Qxg4, while 9…Kf8 allows the discovery 10.Ne6+ followed by Qxd8+, winning the queen.
And 9…Nc6 fails too, in view of 10.Nxc6 bxc6 11.Bxc6+, forking the rook.
The Levenfish trap above is the most notorious, but the Dragon is littered with pitfalls in both directions. A pawn snatched a move too early, or a bishop sortie at the wrong moment, can settle the game on the spot.
In the Yugoslav Attack, the tempting 6.Be3 Ng4?, hoping to win the dark-squared bishop, runs straight into 7.Bb5+!. After 7…Bd7 8.Qxg4 White simply emerges a clean piece up, because the knight on g4 was never truly defended. Remember the golden rule of the Dragon: only play …Ng4 when you can actually trade it for White's e3-bishop.
In the Classical Variation, White's greedy 8.Bg5 Nc6 9.Nb3 Be6 10.f4 b5 11.Bxb5? backfires after 11…Nxe4! 12.Nxe4 Qb6+, when the check and the loose pieces hand Black the material back with interest. This is precisely why seasoned players keep the bishop on e3 rather than g5.
Deep in the 9.0-0-0 d5 main line, after 10.exd5 Nxd5 11.Nxc6 bxc6 12.Nxd5 cxd5 13.Qxd5 Qc7, the queen-grab 14.Qxa8? Bf5! turns the tables: Black threatens both …Qxc2# and the trapping of the wandering queen. White should bail out with 14.Qc5 and keep the balance.
What the Dragon gives you, and what it costs
The trade-off is easy to state and harder to live with at the board: huge attacking potential in exchange for a heavy memory load and zero margin for error.
Pros
- Presents considerable tactical hurdles for White as they engage in a race toward opposite side castling
- The Dragon bishop on g7 guards Black's king and presses on White's queenside.
Cons
- Heavily theorized, and each inaccuracy in the opening or middlegame stage can cost the game.
- Demands a high degree of precision in defensive abilities.
Case Study: Carlsen vs Jones, Tata Steel 2021
For an honest picture of why the Yugoslav still scores well at the very top, it is hard to beat this game. Gawain Jones is one of the world's leading Dragon specialists and has written books on it; Carlsen beat him with the Black pieces' own thematic structure, and the game is a clinic in how White neutralizes the Dragon without ever overreaching.
Watch how Carlsen sidesteps the main-line slugfest. After 7.Qd2 Jones tries 7…Ng4, the very sortie that is a blunder one move earlier; here it is legal but harmless, and 8.Bg5 h6 9.Bh4 just makes Black spend tempi chasing the bishop while the knight has to trek back with 10…Nf6. The key choice is 12.Be2 and 14.0-0: Carlsen castles short rather than long. This is the quiet anti-Dragon recipe. With both kings on the same wing there is no pawn-storm race, and the Dragon bishop loses its main target.
The turning point is the central operation 15.Nd5. After 15…Nxb3 16.axb3 Nxd5 17.exd5 Bf5 18.c3 e5 19.dxe6 Bxe6, Carlsen has traded down into a position where his structure is sounder and Black's …d6 pawn is a chronic weakness. The decisive idea is 22.Bd4 followed by 23.Bxg7, swapping off the famous Dragon bishop. Once that piece is gone, Black's whole counterattacking concept evaporates and the g7-king is permanently a touch draughty.
From there it is pure Carlsen technique. He wins the exchange on move 34 (33…Bxd1 34.Bxb5 axb5 35.Rxd1), keeps the rooks active, and pushes his queenside majority. The practical takeaway for a club player is twofold. As Black, do not assume the Dragon bishop is untouchable; if White is willing to trade it and you have no concrete attack to show for it, your position can go quietly downhill, exactly as Jones's did. As White, you do not have to win the h-file race to beat the Dragon. Castle short, trade the g7-bishop, and grind. Against an unprepared opponent that is often easier than memorizing the sac-sac-mate lines.
Should you play the Dragon?
The Sicilian Dragon is an iconic opening that has gone in and out of fashion throughout the game's history. Its appeal is clear: it gives Black a sound way to seize the initiative and play for a win, which has always drawn ambitious players to it. That same popularity invited exhaustive analysis, and the resulting engine-era theory is part of why the Dragon has faded at the very top. Even so, it remains one of the most combative ways to meet 1.e4, and at club level it is as dangerous as ever. If you enjoy clear attacking plans and don't mind doing your homework, the Dragon is well worth taking up.
Test Yourself: Sicilian Dragon Positions
Make the move on the board. Hint gives you a nudge, Answer shows the move and why it works.
Sicilian Dragon. White has played 5.Nc3. Which pawn move prepares the fianchetto on g7 and gets Black's king ready to castle?
Classical Dragon. White's knight retreated to b3. Which bishop move controls c4 and is the most played here?
Levenfish Variation. White's f4 prepares e5, kicking the f6-knight. Which knight move challenges the d4-knight and keeps the c8-bishop's diagonal open?
Levenfish, 6.f4 Bg7 7.e5. White's pawn attacks the f6-knight. Which pawn capture takes the advanced pawn?
Yugoslav setup. Black's ...Ng4 eyes the e3-bishop and is guarded only by the c8-bishop. Which bishop check wins a piece?
Yugoslav Attack. Black's ...Nc6 prepares ...d5. Which bishop move prevents that and eyes f7?
Chinese Dragon. Black's rook stands on b8. Which pawn push is ready to sacrifice and blast open the b-file at White's king?
Yugoslav Attack. Black's knight landed on c4, where it attacks your queen and the e3-bishop. Which capture removes it?
Soltis Variation. Black jammed the h-pawn with 12...h5. Which bishop move offers to trade Black's key dark-squared bishop?
Black captured the c3-knight with the rook. Which recapture with the queen keeps the pawns around White's king intact?