
 By

Queen's Gambit in Brief
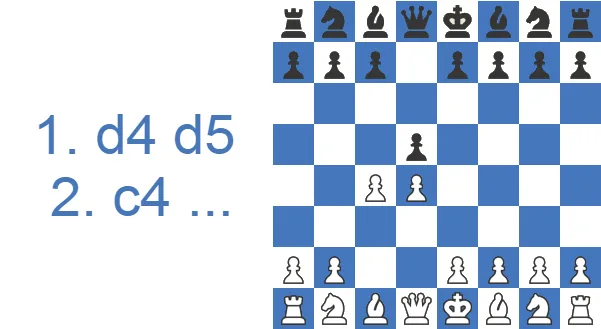
The Queen's Gambit starts with 1.d4 d5 2.c4. White offers the c4-pawn to pull Black's d5-pawn away from the center and build a strong pawn pair on d4 and e4. It is not a real sacrifice. White wins the pawn back in nearly every line, which is one reason the Queen's Gambit is among the soundest and most popular openings at every level.
- First moves: 1.d4 d5 2.c4
- Main idea: trade a flank pawn for a strong center and easy development.
- Black's three main replies: Declined (2...e6), Accepted (2...dxc4), and the Slav (2...c6).
- Best for: players who prefer solid, strategic positions over wild tactics.
- Is the pawn lost? No. White regains it in nearly every line.
Study the Queen's Gambit Opening as White or Black
The Queen's Gambit is the oldest fight in chess over the d5-square, and sooner or later you will sit on both sides of it.
Play the Queen's Gambit as White
White offers the c4-pawn to pry Black's grip off the center, then occupies it by force. Learn why the Queen's Gambit pawn offer costs nothing, what White's core plan looks like, and the cleanest order to put the pieces on their squares.
Meet the Queen's Gambit as Black
Settling on how to face the Queen's Gambit comes down to one choice: capture on c4 or keep the d5-point. Compare Black's main replies and the structures they produce, from the Accepted lines to the Slav, the most trusted Queen's Gambit counter at every level.
Key Ideas and Strategy in the Queen's Gambit: Why White Gives Up the c4-Pawn
The idea behind the Queen's Gambit is simple. By offering the c4-pawn, White asks Black to make a choice: accept the pawn and weaken the hold on the center, or decline it and settle for less space and a more passive setup. That trade-off is the strategic fight that defines the whole opening.
There is a practical reason for 2.c4 as well. White wants to play the queenside knight to c3 without it blocking the c-pawn. Clearing that path lets White build a harmonious setup. If Black takes with 2...dxc4, White gets fast piece activity and central pressure in return. If Black declines, White keeps the larger share of the center and usually the smoother development.
The Queen's Gambit is a strategically sound opening trusted by world champions for over a century, from Capablanca and Botvinnik through to today's top players.
Why It's Called the Queen's Gambit (and Why It Isn't a Real Sacrifice)
The name has nothing to do with the queen as a piece. The gambit pawn on c4 sits on the queenside, the half of the board nearest the queen. That separates it from the King's Gambit (1.e4 e5 2.f4), where the offered pawn sits on the kingside. Both names are centuries old and simply describe which wing the pawn comes from.
The word "gambit" is only half-true here. A genuine gambit means giving up material for lasting initiative. In the Queen's Gambit, White regains the c4-pawn in nearly every line with simple moves like e3 and Bxc4, so you are seldom down material for long. Think of 2.c4 less as a sacrifice and more as a lever. It pries Black's d5-pawn off the center in exchange for a flank pawn White expects to recover.
What the Position Is Really About: Imbalances, Structure, and Piece Play
It helps to view the Queen's Gambit through three lenses. The first is the imbalance. White trades a flank pawn for central space, betting that better development outweighs the temporary material.
The second is pawn structure. Depending on Black's choice you get very different middlegames. Many Accepted and Tarrasch lines produce an isolated queen's pawn (IQP), where White attacks the lone d-pawn while Black uses the open files and active pieces. The Exchange Queen's Gambit Declined gives an asymmetrical Carlsbad pawn structure instead, the home of the minority attack.
The third is piece coordination, and here the recurring story is Black's light-squared bishop on c8. Hemmed in behind its own pawns, it needs a clean way out, through ...c5, through ...b6 and ...Bb7, or through an eventual ...dxc4. Freeing it is one of Black's central problems and the thread connecting almost every variation.
Here are some numbers drawn from online games on Lichess, which give a feel for how the opening actually scores in practice:
| Rating level (Lichess) | White wins | Draw | Black wins |
|---|---|---|---|
| 800, beginner | 53.5% | 4.0% | 42.4% |
| 1000, novice | 53.5% | 3.9% | 42.7% |
| 1200, improver | 53.6% | 3.8% | 42.6% |
| 1600, club | 52.6% | 4.4% | 43.0% |
| 1800, club | 51.9% | 5.1% | 43.0% |
| 2000, advanced club | 51.1% | 6.1% | 42.9% |
Source: Lichess opening explorer, blitz, rapid and classical games at the position after 1.d4 d5 2.c4. Figures are win rates by Lichess rating band; draws are rare at these levels.
Watch the Queen's Gambit in Action
If you'd rather see the ideas demonstrated on a board, the video below walks through the basics.
How to Play the Queen's Gambit: The White Side's Core Plan
Play 1.d4 to stake out the center with a pawn, then follow with 2.c4. That second move is the gambit: you attack Black's d5-pawn and invite the capture 2...dxc4. The point is not to give away material. If Black grabs the pawn, you regain it later with moves like e3 and Bxc4 while finishing your development faster.
The plan for White stays the same in almost every line. Support the center, develop the knights to c3 and f3, bring out the dark-squared bishop, castle short, and look for the e3-e4 break once your pieces are ready. You are not trying to win in the opening. You are building a position that plays itself in the middlegame.
Move Order: Building White's Setup Move by Move
- 1.d4: claim the center.
- 2.c4: offer the gambit and pressure d5.
- 3.Nc3: add a second attacker to d5.
- 4.Nf3 and e3: develop and free the light-squared bishop.
- Castle short, then prepare the e3-e4 advance.
If you only remember one thing, keep the d4-pawn protected and aim for e4. Everything else in the Queen's Gambit flows from that.
Main Variations in the Queen's Gambit: Black's Replies and the Structures They Create
Now let's look at the most common replies Black has available:
- 2...e6 (Queen's Gambit Declined)
- 2...dxc4 (Queen's Gambit Accepted)
- 2...c6 (Slav Defense)
- 2...e5!? (Albin Counter-Gambit)
- 2...Nf6?! (Marshall Defense)
Queen's Gambit Declined: 2.c4 e6
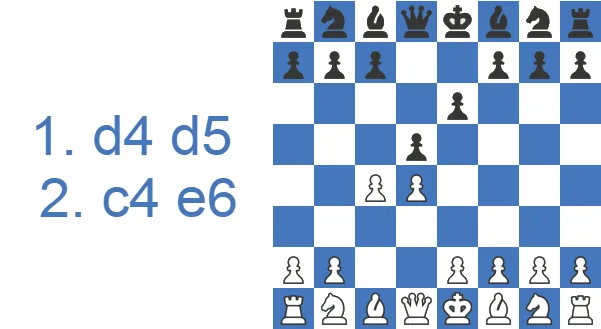
The Queen's Gambit Declined appears when Black turns down the offer on c4 and props up the center with e7-e6. It is a very sound choice. It opens a line for the dark-squared bishop to develop while keeping the option of recapturing on d5 with a pawn. You will see why that matters when we get to the dubious Marshall Defense. If White wants to fight for an opening edge in the current state of theory, two main setups stand out, and both hinge on where the light-squared bishop goes: fianchettoed or not. The Catalan is defined by 3.Nf3 Nf6 4.g3 (below), and its plan is to fianchetto the light-squared bishop before striking in the center.
It is an ambitious plan, because it prepares the king's bishop for a long diagonal where it presses on the center and the queenside. The flip side is that the c4-pawn now becomes more tempting for Black to grab, since the light-squared bishop is no longer ready to recapture it quickly. Consider the diagram below.
Black has just played 6...dxc4, finally accepting the gambit. If White wants to win it back with the queen and then tuck that piece onto a safe square, three tempi are needed, as the green arrows show, and Black can use that time to solve the problem of the light-squared bishop on c8. White can also skip the fianchetto with e2-e3, keeping an eye on c4. With that setup White claims an edge based on better-placed pieces, since Black stays saddled with the c8-bishop. After 3.Nf3 Nf6 4.Nc3 Be7 5.Bf4 0-0 6.e3:
we can see that Black would much rather have the light-squared bishop outside the pawn chain, say on f5. This chronic problem runs through most lines of the Queen's Gambit. More often than not, Black tries to free the bishop either by accepting an isolated pawn in the center (with c7-c5) or by playing b7-b6 and Bc8-b7, which leaves weaknesses on the c-file.
The Minority Attack: White's One Winning Plan to Remember
If you take a single plan away from this opening, make it the minority attack. It arises in the Exchange Queen's Gambit Declined, where the asymmetrical Carlsbad structure leaves White with two queenside pawns against Black's three. White pushes the queenside pawns with b4-b5, deliberately advancing fewer pawns than Black has on that wing.
The point is not to win pawns. It is to create a weakness. After b5xc6, Black is left with a backward pawn on c6 and a hole on c5 or d5 for White's pieces. Kasparov used exactly this method against Karpov to grind out structural wins. It also shows why Black's passive light-squared bishop hurts so much: the bishop watches the b-file action without ever influencing it.
The Tarrasch and the Other Declined Sublines
Beyond the main Declined move 2...e6, several named sublines are worth knowing. The Tarrasch Defense (3.Nc3 c5) is the most aggressive. Black accepts an isolated queen's pawn in return for free piece play and an active light-squared bishop, the very piece that suffers in other lines. It is principled but demands precise handling of the IQP.
The Cambridge Springs (after 3.Nc3 Nf6 4.Bg5 Nbd7 5.e3 c6 6.Nf3 Qa5) uses a quick ...Qa5 to pin and pressure White's queenside, while the Vienna Variation (...Nf6 and ...dxc4 with sharp central play) leads to far more forcing positions. When Black supports d5 with both ...c6 and ...e6, you reach the Semi-Slav, a distinct battleground that combines the Slav's solidity with QGD flexibility. Each name points to a different pawn structure and a different plan for the c8-bishop.
Queen's Gambit Accepted: 2.c4 dxc4
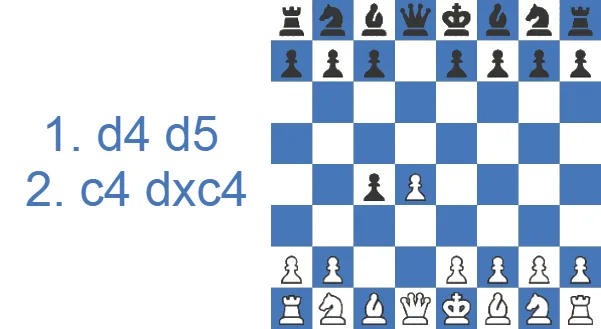
This is perhaps the critical test of the Queen's Gambit: Black simply accepts it. We have already discussed the pros and cons of this move, so let's see how those ideas turn into concrete play. White has two main choices: play aggressively and grab the whole center as fast as possible with 3.e2-e4, opening lines for the pieces, or play more positionally with 3.Nf3 or 3.e3. After the former, the game can continue 3...Nf6 4.e3 e6 5.Bxc4:
and again Black struggles with the awkward c8-bishop and a space disadvantage. So what was the point of 2...dxc4? White's light-squared bishop is a little exposed and can be hit with b7-b5, which lets Black develop the light-squared bishop to the active b7-square with gain of tempo. Even so, the general view is that this is not enough to offset White's greater central control and easier development.
The Central Variation (3.e4): White can also play the aggressive 3.e4, grabbing the full center at once. After 3...Nf6 4.e5 Nd5 the game turns sharp and theory-heavy. It is a fine weapon if you like forcing lines, but the calm 3.Nf3 is easier to handle as a first repertoire choice.
Queen's Gambit Accepted: Naming Black's Third-Move Choices
Once Black plays 2...dxc4, White usually recovers the pawn with e3 and Bxc4, but Black's third move sets the tone. The Old/Classical lines run with 3...Nf6 (sometimes called the Alekhine System when Black follows up ...e6 and ...c5), heading for sound IQP structures. The McDonnell Defense (3...e5) strikes the center at once, daring White to prove that development is worth the pawn. The Modern lines lean on a quick ...e6, ...c5 and ...Bb7 to solve the light-squared bishop early. The Rubinstein-style ...c5 setups challenge d4 immediately.
Then there is the Greco Variation (3...b5), the greedy try, clinging to the extra pawn. It is the line that justifies White's a4 and b3 break, after which Black's queenside falls apart. Knowing these branches by name turns generic "recapture the pawn" advice into a real plan.
Slav Defense: 2.c4 c6
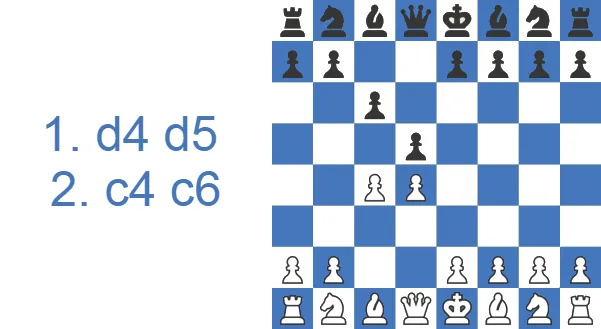
Along with the Queen's Gambit Declined, the Slav is one of Black's main answers to the Queen's Gambit. It shares some goals with the QGD but is more ambitious, since it leaves the diagonal open for the light-squared bishop and hints that White should soon protect the c4-pawn, because b7-b5 is now a real threat. It has two drawbacks: it does nothing for kingside development, and it is still awkward to develop the c8-bishop without trouble for the b7-pawn. For instance, after the natural 3.Nf3 Nf6 4.Nc3 Bf5, White can strike at once with 5.cxd5! cxd5 6.Qb3, when Black cannot comfortably defend the b7-pawn. For that reason Black often prepares the bishop's development with 4...a6:
which introduces the idea of Ra8-a7 to defend the pawn, among others. That move costs some time, which is not ideal this early. The QGD and the Slav are closely related and can transpose into each other in the opening, and the middlegame ideas often resemble one another for both sides.
Albin Counter-Gambit: 2.c4 e5!?
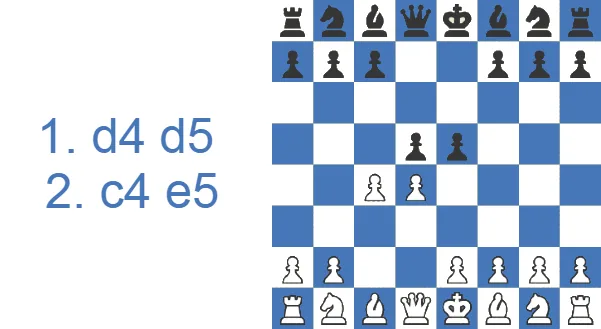
The Albin Counter-Gambit is an energetic move that modern theory frowns on, but it is a genuinely interesting weapon at club level, since White has to be precise to keep an edge. With 2...e5, Black says it has no interest in suffering with less space and worse pieces. It wants more space and freer development instead. Black gets that after White takes on e5 (as it should) and Black answers 3...d4.
Both bishops are open and the d4-pawn gives Black a fine grip on the center. It looks ideal for Black. The catch is that Black has given up a pawn to get there, and the time needed to win it back lets White build a useful lead in development (a similar theme to the Catalan, except there it was White trying to recover the pawn). In practice play often continues 4.Nf3 Nc6 5.g3 Nge7, where you can already see Black wasting time with the knights to regain the e5-pawn.
Marshall Defense: 2.c4 Nf6
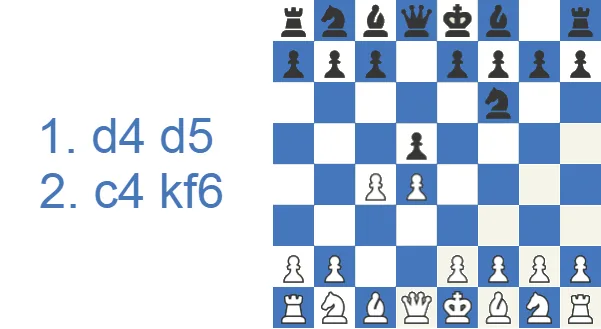
The Marshall Defense is defined by 2...Nf6. It is not a good defense, and comparing it with the earlier lines makes the reason clear. Black does not reinforce the center with a pawn, which lets White capture on d5 and gain central control without spending any tempi shuffling pieces. As if that were not enough, once Black recaptures on d5 with the knight, the advance e2-e4 comes with tempo. Recapturing with the queen runs into the same problem: Nb1-c3 develops with gain of tempo.
How Black Sidesteps the Queen's Gambit Entirely
Black does not have to enter the gambit at all. By answering 1.d4 with 1...Nf6 instead of 1...d5, Black keeps the d-pawn home and steers toward the Indian Defenses. The Nimzo-Indian (after 2.c4 e6 3.Nc3 Bb4) pins the knight and fights for the center with pieces. The closely related Bogo-Indian (3.Nf3 Bb4+) and Queen's Indian (3.Nf3 b6) follow similar logic, often freeing that troublesome light-squared bishop to b7. The King's Indian invites White to build a big center and then attacks it, and 1...f5, the Dutch Defense, grabs kingside space from the first move.
None of these allow a Queen's Gambit, so White has to be ready for them, and the c8-bishop problem that defines the QG never arises in quite the same way. Move order, and the transpositions it allows, is half the battle in 1.d4 openings.
How to Play Against the Queen's Gambit as Black: Choosing Your Defense
Black has no reason to fear the c4-pawn. The opening has stood for over a century precisely because Black has several reliable answers. Your choice depends on the kind of game you want.
Decline It: 2...e6 (Queen's Gambit Declined)
The most solid reply. Black supports d5 with the e6-pawn and aims for a sturdy, hard-to-crack structure. The downside is a slightly passive light-squared bishop, which Black has to free later with ...c5 or ...dxc4 and ...e5.
Stay Flexible: 2...c6 (Slav Defense)
Black props up d5 with the c-pawn instead, keeping the c8-bishop's diagonal open. The Slav is rock-solid and a favorite of players who want safety without locking in the bishop.
Accept It: 2...dxc4 (Queen's Gambit Accepted)
Black takes the pawn, gives back the center for now, and plans to strike with ...c5 and ...e5. This leads to open, active positions where development matters more than the extra pawn.
Counter-Attack: 2...e5 (Albin Countergambit) and 2...Nc6 (Chigorin)
For players who want to fight from move two, the Albin (2...e5 3.dxe5 d4) and the Chigorin (2...Nc6) throw White off balance. They are riskier and less reliable at higher levels, but they make excellent surprise weapons in faster games.
Traps in the Queen's Gambit: Four Tactics to Know
You should never pick an opening for its traps, because if your opponent sidesteps them you are usually left worse. Still, there are a few that arise naturally from the position, and it pays to know them. Below are some typical traps from the variations we have covered.
1.d4 d5 2.c4 e6 3.Nf3 Nf6 4.g3 Be7 5.Bg2 0-0 6.0-0 dxc4. Now that the bishop has left the f1-a6 diagonal, this capture makes a lot of sense. 7.Qc2 a6 (hinting at b7-b5 and Bc8-b7) 8.a4 (stopping b7-b5) Bd7 9.Qxc4 Bc6 10.Nbd2, a natural move preparing Nb3. But there is a problem.
10...Bb5! The bishop cannot be captured and the e2-pawn falls.
1.d4 d5 2.c4 dxc4 3.e3 (preparing to recapture on c4 as soon as possible) 3...e5 (striking at once; White should not take, because Black can trade queens and misplace White's king) 4.Bxc4 exd4 5.Nf3 (quick development, and a small trap at the same time). Should Black grab a second pawn with 5...dxe3?
No. White wins with 6.Bxf7+!
1.d4 d5 2.c4 c6 3.cxd5 (a fairly harmless line if Black knows what to do; White argues that better development will cause some problems) cxd5 4.Nc3 Nc6 5.Nf3 Nf6 6.Bf4 Bf5 7.e3 a6 (a logical move, preparing b7-b5 to expand on the queenside) 8.Be2 e6 9.Qb3 (how does Black defend b7?) 9...Na5 10.Qa4+ b5. Not like this.
11.Bxb5! axb5 12.Nxb5 (there is no way to avoid losing material) 12...Qd7 13.Ne5 Bb4+ 14.Qxb4 +-.
1.d4 d5 2.c4 dxc4 3.e3 b5 (Black tries to hang on to the extra pawn, but the plan has a flaw) 4.a4 c6 (reinforcing the pawn chain). What now?
5.axb5! +- Black's pawn chain collapses, since 5...cxb5?? loses the rook to 6.Qf3.
Famous Queen's Gambit Games: Three Instructive Examples
The Queen's Gambit Beyond the Board
Few openings have had a cultural moment to match this one. The 2020 Netflix series The Queen's Gambit, following the fictional prodigy Beth Harmon, sent chess-set sales soaring and drew millions of new players to the game. The title fits. Like the opening, the show is about quiet positional pressure and long-term planning rather than flashy sacrifices.
The series takes plenty of dramatic license, but it put a centuries-old opening back in the spotlight. If a binge-watch is what brought you here, the real Queen's Gambit rewards the same patient, structural thinking the show romanticized.
How I Play the Queen's Gambit as White
White is my side of the Queen's Gambit, and this game was the Declined. At 2003 against 1986 it went 1.d4 d5 2.c4 e6 3.Nc3 Nf6 4.Nf3 Bb4, the Ragozin. After 5.e3 Nc6 6.Qb3 O-O 7.Ne5 Ne4 8.Nxc6 Bxc3+ 9.bxc3 bxc6 10.cxd5 cxd5 the c-pawn tension was gone, and the imbalance left on the board was that he had traded his dark-squared bishop for my knight.

So I used mine: 11.Ba3, then 17.Bc5, on the diagonal his bishop had left. It went wrong first. My 22.Rb1 dropped the reading from -2.48 to -5.89. It came back to level, and then 26...Qa4 lost it the other way, 0.00 to +4.32. After 27.Qxe3 the finish was 28.Qe8+ Kg7 29.Qe5+ Kh6 30.Bf8#.

The pawn on c4 was never the story here, which is the point the structure section above makes. What decided the game was an exchange on move eight, and the mate arrived 22 moves later on the squares that exchange gave up. Count what the trade on c3 leaves behind before you count pawns.
Strengths and Drawbacks at a Glance
Pros:
- Controls the center early with pawns on d4 and c4
- Develops the pieces smoothly, especially the queenside knight
- Puts immediate pressure on Black, forcing strategic decisions
- Leads to a small but stable edge in many mainline positions
- Builds positional understanding for improving players
Cons:
- Temporarily gives up a pawn, which can confuse beginners unfamiliar with compensation
- Demands accuracy in some lines to regain the pawn or avoid falling behind
- If mishandled, White can lose time chasing the c4-pawn in the Accepted
Case Study: Aronian vs. Anand, Mexico City 2007
The best way to see these ideas working together is a full top-level game. This is the Aronian–Anand encounter from the 2007 World Championship Tournament, a Semi-Slav where Anand, with Black, shows how active piece play and the freed light-squared bishop can turn the tables on White's central pawns. Treat it as a model game rather than a recipe to memorize.
A move-by-move walk through the turning points:
- 1.d4 Nf6 2.c4 e6 3.Nf3 d5 4.Nc3 c6: by move four this is already a Semi-Slav, the structure where Black supports d5 with both ...c6 and ...e6. Notice how the whole game still revolves around that c8-bishop we kept flagging.
- 5.Bg5 h6 6.Bh4 dxc4 7.e4 g5 8.Bg3 b5: this is the Botvinnik-style sharp line of the Anti-Moscow Gambit. Black grabs the c4-pawn and immediately throws the kingside pawns forward with ...g5 and ...b5 to hang on to it and gain space. It is the opposite of a quiet QGD: both sides commit early.
- 11...Bb7: the key positional point. The light-squared bishop, the problem child of almost every Queen's Gambit line, comes to the long diagonal under its own steam. Once it is active, Black's whole position breathes.
- 17.f3 c5: Black challenges the center exactly the way the strategy section recommends, hitting d4 with ...c5 to free the position and open lines for the better-coordinated army.
- 21.Nd5 exd5 22.exd5: Aronian sacrifices a knight to blow open the center and chase Black's king, the kind of complication White hopes for when down a pawn. The position is genuinely double-edged here.
- The turning point is around moves 25–33. White's pieces (the rook on d5, the bishops) look menacing, but Anand keeps finding active replies (25...Ne4, the cool 31...Qf7) and never lets the attack land. The bishop pair and the well-placed knight on e4 hold everything together.
- 36...Qc7+ 37.g3 Re3: Black's rook crashes into the third rank and White's king is suddenly the more exposed of the two. After 39...f4 and 41...fxg3+, the pawns and pieces converge on g2 and White resigned.
The practical takeaway for a club player: in the Queen's Gambit, the pawn White lent you is rarely the whole story. If Black can untangle the light-squared bishop and hit the center with ...c5 before White finishes coordinating, the extra space can turn into overextension. Develop with a plan, free your worst piece early, and the material usually sorts itself out.
Final Takeaways for Your Own Games
The Queen's Gambit is a principled, reliable opening that hands White early central control, smooth development, and long-term pressure against Black's position. Challenging the center with 2.c4 while exploiting Black's difficulty in developing the light-squared bishop makes this opening a strong choice at all levels. Whether Black accepts or declines the gambit, White retains practical chances for an advantage with accurate play. For beginners, it is an excellent foundation for learning the strategic side of chess. I came to 1.d4 fairly late myself, and the Queen's Gambit was the line that finally made positional planning click rather than feel like memorization.
Test Yourself: Queen's Gambit Positions
Set up each position and find the best move. Use Hint for a nudge or Answer to reveal the engine’s top move.
Find the best move.
Find the best move.
Find the best move.
Find the best move.
Find the best move.