
 By
By 
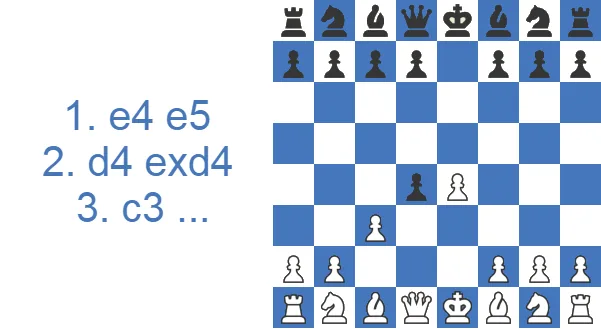
By the mid-1800s the Danish player Martin Severin From had published the first detailed studies of the line, and the opening took his country's name. As 20th-century theory advanced and Black's defensive resources came into focus, the gambit faded from serious play, though it never lost its bite as a practical surprise.
Is the Danish Gambit Good? The Short Version
- It is an aggressive pawn sacrifice in which White gives up one or two pawns to open the center and aim both bishops at Black's kingside.
- Black's most reliable replies are to accept with 3...dxc3 and then hand a pawn back with an early ...d5, or to decline immediately with 3...d5.
- Against precise defense the opening is objectively unsound, which is why it has all but vanished from elite play. It remains a dangerous practical try in blitz and at club level, where White scores well against unprepared opponents.
- If you enjoy fast development, open lines, and early attacks, the Danish Gambit earns a place in your 1.e4 repertoire as a surprise weapon.
Study the Danish Gambit as White or Black
Two pawns is the asking price of the Danish Gambit, and the game turns on whether White's raking bishops cash in before Black returns the material on good terms.
Attack with the Danish Gambit as White
From b2 and c4 the bishops hit g7 and f7 at the same time, and that battery is the whole engine of the Danish Gambit. Learn how it works, when to offer one pawn instead of two, and the pair of queen strikes that turn a Danish Gambit initiative into quick wins.
Neutralize the Danish Gambit as Black
Calm beats greed as a Danish Gambit counter: Black can decline with a central strike or hand the pawns back at the right moment. Both recipes are covered below, next to a blunt verdict on the gambit's soundness and a short note on its origins, which together settle how to face the Danish Gambit.
Where the Danish Gambit Came From
The gambit grew out of the Romantic chess of the 19th century, when fast development and a direct hunt for the king mattered more than counting pawns. Its name traces to the Danish player Martin Severin From, who worked on the line at length in the mid-1800s, though his countryman Hans Lindehn had already used the early c3 idea, and the German Jacques Mieses did the most to popularize it in serious tournament play around the turn of the century. Its Scandinavian roots earned it an older label, the Nordic Gambit, which you still meet in vintage chess books. Once 20th-century defensive theory matured and Black's resources with an early ...d5 became well known, the line slipped out of elite practice. Today it lives on mostly as a surprise weapon.
Win, Draw, and Loss Rates
The table below sums up how the two sides actually score in practice, across both the accepted and declined lines.
| Rating level (Lichess) | White wins | Draw | Black wins |
|---|---|---|---|
| 800, beginner | 51.2% | 3.8% | 45.0% |
| 1000, novice | 53.4% | 3.0% | 43.6% |
| 1200, improver | 54.1% | 2.9% | 42.9% |
| 1600, club | 55.2% | 3.3% | 41.6% |
| 1800, club | 54.4% | 3.7% | 41.8% |
| 2000, advanced club | 52.0% | 4.6% | 43.4% |
Source: Lichess opening explorer, blitz, rapid and classical games at the position after 1.e4 e5 2.d4 exd4 3.c3. Figures are win rates by Lichess rating band; draws are rare at these levels.
Watch the Danish Gambit in Action
If you would rather see the ideas move by move first, the short video below walks through White's main attacking plans.
Key Ideas Behind the Danish Gambit: The Two-Bishop Battery and the f7 Target
The Danish leads to sharp, dynamic positions, and it is chosen for the attacking chances it hands White early. By prying open the center, White gets a lot of piece activity for the price of a pawn or two. This is high-risk, high-reward chess that rewards accurate play and good tactical eyes. It rarely appears at the top because Black has enough defensive resources, but it works as a surprise weapon in faster time controls or against opponents who do not know the move order.
The core idea is to grab control of the center, clear paths for the pieces, and launch a quick attack on Black's position. White gives up one or sometimes two pawns, and while Black spends moves collecting material, White uses that time to develop quickly and pile immediate pressure on Black. The star piece is usually the bishop on c4, which trains on f7 and stands ready to be sacrificed there if Black is slow to finish kingside development. Paired with the dark-squared bishop on b2, the two diagonals form a battery pointing straight at f7 and g7, the standing targets of the whole setup.
Main Variations of the Danish Gambit: Single Gambit vs. Double Gambit
After 1.e4 e5 2.d4 exd4 3.c3, Black faces the first real decision of the game: take the pawn or give it back. Every Danish line branches from this single choice, and it helps to see the whole map before going into detail. Accepting with 3...dxc3 leads to White's two main tries: the aggressive 4.Bc4, offering a second pawn on b2, and the solid 4.Nxc3, simply recovering the pawn and developing. Declining keeps the material balance closer and is Black's safest route. The three main ways are 3...d5, striking back in the center at once; 3...d3, returning the pawn to free White of any sacrifice; and 3...Qe7, pinning down e4. The sections below cover each line in turn, with the key tactical ideas for both sides.
Single Gambit or Double Gambit? The Real Fork in the Road
After 1.e4 e5 2.d4 exd4 3.c3, Black's first decision is to take the pawn or hand it back. But it is White's choice that shapes the character of the game. With 3...dxc3, White picks between two very different plans. The Single Gambit, 4.Nxc3, just recaptures the pawn and develops the knight, holding firm control of d5 and a healthy lead in development without much risk. The Double Gambit, 4.Bc4 cxb2 5.Bxb2, is the true Danish. White gives up a second pawn to build the two-bishop battery, with the c4 and b2 diagonals both raking toward f7 and g7 while Black has yet to move a piece. The Single Gambit is the low-variance road. The Double Gambit is the all-in attacking bet. Spotting which one you are facing tells you straight away how sharp the coming fight will be.
Danish Gambit Accepted: 3.c3 dxc3
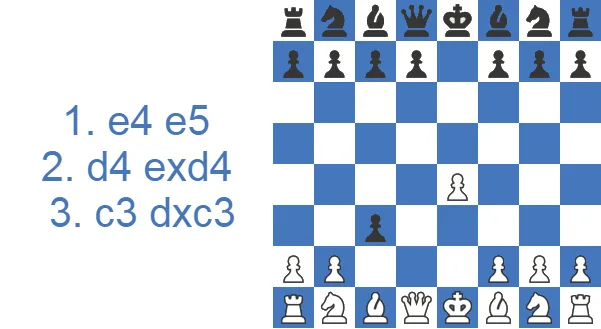
If Black accepts the gambit, White can either offer more pawns to speed up development with 4.Bc4 or simply recapture with 4.Nxc3, developing the knight and gripping the center.
4.Bc4
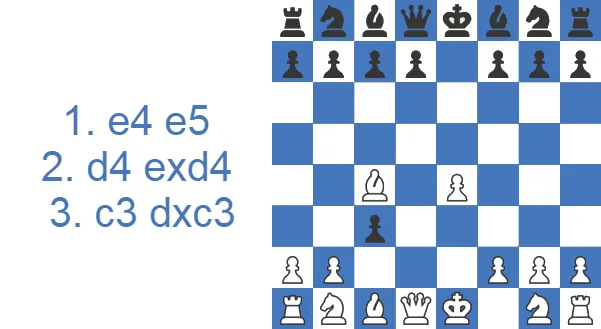
Gambiting a second pawn with 4.Bc4 is the true spirit of the Danish. Black takes the offer with 4...cxb2, and after 5.Bxb2 White has two dangerous bishops bearing down on Black's kingside while Black has not developed a single piece and is badly behind. The position is treacherous, and even Emanuel Lasker, the second World Champion, once lost in a handful of moves here against Bird: 5...Qg5? attacking g2, 6.Nf3 Qxg2 7.Rg1 Bb4+ 8.Ke2 Qh3 9.Bxf7+ Kd8 (9...Kxf7 loses the queen to 10.Ng5+) 10.Bxg7 Ne7 11.Ng5 Qh4 12.Ne6#.
One way for Black to develop as fast as possible is 5...Bb4+, when White chooses between the inferior but trickier 6.Kf1 Nf6 7.e5 and the cleaner 6.Nc3 Nf6 7.Qb3, double-attacking the bishop and f7. After 7...Bxc3+ 8.Qxc3 O-O 9.Nf3 d6 (9...Nxe4 fails to 10.Qxg7#) 10.O-O, White gets a very active, easy-to-play position with strong attacking chances in the middlegame.
The main antidote to the double gambit is 5...d5, returning one pawn to open lines and free the position. It looks as if White wins the queen with a deflection on f7 after 6.Bxd5 Nf6 7.Bxf7+, but the point of 5...d5 is the discovered check that follows: 7...Kxf7 8.Qxd8 Bb4+ 9.Qd2 Bxd2 10.Nxd2, reaching an endgame with equal chances for both sides.
In practice White scores far better than the engine suggests. Databases give White roughly 55% in the accepted lines, even though Stockfish slightly prefers Black. That gap is the whole point of the gambit: these positions are much easier to attack with than to defend against over the board.
4.Nxc3
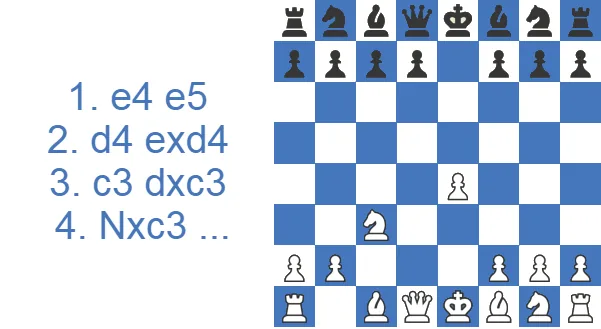
Recapturing with 4.Nxc3 makes it harder for Black to find counterplay with ...d5, since White now controls d5 with three pieces. Without ...d5, White can post the bishop on the a2-g8 diagonal and sacrifice on f7 in many lines. For example, the natural 4...Nc6 5.Bc4 Nf6 6.Nf3 Bc5 runs into 7.e5 Ng4 8.Bxf7+ Kxf7 9.Qd5+ Ke8 10.Qxc5, and White is much better.
Another natural-looking developing move, 4...Nf6?, is simply a blunder because of 5.e5 Qe7 6.Qe2 Ng8 7.Nf3, leaving White with a crushing position.
Black therefore has to be careful about which pieces come out and in what order. One sound path is 4...Nc6 5.Bc4 d6 (instead of 5...Nf6) to prevent e5, then 6.Nf3 Nf6 and develop with ...Be7 and ...0-0. If White tries to hit f7 before Black castles, say with 7.Ng5, Black holds with 7...Ne5 8.Bb3 h6 9.f4 hxg5 10.fxe5 Bg4, recapturing on e5 next.
Move-Order Trap: Why 4...Nf6 Loses on the Spot
In the Single Gambit after 4.Nxc3, the most natural-looking developing move is a near-instant loss. The greedy 4...Nf6? walks into 5.e5 Qe7 6.Qe2 Ng8 7.Nf3, when Black has been shoved all the way backward and White has a winning position for free. The fix is move order. After 4...Nc6 5.Bc4, play 5...d6 first to take the e5 break away, and only then 6.Nf3 Nf6 with ...Be7 and ...0-0 to follow. The same greed bites in the Double Gambit, where 5...Qg5? chasing g2 is the move that mated Lasker, while the calm 5...d5 returns a pawn and equalizes. In both branches the pattern is the same: the move that grabs material or develops most naturally is very often the one that loses.
Two Attacking Patterns to Memorize: Qxd8 and Qb3
Most Danish disasters for Black come down to two reusable motifs, and recognizing them does more for you than memorizing any single line. The first is the Qxd8 deflection. White lures the f7-pawn or the king off its post, usually with Bxf7+, then snaps the undefended queen with Qxd8. It shows up again and again, for instance after 5...d6 6.e5 dxe5 7.Bxf7+ Ke7 8.Ba3+ and 9.Qxd8. The second is the Qb3 sortie, which sets up a double threat: the queen eyes f7 alongside the c4-bishop while also pressing toward b7, so a single defensive move rarely covers both. Nearly every Danish attack that crosses my board lands on f7 or b7, and once you treat those squares as the standing targets of the bishop battery, the tactics that follow stop feeling like accidents.
Danish Gambit Declined: 3...d5
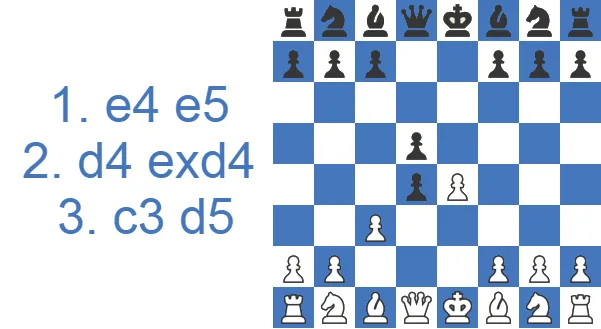
The best way to decline is to hit the center at once with 3...d5. After 4.exd5 Qxd5 5.cxd4 Nc6 6.Nf3 Bg4, the resulting position with the isolated queen's pawn looks like a Scandinavian Defense in which Black's e-pawn and White's c-pawn have been swapped. A natural continuation is 7.Be2 0-0-0 8.Nc3 Bb4, pinning the knight, 9.0-0 Bxc3 10.bxc3, and with the kings on opposite wings White stands a touch better thanks to the bishop pair and the open b-file pointing at Black's king.
Danish Gambit Declined: 3...Qe7
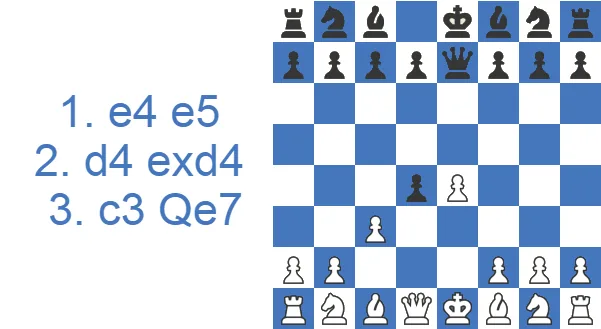
Although it is not as good as 3...d5, the move 3...Qe7 puts immediate pressure on e4. After 4.cxd4 Qxe4+ 5.Be3, White aims to develop with tempo against the exposed queen. Then 5...Bb4+ 6.Nc3 Nf6 7.Nf3 (playing 7.Bd3 first would drop g2 to 7...Qxg2) 7...Nd5 piles onto both pinned white pieces. White answers 8.Qd2, threatening Nxe4, and after 8...Nxe3 9.fxe3 White is still a pawn down but has fair compensation in development and central control, with the half-open f-file to use after castling kingside.
Danish Gambit Declined: 3...d3
Instead of grabbing material, Black can hand the pawn straight back with 3...d3, a quiet but practical choice that takes all of White's sacrificial play off the board. After 4.Bxd3, White has recovered the pawn, developed a piece, and kept a small lead in development, but none of the usual Danish fireworks remain. A natural continuation is 4...Nc6 5.Nf3 d6 (4...Nf6 would run into 5.e5) 6.h3, taking the g4-square away from Black's bishop, 6...Nf6 7.0-0 Be7 8.Nbd2 0-0, and White is left with a comfortable, risk-free pull thanks to the extra space and easier development.
There is no attack here, but for Black that is exactly the point: by returning the pawn early, Black sidesteps the sharp lines where White's initiative becomes genuinely dangerous.
How to Counter the Danish Gambit as Black: Decline with 3...d5 or Return the Pawn
The first method is to accept the pawns and give one back at the right moment. After 3...dxc3 4.Bc4 cxb2 5.Bxb2, the move 5...d5! is the key equalizer: Black returns a pawn to blunt the bishop on c4 and open lines for his own pieces. Following 6.Bxd5 Nf6 7.Bxf7+ Kxf7 8.Qxd8 Bb4+ 9.Qd2 Bxd2+ 10.Nxd2 Re8, Black reaches a healthy endgame with no lasting problems. The rule when accepting is simple: develop quickly, finish kingside development, and do not get greedy trying to hold every extra pawn.
The second method is to decline with 3...d5, hitting back in the center before White can build up. After 4.exd5 Qxd5 5.cxd4 Nc6, Black has a comfortable Scandinavian-style position and White has nothing better than an isolated queen's pawn with roughly equal chances.
Players who simply want to avoid theory can also return the pawn with 3...d3, as covered above. In all of these lines Black's plan is the same: neutralize White's bishop pair, complete development, and let the extra material, or at least the absence of any real attack, tell in the long run.
Engine Verdict vs the Scoreboard
Plug the Danish into a modern engine and the verdict is blunt. With accurate defense Black keeps a small but stable edge, which is exactly why the line has all but vanished from top-level play. The scoreboard says something else. Practical databases give White roughly 55% in the accepted lines, well above what the engine evaluation predicts, because the resulting positions ask Black for precise, unintuitive defense move after move while White just develops and attacks. That contrast decides how you should use the opening. As White, the gambit pays off in blitz and at club level against unprepared opponents. As Black, the engine edge only shows up if you find the freeing returns at the right moment instead of clutching every extra pawn.
Common Traps in the Danish Gambit Every Player Should Know
The Danish is full of traps where a natural-looking move loses on the spot. Almost all of them come back to the same handful of tactical ideas, so it is worth knowing the patterns before the concrete lines.
1.e4 e5 2.d4 exd4 3.c3 dxc3 4.Bc4 cxb2 5.Bxb2 Bb4+ 6.Nc3 Nf6 7.Ne2 (7.e5 is met by 7...d5), offering yet another pawn for the sake of rapid development. After 7...Nxe4 8.0-0, White has every piece out and development complete. Then 8...Nxc3 9.Nxc3 Bxc3 10.Bxc3, and although White is three pawns down, the position is crushing because of the pressure the bishop pair puts on Black's kingside. With Black's defenders traded off, the king cannot find shelter. The fatal try is 10...0-0??, which loses at once to 11.Qg4! g6 12.Qd4, and mate is unavoidable since the f7-pin stops Black from blocking the dark-squared diagonal.
1.e4 e5 2.d4 exd4 3.c3 dxc3 4.Bc4 cxb2 5.Bxb2 d6, a common move meant to stop e5. White can still play 6.e5 anyway, because capturing with 6...dxe5 allows the deflection on f7: 7.Bxf7+! Ke7 8.Ba3+, and the black king is forced to abandon the queen, 8...Kxf7 9.Qxd8.
Test Yourself: Five Tactics from the Lines Above
Make the move on the board. Hint gives you a nudge, Answer shows the move and why it works.
Danish Gambit. Black took on c3. Which bishop move offers a second pawn and aims at f7?
Black counters with 5...d5, hitting the bishop. Which bishop capture takes the pawn and keeps eyeing f7?
Black checked with 5...Bb4+, White played 6.Kf1, and Black developed 6...Nf6. Which pawn push hits the knight with tempo?
Black took on e5 with the d-pawn and opened the d-file. Which bishop capture gives check and sets up a shot at the queen?
Case study: the 12-move miniature. Black's queen just went to h4. Which knight move mates?
Single Gambit, 4.Nxc3. Black developed the natural-looking 4...Nf6. Which pawn push punishes it?
Single Gambit. White's bishop eyes f7 and e5 is coming. Which pawn move takes e5 away and opens the c8-bishop?
Single Gambit. Black skipped ...d6 and played 5...Nf6 and 6...Bc5. Which pawn push kicks the knight and grabs space?
Single Gambit. White's Ng5 eyes f7 before Black has castled. Which knight move defends f7 and hits the c4-bishop?
Danish Gambit. White offers 3.c3. Which pawn move declines the gambit and hits back at e4?
What You Gain and What You Risk
The trade-offs of the Danish come down to a clean balance of attacking upside against objective soundness, summarized below.
PROS
- Rapid development and central control
- White’s bishop pair exert pressure on black’s kingside and lot of chances for tricks
CONS
- Objectively unsound, especially due to defensive lines with …d5
- The presence of a queenside pawn majority provides black with a long-term advantage
How the Danish Gambit Compares to Other Gambits: Danish vs. Goring vs. Scotch
The Danish belongs to a family of aggressive 1.e4 e5 gambits built on the same idea: sacrifice a central pawn or two for fast development and an attack. Its closest relative is the Göring Gambit, which reaches a very similar structure after 1.e4 e5 2.Nf3 Nc6 3.d4 exd4 4.c3. The difference is that in the Göring both sides have already developed a knight, which makes Black's defense a little easier and White's attack slightly less wild than in the pure Danish, where White aims both bishops at the kingside before the knights come out at all.
Two other cousins are worth knowing. The Scotch Gambit (1.e4 e5 2.Nf3 Nc6 3.d4 exd4 4.Bc4) goes after f7 with the bishop in much the same spirit, while the Center Game (1.e4 e5 2.d4 exd4 3.Qxd4) is the solid, non-sacrificial way to handle the position the Danish springs from. If you like the Danish but want a sounder version of the same attacking ideas, the Göring and Scotch Gambits are the natural next steps.
Case Study: Bird's Quick Mate in the Double Gambit
The cleanest illustration of how fast Black can get punished comes from a miniature in which even Emanuel Lasker, on the black side, was mated in twelve moves. Treat it as a model game for the attacking patterns, not a recommended defense.
After 5.Bxb2 the two bishops already rake f7 and g7, and Black has not developed a piece. The trouble starts with 5...Qg5?, a greedy lunge at g2. White is happy to give it: 6.Nf3 develops with tempo, and once 6...Qxg2 7.Rg1 the rook swings onto the g-file with gain of time. This is the recurring Danish bargain in miniature, where Black collects pawns on the wrong side of the board while White's pieces all come out pointing at the king.
8.Ke2 looks strange, but it is the turning point. White declines to block the check on the back rank and instead keeps every attacking piece active, accepting an exposed king because Black has nothing developed to exploit it. The queen on h3 is now a tourist far from home. 9.Bxf7+ is the thematic blow: the c4-bishop crashes into the soft square, and after 9...Kd8 the black king is stranded in the center with its kingside torn open. Note 9...Kxf7 would have dropped the queen to 10.Ng5+, the same fork motif that haunts these lines.
The finish is pure bishop-battery geometry. 10.Bxg7 grabs the second target and clears the long diagonal, 11.Ng5 brings the last attacker in, and after 11...Qh4 the knight delivers 12.Ne6#, a smothered-style mate that the b2-bishop and the centralized white pieces make possible.
The practical takeaway for a club player is the one rule that holds across the whole opening: as Black, do not chase pawns on the flank while your kingside sits undeveloped. The honest reply was 5...d5, returning a pawn to kill the c4-bishop and free your pieces. As White, the game is a checklist of what to aim for: develop with tempo, keep the bishops trained on f7 and g7, and do not be afraid to leave your own king in the center when the opponent has nothing to hit it with.
Final Word: Should the Danish Gambit Be in Your Repertoire?
The Danish Gambit puts Black under real tactical and positional pressure from the opening moves. Many natural developing moves lose quickly to the many tricks White has up his sleeve, and that is precisely what makes it effective against an unprepared opponent. It is almost never seen at the top today, but it is a fine occasional choice for sharpening your tactics and developing a feel for open, dynamic positions. Keep it as a surprise weapon, know the freeing returns from both sides, and it will keep paying off in faster time controls.