
 By

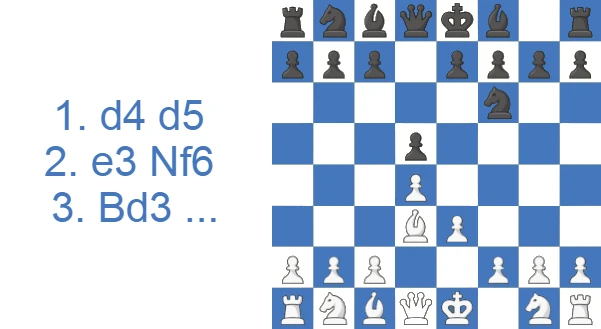
It gained popularity in the late 1800s, when attacking players used it to great effect. The main line is no longer seen at the elite level, but several strong grandmasters have kept a few ideas up their sleeve to surprise an unprepared opponent.
The Stonewall Attack in One Minute
- What it is: a system-based opening for White built on the c3-d4-e3-f4 pawn wall, usually reached by 1.d4 d5 2.e3 Nf6 3.Bd3.
- The plan: clamp the e5-square, put the bishop on d3 and the knights on d2 and f3 (or h3), castle short, then storm the kingside with g4 and h4.
- Best for attacking players who want a clear plan with very little theory to memorize. The opening is sometimes nicknamed the "Yaac Attack."
- Main weakness: the f4-push hands Black the e4-square, and endgames often favor the second player.
- Attack versus Defense: the Attack is White's version; the Stonewall Defense is the same wall mirrored by Black, a Dutch Defense line with c6-d5-e6-f5.
Study the Stonewall Attack as White or Black
The Stonewall Attack gives White a pre-built kingside plan behind a fixed pawn wall, while Black gets a clear target the moment the wall's weak squares come into focus.
Run the Stonewall Attack as White
White locks pawns on d4, e3, and f4, aims the light-squared bishop at h7, and follows an attacking script that fits in one sitting: knight to e5, queen to the kingside, rook lift. Start with the sixty-second version of the Stonewall Attack below, then watch it win a model game.
Shut Down the Stonewall Attack as Black
Black's most reliable Stonewall Attack counter runs through the e4 square: trade the light-squared bishops, then park a knight where the pawn wall can never evict it. Everything for facing the Stonewall Attack sits below, from the score tables by rating to what changes when Black builds the identical wall himself.
How White and Black Score
What Top-Level Practice Shows
Among master games the Stonewall has a modest record, which is why it has dropped out of elite practice.
| Results | Rate |
|---|---|
| Victory for White | 28% |
| Draw | 37% |
| Victory for Black | 35% |
How the Stonewall Scores in 3.5 Million Club Games
Drop below master level and the picture changes sharply. Across a database of roughly 3.5 million amateur games, White does well.
| Rating level (Lichess) | White wins | Draw | Black wins |
|---|---|---|---|
| 800, beginner | 48.7% | 4.1% | 47.3% |
| 1000, novice | 49.6% | 3.9% | 46.4% |
| 1200, improver | 50.9% | 3.7% | 45.3% |
| 1600, club | 51.8% | 4.0% | 44.2% |
| 1800, club | 51.2% | 4.6% | 44.2% |
| 2000, advanced club | 49.6% | 5.4% | 45.0% |
Source: Lichess opening explorer, blitz, rapid and classical games at the position after 1.d4 d5 2.e3 Nf6 3.Bd3. Figures are win rates by Lichess rating band; draws are rare at these levels.
The gap between the two tables is the whole story of this opening: a ready-made attacking plan that strong defenders neutralize but club opponents often cannot.
Watch the Stonewall Attack in Action
The video walks through the basic setup on a board.
Key Ideas in the Stonewall Attack: the Three Attacking Moves That Do All the Work (Ne5, Qe1-h4, Rf1-f3-g3)
The core idea is to build the d4-c3-f4 wall and then expand on the kingside with g4 and h4. The f1-bishop almost always belongs on d3, the knights go to d2 and f3 (or h3), and White castles short. Black usually counters on the queenside, looking for pawn breaks such as ...c5 to hit White's weak points.
In practice, three maneuvers do most of the attacking work. The first is the knight jump Ne5, planting a piece on the very outpost the structure was built for. The second is the queen lift Qe1-h4 (or Qd1-f3-h3), bringing the heaviest piece across to the kingside. The third is the rook swing Rf1-f3-g3/h3 once the f-file has done its job. Combined with the g4-h4 pawn storm, these give White a plan that works against most of Black's setups, which is exactly why the Stonewall is so friendly to club players short on theory.
White's Development Choice: 6.Nd2 or 6.Nf3?
Once the wall is up, White faces one real fork: which square gets the queenside knight first. Nd2 is the attacking choice. Steering the b1-knight to d2 rather than f3 keeps the f3-square free for the f-pawn and, more importantly, for the queen lift Qe1-h4 (or Qd1-f3-h3) that drives the kingside assault. The trade-off is that Nf3, the more natural developing move, is harder to give up. Park the knight there, though, and it blocks the very lift that powers your attack. The practical rule is simple. If you want the full g4-h4 storm, develop with Nd2 and bring the king's knight to f3 only after the queen and rook have their kingside route. If you just want a sound game, an early Nf3 is fine; the heavy-piece swing simply won't flow as smoothly.
White's Ideas: Building the Kingside Attack
White wants a kingside expansion and a pawn storm aimed at the black king, which usually means prising open the g- or h-file to bring the heavy pieces into the attack.
Black's Ideas: Fighting for the e4 Square
Black expands on the queenside, looks for the right pawn break, and exploits the squares that f4 left soft, above all e4. For the same reasons, the endgames often favor Black.
The Stonewall Pawn Structure: the e5 vs e4 Outpost Battle
The Stonewall Attack is named after its pawn formation, not a particular move order. White builds a wall on c3, d4, e3 and f4, and that structure dictates almost every plan in the game.
The point of the wall is control of the e5-square. With pawns on d4 and f4 backing a knight that lands on e5, White owns a permanent outpost in the heart of Black's position. From e5 the knight cramps Black, eyes the kingside, and lets White push pawns forward without loosening the center.
The structure has one lasting drawback. Once the f-pawn leaves f2, no pawn guards e4, and Black will try to plant a piece there, usually the f6-knight with ...Ne4. Whoever holds their outpost (White on e5, Black on e4) usually holds the game.
A simple way to picture it: White's c3-d4-e3-f4 wall is a mirror of Black's c6-d5-e6-f5 wall in the Dutch Stonewall. Same bricks, opposite colors.
Origin of the Stonewall and the Dutch Stonewall Connection
The Stonewall structure is one of the oldest system setups in chess, popular back in the 1800s when players preferred a fixed, easy-to-learn formation over precise opening theory. Its lasting fame, though, owes a lot to the mirror-image version played by Black. In the Dutch Stonewall, Black answers 1.d4 with ...e6, ...d5 and ...f5, building the same c6-d5-e6-f5 wall a tempo down and aiming the f6-knight at the e4-outpost. Capablanca is the name most often tied to handling these positions, showing how the weak squares can be exploited with patient maneuvering. One distinction is worth fixing in your head: the Stonewall Attack is White's version, the Dutch Stonewall is Black's. Same bricks, opposite colors. For whichever side builds the wall, the bad light-squared bishop trapped behind the pawn chain is the standing worry.
Stonewall Attack vs. Stonewall Defense: Same Wall, Opposite Colors
These two names cause a lot of confusion, so it is worth drawing a clear line between them.
The Stonewall Attack is played by White. White builds the c3-d4-e3-f4 wall and attacks on the kingside, as covered throughout this guide.
The Stonewall Defense is played by Black and is a branch of the Dutch Defense. Black meets 1.d4 with 1...f5 and builds the same wall a tempo down: pawns on c6-d5-e6-f5, the bishop on d6, and the f6-knight heading for the e4-outpost. Strong players such as Carlsen and Nakamura have used it to fight for the initiative with Black.
In short: same wall, opposite sides of the board. If you enjoy the Stonewall structure as White, the Dutch Stonewall is the natural way to reach it as Black.
Theoretical Lines in the Stonewall Attack: How Black Tries to Refute It (3...e6, 3...c5 and 3...Nc6)
Black has three main ways to meet the Stonewall:
The 3...e6 variation often leads to closed positions where Black's light-squared bishop is shut inside the pawn chain. White completes the ideal setup and strikes with g4 and h4, and can also reroute the queen via f3 and h3 to feed the attack.
The 3...c5 variation hits the center at once. White can struggle to build the wall here, and these games often favor Black if White stubbornly forces the standard setup.
The 3...Nc6 variation usually concedes Black the bishop pair while White looks to expand on the kingside.
3...e6 variation
This variation starts with 1.d4 d5, after which White plays 2.e3 to free the f1-bishop for d3 (3.Bd3) and finish the Stonewall setup. Black has several replies. The usual route is 2...Nf6 against the e3-push, then 3...e6 to open the f8-bishop. As always, the structure leaves White a weak e4-square once both the d- and f-pawns advance.
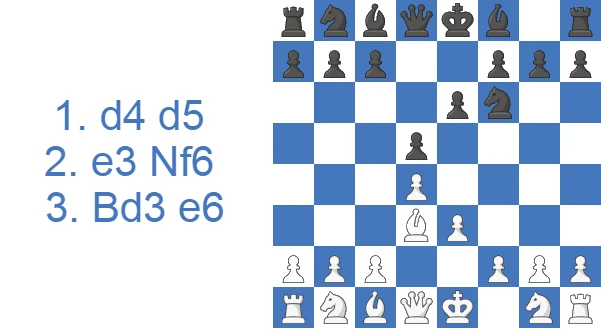
From here White typically wants Nd2 and f4, and the move order between them rarely matters as long as Black creates no immediate threats. The two natural tries are 4.Nd2 and 4.f4.
4.Nd2 line
White develops the b1-knight to d2 first and intends 5.f4 next if nothing unusual happens. Black's main replies are 4...c5 (hitting d4) and 4...Be7 (heading for short castling).
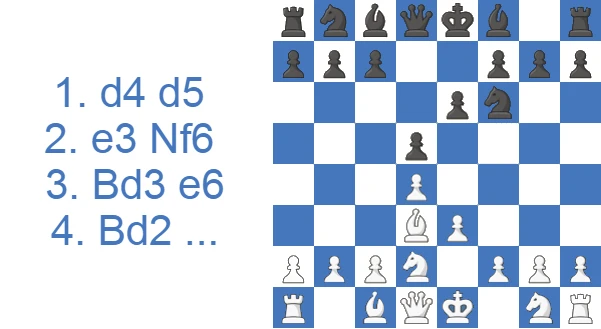
Take 4...c5 first. White must delay f4, because 5.f4 c4 hits the d3-bishop, and after 6.Be2 b5 Black expands on the queenside while White's light-squared bishop loses its grip on the key b1-h7 diagonal.
So against 4...c5 White plays 5.c3, keeping the b1-h7 diagonal open for the bishop in case ...c4 comes.
A sample line after 5.c3: 5...Nbd7 (developing the b8-knight), 6.f4 (reaching the Stonewall setup), 6...b6 (preparing a fianchetto for the c8-bishop), 7.Ngf3 (improving the knight and getting ready to castle), 7...Be7, 8.Ne5 (a standard maneuver in the Stonewall, where White plans g4-h4 next), 8...O-O, 9.O-O Bb7, 10.Qf3 (lifting the queen toward the kingside), 10...Rc8, and 11.g4.
From here White wants 12.h4 or 12.Qh3, both with the same goal: roll the pawns and the heavy pieces at the black king.
If Black instead plays 4...Be7 or a similar quiet move, White can answer 5.f4 and 6.c3 and reach the same structures once castled.
4.f4 line
This line starts with 4.f4, intending 5.Nd2 next. As in the 4.Nd2 line, Black usually chooses 4...Be7 or 4...c5, and again White meets ...c5 with c3 to keep the bishop's diagonal. Because these positions transpose so often, the move that actually shows a difference is the immediate 4...Ne4.
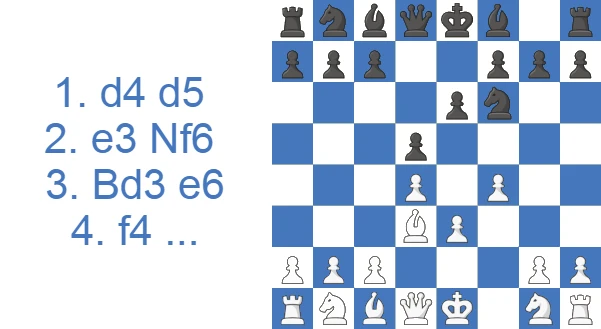
After 4...Ne4 White must be precise. The right move is 5.Nf3, stopping the ...Qh4+ idea. Allowing it costs a pawn in the worst case: 5.Nc3 Qh4+ 6.g3 Nxg3 7.Nf3 Qh3 hits g2.
Capturing with 5.Bxe4 is a positional mistake: White surrenders the bishop pair, and Black's doubled e-pawns help clamp down on the center.
3...c5 variation
Here Black skips ...e6 and strikes the center at once with 3...c5. This is the more testing line, because precise play hands Black a positional edge: with the e-pawn still home, Black's light-squared bishop comes out freely and helps shut down White's kingside ambitions.
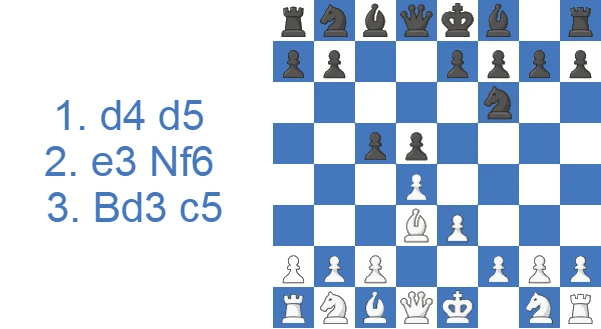
White has two main tries, 4.c3 and 4.b3.
4.c3 line
The natural 4.c3 is usually met by 4...Nc6, which prepares ...e5 if White is slow with f4.
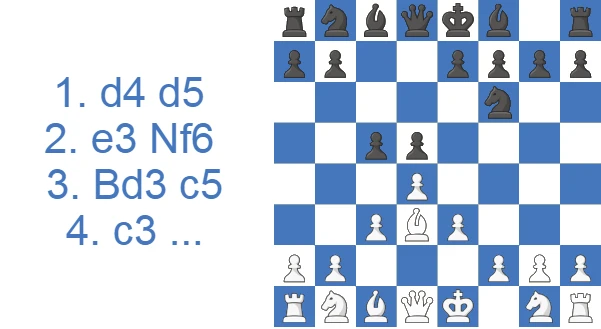
That is why 5.Nd2 would be inaccurate: 5...e5 strikes the center, and after 6.dxe5 Nxe5 Black recaptures with the knight and enjoys a strong central grip.
The sound way to keep the Stonewall intact is 5.f4 at once, ruling out ...e5. Black gets a tempo with 5...Bg4, developing the light-squared bishop. White can still attack, but Black has to defend accurately.
A sample line: 6.Nf3 (developing and covering the queen), 6...e6 (opening the f8-bishop), 7.O-O Bd6, 8.h3 (kicking the bishop), 8...Bh5, 9.Nbd2, 9...O-O, 10.g4 (gaining space and hitting the bishop), 10...Bg6.
White can now trade the light-squared bishops and play Ne5 with attacking ideas. Black expands on the queenside, and an endgame tends to favor Black, since White has overextended and weakened too many squares.
4.b3 line
White plays 4.b3 against 3...c5 to stop ...c4, but it is passive and makes the natural f4-push and the ideal setup hard to reach.
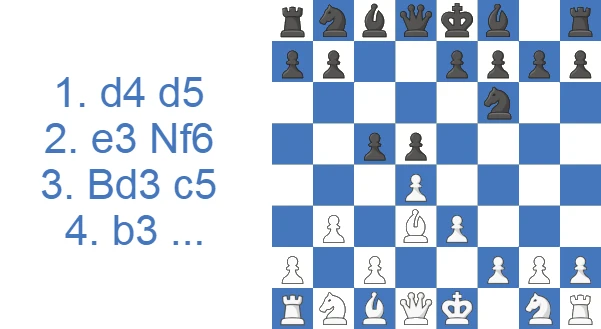
A sample line: 4...Nc6 (now 5.c3 e5 would hit the center), and White fianchettoes with 6.Bb2. This is not really in the spirit of the Stonewall. After 6...cxd4 7.cxd4 the a1-h8 diagonal is closed, the b2-bishop is misplaced, and the dark-square weaknesses leave Black better in most lines.
3...Nc6 variation
Here Black answers 3.Bd3 with 3...Nc6.
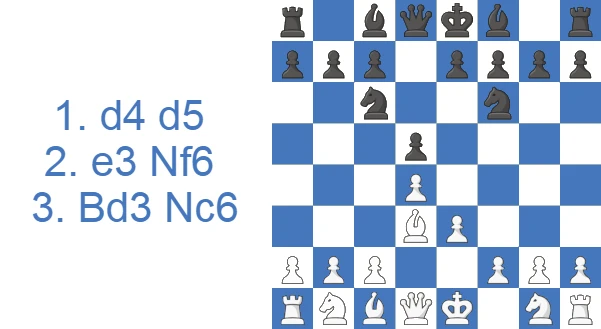
The point is often ...Nb4, harassing the d3-bishop; and if White plays 4.c3, Black hits the center with 4...e5 and claims an edge.
So White does better with 4.f4, willing to trade the d3-bishop for the knight in return for kingside expansion.
A sample line: 4.f4 Nb4 (going after the bishop and the bishop pair), 5.Nf3, 5...Nxd3+ 6.cxd3 Bf5 (getting the bishop outside the chain before ...e6), 7.O-O e6, 8.Nc3 Bd6, 9.Ne5 O-O, 10.g4. White expands on the kingside while Black plays positionally and targets White's weak squares.
How to Beat the Stonewall Attack (Playing It as Black)
If you are on the receiving end, the antidote is to deny White the free attack. The most reliable plan is queenside expansion. Meet the wall with an early ...c5, and once White's bishop sits on d3, the thrust ...c4 followed by ...b5 gains space and shuts in White's light-squared bishop along the b1-h7 diagonal. That bishop is the piece the whole d3 battery depends on. The sharpest central try is ...e5; if White has carelessly played Nd2 before f4, ...e5 simply equalizes or better. The ...Ne4 leap is also worth knowing, since it grabs the e4-outpost and can set up ...Qh4 ideas. Trade White's good bishop when you can, keep your own bad bishop active outside the chain, and steer toward an endgame, where White's weak e4-square and overextended kingside pawns usually favor Black.
Grandmaster Games with the Stonewall Attack: Recent Practice
Playing Black Against the Stonewall Attack: One of My Games
My opponent built the wall exactly as described above, 2.e3 3.Bd3 4.Nd2 5.c3 6.f4, then brought the pieces to their standard squares with 9.Ne5, 11.Qf3 and 12.Qg3. I took my chances on the other side with 12...b5 and 13...b4. The attack arrived anyway, starting with 19.Bxh6.

My 19...Rfb8 was the real error, +3.23 to +7.56. I was still pushing on the queenside while every white piece pointed at my king. He then chose 20.Bxg6 instead of the strongest continuation and it fell back to +2.21, and the pawn I had been pushing decided things: 25...bxc3, 27...cxb2, and by move 31 the engine had me nearly five pawns up. I won from there.

The wall cracked, but not because of anything clever from me. What I take from this game is to count his attackers before committing a rook to the far side. The Ne5, Qg3 and Rf3-h3 plan is a real attack, and ...h6 and ...g6 hand it the hooks it is looking for.
Strengths and Weaknesses: When the Wall Holds and When It Cracks
The trade-offs of the Stonewall come into focus when you line up its pluses against its minuses.
Pros
- Stonewall Attack for White can launch a strong initiative on the Kingside.
- White remains a solid pawn structure.
- Black might have difficulty defending against a pawn storm.
- White immediately goes for the kill, whereas Black’s moves are not obvious.
Cons
- Black can counter this assault by striking from the Queenside.
- The move ‘f4’ creates a long-term weakness for White.
- Endgames often favor Black due to White’s weak squares.
- If Black plays precisely, they are objectively better.
Stonewall Attack vs. London System and Colle System
White players who like quiet 1.d4 systems often weigh the Stonewall against its two closest cousins.
The London System develops the dark-squared bishop outside the pawn chain to f4 and aims for a safe, flexible position rather than an early attack. The Colle System keeps that bishop at home for a while in exchange for fast development and a central e4-break. The Stonewall Attack is the most aggressive of the three: it commits to f4 and a direct kingside assault, accepting the weak e4-square as the price of attacking chances.
If you want a fight, choose the Stonewall. If you want safety first, the London or Colle may suit you better.
Move-Order Tricks: Reaching the Stonewall from a London or Colle
You don't have to announce the Stonewall on move two. Because all three quiet 1.d4 systems share the d4-e3 spine, you can keep your options open and transpose once you see Black's setup. From a Colle move order (1.d4 d5 2.e3 Nf6 3.Bd3 e6 4.Nd2), the f4-push turns a Colle into a full Stonewall whenever Black has committed to a slow ...e6/...Be7 plan. From a London move order the difference is the bishop: if you've already played Bf4, you're committed to London ideas, so save the Stonewall for games where you keep the c1-bishop at home. Personally I hold f4 back until I've confirmed Black isn't ready for a quick ...c5/...e5 central strike, then push it and reroute the queenside knight to f3 to lock in the wall.
Stonewall Attack Trap: the Bxh7 / Qh5 Greek-Gift
This trap comes out of the 3...e6 variation. White goes into the c3 line, and Black replies 4...Be7. Play continues 5.Nd2 O-O 6.f4 Nbd7 7.Ngf3 c6 8.O-O, and then the standard-looking 9.Ne5. Black tries to chase the knight with 9...f6. White ignores it and plays Qh5. If Black grabs the knight with 10...fxe5, White breaks through: 11.Bxh7+ Kxh7 12.Qxf7 and the king is hunted down. This is the classic Greek Gift pattern, and the Stonewall sets it up almost by accident.
Case Study: Harriott vs. Kravtsiv, 2025
For a full game, here is a recent grandmaster encounter that shows both sides of the Stonewall honestly: White gets the textbook attacking setup, and Black demonstrates exactly how the second player is supposed to neutralize it.
White plays the opening by the book. After 1.d4 d5 2.e3 Nf6 3.Bd3 c5 4.c3 Nc6 5.f4, the wall is up and the bishop is on its best diagonal. The key sequence is 8.Nbd2 followed by 9.Qe1 and 10.Qh4: this is the queen lift in its purest form, swinging the heaviest piece to the kingside before Black has any counterplay there. Then 11.Ne5 plants the knight on the dream outpost. If you only remember one attacking recipe from this article, it is exactly this: Nd2 to keep f3 free, Qe1-h4, and Ne5.
The turning point is structural rather than tactical, and it shows why strong players are comfortable defending this position. Black answered the wall the recommended way: 5...g6 and 6...Bg7 put the bishop on the long diagonal, then 8...a6 and 9...b5 expanded on the queenside, the side where Black is meant to play. The critical trade is 12...cxd4 13.exd4 b4, opening lines against White's center and queenside while White's attack is still only a gesture. By move 19, the knight that looked so strong on e5 has been swapped off (19.Nxc6 Bxc6), the light-squared bishops come off, and the kingside storm never gets going. White's pieces end up defending the very weaknesses the f4-push created.
From there it is a long technical grind. The queens leave the board at move 36, and the rest is the endgame the introduction warned about: White's structure is full of holes, Black's pieces are more active, and a passed d-pawn plus an extra pawn decide it. The 82-move length is the point. The Stonewall hands White a fast, dangerous attack against an unprepared opponent, but against a defender who expands on the queenside, trades the right pieces, and heads for the endgame, the same structure quietly turns into a long-term liability.
The practical takeaway for a club player cuts both ways depending on which color you hold. As White, get the Qe1-h4 and Ne5 setup in fast and make something happen before Black consolidates, because your edge is the speed of the attack, not the soundness of the structure. As Black, do what Kravtsiv did: develop, push the queenside pawns, swap off White's attackers, and the weak squares will hand you the endgame.
Test Yourself: Stonewall Attack Positions
Set up each position and find the best move. Use Hint for a nudge or Answer to reveal the engine’s top move.
Find the best move.
Find the best move.
Find the best move.
Find the best move.
Find the best move.