
 By

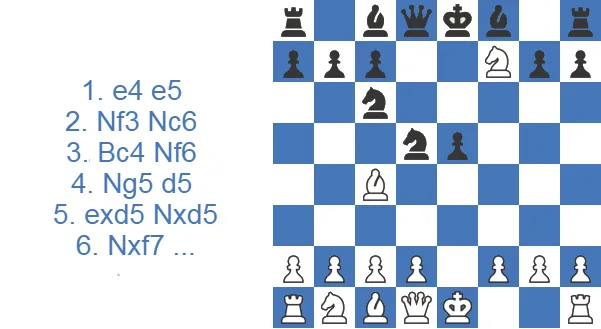
White sacrifices a knight on move six to drag the black king into the open and start a mating attack before Black has finished developing. The line is one of the oldest in recorded chess theory, with analysis going back to the 16th and 17th centuries. Its name comes from the Italian dish Fegatello, "fried liver" in English, a thin slice of pork liver wrapped in fat netting and cooked over a fire. The picture fits the position: Black's king gets wrapped in White's mating net the same way.
The Fried Liver Attack at a Glance
Short on time? Here is what matters about the Fried Liver before you study the full theory below.
- What it is: a knight sacrifice in the Italian Game (Two Knights Defense) that pulls Black's king into the open after 1.e4 e5 2.Nf3 Nc6 3.Bc4 Nf6 4.Ng5 d5 5.exd5 Nxd5 6.Nxf7 Kxf7 7.Qf3+.
- Why play it: White scores around 53% and gets a fierce practical attack for the price of one piece, which makes it dangerous at club level.
- Black's only move in the main line: 7...Ke6, walking the king up to guard the pinned knight. Everything else loses material on the spot.
- How Black should really meet it: avoid the whole thing. Instead of 5...Nxd5, play 5...Na5 (the Polerio Defense, the main line) or the Fritz Variation with 5...Nd4, and the sacrifice never appears.
- Best for: attacking players who enjoy forcing lines and are willing to memorize a little theory.
Here is how the Fried Liver scores across the club rating bands, where White comes out well ahead, though the edge narrows as ratings climb.
| Rating level (Lichess) | White wins | Draw | Black wins |
|---|---|---|---|
| 800, beginner | 74.1% | 2.3% | 23.7% |
| 1000, novice | 72.7% | 2.4% | 24.8% |
| 1200, improver | 70.8% | 2.6% | 26.7% |
| 1600, club | 66.9% | 3.1% | 30.0% |
| 1800, club | 64.1% | 3.5% | 32.4% |
| 2000, advanced club | 59.2% | 3.8% | 37.0% |
Source: Lichess opening explorer, blitz, rapid and classical games at the position after 1.e4 e5 2.Nf3 Nc6 3.Bc4 Nf6 4.Ng5 d5 5.exd5 Nxd5 6.Nxf7 Kxf7 7.Qf3+. Figures are win rates by Lichess rating band; draws are rare at these levels.
White's 53% and the slim 18% draw rate tell the whole story: this is a fighting opening where decisive results are the norm, and the attacking side gets the better of it more often than not.
Study the Fried Liver Attack as White or Black
One knight sacrifice on f7 defines the Fried Liver Attack, and both colors need their homework done before move six arrives.
Run the Fried Liver Attack as White
White's plan is blunt: pull the black king into the open with the f7 strike and keep checking until material falls. The quick summary below shows where the Fried Liver Attack comes from, the king-hunt chapter explains the ideas behind 7.Qf3+, and the walkthrough gives you the exact move order to reach it.
Survive the Fried Liver Attack as Black
Two roads keep Black alive: dodge the whole thing with an early sidestep, or meet the sacrifice head-on with the Traxler's 4...Bc5 and start a king hunt of your own. The sidestep guide and both Traxler sections below give you a complete Fried Liver Attack counter, so you know how to face the Fried Liver Attack whichever mood you are in.
Watch the Fried Liver in Action (Video)
If you prefer to see the ideas played out on the board first, the video walkthrough below covers the main sacrifice and the key follow-ups.
The video is just a starting point. Below you will find the full theory, the transitions into the middlegame, and the practical advice that wins games with this line.
Key Ideas in the Fried Liver Attack: Hunting the f7 King
As the win rate for White suggests, the Fried Liver is an aggressive choice that hands White real practical chances. Attacking is usually easier than defending, so if Black allows the knight sacrifice, most players would happily take the White side of this line.
White builds a fast attack on the light squares step by step, using pins, discovered attacks, and forks once the knight sacrifice on f7 has dragged the black king into the center. The constant theme is pressure along the a2-g8 diagonal and the f-file. White either recovers the sacrificed material or, in some lines, throws in more material to keep the exposed king under fire. The play is highly concrete: forced sequences and exact calculation, not slow maneuvering. Black has no choice but to defend tenaciously and calculate precisely, or lose on the spot.
How to Play the Fried Liver Attack: Step by Step
If you are learning the line for the first time, here is the move order one step at a time. Understanding the idea behind each move matters far more than memorizing the sequence.
- 1.e4 e5: both sides claim the center and open lines for the bishops.
- 2.Nf3 Nc6: White attacks e5, Black defends it.
- 3.Bc4: the bishop takes aim at f7, the weakest square in Black's camp.
- 3...Nf6: Black develops and hits e4, entering the Two Knights Defense.
- 4.Ng5: White piles a second attacker onto f7. Committal, but it sets the trap.
- 4...d5: Black's best reply, blocking the bishop's diagonal.
- 5.exd5: White grabs the pawn and keeps the pressure on f7.
- 5...Nxd5: the greedy recapture that walks into the attack. Safer defenses are covered below.
- 6.Nxf7: the Fried Liver sacrifice. White gives up the knight to expose the king.
- 6...Kxf7 7.Qf3+: the king is dragged out and the queen joins with check, hitting the pinned knight on d5.
From here the play is concrete and forcing. White chases the king on the light squares while Black scrambles to consolidate the extra piece.
Where the Name Comes From: Fegatello and Polerio
The Fried Liver owes its name to the Italian "Giuoco del Fegatello," literally "the game of the little liver." Fegatello is a dish of pork or chicken liver sliced thin, wrapped in caul fat, and cooked over flame. The image fits, because Black's king ends up skewered and roasted in the open just like the dish. The line is one of the oldest in recorded chess theory. Italian masters of the 16th and 17th centuries studied it, with the Roman player Giulio Cesare Polerio analyzing the knight sacrifice as far back as the late 1500s, and Gioachino Greco's games spreading these ideas across Europe. That is also why the safest fifth-move defense, 5...Na5, carries the name Polerio Defense. It traces straight back to the same era that gave the attack its sizzling reputation.
Fried Liver Attack Theory: The Main Line After 7.Qf3+ Tracking the King to e6
The position after 1.e4 e5 2.Nf3 Nc6 3.Bc4 (Italian Game) Nf6 (Two Knights Defense) 4.Ng5 d5 5.exd5 Nxd5 6.Nxf7 Kxf7 7.Qf3+ is the main starting point of the Fried Liver Attack, where Black has a handful of defensive tries. The only way to stay in the game is to defend the knight on d5 with 7...Ke6. Other options, such as blocking the check with 7...Qf6 or stepping aside with 7...Ke7, hand White a serious advantage, though White still needs accurate technique to convert.
Black is not forced into the 5...Nxd5 line that allows the f7 sacrifice in the first place. Black's best reply is the pawn sacrifice 5...Na5 6.Bb5+ c6 7.dxc6 bxc6 8.Be2, with good compensation for the pawn. Another option is 5...Nd4 6.c3 b5 7.Bf1 Nxd5 8.Ne4 Ne6, the Fritz Variation, which carries its own forcing theory. Both are covered in detail further down.
7...Ke6
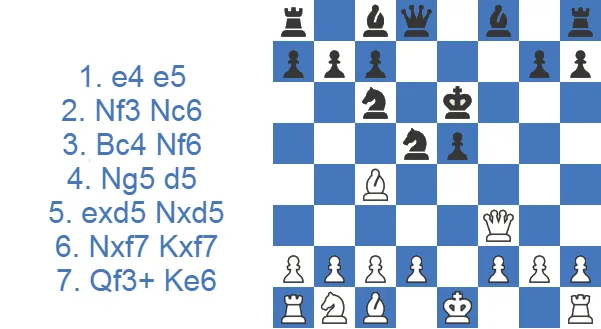
The whole attack with 4.Ng5 only works because the knight on f6 blocks Black's queen from reaching g5, which would not be the case after 3...Bc5. Once 4.Ng5 is on the board, Black's only way to defend f7 is to block the bishop with 4...d5. After 5.exd5 Nxd5, White sacrifices with 6.Nxf7 Kxf7, then plays 7.Qf3+, attacking the d5-knight with check. Since 7...Nf6 is impossible because of the pin, 7...Ke6 is the only move that holds the knight. White keeps the pressure with 8.Nc3, which more or less forces 8...Nb4, defending the d5-knight and hitting c2 at the same time.
White can castle with 9.0-0 to bring the rook into play, or defend c2 first with 9.Bb3. The third try, 9.a3, aiming to dislodge the knight, is unsound, because Black has a surprising defense: 9...Nxc2+ 10.Kd1 Nxa1 11.Nxd5 Qh4 12.Nxc7 (12.Nb6 Ke7 13.Nxa8 Bg4 pins and wins the queen) 12...Kd7 13.Qf7+ Qe7 14.Qxe7+ Bxe7 15.Nxa8 Kd6, and White's knight is trapped in the corner.
The Trap at the Board: Why 9.a3 Backfires
Here is the practical pitfall almost no guide warns you about. After the critical 7...Ke6 8.Nc3 Nb4, where Black's knight defends d5 and jabs at c2, White's most natural-looking move, 9.a3 to kick the knight, is a serious mistake. Black replies 9...Nxc2+ 10.Kd1 Nxa1, and suddenly the would-be attacker is down an exchange with a knight that gets stranded in the corner. The hunter becomes the hunted. The right move is 9.0-0, bringing the rook toward the e-file, or the solid 9.Bb3 to shore up c2 first. The practical picture splits by rating: below roughly 1600 the Fried Liver overperforms because defenders rarely find 7...Ke6 and the follow-up. So as White, pre-memorize 8.Nc3 Nb4 9.0-0 cold, and as Black, drill 7...Ke6 8.Nc3 Nb4 as a single forced unit, since one wrong king step loses immediately.
9.0-0
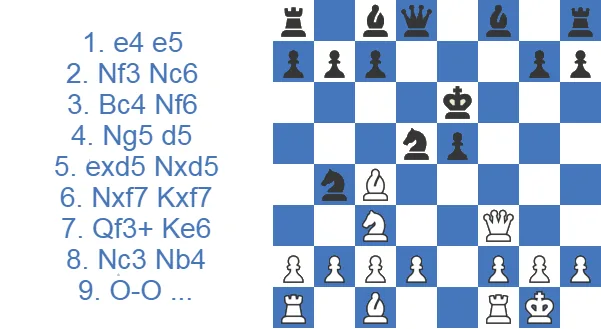
The point of 9.0-0 is not only to stop Black from grabbing c2 with check but also to bring the rook to e1, hammering the king stuck in the center. After 9...c6 10.d4, White rushes to open the e-file. With 10...Qf6 (10...exd4? 11.Re1+ Kd7 12.Bxd5 and White is crushing) Black wants to trade queens because he is up material, but White prefers to keep pieces on, so 11.Qe2 pins the e5-pawn. Then 11...Ke7, heading for a safer square like d8, and after 12.Ne4 Qg6 13.dxe5 Kd8 Black has found relative shelter for the king, though White still holds practical compensation.
9.Bb3
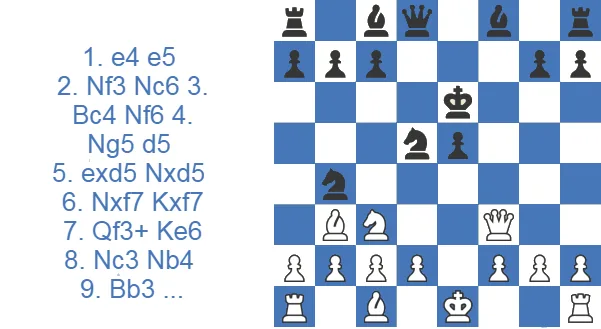
White does not have to rush. Protecting c2 with 9.Bb3 is a sound way to remove Black's counterplay, and it also threatens a3 to chase the b4-knight. Play might go 9...c6 10.a3 Na6 11.Nxd5 cxd5 12.d4, opening the center quickly with c4 to follow. Here Black should give back another pawn to develop and consolidate, for example 12...Be7.
7...Qf6
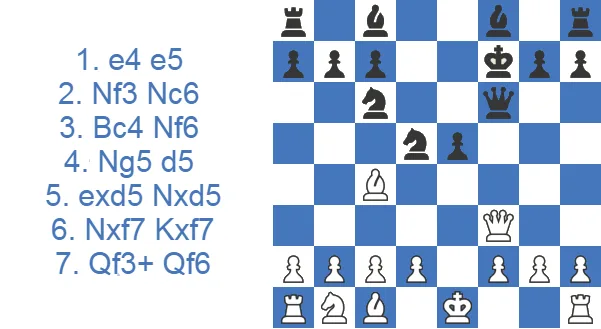
After 7.Qf3+, Black may try to block the check with 7...Qf6 rather than defend the knight with 7...Ke6. But the d5-knight is undefended, so White just captures it with the bishop or queen. Either way White is at least a pawn up, but 8.Bxd5 is much clearer, because after 8...Ke7 or 8...Ke8 White can wreck Black's structure with 9.Bxc6 bxc6. White keeps the queen on, since Black's king is still stuck in the center: 10.Qe2.
Now White has both a material edge and a better pawn structure for the endgame while the attack continues. Black should avoid 7...Qf6 altogether.
7...Ke7
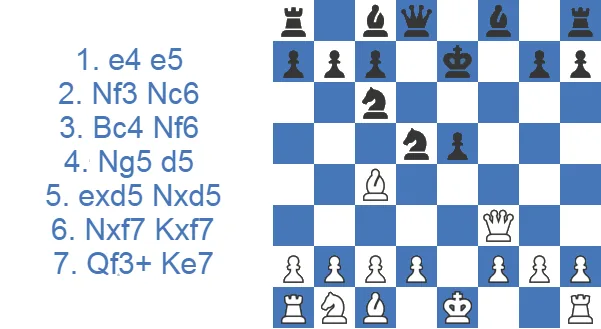
7...Ke7 is no better than 7...Qf6. White simply takes the knight with 8.Bxd5, hitting c6 and threatening Qf7+, so after 8...Nd4 9.Qf7 Kd6 10.Na3, defending c2 and eyeing Nc4+, Black's king is in serious trouble.
Traxler Countergambit: 4...Bc5
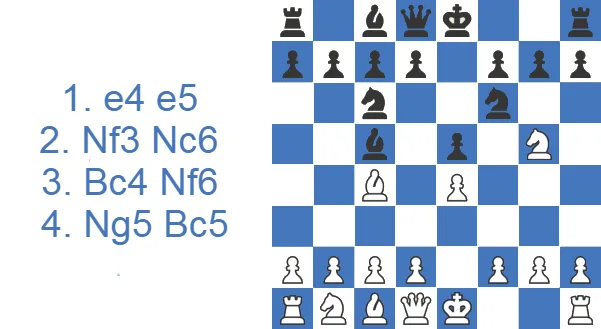
Black can look for counterplay with 4...Bc5 instead of defending with 4...d5. The idea is that after 5.Nxf7 White's e4-pawn is undefended, which sets up the bishop sacrifice on f2: 5...Bxf2+. A couple of lines show how badly things can go for White: 6.Kxf2 Nxe4+ 7.Kf3 Qf6+ 8.Kxe4 Qf4+ 9.Kd5 Qd4#, and 6.Kxf2 Nxe4+ 7.Kf1 Qh4 (7...Qf6+ 8.Qf3) threatening ...Qf2#, 8.Qe1 Ng3 9.Qxg3 Qxc4+ 10.Ke1 Qxf7, and Black has won a pawn.
How to Defend Against the Fried Liver Attack: Sidestepping It Entirely
The best defense against the Fried Liver is to never allow it. The sacrifice on f7 exists only because Black recaptures with 5...Nxd5. Decline that recapture and the knight on g5 has nothing to jump into, so the whole attack disappears. Below are the most reliable ways for Black to sidestep the Fried Liver, in rough order of popularity.
The Traxler Counterattack: Black Hits Back with 4...Bc5
Instead of defending f7 with 4...d5, Black can ignore the threat and develop aggressively with 4...Bc5, the Traxler Counterattack (also called the Traxler Counter-Gambit). The bishop on c5 eyes f2. If White grabs the pawn with 5.Nxf7, the e4-pawn falls undefended after 5...Bxf2+. After 6.Kxf2 Nxe4+, Black's queen springs out with check and the white king is left exposed in the center. The lines are razor-sharp and largely forced, with both sides walking a tightrope. Many strong players sidestep the chaos by declining the f7-pawn and playing 5.Bxf7+ Ke7 6.Bb3 instead, keeping a small, safe edge rather than wading into Black's preparation. If you expect the Traxler, learn your antidote before you sit down at the board.
5...Na5: The Main Line (Polerio Defense)
This is the modern main line and Black's most respected defense. Instead of taking on d5, Black kicks the bishop and offers a pawn for fast development: 5...Na5 6.Bb5+ c6 7.dxc6 bxc6 8.Be2. White is a pawn up, but Black's lead in development, open lines, and central pressure give real compensation. A typical continuation is 8...h6 9.Nf3 e4 10.Ne5 Bd6, when Black has an active, comfortable game despite the missing pawn. The retreat 8.Bd3 is also playable, but it leaves the bishop exposed to a later ...Nd5-f4.
The Polerio Defense (5...Na5): Black's Cleanest Antidote
When Black wants to refuse the sacrifice with the soundest line available, 5...Na5, the Polerio Defense, is the modern main choice. Black chases the light-squared bishop and offers a pawn for fast development: 5...Na5 6.Bb5+ c6 7.dxc6 bxc6, and now White must decide where the bishop goes. The principled retreat is 8.Be2, the modern preference, keeping the bishop flexible and out of harm's way. The older 8.Bd3 is also playable, but it leaves the bishop exposed to a later ...Nd5-f4 hop. After 8.Be2 h6 9.Nf3 e4 10.Ne5 Bd6, Black has an active game with open lines and central pressure that pay back the missing pawn. Engines rate the whole structure as roughly balanced, which is exactly why titled players reach for 5...Na5 rather than walking into the f7 fireworks.
5...Nd4: The Fritz Variation
For players who want to dodge the heavy theory of 5...Na5, the Fritz Variation is a fine surprise weapon: 5...Nd4 6.c3 b5 7.Bf1 Nxd5. Black drives White's bishop back with ...b5 before recapturing the pawn on d5. The key move to remember is 8.Ne4 Ne6, after which Black equalizes comfortably. The lines are forcing, so a little memorization pays off, but the positions are easier to handle than they look.
5...b5: The Ulvestad Variation
The Ulvestad is the Fritz Variation's lesser-known cousin: 5...b5 6.Bf1 Nd4, often transposing into similar tactical territory. It is rarer, which is the whole point. If you like taking opponents out of their preparation early, this is a sound way to do it. Black still aims to dismantle White's grip on d5 and untangle, using the extra space the pawn thrust provides.
What If You Already Allowed the Sacrifice?
If Black has already played 5...Nxd5 and been hit with 6.Nxf7, do not panic and do not resign. The position is unpleasant but not lost with accurate play. The single most important move is 7...Ke6: the king must march forward to defend the pinned knight, since retreating with 7...Ke7 or blocking with 7...Qf6 simply drops material. From there Black returns part of the extra material at the right moment, trades queens whenever possible, and tucks the king away on d7 or d8. The detailed lines are covered in the 7...Ke6 section above.
The Wrong King Moves: How 7...Ke7, 7...Qf6 and 7...Kg8 Lose
After 7.Qf3+ Black has exactly one move that survives, and the alternatives fail in instructive ways. The knight on d5 is pinned and attacked, so 7...Nf6 cannot defend it. Stepping back with 7...Ke7 walks into 8.Bxd5, hitting c6 and threatening Qf7+, after which 8...Nd4 9.Qf7 Kd6 10.Na3 leaves Black's king hunted in the middle of the board. Blocking with 7...Qf6 fails to 8.Bxd5, since 8...Ke7 or 8...Ke8 lets White wreck the structure with 9.Bxc6 bxc6 10.Qe2, a pawn up with the better endgame and the attack still rolling. Retreating to 7...Kg8 is worst of all. The king drops back into the corner, the d5-knight simply falls, and White has regained the sacrificed piece and is a pawn ahead. Only 7...Ke6, marching forward to shield the knight, keeps Black in the fight.
Black's Defenses at a Glance
Here is a quick reference comparing every realistic way for Black to handle the position.
| Defense | Key Move | Verdict | Best For |
|---|---|---|---|
| Main Line (Polerio) | 5…Na5 | Pawn down, full compensation | Solid, principled players |
| Fritz Variation | 5…Nd4 | Equal with accurate play | Surprise-weapon fans |
| Ulvestad Variation | 5…b5 | Playable, off the beaten path | Sidestepping theory |
| Traxler Counter-Attack | 4…Bc5 | Sound but wildly sharp | Tactical daredevils |
| Accepting the Fried Liver | 5…Nxd5 … 7…Ke6 | Difficult but defensible | Only if forced into it |
The takeaway is simple: if you face the Fried Liver as Black and you have done your homework, play 5...Na5 or the Fritz Variation and you will be fine. The attack is dangerous against the unprepared, which is exactly why knowing one clean defense is worth the small investment.
Two Instructive Fried Liver Games
1. Mirsaleh Seyidli vs. Richard Stalmach, 2025
A clean demonstration of White's attack working. Black drifted with 7...Ke8, allowed the structure to collapse after 8.Bxd5 Qf6 9.Bxc6+ bxc6, and never escaped the pressure.
2. Kirill Alekseenko vs. Pranav Venkatesh, 2022
The other side of the coin: a strong defender absorbs the attack, consolidates the extra piece, and turns it into a winning counterattack. This is the game I have chosen for the case study below.
Meeting the Fried Liver Attack as Black: A Game of Mine
I was 1401 against 1509 in this one, and I used the simplest antidote there is: 1.e4 e5 2.Nf3 Nc6 3.Bc4 h6. It did its job. Ng5 never happened, and through 4.Nc3 Nf6 5.d3 Bb4 6.Bd2 Bxc3 7.Bxc3 the game stayed close to level.

The rest had nothing to do with the Fried Liver. 8.Nxe5 d5 9.Bb5 dxe4 10.Nxc6 bxc6 11.Bxc6 cost me material, although by the time I had to play my fifteenth move the engine read -2.99 in my favor. Then 15...Nh5 flipped it to +1.90, he returned the favor with 16.Qg4 at -8.88, and I did not use that either.

Then the finish: 16...Qc5, 17.Bd5 pinned my f7 pawn, and when I answered 17...g6 that square had nothing left defending it, because my h-pawn was on h6 and not h7. 18.Qxg6+ and I resigned. The h6 line really does take the Fried Liver off the board. Just remember that it also moves a defender, and those light squares stay one man short for the rest of the game.
Should You Add the Fried Liver to Your Repertoire?
Here is the honest balance sheet before you commit it to memory.
Pros
- Objectively and statistically better for white.
- It s easier to attack than to defend, so black has a relatively tougher task.
Cons
- White should theoretically know how to follow up on the knight sacrifice.
- Precise calculation and tactical affinity are required.
Do Grandmasters Play the Fried Liver?
Rarely, and almost never as a serious main weapon at the top. The reason is simple. A well-prepared opponent just declines with 5...Na5 or the Fritz Variation, so the sacrifice never lands, and the engine verdict of roughly equal does not reward the risk against elite defense. Where the Fried Liver thrives is club, scholastic, and online blitz play, where it scores well above its nominal 53% because defenders crack under the forcing pressure around moves 7-8. People still grab the d5-pawn against me on autopilot and then have no idea what 7.Qf3+ is really threatening. Strong players do occasionally wheel it out as a surprise in faster time controls. Hikaru Nakamura and other elite blitz specialists have used the broader 4.Ng5 complex to ambush unprepared opponents online. As a one-off shock it still has teeth. As a repertoire cornerstone against 2700s, it does not.
Case Study: Alekseenko vs. Venkatesh, How Black Refutes a Greedy Attack
This game is the best illustration in this article of what happens when the Fried Liver meets a defender who knows the drill. It is not a game I played, but a model game worth studying from both sides.
What to learn from it, move by move:
- Through move 7, this is textbook Fried Liver: 5...Nxd5 6.Nxf7 Kxf7 7.Qf3+ Ke6, and Black has found the only move, marching the king up to guard the pinned knight.
- 8.Nc3 Ne7 is the modern, engine-approved retreat. Instead of the older 8...Nb4, Black moves the c6-knight to e7, where it defends d5. The d5-knight stays pinned by the c4-bishop, but now has an extra defender.
- 9.0-0 c6 10.d4 is White's standard try to blast open the center against the stranded king. The turning point of the whole game is Black's reply: 10...Kd6, a genuinely brave king walk. The king volunteers to run rather than sit and get mated, and the engines confirm it is correct. After 11.dxe5+ Kc7 the king reaches relative safety on the queenside.
- 12.e6 Bxe6 13.Re1 Qd7: White keeps throwing pawns and pieces at the king, but every check runs out. Notice how Black answers each threat with a developing move (...Bxe6, ...Qd7, ...Ng6) rather than a passive shuffle. Once the king tucked onto b7 and then a8 (moves 17 and 21), the attack had nothing left.
- From move 22 onward Black is simply up a piece with a safe king, and the rest is conversion. The finish, 27...Qf5 28.Rb2 Nf3+ 29.gxf3 Re1+ 30.Kg2 Qxg5+ 31.Qg4 Nf4+ 32.Kg3 Rg1#, shows the defender turning attacker: Black's extra material flows into a mating net of his own.
The practical lesson for a club player cuts in two directions. As White, this game shows what happens when the attack does not land against precise defense: you are down a piece and the initiative evaporates around move 20. As Black, it shows the defensive recipe in full: find 7...Ke6, reinforce the pinned knight, be willing to walk the king to the queenside, answer every check with a useful move, and once the storm passes, cash in the extra piece.
Final Thoughts on the Fried Liver Attack
The Fried Liver is one of the most exciting tactical openings in the 1.e4 e5 world, and it rewards the attacker who knows the follow-up cold. White needs accurate technique after the sacrifice, and one careless move, such as 9.a3, can flip the position. Black should avoid allowing the attack at all, because an unprepared defender is in real danger. But a player who knows 5...Na5 or the Fritz Variation, or who can find 7...Ke6 and the defensive plan, will not only blunt the attack but often emerge with the advantage. Learn it from both sides and you will be ready whichever color you sit behind.
Test Yourself: Fried Liver Attack Positions
Make the move on the board. Hint gives you a nudge, Answer shows the move and why it works.
Two Knights Defense. Which knight move, without capturing, attacks f7 a second time and starts the Fried Liver setup?
White threatens Nxf7 and Bxf7+. Which pawn move blocks the bishop's diagonal and attacks the bishop?
Black recaptured with 5...Nxd5. Which knight sacrifice is the Fried Liver, dragging the king out for a queen check?
The Fried Liver. White gave check with 7.Qf3+. Which king move defends the pinned d5-knight?
Black's knight on b4 attacks c2 with a fork on e1 and a1. Which bishop move protects c2 and keeps the pin on the d5-knight?
Trap at the board. White kicked the b4-knight with 9.a3. Which capture gives check and forks the king and the a1-rook?
After 5.exd5, Black can refuse the Fried Liver. Which knight move attacks the c4-bishop (the Polerio Defense)?
Traxler Countergambit. White just took on f7 and forks the queen and rook. Which bishop capture gives check instead of saving anything?
Black's 4...h6 attacks your g5-knight. Don't retreat it. Which knight capture forks the queen and the rook?
Black grabbed the e4-pawn. Which bishop capture gives check first, so the loose knight can be taken next?