
 By
By 
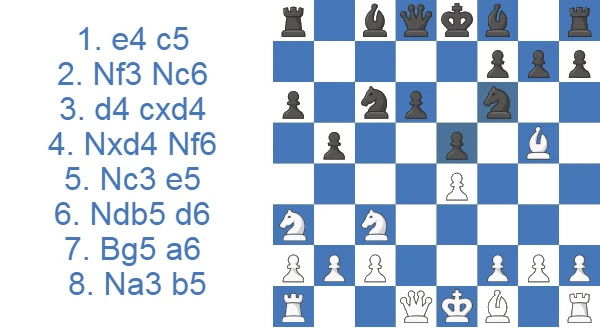
The opening takes its name from the Russian grandmaster Evgeny Sveshnikov, who reshaped the line in the 1970s. It is known for its dynamism and the positional imbalances Black accepts on purpose, a hallmark of the pragmatic Soviet School of Chess.
Sveshnikov Sicilian in 60 Seconds
- What it is: a sharp, fully sound answer to 1.e4, reached by 1.e4 c5 2.Nf3 Nc6 3.d4 cxd4 4.Nxd4 Nf6 5.Nc3 e5. Black voluntarily weakens the d5 square in return for the bishop pair and active piece play.
- Also called: the Pelikan or Chelyabinsk Variation, named after the city where Evgeny Sveshnikov and Gennadi Timoshchenko revived it in the 1970s.
- Black's main plan: the ...f7-f5 break to challenge e4, untangle the bishops and attack on the kingside.
- White's main plan: plant a knight on d5, pressure the backward d6-pawn and expand on the queenside.
- Critical branch: on move 9 White chooses between 9.Bxf6 (doubling Black's pawns) and 9.Nd5 (the slower, positional route).
- Who plays it: a long-standing weapon at the very top, most famously the battleground between Magnus Carlsen and Fabiano Caruana in their 2018 World Championship match.
Study the Sveshnikov Sicilian as White or Black
The Sveshnikov Sicilian is an argument about one square: Black concedes d5 and a backward d6 pawn, claims the piece activity is worth more, and dares White to prove otherwise.
Press the Sveshnikov Sicilian as White
White's task in the Sveshnikov Sicilian is to prove the d5 grip outweighs what Black gets back, and the ideas section below shows exactly what that return is: the bishop pair and the ...f5 break. The sidelines piece is written from Black's chair, yet reading it tells White precisely which shortcuts, including the premature knight hop to d5, already have prepared answers.
Learn the Sveshnikov as Black
Sixty seconds of overview, one look at the score tables, and a few model games get you playing the Black side today. Watch how strong players in those games handle each Sveshnikov Sicilian counter White tries, and how to face the Sveshnikov stops looking mysterious from either side of the board.
How the Sveshnikov Scores
Among club and online players the Sveshnikov is a genuine fighting opening, and the two sides finish close together, both landing in the mid-to-high 40s across the rating bands. Draws are uncommon, mostly running in the 5% to 7% range rather than deciding the outcome. Here is the broad breakdown by rating.
| Rating level (Lichess) | White wins | Draw | Black wins |
|---|---|---|---|
| 800, beginner | 43.3% | 10.0% | 46.7% |
| 1000, novice | 48.3% | 6.5% | 45.3% |
| 1200, improver | 46.3% | 5.8% | 47.9% |
| 1600, club | 48.0% | 4.7% | 47.3% |
| 1800, club | 48.1% | 5.8% | 46.1% |
| 2000, advanced club | 48.6% | 7.0% | 44.4% |
Source: Lichess opening explorer, blitz, rapid and classical games at the position after 1.e4 c5 2.Nf3 Nc6 3.d4 cxd4 4.Nxd4 Nf6 5.Nc3 e5 6.Ndb5 d6 7.Bg5 a6 8.Na3 b5. Figures are win rates by Lichess rating band; draws are rare at these levels.
Watch the Sveshnikov in Action
If you prefer to see the ideas first, there is a short video walkthrough of the Sveshnikov on our YouTube channel.
Why It's Also Called the Pelikan and Chelyabinsk Variation
The Sveshnikov carries several names that all point to the same structure. The early forerunner with 5...e5 was explored by the Czech master Jiří Pelikán, so many databases still file the line as the Pelikan Variation. Decades later it was systematically revived by Evgeny Sveshnikov together with Gennadi Timoshchenko, both from Chelyabinsk, which is why you will also see it called the Chelyabinsk Variation. In practice, Sveshnikov, Sicilian Sveshnikov, Pelikan and Chelyabinsk all describe the same opening.
What Sveshnikov and Timoshchenko changed was the assessment. Before them, the voluntary weakening of d5 was considered simply bad, and Black struggled to show compensation. Their key contribution was the ...a6 and ...b5 plan that drives White's knight to the passive a3 square, buying Black the time needed to organize the ...f5 break. The resulting pawn skeleton, with Black pawns on d6 and e5 facing White's e4, is the same Boleslavsky Wall structure that underpins many Open Sicilians, but here Black handles it far more aggressively.
The verdict has since swung completely. Once treated with suspicion, the Sveshnikov became a main-line weapon for elite players, with Vladimir Kramnik and Magnus Carlsen among its most prominent practitioners. Its reputation as a fully reliable defense at the highest level is precisely why it remains so heavily analyzed today.
The Story Behind the Sveshnikov
The opening's roots reach back to the Czech master Jiří Pelikán, who explored the early 5...e5 idea in the 1930s and 40s. That is why databases still file the line as the Pelikan Variation. For years the voluntary surrender of d5 was judged simply bad, and Black could rarely show real compensation. The rehabilitation came in the 1970s from Evgeny Sveshnikov and his fellow Chelyabinsk player Gennadi Timoshchenko, hence the third name you will see, the Chelyabinsk Variation. Their breakthrough was not a single move but a reassessment. The ...a6 and ...b5 mechanism that drives White's knight to the passive a3 square buys Black exactly the time needed to prepare the ...f5 break. That practical, results-driven approach was pure Soviet School, and it turned a discredited sideline into elite theory.
Carlsen vs Caruana 2018: The Modern Referendum
No event did more for the line's standing than the 2018 World Championship. Caruana defended the Sveshnikov as Black in every classical game where Carlsen opened 1.e4, making it his main choice at the sport's highest stakes. Carlsen answered with the 7.Nd5 move order, jumping into the hole immediately and bypassing the entire ...a6/...b5 mechanism. That choice is no curiosity. It is the live, engine-era main line, and it is the same move order that conceals the opening's nastiest trap, covered below. The match settled the soundness debate in public. If the world's best preparer chose it for a title defense, club players can trust it too. It is also why the Sveshnikov remains one of the most heavily analyzed defenses to the King's Pawn.
Who Plays the Sveshnikov
The line's pedigree is a large part of its appeal. Beyond Caruana, who made it the centrepiece of his 2018 title challenge, it has been a regular choice for Vladimir Kramnik and Magnus Carlsen, and a long-standing favorite of grinders such as Teimour Radjabov and Loek van Wely. That spread matters. When elite preparers stake World Championship and super-tournament points on a defense, its theoretical standing is no longer a matter of opinion. For a club player, leaning on this body of top-level practice means studying lines that the best in the world have already tested against the strongest engines, rather than working out the assessment from scratch.
Main Ideas and Plans: The Bishop Pair and the f5 Break
The Sveshnikov plants a Black pawn on e5, a departure from the more common Sicilian variations where White usually aims a knight at d4. That e5 advance does several jobs at once: it grabs central space and takes control of d4 away from White. Just as important, it frees Black's bishop pair to come into play. The full potential of those two bishops only shows once Black achieves the opening's primary goal, the ...f5 pawn break. With that in mind, Black maneuvers the kingside pieces into position for an aggressive assault.
The opening also leans on moves like ...a6 and ...b5 alongside ...d6 and ...e5, which gives the position a strikingly unusual look. These pawn advances can seem provocative and at odds with positional principles, especially given White's lasting grip on d5. But that is exactly the point: the Sveshnikov is a concrete opening. Everything rests on the dynamic activity of the minor pieces and on tactical resources that offset the drawbacks of the pawn expansion.
Sicilian Sveshnikov Theory: The Move-9 Crossroads (9.Bxf6 vs 9.Nd5)
Up to the major branching point on move 9, a typical Sveshnikov game follows one main line with little deviation: 1.e4 c5 2.Nf3 Nc6 3.d4 cxd4 4.Nxd4 Nf6 5.Nc3 e5 6.Ndb5 d6 7.Bg5 a6 8.Na3 b5, and now Black simply threatens ...b4, forking White's knights. The d5 square is very inviting, but White has to decide whether to occupy it at once with 9.Nd5 Be7 10.Bxf6 (removing the only piece that challenges the d5-knight) 10...Bxf6, or to double Black's pawns first with 9.Bxf6 gxf6 10.Nd5. In both cases White gives up the bishop pair. In the second, Black usually clears the doubled pawns right away with 10...f5 and undermines White's center.
The Two Pawn Structures You Are Really Playing
Almost every Sveshnikov reduces to one of two pawn skeletons, and recognizing which one you are in tells you the plan. After 9.Bxf6 gxf6, Black accepts doubled f-pawns and a half-open g-file in exchange for the bishop pair and a quick ...f5. The doubled pawns are usually liquidated at once, and Black's long-term trump is the open position for the two bishops. The 7.Nd5 line and ...Nxd5 exd5 give a different picture. Now White owns a protected wedge on d5 and a queenside space edge, while Black slowly regroups with ...Ne7, ...Ng6 and ...f5 to generate kingside play. In both cases the structural cost is the same: a backward d6-pawn and the d5 hole. What changes is the assets that pay for it.
9.Bxf6 gxf6 10.Nd5 f5
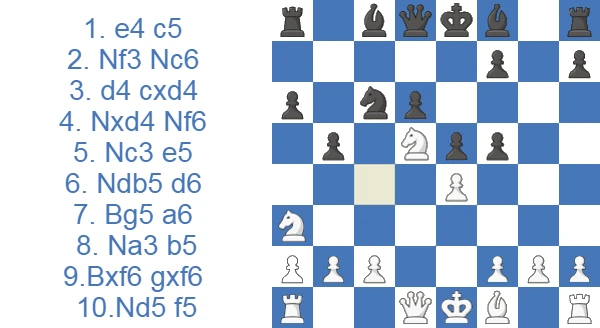
White's main goal is an uncontested knight outpost on d5, and to get it the f6-knight has to be dealt with sooner or later. Capturing on f6 before Black can play ...Be7 leaves Black with doubled pawns on the f-file. 9.Bxf6 gxf6 (9...Qxf6 fails to a tactical blow: 10.Nd5 Be6 11.Bxb5! axb5 12.Nxb5 and the threat of Nc7+ is hard to meet, for example 12...Qa5+ 13.c3 Rb8 14.b4 and the queen has no square to go to without running into a knight fork on c7) 10.Nd5, and Black wants to be rid of the doubled pawns at once with 10...f5. White can defend the e4-pawn, capture on f5 or simply ignore ...fxe4. Each option leads to a different game and is worth a closer look.
11.Bd3
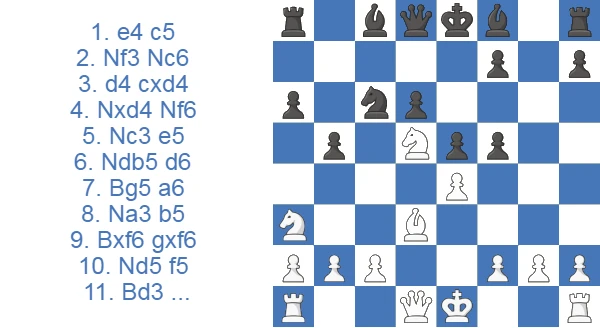
11.Bd3 is both the most natural reply to Black's central undermining and the most common move. It develops a piece to a good square, and White is ready to recapture with Bxe4 after ...fxe4, where the bishop on e4 carries threats based on discovered attacks (for example 11...fxe4?! 12.Bxe4 Bg7?? 13.Nf6+! Qxf6 14.Bxc6+ followed by 15.Bxa8, winning a full rook).
At the same time White threatens exf5, so Black plays 11...Be6 to stop it, since 12.exf5?? would drop the knight on d5 to 12...Bxd5. White usually castles with 12.0-0, allowing 12...Bxd5 13.exd5 Ne7.
White would like the queen on h5, taking advantage of the missing knight on f6. But if Black gets in ...e4 first, White has to play Be2 and the queen's path to h5 is blocked. So White makes luft for the bishop with 14.c3, which also opens the c2 square so the a3-knight can rejoin the game via c2-e3 or c2-d4. 14...Bg7 15.Qh5 e4 16.Be2 0-0 17.Nc2 Kh8, and Black slowly expands on the kingside with ...f4, ...Ng6 to follow.
11.c3
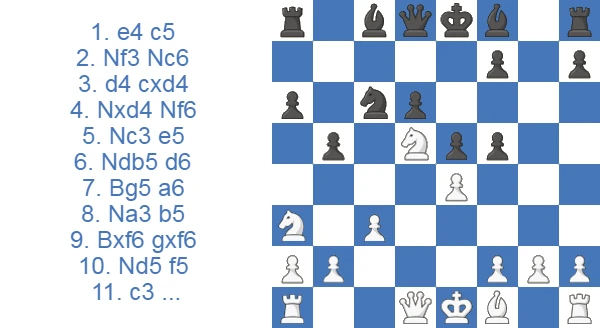
The calm 11.c3 lets Black grab on e4, but for a deep tactical reason. Take the line 11...fxe4?! 12.Bxb5! axb5 13.Nxb5: White's threat of Nbc7+ lands with full force, for example 13...Be6 (13...Ra5 14.Nbc7+ Kd7 15.Qg4+! f5 16.Qxf5#) 14.Nbc7+ Kd7 15.Nxa8 Bxd5 (15...Qxa8?? 16.Nb6+ and Nxa8) 16.Qxd5 Qxa8 17.Qf7+, and White has a crushing advantage.
The same idea without c3 would not work as well, for a subtle reason: after 11.Bxb5 axb5 12.Nxb5, Black has 12...Ra4, hitting e4 with ...Rxe4+.
So 11.c3 does double duty: it denies the rook the a4 square, and ...fxe4 opens the diagonal for Qg4+ as in the line above. That is why after 11.c3 Black almost always plays 11...Bg7. A standard continuation is 12.exf5 Bxf5 13.Nc2 (the whole point of 11.c3) 13...0-0 14.Nce3 Be6 15.Bd3 f5, and in practice Black is in the driver's seat thanks to a strong, dynamic center.
11.exf5
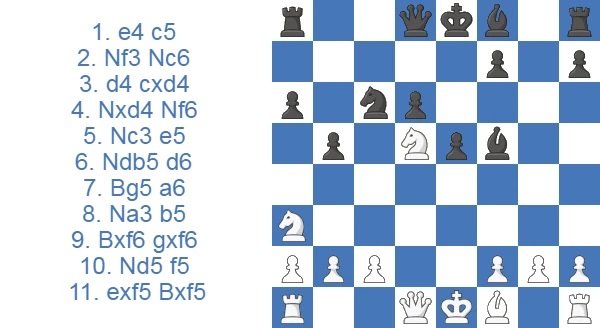
11.exf5 has a lot in common with 11.c3 and usually transposes into the lines above after 11...Bxf5 12.c3 Bg7 13.Nc2 0-0 14.Nce3 Be6 15.Bd3 f5.
White can try to steer away with 12.Bd3 Be6 13.Be4 Bg7 14.Qh5, but Black consolidates easily with 14...Rc8 15.c3 Ne7 and is likely to take over the center.
11.Bxb5
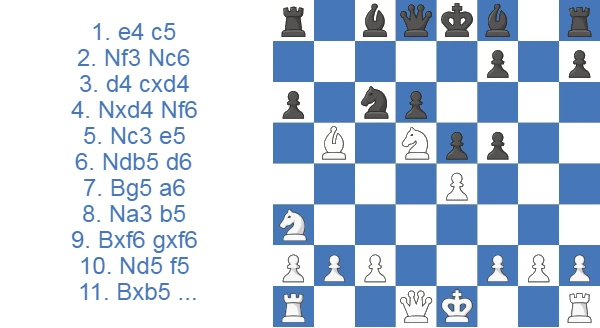
11.Bxb5 is a notable line that runs into a forced tactical sequence, as flagged in the 11.c3 section above. After 11...axb5 12.Nxb5 Ra4 13.Nbc7+ Kd7 14.0-0 Rxe4 15.Qh5, hitting both f5 and f7, 15...Nd4 16.c3 Ne2+ 17.Kh1, and with 17...Kc6!, the only move, Black astonishingly escapes, exploiting the lack of coordination among White's pieces and the absence of bishops to hit the black king. After a few more trades, for example 18.c4 Nf4 19.Qd1 Nxd5 20.Nxd5 Kd7, Black ends up positionally on top thanks to the bishop pair in an open position.
9.Nd5
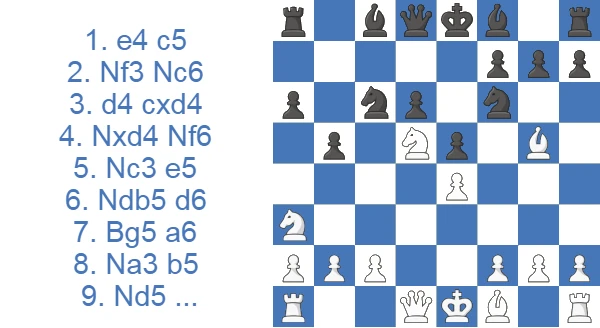
The major alternative to 9.Bxf6 is 9.Nd5, delaying the capture on f6 until Black develops with ...Be7. After 9...Be7 10.Bxf6, recapturing with ...gxf6 no longer makes sense, since it would misplace the bishop on e7, so Black retakes with 10...Bxf6.
Compared with the doubled-pawn version from the 9.Bxf6 gxf6 line, Black's ...f5 break now takes longer to prepare, which is the whole point of 9.Nd5. 11.c3 frees the c2 square for the knight, 11...0-0 12.Nc2, and White is ready to launch pawn breaks on the queenside with a2-a4, while Black builds up on the kingside. The first step is 12...Bg5, clearing the way for ...f7-f5. 13.a4 bxa4 14.Rxa4 a5!, freeing the a8-rook from defense and also stopping White's b2-b4. 15.Bc4 Rb8 16.b3 Kh8, stepping off the diagonal of White's light-squared bishop, 17.0-0, and Black can finally play the desired break 17...f5 18.exf5 Bxf5 19.Nce3 Bg6, with chances for both sides.
How to Play Against White's Sidelines and the 7.Nd5 Trap
Not every White player heads for the main 6.Ndb5. At club level you will regularly meet quieter sixth moves, and knowing the standard reactions saves Black a lot of trouble.
- 6.Nxc6 bxc6: once White trades on c6, the d5 square is no longer a real weakness. Black continues with ...Bb4 and ...d5, equalizing comfortably.
- 6.Nb3 or 6.Nf3: Black answers ...Bb4, pinning the knight, and follows up with a quick ...d5 to open the position for the bishops.
- 6.Nf5: aggressive on the surface, but the knight is loose. After 6...d5 Black breaks in the center and comes out with the more active pieces.
The most important modern try, though, is 7.Nd5, the immediate jump that bypasses the ...a6/...b5 mechanism entirely. It was Fabiano Caruana's repeated choice against Magnus Carlsen, and it is the same move order that hides the trap covered in the next section. Black should react precisely with 7...Nxd5 8.exd5 Ne7, intending ...Ng6 and ...f5, rather than rushing ...a6.
Sveshnikov vs Kalashnikov vs Najdorf: Picking Your ...e5 Sicilian
Three Open Sicilians get compared constantly because they share the same moves before branching. The difference comes down to one detail: when, and whether, Black commits the knight to f6.
| Variation | Defining moves | Character | Best suited to |
|---|---|---|---|
| Sveshnikov | …Nf6 and …e5 with …a6, …b5 | Concrete, theory-heavy, bishop-pair play and the …f5 break | Players who enjoy memorized, dynamic main lines |
| Kalashnikov | …e5 played immediately, without …Nf6 | Simpler, more flexible, fewer forcing lines | Players who want Sveshnikov ideas with less theory |
| Najdorf | …d6 and …a6, the knight stays on f6 | Universal, flexible, less committal in the center | Players who prefer rich positional choice over a fixed plan |
The Kalashnikov is the closest relative: by delaying ...Nf6, Black keeps the f6-knight in reserve and sidesteps some of White's heaviest preparation, at the cost of a slightly looser grip on the center. The Najdorf is the more universal choice, avoiding the early ...e5 commitment altogether. The Sveshnikov rewards players willing to learn precise theory in exchange for one of the most active black structures against 1.e4.
Sveshnikov Sicilian Trap: Why 9...a6?? Loses on the Spot to 7.Nd5
1.e4 c5 2.Nf3 Nc6 3.d4 cxd4 4.Nxd4 Nf6 5.Nc3 e5 6.Ndb5 d6 7.Nd5. Now White threatens to plant a knight on c7 and fork the rook with check. 7...Nxd5 8.exd5 Ne7 9.c4, propping up the d5-pawn, 9...a6??, trying to dislodge the knight immediately, walks into trouble on the a4-e8 diagonal: 10.Qa4 not only pins the a-pawn (with the idea Qxa8) but also threatens a discovered mate after 10...Bd7 11.Nxd6#.
The Trade-Off: Bishop Pair vs the d5 Hole
PROS
- In most cases, black enjoys the advantage of bishop pair and can use them actively.
- Control over the dark color complex in the center and the prospect of a kingside attack starting with the f5 pawn break.
CONS
- The absence of pawns to control the d5 square creates a positional vulnerability in the position
- Pawns on the queenside as well as the backward pawn on d6 can turn into potential targets
Why White Often Hates Facing It
It is worth seeing the Sveshnikov from the other side of the board, because much of its appeal lies in White's discomfort. White gets a long-term target on d5 and a backward d6-pawn, yet converting those static pluses is genuinely hard. The position is concrete, theory-heavy and forcing, so a single inaccurate move can hand Black the initiative and the bishop pair in an open position. White cannot coast on general principles, and many of the critical lines have to be known move for move. The result is a fighting opening that plays for all three results. Black is not defending for a draw but actively pressing for the win. Plenty of the White players I meet simply steer toward quieter Anti-Sicilians instead, just to avoid all of this.
Case Study: The 11.Bxb5 Tactical Storm
The 11.Bxb5 line in the 9.Bxf6 structure is the most instructive sequence in the whole opening, because it shows what the Sveshnikov is really about: Black survives a forcing tactical storm with the king in the center, then cashes the bishop pair in the endgame. It is not a game from a specific event, but the critical theoretical line every Sveshnikov player should know cold.
Up to move 10 this is the standard 9.Bxf6 main line: Black takes the doubled f-pawns, plays 10...f5, and prepares to liquidate them. 11.Bxb5 is the critical sacrifice. White gives up a bishop to crash through on the queenside while Black's king is still in the middle.
11...axb5 12.Nxb5 is the point. White threatens Nbc7+ forking king and rook, exactly the motif from the 11.c3 section. The move that makes the whole line work for Black is 12...Ra4. The rook leaves the c7-fork and lands on a square where it hits e4 along the fourth rank, generating its own counterplay rather than passively defending.
13.Nbc7+ Kd7 14.0-0 Rxe4. Black has to keep walking the king up the board, but every White piece is committed to the attack and none of them can deliver a clean blow. 15.Qh5 is the most testing try, hitting f5 and f7 at once. Black's reply 15...Nd4 is the key resource, bringing the last piece into the game with tempo and heading for the e2 fork.
16.c3 Ne2+ 17.Kh1 Kc6! is the move to remember. It looks insane to march the king to c6 on move 17, but it is the only move and it works. There are no bishops left to attack the exposed king, White's knights on c7 and d5 are clumsy, and the coordination simply is not there. This is the practical takeaway: in the Sveshnikov, king safety is measured concretely, not by general rules. If the attacker has no pieces that can actually reach the king, an open king is just a king on an active square.
The rest is conversion. 18.c4 Nf4 19.Qd1 Nxd5 20.Nxd5 Kd7, and the dust settles with Black holding the bishop pair in an open position. White's static weaknesses never mattered, because Black's dynamic resources came first. For a club player the lesson to carry away is simple: do not panic when the king is dragged forward in these lines. Count the attackers, look for the one resource that brings your own pieces in with tempo, and trust the bishop pair to win the endgame.
Test Yourself: Sveshnikov Sicilian Positions
Set up each position and find the best move. Use Hint for a nudge or Answer to reveal the engine’s top move.
Find the best move.
Find the best move.
Find the best move.
Find the best move.
Find the best move.