
 By

Unlike most gambits, it shows up at the elite level in serious competition because the resulting positions are deep and full of theory. Small details often hand winning chances to whichever side knows them better, and this opening can steer the game toward sharp tactics or quieter positional play, depending on the line.
The short version
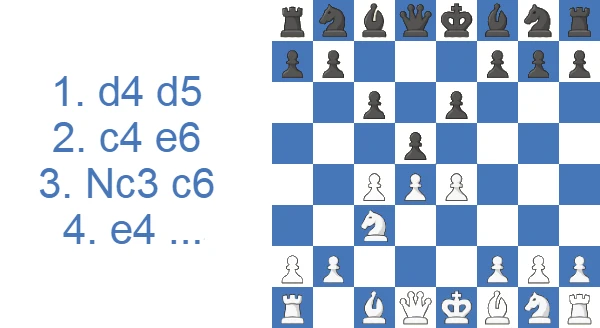
- The Marshall Gambit is a 1.d4 opening from the Queen's Gambit Declined and Semi-Slav move order (1.d4 d5 2.c4 e6 3.Nc3 c6 4.e4), where White sacrifices the e-pawn for a fast attack on the dark squares and the d-file.
- It is not the Ruy Lopez Marshall Attack (1.e4 e5). Same name, different opening, different side doing the sacrificing.
- The main line runs 4...dxe4 5.Nxe4 Bb4+ 6.Bd2 Qxd4 7.Bxb4 Qxe4+, after which White chooses between 8.Be2 and 8.Ne2.
- White gets real compensation, but with accurate play Black keeps the extra pawn and aims for an endgame.
- Below: every main line, a video walkthrough, the 5...Qh4 trap, and how Black should counter it.
Study the Marshall Gambit in the Semi-Slav as White or Black
The Marshall Gambit turns the solid Semi-Slav into an immediate pawn sacrifice, and preparation decides which player enjoys the ambush.
Attack with the Marshall Gambit as White
The Marshall Gambit spends a central pawn on the bishop pair and a black king stranded in the middle. Understand why the pawn is cheap, track where each side's attack lands, and sort out how this line differs from the other two openings carrying Marshall's name.
Defuse the Marshall Gambit as Black
The numbers show why knowing how to face the Marshall Gambit matters: accept it and keep the extra pawn with precise defense, or use a move-order counter to dodge the gambit altogether. Both paths are mapped out below.
How White and Black actually score
Here is how the gambit performs at master level and in the much larger amateur pool, drawn from a database of strong games and one of 1.2 million club games.
Master games:
| Results | Rate |
|---|---|
| Victory for White | 36% |
| Draw | 42% |
| Victory for Black | 22% |
From 1.2 million amateur games:
| Rating level (Lichess) | White wins | Draw | Black wins |
|---|---|---|---|
| 800, beginner | 59.5% | 0.0% | 40.5% |
| 1000, novice | 45.0% | 3.3% | 51.7% |
| 1200, improver | 49.0% | 4.5% | 46.6% |
| 1600, club | 47.3% | 4.9% | 47.7% |
| 1800, club | 49.9% | 3.8% | 46.3% |
| 2000, advanced club | 50.7% | 4.7% | 44.5% |
Source: Lichess opening explorer, blitz, rapid and classical games at the position after 1.d4 d5 2.c4 e6 3.Nc3 c6 4.e4 dxe4 5.Nxe4 Bb4+ 6.Bd2 Qxd4 7.Bxb4 Qxe4+. Figures are win rates by Lichess rating band; draws are rare at these levels.
Two things stand out. Among masters the gambit scores well for White and produces a high draw rate, which fits an opening where deep preparation neutralizes a lot of the risk. In amateur games the draw rate collapses and decisive results dominate, exactly what you would expect from a sharp opening where one inaccuracy can decide the game.
Watch the gambit played out
If you prefer to see the ideas in motion before reading the theory, this short video walks through the gambit's main plans.
Got the overview? The rest of the article takes you through every tactical and strategic detail of the Marshall Gambit.
Key Ideas Behind the Marshall Gambit: why White gives up the e-pawn
White's main idea is to give up a pawn for an attack on the Black king. To do that, White usually leans on the d-file and the dark-squared bishop along the a3-f8 diagonal. Black, in turn, wants to stop this initiative, consolidate by improving the pieces, and trade down into an endgame where the extra pawn tells.
Who attacks where: Black's kingside vs White's center and queenside
The clearest way to understand the Marshall Gambit is as two plans pointed in opposite directions. White's compensation for the pawn is dynamic: a development lead, the bishop raking the a3-f8 diagonal, and heavy pieces piling onto the half-open d-file with ideas like Qd6 and Rd1. The target is Black's uncastled king and the soft dark squares around it. Black holds the structural trumps. The plan is to finish the kingside development, tuck the king away, and aim a counter at White's loose center, often with an early ...c5 break to undermine d4 and open lines toward the queenside. It usually comes down to who lands their plan first. If White's initiative stalls, the extra pawn and Black's sturdier long-term structure decide the game on their own.
Marshall Gambit vs. Marshall Attack vs. Marshall Defense: same name, three openings
Frank Marshall left his name on more than one idea, so the term Marshall Gambit gets confused with two other openings. The line covered here is the 1.d4 version that arises from the Queen's Gambit Declined and the Semi-Slav. Before going into the theory, it is worth separating the three so you know you are studying the right one.
| Opening | Move order | Who sacrifices |
|---|---|---|
| Marshall Gambit (this page), also called the Semi-Slav Marshall Gambit or the Marshall Variation of the Semi-Slav | 1.d4 d5 2.c4 e6 3.Nc3 c6 4.e4 | White |
| Marshall Attack (Ruy Lopez Marshall Gambit) | 1.e4 e5 2.Nf3 Nc6 3.Bb5 a6 4.Ba4 Nf6 5.O-O Be7 6.Re1 b5 7.Bb3 O-O 8.c3 d5 | Black |
| Marshall Defense (to the Queen’s Gambit) | 1.d4 d5 2.c4 Nf6 | Neither, a separate, rarely played reply |
The key point is that on this page White is the one giving up a pawn with 4.e4, hoping to use the d-file and the dark-squared bishop before Black finishes development. Many players reach it through the Queen's Gambit Declined move order and search for it as the Queen's Gambit Marshall or even the Marshall Defense, but the position is the same Semi-Slav Marshall Gambit examined below.
Why it's named after Frank Marshall
The gambit carries the name of the American champion Frank Marshall (1877 to 1944), one of the leading attacking players of the early twentieth century and the man behind several prepared sacrifices that still bear his name. Marshall built a reputation for springing booby-trapped openings in tournament play, conceding material early to win it back with interest, usually with a king-hunt to follow. The Semi-Slav line fits that habit. White hands over the e-pawn not out of recklessness but to grab the initiative and chase the enemy king while it is still stuck in the center. Knowing the origin also helps untangle the name collision, since the far more famous Ruy Lopez Marshall Attack honors the same player but is a separate opening, and one used by Black.
Theoretical Lines of the Marshall Gambit: the main line 6.Bd2 and the double-pawn grab
The main line lets White generate tactical threats in return for the lost pawn. White works the d-file with moves like Qd6 and Rd1, and uses the dark-squared bishop to hit Black's weak dark squares and lag in development.
The Forgotten Variation is far less tactical. Both sides usually develop quietly and castle short, and Black typically goes for an early ...c5 break to undermine White's central pawns.
Main line: 4...dxe4 5.Nxe4 Bb4+ 6.Bd2 Qxd4 7.Bxb4 Qxe4+
The main line starts after Black captures the e4-pawn (4...dxe4) and White recaptures with the c3-knight (5.Nxe4). Black then develops the f8-bishop with check (5...Bb4+), and White blocks with the bishop (6.Bd2) rather than the knight.
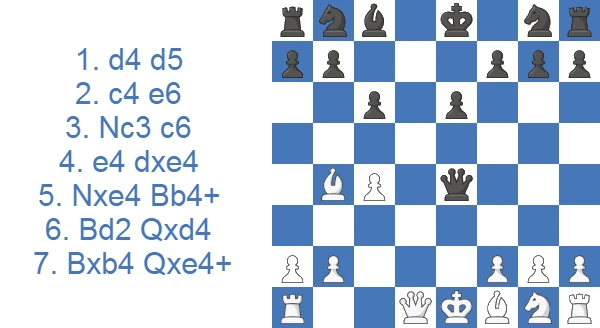
Black takes the d4-pawn (6...Qxd4), White captures the b4-bishop (7.Bxb4) to control the a3-f8 diagonal, and Black grabs the e4-knight with check (7...Qxe4+).
This variation is genuinely complex, with nuances both sides have to respect. White aims to dominate the dark squares near the enemy king, while Black seeks to consolidate the extra material won in the sequence.
White can block the check with either the knight or the bishop. The bishop is the more popular choice, since it avoids getting stuck on f1. Blocking with the queen on e2 is not advised: Black is a pawn up and White needs to act fast and create counterplay. If the queens come off, the game heads for an endgame where Black is the clear favorite.
In the following sections, we will look at both 8.Be2 and 8.Ne2.
8.Be2 variation
The more popular move is 8.Be2. The point is to block the check while setting up chances on the d-file with the b4-bishop, the d1-queen, and a rook lift from a1 to d1.
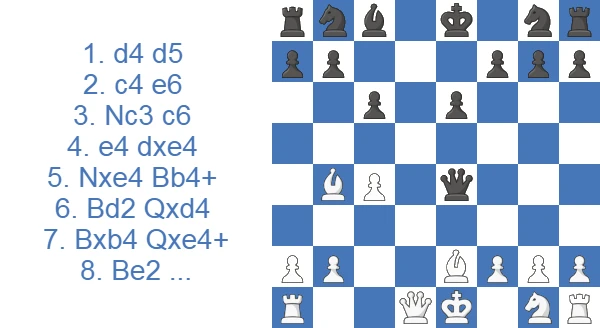
After 8.Be2, Black has three candidate moves: 8...Na6, 8...Qxg2, and 8...Nd7.
The most common choice, 8...Na6, prepares to capture the b4-bishop and cut the scope of the a3-f8 diagonal.
A move like 9.Qd6 (threatening Qf8 and Rd1 ideas) fails to 9...Nxb4. So White usually plays 9.Ba5 to keep the threats alive, with Qd8 mate in the air. The other option is to keep the bishop on the a1-h8 diagonal with 9.Bc3, attacking g7.
After 9.Ba5, Black typically plays 9...b6 to hit the bishop. That lets White go all in with 10.Qd6, sacrificing the bishop to play Rd1 and Qd8. After 10...bxa5, the line 11.Rd1 f6 (Qd8 no longer works because the king can run to f7) 12.f3 (kicking the queen and eyeing c6) is genuinely dangerous for Black, given the lack of development and the exposed king.
If White chooses 9.Bc3, Black can reply 9...f6, and after 10.Nf3 White leads in development and has full play for the pawn thanks to the bishop pair and the weak squares in Black's camp.
If Black grabs a second pawn with 8...Qxg2, White gets plenty of play down the g- and d-files after 9.Bf3 Qg6 10.Ne2. The b4-bishop can drop back to c3 and the h1-rook can swing to g1, hitting the queen and g7. Play here becomes very concrete and calculation-heavy, and White is objectively better.
After 8...Nd7, Black has to be careful, because the queen's leap into d6 can be deadly once 9.Nf3 is in (ruling out ...Qe5 for Black). An attempt like 9...b6 and 10...c5 does not work, because 10.Qd6 and 11.Bc3 is an excellent setup to exploit the a8-h1 diagonal after 12.Nd2 and 13.Bd3.
8.Ne2 line
The second most popular move, 8.Ne2, carries similar intentions to 8.Be2. As noted, Qd6 and Rd1 are the main threats. Here Black's two candidates are 8...Na6 and 8...Nd7.
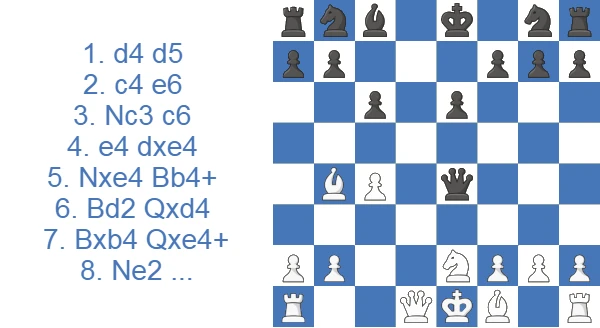
The most popular reply, 8...Na6, can be met with the startling 9.Bf8. This can be a real shock to an unprepared opponent. Black cannot take the bishop, because 9...Kxf8 runs into 10.Qd8 checkmate.
Since White is threatening Bxg7, Black usually plays 9...Ne7, rescuing the rook with 10...Rg8 after 10.Bxg7.
Black can also head into a chaotic line after 10.Bxg7 by counterattacking with 10...Nb4. Both sides must be precise here, because it is very sharp and either player can blunder on the next move. White takes the rook with 11.Bxh8, and Black needs 11...e5, which stops the h8-bishop from retreating to c3 and prepares ...Nd3+ and ...Nf2. With the bishop trapped, Black can win the h1-rook (after 12.Qd2 Nd3+ 13.Kd1 Nxf2+), and once the queens come off the game heads toward a roughly equal endgame.
The other popular try after 9.Bf8 is 9...Qe5, defending g7 and keeping the pin on the e-file. But the quiet-looking 10.Qd2 defends b2 and prepares long-side castling for an assault on the d-file. This is much better for White, given the active pieces and Black's exposed king.
Forgotten Variation: 5.Nxe4 Bb4+ 6.Nc3
The Forgotten Variation begins with 6.Nc3 instead of 6.Bd2. White sidesteps the tactical mainline theory and just develops normally.
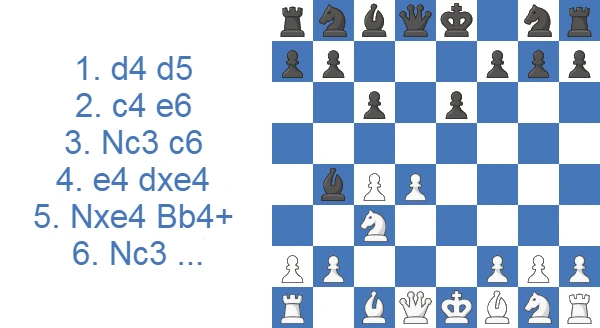
After 6.Nc3, Black usually plays 6...Nf6, developing the knight and heading for safety. A normal-looking Semi-Slav position can arise after 7.a3 (kicking the b4-bishop and aiming for the bishop pair) 7...Bxc3 (doubling White's pawns) 8.bxc3 O-O 9.Nf3.
The next sections cover two other playable options for Black: 6...c5 and 6...Ne7.
6...c5 line
This line starts with 6...c5 after 6.Nc3. The move gives the b8-knight a square on c6 and undermines White's center. The play is more positional than the mainline, and White has several tries: 7.a3, 7.Nf3, and 7.Be3.
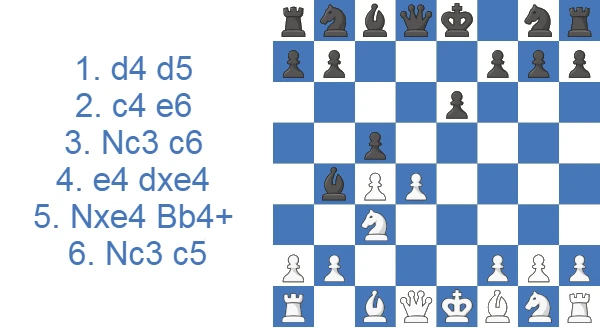
After 7.a3, the game can transpose to a line we already saw, with 7...Bxc3 8.bxc3 Nf6 9.Nf3.
A sample line with 7.Nf3 could be 7...Nf6 8.Be2 (preparing to castle) 8...Nc6 (pressuring d4) 9.Be3.
The resulting position is roughly equal, and both sides can castle short.
6...Ne7 line
Black can also choose 6...Ne7 after 6.Nc3. It is less popular than the other tries above.
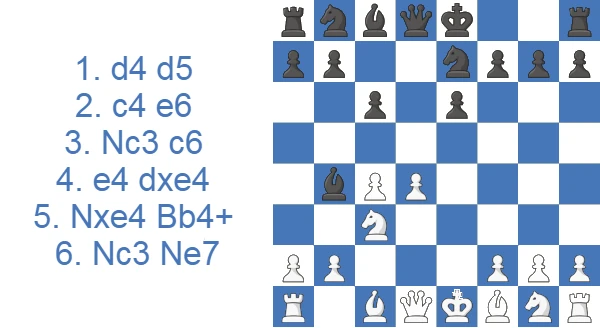
The game can head for an endgame after 7.Nf3 c5 (a typical Forgotten Variation break) 8.Be2 cxd4 9.Qxd4 Qxd4 10.Nxd4.
If this pawn structure stays on the board, White should play on the queenside, where the pawn majority is three against two.
Pawn structures and the trades that matter
Once the early fireworks fade, the Marshall settles into one of two structures. In several Forgotten Variation lines White recaptures on c3 with the b-pawn, accepting doubled c-pawns in return for a strong center and the bishop pair to offset the missing pawn. In other lines an early ...cxd4 leaves White with an isolated queen's pawn, and the play takes on a familiar isolated-queen's-pawn character: White uses the d-file and active pieces while Black blockades the d5-square and tries to trade down. Trading is where Black's whole plan lives. The extra pawn matters most with fewer pieces on the board, so Black wants to swap minor pieces and, above all, the queens. Every exchange that does not open lines toward Black's king brings the better endgame a step closer, while White wants pieces on and the attack alive.
How to Play Against the Marshall Gambit as Black: keeping the extra pawn
Because White is the one sacrificing here, countering the Marshall Gambit means defending accurately and converting the extra pawn rather than refuting anything. Black's plan is simple to state and harder to execute: grab the pawn, finish development, and steer toward a queen trade where the extra pawn matters.
The practical guidelines are the same in every line. Develop the kingside quickly so the king can get out of the center, keep an eye on the d-file and the dark squares around your king, and be ready to give the pawn back if it buys you a safe position. When the queens come off, Black is usually the one pressing.
A reliable path runs through 8...Na6, hitting the b4-bishop and taking the sting out of the a3-f8 diagonal. After 9.Bc3 f6, Black blunts the long diagonal and prepares to untangle with the knight to e7 and the king to safety, holding the extra pawn without giving White a clean attack.
If you would rather not enter the gambit at all, you can sidestep it with the move order. Playing 3...Nf6 before committing to ...c6 stops White from getting the 4.e4 break under the same conditions, transposing into calmer Semi-Slav and Queen's Gambit Declined structures.
Move-order traps: how Black can sidestep the gambit entirely
If you play the Black side and would rather not memorize the sharp accepted lines, the cleanest answer is a move-order trick. The 4.e4 break depends on Black having already committed to ...c6, so by playing 3...Nf6 first instead of 3...c6, Black takes the gambit off the table. The game then transposes into mainstream Semi-Slav and Queen's Gambit Declined structures where White has nothing better than quiet development, and the e-pawn sacrifice never appears. Know the cost, though. You give up the chance to bank a free pawn against an unprepared White player. But for anyone who prefers a reliable, low-theory setup over a tactical brawl, the 3...Nf6 transposition is the most practical way to neutralize the Marshall Gambit before it starts.
Marshall Gambit Declined: when Black refuses the pawn
Black is not obliged to grab the e-pawn. Instead of 4...dxe4, the most respected way to decline is 4...Bb4, pinning the c3-knight and keeping the central tension. White can no longer count on the open d-file and dark-square play that define the accepted lines, so the game drifts toward a calmer Semi-Slav or Queen's Gambit Declined structure where neither side is down material. The simplest practical decline is a move-order one. If Black plays 3...Nf6 before committing to ...c6, White never gets the clean 4.e4 break and the whole gambit evaporates. Declining costs Black nothing objectively, but it also hands back the half-point chances the extra pawn would have offered, so club players who know the defense usually accept and play for the win.
A Marshall Gambit Loss of My Own
My game reached the French version of the Marshall Gambit rather than the Semi-Slav one, but the question it asks is the same: White throws a pawn at the center and dares you to keep it. I kept it and more. His 9.c3 was already the engine's turning point, -1.04 to -2.50, and after 9...dxc3 10.bxc3 Bxc3+ 11.Bd2 Bxa1 12.Qxa1 I was the exchange up with a healthy position.

Then I lost it in a single move. 19...Qa5 was fine until 22.Bd2 attacked the queen, and I answered 22...fxe5 anyway. 23.Bxa5 and it was over, from -1.81 for me to +5.08 for him. I resigned two moves later.

That is why the honest verdict matters more here than the theory. The extra material in this gambit is real and it can be held. What you cannot do is treat the position as already won. The point of the sacrifice is not the pawn, it is that the defender has to stay accurate for another twenty moves.
Should you play it? An honest verdict
Pros
- White usually gets enough compensation for the gambited pawn .
- The games possess a very tactical nature, and Black’s King is often in jeopardy.
- Despite being down a pawn, White is objectively slightly better.
- If Black is unfamiliar with the theory, they can lose the game drastically.
Cons
- Endgames typically favor Black due to the extra pawn they have.
- If Black can consolidate, they can equalize and prove their advantage.
- Black can force repetition in Marshall Gambit s forced draw lines.
- If White focuses on the lost pawn and seeks to win it back, they can lose their initiative.
Trap in the Marshall Gambit: the 5...Qh4 shot that punishes pawn-greed
This trap begins with the Marshall Gambit and 5...Qh4 after 4...dxe4 5.Nxe4. White defends the attacked e4-knight by developing the f1-bishop to d3 (6.Bd3). If Black plays 6...f5 to hit the knight, White can play 7.Ng5, and after 7...Qg4 the queen is in trouble. Then 8.Be2 attacks it again, and 8...Qxg2 loses to 9.Bf3, where 9...Bb4+ changes nothing after 10.Kf1.
More than one opponent of mine has walked straight into this: the queen comes out early to win the pawn back, and three moves later it has nowhere to go. It is a good reminder that grabbing material with the most valuable piece on the board is how you get hunted.
Case Study: the 8.Ne2 Na6 melee
The sharpest illustrative line in the whole opening is the 8.Ne2 Na6 9.Bf8 mess, where both sides play on a knife's edge. It is worth walking through move by move, because it shows what Black's defense actually looks like when White throws everything forward.
Through move 7 this is just the main line: Black is a pawn up after 6...Qxd4 and 7...Qxe4+, and White has the bishop pair and a big lead in development as compensation. The instructive part starts here.
8.Ne2 blocks the check and keeps the queen and rook aimed at the d-file. 8...Na6 is Black's most testing reply, eyeing the b4-bishop. White answers with the shocking 9.Bf8, which looks like a blunder but is not: Black cannot play 9...Kxf8 because 10.Qd8 is mate. The whole point of the gambit is on display here, with White's pieces swarming a king still stuck in the center.
9...Ne7 is the practical defense. Black ignores the bishop and develops, intending ...Rg8 to save the rook after White takes on g7. The fighting move, and the one in this line, is 10...Nb4, a counterattack instead of a retreat. Black goes after White's king while White is busy grabbing material. After 11.Bxh8 White is a rook ahead for the moment, but the bishop on h8 is buried.
The key resource is 11...e5. This quiet pawn move is the point of the whole sequence: it slams the door on the h8-bishop, which can no longer escape via c3, and it clears the way for the knight. With the bishop trapped, the material count is about to swing back. After 12.Qd2 Nd3+ 13.Kd1 Nxf2+ Black forks the king and the h1-rook, regaining the exchange and dragging the position toward a roughly level endgame once the queens come off.
The takeaway for a club player is concrete. In these positions, do not panic when White's pieces look terrifying. Count the loose pieces in White's camp too. Here the buried h8-bishop and the soft f2-square give Black exactly the tactical resources needed to survive. Calm defensive moves like 11...e5 that trap an attacker are often worth more than a desperate counter-sacrifice.
The verdict: a sound pawn sacrifice with practical bite
The Marshall Gambit usually produces sharp, tactical play. Black is typically a pawn up but has to defend accurately against White's threats to keep it. The statistics favor White, and the gambit appears even at the elite level despite White being down material, because the initiative is real and the practical pressure on Black is constant.
Test Yourself: Marshall Gambit Positions
Set up each position and find the best move. Use Hint for a nudge or Answer to reveal the engine’s top move.
Find the best move.
Find the best move.
Find the best move.
Find the best move.
Find the best move.