
 By

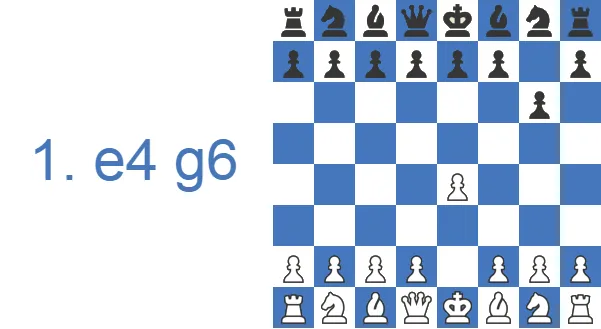
In the 1960s and 1970s, the Austrian player Karl Robatsch worked out much of the early theory, which is why the line is also known as the Robatsch Defense. You will sometimes see it called the Rat Defense too. The Modern is rare at elite level today, but it still shows up as a practical surprise weapon because of the imbalances it creates. It is filed under ECO code B06, and since the …g6 / …Bg7 setup works against 1.d4 and other first moves as well, plenty of club players adopt it as a universal, low-theory answer for Black.
Here is the short version before we get into the detail. The Modern Defense (1.e4 g6), also known as the Robatsch Defense (ECO B06), is a flexible hypermodern opening in which Black hands White the center and strikes back with the fianchettoed g7-bishop and a well-timed …c5 or …e5. It works against both 1.e4 and 1.d4, transposes easily into the Pirc Defense, the King's Indian, or the Benoni, and suits players who prefer counterattacking, asymmetrical middlegames over memorizing long forcing lines. Below you will find the main setups (Standard 4.Be3, Pseudo-Austrian 4.f4, Averbakh 3.c4, Pterodactyl 3…c5), a video covering every variation, the common traps both sides fall into, and three annotated games.
Win, Draw, and Loss Rates
Here is how the Modern has scored across the club rating bands for each side.
| Rating level (Lichess) | White wins | Draw | Black wins |
|---|---|---|---|
| 800, beginner | 49.0% | 4.2% | 46.8% |
| 1000, novice | 50.7% | 3.8% | 45.5% |
| 1200, improver | 51.4% | 3.6% | 45.0% |
| 1600, club | 53.3% | 3.8% | 42.9% |
| 1800, club | 54.2% | 4.1% | 41.8% |
| 2000, advanced club | 53.0% | 4.7% | 42.3% |
Source: Lichess opening explorer, blitz, rapid and classical games at the position after 1.e4 g6 2.d4 Bg7 3.Nc3. Figures are win rates by Lichess rating band; draws are rare at these levels.
Study the Modern Defense as White or Black
The Modern Defense invites White to build a broad pawn center, then stakes Black's entire game on tearing that center down.
Face the Modern Defense as White
Take the space you are offered, but know which system you are committing to: the theory section maps the main setups White can choose from, and the 4.f4 plan shows the most aggressive way to meet the Modern Defense head-on.
Play the Modern Defense as Black
Handing over the center is the whole Modern Defense counter: Black concedes ground on purpose, then attacks the pawns that claimed it. Watch the plan on video, read why the concession works, and drill the setup guide until you can show anyone wondering how to face the Modern Defense why that question is harder than it looks.
Watch the Modern Defense in Action
If you would rather see the ideas play out on the board first, this 10-minute walkthrough covers every main variation before you read the move-by-move notes below.
Main Ideas: Why Black Gives Up the Center on Purpose
The Modern is a flexible, complex system that many move orders can transpose into, and it can also transpose into several others. The point of handing White the center is that it creates an asymmetrical pawn structure, which gives Black a clear plan: generate counterplay and play for a win rather than just equalize. That is why it appeals to players who want more than a draw with the black pieces.
As a product of hypermodern thinking, the Modern shares its strategic aim with the Grünfeld Defense: pressure White's central pawns, and above all the d4-pawn. The most thematic way to hit that center is a well-timed …c5, which combines with the fianchettoed g7-bishop raking the long diagonal. Big piece exchanges usually wait until the middlegame, once both sides have finished developing, so the central tension lingers for a while, often until one side launches a wing attack. White can castle queenside and storm the kingside with h4, or castle kingside and try to blunt Black's queenside expansion with a move like a4. Black must therefore react to White's chosen plan and find counterplay to match it.
How to Set Up the Modern Defense
The strength of the Modern is that Black follows a simple, repeatable setup rather than a forcing line. The core moves are …g6, …Bg7, …d6, with …Nf6 or …c5 saved for later, so the same scheme can be reached against almost any first move. After 1.e4, Black plays 1…g6 and meets 2.d4 with 2…Bg7, putting the dark-squared bishop straight onto the long diagonal. That bishop on g7 is the soul of the opening, so Black avoids trading it and builds everything else around its pressure on d4.
The same idea works against 1.d4 g6 and even 1.c4 or 1.Nf3, which is why so many club players use the Modern as a universal answer to White's first move. The one move order to treat with caution is 1.b3, where White's bishop reaches b2 before Black's reaches g7. Once the fianchetto is in place, Black picks a central break: …c5 to hit d4 in Sicilian style, or …e5 for a King's Indian type of structure, depending on how White develops. This wait-and-see approach is exactly what keeps the position flexible and lets Black steer the game toward the structures they understand best.
Modern Defense Theory: The Main Lines White Will Throw at You
The Modern is defined by the …g6, …d6, …Bg7 setup and can arise from several move orders. In appearance it is almost identical to the Pirc, except that the Modern delays …Nf6 to stop White from playing e5, which makes it a touch less risky than the Pirc. White has a free hand to choose a setup. The most natural is to develop for a kingside attack: 1.e4 g6 2.d4 Bg7 3.Nc3 d6 4.Be3 a6 5.Qd2, the Standard Defense. A sharper try against 3…d6 is the Pseudo-Austrian Attack with 4.f4. Black can also play 3…c5, in the spirit of the Accelerated Dragon, to hit White's center early: 1.e4 g6 2.d4 Bg7 3.Nc3 c5 is the Pterodactyl Variation. Finally, instead of 3.Nc3, White can grab a broader center with the Averbakh System, 1.e4 g6 2.d4 Bg7 3.c4.
Standard Defense: 4.Be3 a6 5.Qd2
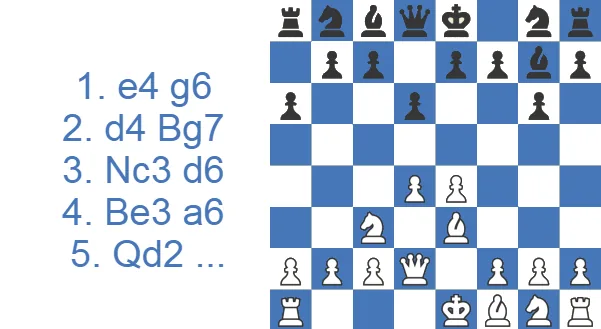
After 1.e4 g6 2.d4 Bg7, White faces the first real decision, choosing between 3.c4 and 3.Nc3. The knight move is the more popular, aiming for quick queenside development. Black restrains the center with 3…d6, preparing …e5 or …c5, and White develops with 4.Be3. This setup is also called the 150 Attack, and White's plan is clear: trade off Black's dark-squared bishop, the key piece in the whole structure. Unless Black wants to transpose to the Pirc with 4…Nf6, there are two main continuations, both involving queenside expansion. The first is 4…c6 5.Qd2 b5 6.Bd3 (6.0-0-0 Qa5 gives Black promising attacking chances) 6…Nd7.
The more flexible and more popular choice after 4.Be3 is 4…a6. The intention is the same as with 4…c6: expand on the queenside with …b5. This works only if White has already played Nc3, because the point of …b5 is to follow with …b4, kicking the knight and attacking the e4-pawn after …Bb7 and …Nf6. Then 5.Qd2 prepares queenside castling and a future Bh6 once Black's g8-knight develops, 5…b5 6.f3 Nd7 keeps delaying …Nf6 while preparing …c5. Now White can either challenge the queenside with 7.a4 or go straight for the throat with 7.h4, which is the most common move.
Black needs to take safety measures against the kingside push and play 7…h5 (7…h6 is also possible). A typical continuation runs 8.Nh3 Bb7 9.Ng5 Ngf6 10.0-0-0 e6 11.Kb1 Qe7, and after …Rc8 or …Rd8 Black aims for a central break with …c6-c5 or …e5.
Pterodactyl Variation: 3…c5
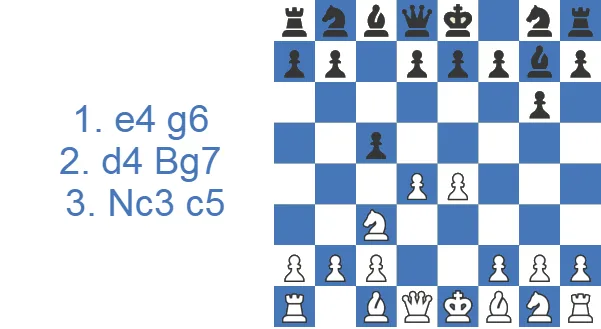
In the Pterodactyl, Black can expect either 4.dxc5 or 4.d5. The latter transposes to a Benoni structure, so Black has to be ready for those ideas. After 4.dxc5, Black keeps up the cross-diagonal pressure with 4…Qa5, double-attacking the knight on c3.
White is fine after 5.Bd2 Qxc5, and can even make Black uncomfortable with 6.Nd5, threatening Bb4. For example, 6…Na6 7.Nf3 e6 8.Bc3 lets White trade off the key g7-bishop and leave Black with dark-square weaknesses. For that reason the Pterodactyl is not played very often.
Pseudo-Austrian Attack: 4.f4
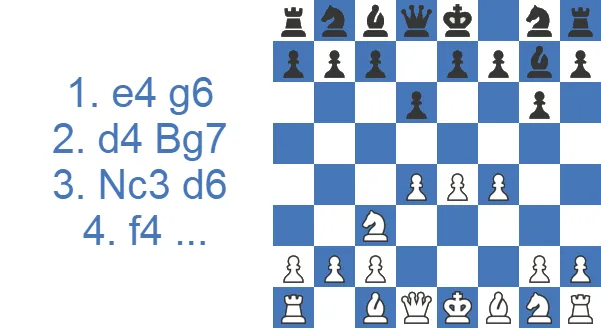
The Pseudo-Austrian Attack with 4.f4 is one of White's most aggressive tries against the Modern. The idea is to support e5 and grab space. Since e5 will weaken White's grip on d5, Black usually transposes to the Pirc with 4…Nf6, planning to castle quickly and to meet 5.Nf3 0-0 6.e5 dxe5 7.fxe5 with 7…Nd5. White should therefore not rush e5 and instead keep developing with 6.Bd3.
White has spent several moves building a center with pawns, while Black has completed kingside development and is ready to undermine it with either 6…Na6 7.0-0 c5 or 6…Nc6 7.0-0 e5 followed by …Bg4, pinning the knight.
The f4 Mega Center: White's Sharpest Try
The most ambitious answer White has to the Modern is to build the biggest pawn center on offer with e4, d4 and f4, the so-called f4 mega center. After 1.e4 g6 2.d4 Bg7 3.Nc3 d6 4.f4, this Austrian Attack-style pawn storm supports e5, grabs space and rolls the kingside pawns forward before Black is organized. The g7-bishop is staring at a wall, so Black cannot afford to sit still. The standard response is 4...Nf6, hitting e4 and forcing White to commit, followed by ...0-0 and a central counter with ...c5 or ...Nc6 and ...e5. A big center is also a big target. If White over-extends with an early e5, breaks like ...c5 and ...dxe5 leave the advanced pawns weak, and the g7-bishop suddenly rakes the long diagonal with nothing in its way.
Averbakh System: 3.c4
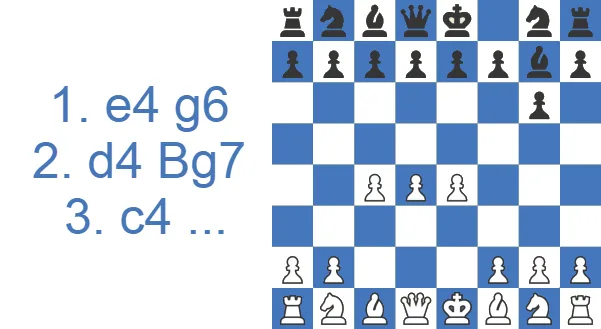
Like the f4 line, the Averbakh System with 3.c4 is a way for White to occupy the center and grab as many key squares as possible. It is a flexible setup with a high chance of transposing to the King's Indian Defense, so Black should know those ideas. On the plus side for Black, 3.c4 means White can no longer prop up d4 with c3, and the c4-square is no longer available to the bishop. After 3…d6 4.Nc3, Black can head into a King's Indian with 4…Nd7 or 4…Nf6. The most common way to keep the game in Modern territory is 4…e5. Trading into the endgame with 5.dxe5 dxe5 6.Qxd8 Kxd8 gives White nothing, so White usually closes the center with 5.d5.
Black's main idea in this structure is to land the …f5 break. Playing 5…f5 at once would be premature, so Black prepares it: 5…a5 (stopping b4) 6.Bd3 Na6 7.Nge2 Nc5 8.Bc2 Nf6 9.0-0 0-0 10.f3 Ne8, with …f5 to follow.
Common Traps in the Modern Defense: The Two That Decide Club Games
Because both sides develop quickly and the center stays fluid, the Modern hides a few practical traps that settle club games before the middlegame even starts.
The first targets Black's most important piece. After 1.e4 g6 2.d4 Bg7 3.Nc3 d6 4.Be3, White's whole plan is Qd2 followed by Bh6, trading off the g7-bishop and leaving Black with weak dark squares. A player who castles kingside too early often walks straight into the exchange. The standard antidote is to delay …Nf6 and …0-0, keep the bishop on g7, and only allow the trade when the white queen can be chased back with tempo or when Black has counterplay ready on the queenside.
A second trap runs the other way. In the Pterodactyl lines with an early …c5, an unprepared White player who grabs the pawn with 4.dxc5 can be met by 4…Qa5, pinning the knight on c3 and regaining the pawn with a comfortable game. White has to know 5.Bd2 here; natural-looking defenses often cost a pawn or the exchange.
The most common pitfall for Black, though, is purely positional: rushing …Nf6 before it is needed. In the Modern, the knight is deliberately kept off f6 so that White cannot gain space and time with e5. A player who plays …Nf6 on autopilot often allows e5, after which the g7-bishop is blunted and White enjoys a free space advantage, exactly the position the Modern is built to avoid.
Modern Defense vs the Pirc and King's Indian Defense: Spot the Difference
Anyone researching the Modern quickly runs into two close relatives, and knowing the difference helps you pick the right setup. Against the Pirc Defense, the structures are nearly identical: both rely on …g6, …d6 and the g7-bishop, but the Modern delays …Nf6. That single difference is the whole point. By keeping the knight at home, Black stops White from grabbing space with an early e5 and keeps both …c5 and …e5 available. The trade-off is that White can sometimes blunt the bishop with an early c2-c3, an idea that disappears once a knight sits on f6.
The King's Indian comparison shows up mainly through the Averbakh System with 3.c4, which can transpose directly into King's Indian structures after …d6 and …Nf6. The practical point is that a Modern player should be comfortable with King's Indian breaks like …e5 and …f5, because White can steer the game there at will. In short, the Modern is the most flexible member of the family. It can become a Pirc, a King's Indian, or a Benoni depending on White's reaction, which is exactly why it appeals to players who would rather understand plans than memorize lines.
The Hippopotamus: A Cousin, Not a Twin
Modern players quickly run into the Hippopotamus Defense, a setup that looks related but rests on a different idea. In the Hippopotamus, Black develops behind a low wall of pawns on a6, b6, d6, e6, g6 and h6, with knights tucked on e7 and d7 and bishops fianchettoed on b7 and g7. The plan is to commit to nothing in the center and wait for White to over-extend before striking with ...c5, ...e5 or ...f5. The Modern is sharper by comparison. It keeps the ...Bg7 fianchetto and the hypermodern aim of attacking d4, but it goes for a concrete central break instead of pure waiting. Both can come from the same ...g6 move order, which is worth knowing, because a Modern player who drifts can find the game has quietly turned into a Hippo. The dividing line is one of intent: counterpunch in the Modern, restrain and wait in the Hippopotamus.
Move-Order Tricks, the English, and the 1.b3 Exception
The strongest selling point of the Modern is move-order economy: one repeatable scheme covers a wide range of White first moves. Against 1.c4, the English Opening, ...g6 and ...Bg7 give Black a sound, low-theory reply that often steers into King's Indian or symmetrical structures with no memorized English lines. Against 1.Nf3 or a quiet 1.c4, Black can play the fianchetto and keep the options open. Even White's third-move alternatives to 3.Nc3, such as 3.Nf3, 3.c3 or the space-grabbing 3.c4 Averbakh System, meet the same ...d6 and central-break plan. One move order has taught me to slow down: 1.b3, where White's bishop reaches b2 and the long diagonal before Black's gets to g7, so Black should adjust the setup rather than fianchetto on autopilot.
Test Yourself: Five Modern Defense Positions
Set up each position and find the best move. Use Hint for a nudge or Answer to reveal the engine’s top move.
Find the best move.
Find the best move.
Find the best move.
Find the best move.
Find the best move.
My Game Against the Modern Defense
One of mine from the White side, 1925 against 1927. Black played the Modern the way this article describes it and gave up the center on purpose with 1.e4 g6 2.Nf3 Bg7 3.g3 d6. I took what was offered and built the big center with 8.d4. My 9.h3 was too slow though, and the engine slid from +3.1 to +0.4.

The break landed anyway. 12.e5 dxe5 13.dxe5 Nd7 14.e6 fxe6 15.Rxe6 opened the position in front of his king, and even there the engine had it at only +0.7. It was 15...Nc5 that made it +4.6. He resigned after 32.Rg7.

That is the risk side of the Modern in one game. Black can hold a big center off for a long time, and he was still inside a pawn of the game at move 15. But once the break comes, those flexible pieces need real squares immediately, and one wrong choice can be the whole game. If you play this defense, rehearse the moves right after White pushes e5 and e6.
What You Gain and What You Risk with the Modern
PROS
- Rich middlegame positions with counterattacking chances to play for a win as black.
- poses a challenge for opponents in preparation due to its versatility and ability to transpose into various pawn structures
CONS
- Space advantage and easier piece play for white
- White determines on which side of the board the action happens. Black has to adapt white’s game plans.
Case Study: The Averbakh …f5 Break
The clearest illustration of what Black is really trying to do in the Modern comes from the Averbakh System, where the closed center forces both sides into a long-term plan. The line below is the model handling for Black against 3.c4, and it shows the …f5 break being prepared one piece at a time rather than fired off too early.
A few things are worth pointing out move by move.
- 1…g6 and 2…Bg7 are the Modern in a nutshell: the bishop goes to the long diagonal and the fight over d4 begins from a distance.
- 4…e5 is the key decision. Instead of drifting into a King's Indian with …Nf6, Black stakes a claim in the center at once. After 5.d5 White locks the structure, and from here the game becomes a race of pawn breaks: White on the queenside with b4 and c5, Black on the kingside with …f5.
- 5…a5 looks slow but is precise. It takes the b4-square away from White and slows the whole queenside plan, buying Black the time to organize the kingside. This is the practical takeaway: in closed positions, a quiet prophylactic move that stops the opponent's break is often worth more than a developing move.
- 6…Na6, 7…Nc5 reroutes the knight to its best square, where it eyes e4 and d3 and supports the coming …f5. Notice Black is not in a hurry. Every piece finds a useful job before the pawns commit.
- 10…Ne8 is the move that ties it all together, and it is the turning point of the plan. The knight steps out of the way so that …f5 can be played, and from e8 it can later swing to d6 or back to f6 once lines open. The trap to avoid here is the natural-looking 10…Nh5, which gets the knight kicked around; the e8 retreat is the patient, correct route.
- 11…f5 is the payoff. Black finally strikes, and because every supporting piece was placed first, the break comes with full force rather than as a lunge.
For a club player the lesson worth carrying away is timing. The …f5 break is the whole reason Black plays this way, but throwing it in on move five would just hand White the e4-square. The strength of the Modern in closed structures is patience: restrain the opponent, improve every piece, and only then open the position you have spent ten moves preparing.
Should You Add the Modern Defense to Your Repertoire?
The Modern offers a dynamic, unorthodox way to meet almost any first move, and its hypermodern logic rewards understanding over memorization. The flip side of that flexibility is the web of transpositions: you really do need some feel for King's Indian and Benoni structures, since White can steer the game into either. The opening also carries a genuine risk of drifting into a passive, cramped position if your timing is off, so accurate move orders and well-judged counterattacks matter. On balance, the Modern fits intermediate and advanced players best, but it can also help beginners get comfortable with positional play and with defending a little space rather than fighting for the center directly.
Grandmaster Games with the Modern Defense: Three Annotated Examples
The annotated lines above trace the main setups, but the opening also has a strong practical record in tournament play. Magnus Carlsen has reached for it himself, including against Anish Giri in 2022, which tells you the Modern is more than a surprise weapon. Replay a few complete games in the variations that suit your style, and the timing of …c5, …e5 and …f5 starts to feel natural rather than memorized.