
 By

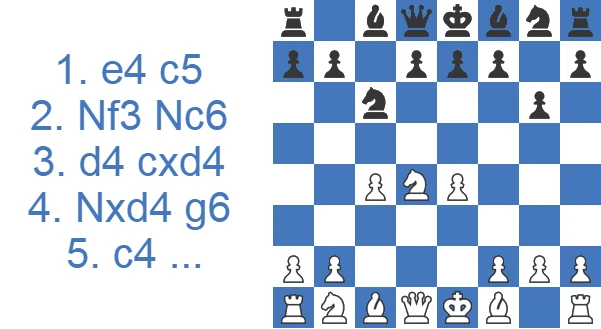
The Maroczy Bind, as an idea against the Sicilian, dates back to the start of the 20th century, when this pawn formation turned up repeatedly in the games of the Hungarian grandmaster Geza Maroczy. For a long time it gave Black a real headache, since facing the Bind with so little space is genuinely uncomfortable.
Who Was Geza Maroczy and How the Bind Got Its Name
The Maroczy Bind takes its name from Geza Maroczy (1870-1951), the Hungarian grandmaster who was among the world's strongest players around 1900 and a serious title contender. He repeatedly used the c4-e4 pawn formation to clamp down on Black's Sicilian counterplay. The setup denied space so consistently that the structure became permanently associated with him. For decades it was considered one of the most uncomfortable things a Sicilian player could face, precisely because the cramped side struggled to generate any active play. The reputation only softened in the mid-20th century, once players such as Bobby Fischer and Bukhuti Gurgenidze demonstrated concrete equalizing methods for Black. The name now describes the pawn skeleton itself, regardless of which specific opening produced it.
Study the Maroczy Bind as White or Black
The Maroczy Bind is a fight about space: White plants pawns on c4 and e4 to smother the Sicilian, and Black spends the whole game working to break the grip.
Set Up the Maroczy Bind as White
Your pawns do the strategic work, so learn what happens behind them: where the pieces belong, which trades help, and when to finally push. The plans-for-both-sides section lays out the full squeeze, and the section on White's own agenda turns the Maroczy Bind from a structure into a script.
Fight the Maroczy Bind as Black
A good Maroczy Bind counter is built on patience: trade the right minor pieces, aim for the b5 and d5 breaks, and never panic about space. The section on Black's resources explains what you actually have, and the anti-bind guide shows how to face the Maroczy Bind move by move in a real game.
The Maroczy Bind in One Minute
- It's a pawn structure, not a forced opening line. White keeps pawns on c4 and e4 after trading the d-pawn for Black's c-pawn, clamping down on the d5 square.
- It shows up most often from the Accelerated Dragon (1.e4 c5 2.Nf3 Nc6 3.d4 cxd4 4.Nxd4 g6 5.c4), but also from the Kan Sicilian, the King's Indian, and the English.
- White's edge is space and a long-term squeeze; the dream is a knight outpost on d5.
- Black is solid, not lost. The standard antidote is the Gurgenidze setup: trade a pair of knights early, post the pieces actively, and aim for the freeing breaks …b5 or …f5.
- It's a positional opening with slow maneuvering and few early fireworks. Great for learning structure, less so if you only want tactics.
How the Maroczy Bind Scores
Across the club rating bands the structure tilts toward White once players reach club level, where he holds a steady edge, while draws stay rare, so most games end decisively.
| Rating level (Lichess) | White wins | Draw | Black wins |
|---|---|---|---|
| 800, beginner | 44.2% | 2.6% | 53.2% |
| 1000, novice | 45.6% | 3.4% | 51.0% |
| 1200, improver | 46.7% | 3.4% | 49.9% |
| 1600, club | 50.2% | 4.5% | 45.3% |
| 1800, club | 50.7% | 5.8% | 43.5% |
| 2000, advanced club | 48.7% | 7.5% | 43.8% |
Source: Lichess opening explorer, blitz, rapid and classical games at the position after 1.e4 c5 2.Nf3 Nc6 3.d4 cxd4 4.Nxd4 g6 5.c4. Figures are win rates by Lichess rating band; draws are rare at these levels.
Watch: A Walkthrough of the Bind
For a visual overview of the setups and plans before reading on, the video below walks through the Maroczy Bind from both sides.
Got the overview from the video? The rest of the article takes you through the tactical and strategic details in full.
Characteristics of the Maroczy Bind: Why the c4–e4 Pawns Clamp Down on d5
White's Position
In the Maroczy Bind, White's main benefit is being able to play Nc3 after c2-c4 rather than before, unlike in many lines of the Sicilian. As a result, White controls the d5 square three times (the e- and c-pawns plus Nc3), and in most cases a knight outpost on d5 is the main objective. White usually castles kingside, and the rooks operate on the central files, supporting the eventual pawn breaks.
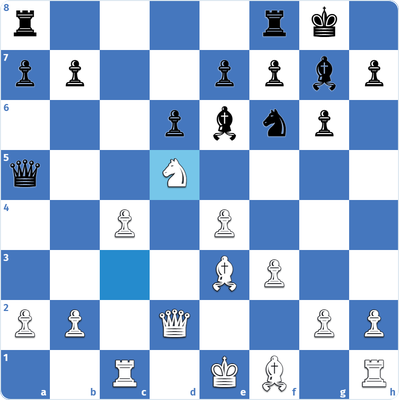
The diagram above, reached after 1.Nf3 Nf6 2.c4 c5 3.Nc3 Nc6 4.d4 cxd4 5.Nxd4 Nxd4 6.Qxd4 g6 7.e4 d6 8.Be3 Bg7 9.f3 0-0 10.Qd2 Be6 11.Rc1 Qa5, shows White's pieces on their typical squares: Be3, Qd2, Rc1 and Nd5. Black's pawn often stays on …e7 rather than advancing to e6, so the knight on d5 can usually only be removed by trading it for a minor piece. One drawback for White is the pawn chain sitting on the light squares, which leaves White's light-squared bishop as the hardest piece to activate.
Black's Position
The Hedgehog formation and the Maroczy Bind look very similar, and the main difference between them lies in how Black develops the dark-squared bishop. In the Hedgehog, Black plays …e7-e6 and develops the bishop on e7. In the Maroczy, Black fianchettoes the bishop on g7 and keeps the e-pawn on e7, so as not to leave d6 as a backward pawn. The following position shows the ideal placement of Black's pieces in a typical Maroczy middlegame: 1.e4 c5 2.Nf3 Nc6 3.d4 cxd4 4.Nxd4 g6 5.c4 Nf6 6.Nc3 d6 7.Be2 Bg7 8.Be3 0-0 9.0-0 Nxd4 10.Bxd4 Bd7 11.Qd2 Bc6 12.f3 a5 13.b3 Nd7 14.Be3 Nc5.
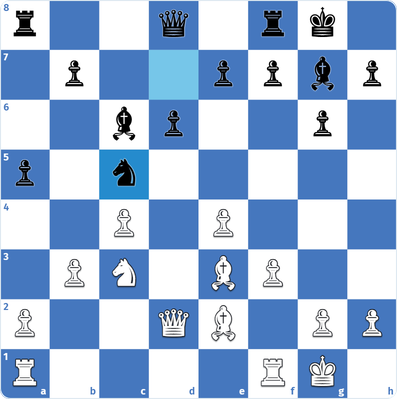
Black's biggest asset is the fianchetto bishop, which exerts heavy pressure on White's center and kingside along the long diagonal. The knight maneuver Nf6-Nd7-Nc5 supports the thematic …a5 break. The rook stays on a8 or comes to the semi-open c-file, the queen reroutes to b4 by way of b6, and the light-squared bishop sits on d7 or c6 to back up a pawn breakthrough on the light squares.
How the Position Arises: Move Orders and Transpositions
Because the Maroczy Bind is a structure rather than a line, several openings transpose into it. The cleanest road is the Accelerated Dragon: 1.e4 c5 2.Nf3 Nc6 3.d4 cxd4 4.Nxd4 g6 5.c4. Black's early …g6 invites c4 precisely because the bishop heads to g7 rather than blocking the long diagonal with …e6, which is why the deepest Maroczy theory lives here. The Kan Sicilian reaches it via 1.e4 c5 2.Nf3 e6 3.d4 cxd4 4.Nxd4 a6 5.c4. From the other side of the board, the Symmetrical English (1.c4 c5 2.Nf3 Nf6 3.Nc3 Nc6 4.d4 cxd4 5.Nxd4 g6 6.e4) and many King's Indian Sämisch lines pour into the same c4-e4 formation. Recognizing these move orders matters: knowing you are heading into the Bind tells you which plans apply long before the middlegame begins.
White's Prophylaxis: Stopping …b5 and …d5
The whole point of the Bind is denial. White's c4-e4 wall is designed to take away the two pawn breaks every Sicilian player wants: …d5, which would free Black's position in the center, and …b5, which would open the queenside. The c4 pawn directly stops …d5 (the d5 square is covered by the c- and e-pawns plus Nc3), so White's job is largely the prophylactic management of …b5. The standard tool is a2-a4, fixing the queenside and meeting a future …b5 with the half-open a-file. The Fressinet-Kempinski game shows the idea cleanly: 13.Rc1 a6 14.a4 takes the sting out of …b5 before Black is ready for it. Bottle up both breaks and the spatial advantage becomes permanent, with Black reduced to shuffling pieces behind the wall.
Game Plans for Both Sides: How White Squeezes and Black Counters
White's Plans
The fundamental idea behind the Maroczy Bind is to deprive Black of the typical Sicilian pawn breaks, …b5 and …d5, leaving White with a lasting spatial advantage. White's main middlegame ideas are:
1. A knight outpost on d5, often provoking Black to capture it. After the recapture, the pawn structure transforms drastically: with cxd5 White focuses on the c-file, while exd5 more often leads to a kingside attack.
2. Expanding on either wing to squeeze Black's pieces further.
3. Breaking with f2-f4 on the kingside or e4-e5 in the center once the rooks are placed on the central files.
Black's Plans
Playing against the Maroczy Bind calls for patience, since Black's pieces start out cramped.
1. Almost every piece trade eases Black's spatial disadvantage. Trading the queens is especially helpful, since it lets Black prepare a kingside pawn break without fearing a backfire.
2. Well-timed pawn breaks: …e6 and …f5 in the center, or …a5 and …b5 on the queenside.
3. Pressure on the queenside and on the dark squares, which are slightly weakened because most of White's pawns sit on light squares.
4. After a trade on d5 where White recaptures with cxd5, Black contests the c-file with the rooks and eventually breaks into White's second rank.
Example Lines: The Main Roads into the Bind
The most common openings that lead to the Maroczy Bind are the Accelerated Dragon and the Kan Variation of the Sicilian, almost all the main lines of the King's Indian Defense, and the English Opening. Sample lines for each follow.
1. Accelerated Dragon: 1.e4 c5 2.Nf3 Nc6 3.d4 cxd4 4.Nxd4 g6 5.c4
The Maroczy Bind and the Accelerated Dragon are joined at the hip. Black's move order with 4…g6 invites 5.c4 precisely because the bishop is heading to g7 rather than blocking the long diagonal with …e6. That is why almost every search for the Maroczy Bind eventually lands on the Accelerated Dragon: it is the cleanest road into the structure, and the one where the theory runs deepest.
2. The Kan Variation: 1.e4 c5 2.Nf3 e6 3.d4 cxd4 4.Nxd4 a6 5.c4
3. King's Indian Defense (the Sämisch Variation): 1.d4 Nf6 2.c4 g6 3.Nc3 Bg7 4.e4 d6 5.f3 0-0 6.Be3 c5 7.Nge2 cxd4 8.Nxd4
4. English Opening (Symmetrical Variation): 1.c4 c5 2.Nf3 Nf6 3.Nc3 Nc6 4.d4 cxd4 5.Nxd4 g6 6.e4
A Model White Win: Fressinet–Kempinski, 2011
The game between Laurent Fressinet and Robert Kempinski in 2011 features all of White's main ideas in the Maroczy Bind: the knight outpost on d5, the f2-f4 break, and queenside expansion with a4-b4-a5. Black never finds the right responses and is gradually outplayed.
1.d4 Nf6 2.c4 g6 3.Nc3 Bg7 (a King's Indian move order) 4.e4 O-O 5.Be2 d6 6.Nf3 c5 (6…e5 is the more common move) 7.O-O cxd4 8.Nxd4
The Maroczy Bind formation has now been reached. 8…Nc6 9.Be3 Nxd4 10.Bxd4 Be6?! Placing the bishop on c6 via d7 would have been better; now White's f4-f5 break comes with tempo. 11.f4 Rc8 12.b3 Qa5 13.Rc1 a6 14.a4, a prophylactic move that prevents Black's …b5 counterplay. 14…Kh8. Black could still try 14…b5, since 15.axb5 axb5 16.cxb5 would be a mistake after 16…Nxe4! 17.Bxg7 Nxc3. 15.Kh1 Ng8. Black wants to play …f5 before White does, but it is already too late. 16.f5!
The thematic break in the Maroczy Bind arrives with tempo thanks to the earlier 10…Be6. 16…Bd7 17.Nd5. With the knight anchored on d5, White's positional edge is so large that it is almost worth a piece, and White now threatens Bb6, trapping Black's queen. 17…Bxd4 18.Qxd4+ f6 19.b4. White keeps expanding on every side of the board, squeezing Black's forces toward the back rank. 19…Qd8 (19…Qxa4? 20.Nb6 forks the queen and the rook) 20.Nb6
White is steadily penetrating the enemy camp, slowly constricting Black's pieces. 20…Rc7 21.Rcd1 Qe8 22.a5 Bc6 23.Qe3 Kg7 24.Rc1 Nh6 25.b5 Bd7 26.bxa6 bxa6 27.c5 Bb5 28.Nd5 Rc8 29.cxd6 Bxe2 30.Qxe2 exd6 31.Nc7 1-0. Black resigned, his position completely overrun: the knight will land on e6, the a6 pawn will fall, and White's a-pawn becomes a deadly passer.
How to Play Against the Maroczy Bind as Black
If you reach the Maroczy Bind as Black and feel cramped, you are not worse, you just need a plan. The most reliable recipe is the Gurgenidze setup, named after Bukhuti Gurgenidze, who showed that Black can equalize by trading a pair of knights early and developing with purpose instead of sitting passively.
The idea is simple to remember: trade on d4 to relieve the cramp, fianchetto on g7, drop the bishop to e6 to nag the c4 pawn, and swing the queen to a5 with pressure down the c-file.
From here Black has two thematic freeing breaks to work toward.
- …b5 to open the queenside. After 14.Rfc1 b5 15.cxb5 axb5, Black gets the open a-file and a mobile pawn that hits the c3-knight. The play is sharp and roughly balanced, exactly what a Sicilian player wants out of a structure that is supposed to suffocate them.
- …f5 to challenge the center once the pieces are coordinated and the queens are off. With fewer pieces on the board the …f5 break is far less risky, and it turns Black's cramped position into an active one.
The one thing to avoid is drifting without a target. The Maroczy only feels dreaded when Black waits. Pick a break, prepare it, and the space advantage stops being a problem.
The Gurgenidze Setup Move by Move
Bukhuti Gurgenidze showed that Black equalizes by trading a pair of knights early and developing with purpose. The move order is easy to remember: exchange on d4 to relieve the cramp, fianchetto with …Bg7, drop the bishop to e6 to nag the c4 pawn, and swing the queen to a5 to pressure the c-file and the c3-knight. From there Black aims for …b5. One tactical point makes the break work. After 14.Rfc1 b5 15.cxb5 axb5, White cannot grab the b5 pawn with 16.cxb5?? because 16…Nxe4! wins material: the knight hits both the defender of the g7-bishop and the c3-knight (17.Bxg7 Nxc3). That resource is exactly what Kempinski missed when he played 14…Kh8 instead of …b5 in the model game. One tempo of waiting and the break was gone for good.
Fischer's Recipe: Simplify and Strike with …f5
The Gurgenidze setup is not Black's only path. Bobby Fischer popularized a quieter recipe built on simplification: trade pieces to relieve the cramp, then break with …f5 once the position has opened up. The logic is structural. In a tight position the side with less space suffers most from having pieces bump into one another, so every exchange eases Black's burden and turns White's extra room into empty squares. Trading queens helps a lot, because it lets Black advance the f-pawn without fearing a kingside collapse. Once a knight maneuvers to c5 or pieces come off, …f5 challenges e4 and converts a passive position into an active one. So treat it as a choice: Gurgenidze's …b5 when you want sharp counterplay, Fischer's trade-and-…f5 plan when you would rather neutralize White's space and head for a balanced ending.
Tactics on a5 and the c-File
The Gurgenidze queen sortie to a5 is not just positional pressure. It carries real tactical bite, and it also creates risk. With the queen on a5 eyeing the c3-knight and the half-open c-file, Black's standard ideas are …Rfc8 doubling on c4 and the …Nxe4 shot that punishes a premature cxb5. The flip side is that the queen can become a target. White's a2-a4-a5 plan can chase her, and motifs like Nb6 fork the queen and a rook, as happens in Fressinet-Kempinski after 19…Qd8 20.Nb6. So the a5-queen cuts in two directions: well supported, she generates queenside counterplay; left to drift, she gets harassed and trapped. The practical guideline is to keep her connected to a concrete break. If …b5 is coming, the queen belongs on a5, but if the position closes, retreat her before she runs out of squares.
Grandmaster Games with the Maroczy Bind Formation
Strengths and Weaknesses of the Bind
A quick scorecard of what the structure gives White and what it costs.
PROS
- Often grants a significant spatial advantage due to strong control over key central squares, which frequently forces black into a passive position.
- Transitioning the game s nature from a tactical slugfest to a battle of positional ideas could present a challenge for Sicilian players who are accustomed to an attacking mindset.
- Flexibility as white can choose when and where to launch a pawn break, adjusting the nature of the position to their advantage.
CONS
- Black’s minority attack on the queenside might put white under serious test
- Potential weakness on the dark squares as white’s pawn chain is placed on light squares. Consequently, a light-square bishop might turn into a bad bishop.
- Maroczy Bind is characterized by slow maneuvering, and pawn breaks must be built up cautiously.
The Maroczy Endgame: Why White's Edge Often Persists
The Bind's space advantage does not evaporate when queens come off. It frequently carries straight into the endgame, which is one reason both sides should know the structure cold. White's typical endgame trumps are the d5 outpost, a queenside pawn majority that can roll with b4-c5 or a4-a5-b5, and more comfortable rooks on the c- and d-files. The conclusion of Fressinet-Kempinski is a textbook squeeze: White expands on every front, the a6 pawn falls, and a passed a-pawn decides. For Black the endgame is a mixed blessing. Mass simplification eases the cramp, but trading into a passive endgame without a break only hands White a clean technical win. The defensive rule matches the middlegame: trade pieces to breathe, but make sure …b5 or …f5 has equalized the structure first. Otherwise you are merely simplifying into a worse ending.
Case Study: Fressinet–Kempinski, 2011
This game is worth replaying in full because it shows every White plan in the Bind working together, and it punishes the most common Black mistake, waiting too long to break.
The opening is a King's Indian move order that melts into the Bind once Black goes for …c5 and the d-pawns come off (6…c5 7.O-O cxd4 8.Nxd4). The first instructive moment is 10…Be6?!. It looks natural, but the bishop belongs on c6 via d7, where it backs up …b5 and stays out of the way. On e6 it walks into a tempo, because White's coming f4-f5 hits it directly.
White's plan is textbook prophylaxis. 11.f4 and 12.b3 build the kingside expansion, then 13.Rc1 and 14.a4 shut down …b5 before Black is ready for it. This is the heart of the Bind: take away the freeing break, and the extra space becomes permanent. Black's reply, 14…Kh8 followed by 15…Ng8, is the losing idea in slow motion. Kempinski wants to prepare …f5 himself, but he is two moves too slow. The note in the model line is the key practical lesson for any club player: 14…b5 was still possible and fully playable, because 16.cxb5 would run into 16…Nxe4!. Miss your one break and the position closes for good.
The turning point is 16.f5, which arrives with tempo precisely because of that earlier …Be6. After 17.Nd5 the knight reaches the dream outpost, and White even threatens Bb6 to trap the queen. From here it is a clean positional grind. White expands with 19.b4 and 22.a5, lands a second knight on b6, and slowly squeezes Black's pieces back to the first two ranks.
The finish shows why the Maroczy edge so often carries into the endgame. With 25.b5 and 27.c5, White's queenside majority rolls forward, the a6 pawn drops after 26.bxa6 bxa6, and 31.Nc7 sets up Ne6 with a winning passed a-pawn. Black resigned.
The practical takeaway: as Black, identify your break early and play it the moment it is available, even if it looks committal. As White, the recipe is to fix the queenside with a4, expand at your own pace, and aim a knight at d5. Patience is the whole point of the structure, on both sides.
Test Yourself: Maroczy Bind Positions
Set up each position and find the best move. Use Hint for a nudge or Answer to reveal the engine’s top move.
Find the best move.
Find the best move.
Find the best move.
Find the best move.
Find the best move.
Maroczy Bind FAQ
What are the Maroczy Bind ideas?
Is the Maroczy Bind a good opening?
Should beginners play the Maroczy Bind?
Who should play the Maroczy Bind?
How do you play against the Maroczy Bind?
What is the difference between the Maroczy Bind and the Hedgehog?
Is the Maroczy Defense the same as the Maroczy Bind?
Playing the Bind from Both Sides
Mastering pawn structures is one of the real milestones on the road to chess improvement, and the Maroczy Bind is among the most useful to understand. The resulting middlegames are packed with high-level positional ideas that sharpen your strategic understanding. White's spatial advantage gives more flexibility in deciding when and where to break. To really grasp the nuances, play the Maroczy Bind from both sides of the board.