
 By
By 
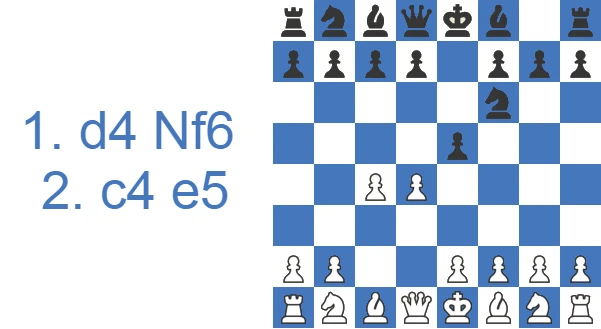
The opening had been seen earlier, but it took off in the early 1900s after a Hungarian master beat one of the world's strongest players with it. These days the Budapest is treated as an old line and rarely shows up at the very top, yet it remains a real headache for an unprepared opponent.
The Budapest Gambit at a Glance
It starts with 1.d4 Nf6 2.c4 e5. Black gives up the e5-pawn to grab a fast lead in development and pull White into a fight. Here is the short version before we go deeper.
- Black almost always wins the pawn back. White only gets into trouble by greedily trying to keep it.
- The critical reply is 3.dxe5 Ng4, hitting e5 again. The sharp sideline 3...Ne4 is the Fajarowicz Variation.
- White's two main fourth moves are 4.Nf3 (Adler Variation) and 4.Bf4 (Rubinstein Variation), and they often transpose. 4.e4 (Alekhine Variation) is the independent, aggressive try.
- There is one famous trap every Budapest player keeps in mind: the Kieninger Trap, ending in 8...Nd3#.
- Engines give White a small edge (roughly +0.7 to +0.8), so it is not fully sound at master level, but at club level it is a genuine surprise weapon.
Want the practical recipe for Black first, then the full theory? Read on.
How White and Black score in practice tells the same story. Here are the numbers from master play.
| Results | Rate |
|---|---|
| Victory for White | 44% |
| Draw | 36% |
| Victory for Black | 20% |
And here is what happens across eight million amateur games, where Black scores far better because White rarely defends precisely.
| Rating level (Lichess) | White wins | Draw | Black wins |
|---|---|---|---|
| 800, beginner | 49.8% | 2.9% | 47.3% |
| 1000, novice | 48.8% | 2.8% | 48.4% |
| 1200, improver | 48.2% | 2.9% | 48.9% |
| 1600, club | 47.6% | 4.0% | 48.4% |
| 1800, club | 48.9% | 5.0% | 46.1% |
| 2000, advanced club | 50.6% | 5.9% | 43.4% |
Source: Lichess opening explorer, blitz, rapid and classical games at the position after 1.d4 Nf6 2.c4 e5 3.dxe5 Ng4. Figures are win rates by Lichess rating band; draws are rare at these levels.
Study the Budapest Gambit as White or Black
The Budapest Gambit ambushes 1.d4 players on move two, and the fight that follows rewards whichever side actually knows the standard plans.
Face the Budapest Gambit as White
Beating the Budapest Gambit starts with knowing exactly what Black is trying to do: the section on the two defining plans and the write-up on Black's trademark rook lift show you the attack before you ever have to stop it. The step-by-step recipe reveals your opponent's ideal setup, which doubles as a list of things for White to prevent.
Take Up the Budapest Gambit as Black
White's most testing reply keeps the extra e5-pawn with an early bishop to f4, and the Rubinstein section shows Black's counter to it piece by piece. Pair the capsule summary with the featured games to see how quickly the Budapest Gambit turns into a kingside attack once the pawn comes home.
Watch the Budapest Gambit in Action
If you prefer to see the ideas move by move, the video below walks through the main lines and the key traps.
Key Ideas in the Budapest Gambit: The Two Plans That Define Every Game
The point of the ...e5 pawn sacrifice is to create lasting trouble for White and outplay them by saddling them with long-term pawn weaknesses. White usually tries to consolidate the extra pawn and trade pieces, heading for an endgame a pawn to the good. Black aims for a solid structure and a strategic fight against White's damaged pawns in many lines. Both sides need real positional understanding here; this is not a memorize-and-go opening.
The Budapest Rook: Black's Signature Attacking Lift
One idea is tied so closely to this opening that it has its own nickname, the Budapest Rook. In lines where Black castles short and White's structure is already committed, the a8-rook swings into the attack along the third rank, usually ...Ra6 followed by ...Rh6 or ...Rg6, pointing straight at White's king. It works hand in hand with the dark-square play. While the queen, bishop and knights press on e5 and the doubled c-pawns, the rook lift adds a fresh attacker that White often cannot meet in time.
You will not get the chance every game. But when White has weakened the kingside, the swing turns a slow positional pull into a real mating attack. Watch for it whenever your pieces are already active and White's king is short of defenders.
How to Play the Budapest Gambit as Black: A Five-Step Recipe (No Memorization Needed)
Most players reach this page because they want to play the gambit themselves, so here is the practical recipe before the deep theory. You do not need long lines memorized; you need to know your plan.
- Offer the pawn and chase it back, but not too soon. After 3.dxe5 play 3...Ng4, then first develop with ...Nc6, ...Bb4+ and ...Qe7, and only then recapture on e5. Recapturing the pawn too soon usually plays into White's hands.
- Use the check. ...Bb4+ forces White to commit the b1-knight or block awkwardly, and it sets up the Kieninger Trap if White gets greedy.
- Against 6.Nc3, double the pawns. Take with 6...Bxc3 7.bxc3 and then pressure the doubled c-pawns with ...Qe7, ...f6 and ...d6.
- Aim for the dark squares. Black's long-term trumps are White's loose pawns and the dark squares around e5 and d4. Trade a knight for a bishop when it weakens White's structure.
- Castle short and stay active. If White returns the pawn quietly, take the near-equal game and comfortable development rather than forcing matters.
Keep these five ideas in mind and the specific move orders below will start to make sense instead of feeling like a list to learn by heart.
Budapest Gambit Theory: The Named Variations, Mapped
The Budapest splits into a handful of well-known lines, and you will meet most of them under their own names in books and databases. Here is the map before we walk through each one.
| Name | Moves | Idea in one line |
|---|---|---|
| Adler Variation | 3.dxe5 Ng4 4.Nf3 | White develops and returns the pawn for a small structural edge. |
| Rubinstein Variation | 3.dxe5 Ng4 4.Bf4 | White defends e5 and develops the bishop; often transposes to the Adler. |
| Alekhine Variation | 3.dxe5 Ng4 4.e4 | White grabs a big center instead of holding the pawn. The sharpest try. |
| Fajarowicz Variation | 3.dxe5 Ne4 | Black ignores the pawn and goes for piece activity. Objectively risky. |
| Kieninger Trap | 4.Bf4 Nc6 5.Nf3 Bb4+ 6.Nbd2 Qe7 7.a3?? Ngxe5 | If White grabs the bishop with 8.axb4, then 8 Nd3 is mate. |
The Main Line: 3.dxe5 Ng4 and the Adler Variation
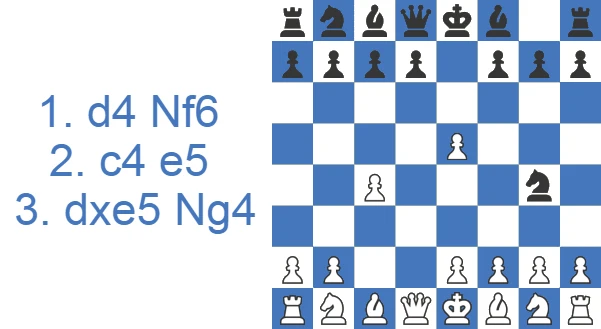
The main line begins with White accepting the pawn (3.dxe5) and Black attacking it again with 3...Ng4, planning to win it back.
White usually wants to hold the pawn and plays 4.Nf3. Black ramps up the pressure by developing the b8-knight to c6 (4...Nc6). White then typically guards the pawn again with 5.Bf4, and Black continues 5...Bb4+, intending to bring the queen into the attack later.
After 5...Bb4+ White has to block the check. The two most common ways are 6.Nc3 and 6.Nbd2.
The 6.Nbd2 line often gives White the bishop pair but costs the e5-pawn.
The 6.Nc3 line usually saddles White with a doubled pawn while letting the extra pawn survive for the short term. We will look at both lines in detail below.
If White would rather avoid all this theory, they can simply give the pawn back with 4.Nc3, then play e3, Nf3 and Bd2, develop the light-squared bishop and castle short. This is less ambitious, and Black equalizes without much trouble.
The 6.Nbd2 Line: Bishop Pair, Returned Pawn
This line begins once White blocks 5...Bb4+ with 6.Nbd2.
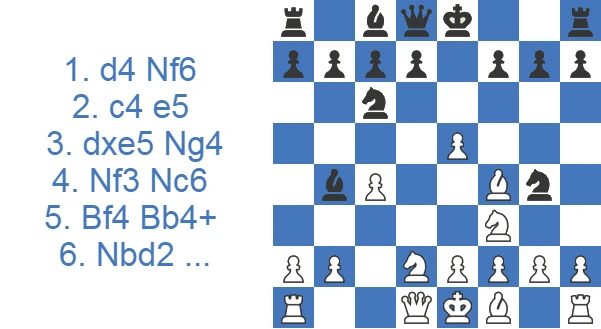
Black usually replies 6...Qe7, piling a second attacker onto the e5-pawn. The pawn is going to fall, since the white queen cannot defend it. White, however, can play for the bishop pair: with the b4-bishop short of good squares once a3 comes, it will eventually have to take on d2. Note that 7.a3 at once threatens nothing, because 7...Nge5 sets up 8...Nd3# if White grabs the bishop with 8.axb4.
So before claiming the bishop pair with a3, White first has to deal with the Nd3 idea and free the f1-bishop. The move 7.e3 does both jobs. After 7...Ngxe5, 8.Be2 prepares castling. Black can take on f3 with 8...Nxf3, and after 9.Bxf3, a move like 9...d6 (opening the c8-bishop's diagonal) can be met by 10.a3. Then 10...Ba5 11.b4 Bb6 would leave Black with a bad dark-squared bishop while White would be overextended on the queenside.
Because of that, Black often takes on d2 (10...Bxd2) and gives up the bishop pair.
In these positions Black plays with a solid structure but a lack of space, usually looking to trade one of the knights for a white bishop. White, in turn, wants to open the position to use the bishops and expand without overreaching.
The 6.Nc3 Line: Doubled Pawns, Held Pawn
Here White blocks 5...Bb4+ with 6.Nc3, which lets the d1-queen help defend the e5-pawn.
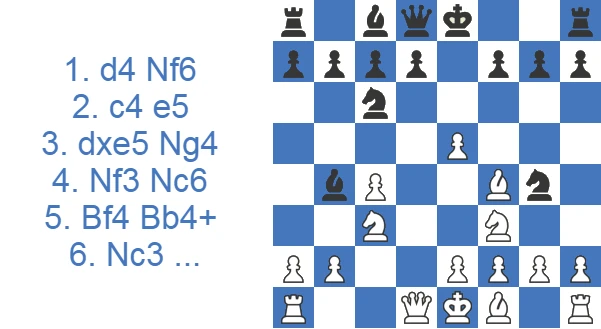
Black usually answers 6...Bxc3 to double White's pawns on the c-file. White recaptures with 7.bxc3, and Black attacks the e5-pawn with the familiar 7...Qe7. White holds the pawn with 8.Qd5.
From here Black has to get the pieces active and pile pressure on the doubled pawns. The first job is to remove the e5-pawn, since ...d6 is impossible while exd6 is hanging over it. So Black plays the pawn break 8...f6, reorganizing in order to play ...d6 and free the c8-bishop.
After 9.exf6 Nxf6 the white queen has to find a safe square. The usual choice is 10.Qd3, because after 10...d6 the c8-bishop would love to sit on f5, and the d3-queen prevents that. White can then fianchetto with 11.g3 and 12.Bg2. Black castles (11...O-O), brings the bishop out with 12...Bg4 and lifts the rook into play with 13...Rae8.
In these positions White wants to untangle the doubled pawns, put the g2-bishop to work and reach a favorable endgame a pawn up. Black, on the other hand, can launch a kingside attack or keep grinding on the weak doubled pawns.
The Rubinstein Variation: Defending e5 with 4.Bf4
Instead of 4.Nf3, White can defend the e5-pawn immediately with 4.Bf4. The point is that White can later play e3 without locking in the c1-bishop, since the bishop is already outside the pawn chain. In practice this often transposes back to the main line after 4...Nc6 5.Nf3 Bb4+ 6.Nbd2, so most of what you learned in the Nbd2 line carries over.
A typical equalizing path for Black is 4...Nc6 5.Nf3 Bb4+ 6.Nbd2 Qe7 7.a3 Ngxe5 8.Nxe5 Nxe5 9.e3 Bxd2+ 10.Qxd2 d6, reaching the same kind of solid, slightly cramped position with a healthy structure. White keeps a small pull with the bishop pair and queenside space; Black has easy piece play.
The Alekhine Variation: Grabbing the Center with 4.e4
The most ambitious answer is 4.e4. Here White ignores the idea of holding the pawn and instead builds a broad center, inviting Black to take on e5. After 4...Nxe5 5.f4, White kicks the knight and claims even more space.
The catch is that this center has a price: the f4-push loosens White's kingside. Black retreats with 5...Nec6 and then targets the weakened squares with ideas like ...Bb4+, ...d6 and a quick ...Qh4+ when allowed. The resulting positions are double-edged, and a white player who does not know the lines can collapse fast. If you face 4.e4, do not rush to win the material back; develop, castle, and let White's center become a target.
The Fajarowicz Variation (3...Ne4): Activity Over the Pawn
This line starts with 3...Ne4 instead of the usual 3...Ng4. It lets White keep the e5-pawn and hunt the e4-knight without giving Black much compensation.
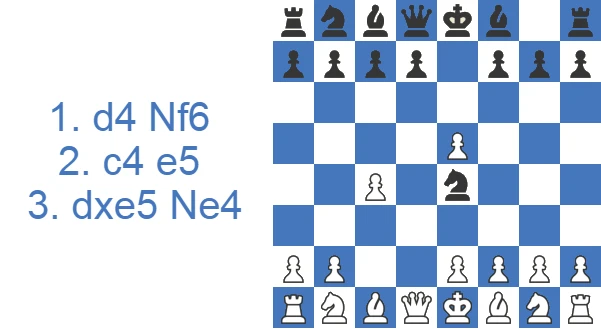
The key move for White is 4.a3, ruling out ...Bb4+.
If White skips a3, then 4...Bb4+ 5.Bd2 is met by 5...Nxd2 6.Nxd2, transposing into something close to the 6.Nbd2 line, where Black can play ...Nc6 and ...Qe7 to win the e5-pawn and White cannot stop it.
So 4.a3 keeps White's edge intact. After a3, the most common amateur move is 4...d6, which lets White hit the e4-knight with 5.Qc2. White is clearly better here.
A sample continuation runs 5...Nc5 (guarding the knight) 6.b4 (kicking the knight and making a fianchetto square on b2) 6...Ne6 7.exd6 Bxd6 8.Bb2 O-O. White then usually develops the kingside with Nf3, e3, Be2 and castles short.
In a position like this White is a clean pawn up and Black has too little for it. With accurate play, White can be close to winning.
The Early 3...Bb4+ Variation and Why It Falls Short
This line starts with 3...Bb4+ on the third move. The check is a mistake: White keeps the extra pawn and gives Black no compensation at all.
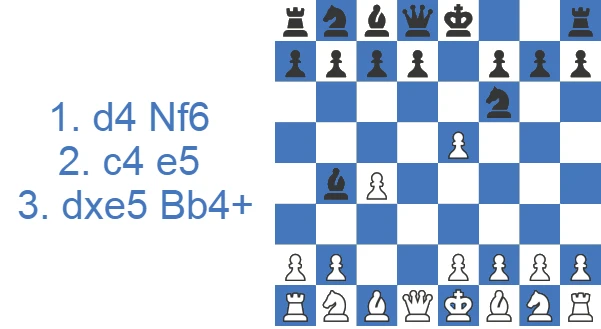
White answers 4.Bd2, and after 4...Bxd2 recaptures with 5.Qxd2. The queen is the right piece to take, because its activity will be central to holding White's advantage. Black hits the e5-pawn with the typical 5...Ng4, met by 6.Nf3, and then piles on with the other knight via 6...Nc6.
Here White is in no danger and can calmly play 7.Nc3, since 7...Ngxe5 8.Nxe5 Nxe5 9.Qe3 wins the knight: after 9...Qe7 (defending it) comes 10.Nd5, hitting the e7-queen and the c7-pawn to threaten a fork while also preparing f4 to win the e5-knight.
If Black avoids taking on e5 and castles instead with 7...O-O, White plays 8.Qf4 to hold the pawn and attack the g4-knight. Black can try 8...d6 to defend the knight, but after 9.exd6 the position is a touch worse for Black.
How to Meet the Budapest Gambit as White
If you are the one facing 2...e5, the practical advice is short. Do not be greedy. The cleanest setup is 3.dxe5 Ng4 4.Nf3 (the Adler) or 4.Bf4 (the Rubinstein), followed by Nbd2, e3 and Be2. The move order that matters is e3 before a3, which shuts down the Nd3 mating idea before you ever chase the b4-bishop. From there you hand the e5-pawn back, finish development and castle short, holding a small, safe pull from the bishop pair and a touch more queenside space. You do not need to keep the extra pawn; the structure does enough on its own. And if you would rather skip the gambit completely, 2.Nf3 before c4 simply rules out 2...e5.
When Someone Plays the Budapest Gambit Against Me
I refused the pawn. Against 2...e5 I pushed 3.d5, and after 3...c6 4.d6 Qa5+ 5.Nc3 Qc5 6.Bg5 Qxd6 7.Qxd6 Bxd6 the pawn was gone anyway and the queens with it. From move three the engine had Black better for the next ten moves or so, at one point by about two and a half pawns.

What saved me was not the opening. His knight went hunting: 12...Na6 13.e3 Nb4 14.O-O-O Nxa2+ 15.Kb1 Nb4, three moves spent on a rook-pawn, and the position slowly turned. My 23.Bxd7 was careless, +2.41 down to +1.32, and he replied 23...Rhd8, which put me back to +3.47. He resigned three moves after that.

So my own verdict lines up with the section below. Declining with 3.d5 refutes nothing, and it cost me the better side of the position for a long stretch. The Budapest is not beaten by grabbing space early. It is beaten later, when the knights that came out early have to walk home.
Is the Budapest Gambit Sound? An Honest Verdict
Objectively, the Budapest is dubious rather than refuted. With best play after 3.dxe5, modern engines give White a stable edge of roughly +0.5 to +0.8, less than a full pawn but enough that elite players steer clear. The soundness question really turns on rating band. Below master level the gambit is fully playable and genuinely dangerous: Black gets fast development, clear plans against White's loose pawns, and the ever-present Kieninger Trap. At the top, precise white play takes the counterplay away and the extra space starts to tell. So the fair label is "objectively dubious, practically excellent" for catching an unprepared opponent. It is not unsound the way a blunder gambit is. It just does not equalize by force, which holds for most respected gambits, from the King's Gambit to the Smith-Morra.
The Budapest Gambit Trap (Kieninger Trap): The Move-Order Mistake That Ends in 8...Nd3#
This is the trap every Budapest player keeps in the back of their mind. It does not win every game, but a surprising number of club opponents walk straight into it when they get greedy about the extra pawn.
It appears after 3.dxe5 Ng4 4.Bf4 Nc6 5.Nf3 Bb4+ 6.Nbd2 Qe7. Black is piling up on the e5-pawn, and White wants to win the b4-bishop with a3. The greedy try is 7.a3, hoping to grab the bishop after Black recaptures on e5.
Black answers 7...Ngxe5, and now the natural-looking 8.axb4 loses on the spot to 8...Nd3#. The knight delivers a smothered mate: the e2-pawn cannot capture because it is pinned to the king by the e7-queen, and the king has no escape square.
This is exactly why White is told to keep the king in mind before chasing the b4-bishop. The clean route is 7.e3 first, removing the back-rank issues before playing a3, as covered in the 6.Nbd2 line above.
Where the Budapest Came From
The opening takes its name from the Hungarian capital, where its first recorded outing was a casual 1896 game between Mor Adler and Geza Maroczy. That game passed almost unnoticed. The gambit only matured around 1916, in the hands of a circle of Hungarian masters: Istvan Abonyi, Gyula Breyer and Zsigmond Barasz refined the key ideas. It gained wide attention in 1918, when Milan Vidmar used Abonyi's analysis to beat Akiba Rubinstein. A short-lived vogue followed in the early 1920s before stronger antidotes pushed it down to club and amateur level, where it has stayed a respected surprise choice ever since. The Fajarowicz sideline (3...Ne4) is named separately, after the German master Sammi Fajarowicz, and carries its own ECO code, A51.
Who Plays the Budapest Today?
At elite level the Budapest is a rarity, mostly seen in rapid and blitz where its surprise value and tactical chances outweigh the small theoretical edge engines give White. Grandmasters such as Mamedyarov and Short have brought it out from time to time, and it surfaces now and then in online events when a player wants to dodge heavy mainline preparation. Its real home, though, is club and online chess. There it is genuinely popular, precisely because so many opponents do not know the move-order pitfalls and walk into the trouble the Kieninger Trap promises. Player after player grabs the e5-pawn against me and then has no idea how to give it back safely. If you are rated below roughly 2000 and enjoy an early fight, you are exactly the player who gets the most practical mileage out of it.
Should You Add the Budapest to Your Repertoire?
Pros
- White can be instantly better in several variations.
- White is often better in endgames due to the extra material.
- White can get a Bishop pair in certain variations.
- Most of the lines are straightforward.
Cons
- Black can create weaknesses and bring a strategic battle.
- The opening requires theoretical knowledge to be able to claim an edge.
- Black can create a Kingside attack on many occasions.
- Several variations require strategic understanding.
Case Study: The 6.Nc3 Main Line in Full
To see the typical Budapest plans working together, follow this model line through the 6.Nc3 main line. It is illustrative rather than a single famous game, but every move is one you will actually meet, and it shows how Black turns the pawn sacrifice into long-term pressure.
The opening moves follow the recipe exactly. After 3.dxe5 Ng4 Black does not rush to win the pawn; instead 4...Nc6 and 5...Bb4+ get pieces out and ask White a question. The check is the heart of Black's plan, because it forces White to choose how to block.
6.Nc3 is the line where White tries to hold the pawn, and Black immediately exploits it. 6...Bxc3 7.bxc3 is the key positional decision of the whole game: Black trades a bishop to give White doubled, fixed c-pawns. Those weaknesses do not go away, and they become the targets Black plays against for the rest of the game.
7...Qe7 piles a second piece onto e5 and pins White to defending it. 8.Qd5 is White's best try to hold on, but it is awkward to keep a queen tied to pawn defense this early. The turning point is the pawn break 8...f6. Black cannot play ...d6 yet because of exd6, so the f-pawn lever removes the e5-pawn first. After 9.exf6 Nxf6 the recaptured knight comes to a great square and Black has finally regained the material with a clearly better structure.
From here it is a matter of activating everything. 10...d6 frees the c8-bishop, and once White hides the queen and fianchettoes with g3 and Bg2, Black completes development with 11...O-O, 12...Bg4 pinning the f3-knight, and the rook lift 13...Rae8 pointing down the e-file. This is the Budapest's whole story in one line: give back the pawn, leave White with damaged c-pawns, and emerge with the more active pieces.
The practical takeaway for a club player is simple. Do not count material in the first ten moves; count weaknesses. The doubled c-pawns are permanent, the pawn deficit is temporary, and active piece play does the rest.
Final Thoughts on the Budapest Gambit
The Budapest Gambit begins with 1.d4 and Black's ...e5 break, sacrificing a pawn to create lasting weaknesses in White's position. If White is careless with the theory, they can be outplayed strategically and even mated outright in the Kieninger Trap. It is an old opening that no longer appears at the top level, and in many lines White can claim a clear edge straight out of the opening. For that reason it pays to study the lines and understand the logic before you rely on it, especially the move orders for recovering the e5-pawn. Below 2000 or so, it remains one of the most practical surprise weapons against 1.d4.
Test Yourself: Budapest Gambit Positions
Set up each position and find the best move. Use Hint for a nudge or Answer to reveal the engine’s top move.
Find the best move.
Find the best move.
Find the best move.
Find the best move.
Find the best move.