
 By

The name comes from a 19th-century correspondence match between London and Edinburgh. The line has a reputation as a sharp, double-edged opening, and modern theory has found accurate ways for Black to neutralize it. Club players love it for the tactical brawls it produces.
The Scotch Gambit in One Minute
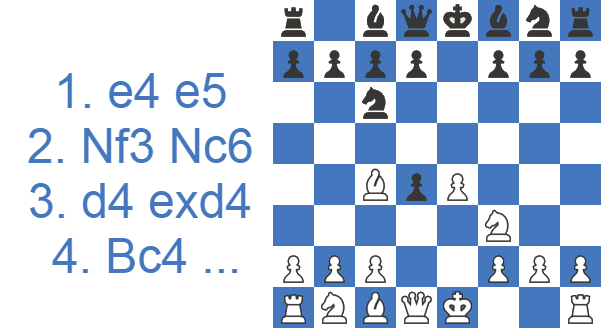
- The moves are 1.e4 e5 2.Nf3 Nc6 3.d4 exd4 4.Bc4 (ECO C44). White gives back the d4-pawn to develop quickly and point the bishop straight at f7.
- Black's three main replies are 4...Nf6 (the safest, transposing to the Two Knights Defense), 4...Bc5, and 4...Bb4+. Black can also decline the pawn with 4...Be7 or 4...d6.
- White's whole plan is speed: castle, push the e-pawn, and pile up on f7. Black's plan is to hit back with the ...d5 break and trade into a slightly better endgame with the extra pawn.
- It works well in practice up to club level, even though engines call it equal. Below 2000, White scores around 55 percent.
- The biggest mistake for Black is getting greedy: grabbing a second pawn (like ...dxc3) instead of returning the material and finishing development.
Study the Scotch Gambit as White or Black
A pawn goes on the table as early as move three in the Scotch Gambit, and which side profits depends entirely on who knows the position better.
Attack with the Scotch Gambit as White
Rapid development, a bishop trained on f7, and open central lines are what White buys with the pawn in the Scotch Gambit. Start with the section on why activity outweighs material here, then learn the castling-first line that can steer into the Max Lange, and study the defense Black should play so it never catches you unprepared.
Neutralize the Scotch Gambit as Black
The reliable counter is unglamorous: develop, hand the pawn back at the right moment, and White's initiative fades. Read the capsule summary for how to face the Scotch Gambit in sixty seconds, then check the results tables to see how sharply the gambit's sting drops as ratings rise.
How White and Black Actually Score
The two tables below come from very different pools of games, and the gap between them tells the real story of this opening. In master practice White struggles; among amateurs, White does well.
Here is how it has gone in master games:
| Results | Rate |
|---|---|
| Victory for White | 26% |
| Draw | 41% |
| Victory for Black | 33% |
And here is the same opening across roughly 11 million amateur games:
| Rating level (Lichess) | White wins | Draw | Black wins |
|---|---|---|---|
| 800, beginner | 53.7% | 3.0% | 43.3% |
| 1000, novice | 55.1% | 2.8% | 42.1% |
| 1200, improver | 55.5% | 2.9% | 41.6% |
| 1600, club | 55.4% | 3.6% | 41.0% |
| 1800, club | 53.9% | 4.3% | 41.9% |
| 2000, advanced club | 51.3% | 5.2% | 43.4% |
Source: Lichess opening explorer, blitz, rapid and classical games at the position after 1.e4 e5 2.Nf3 Nc6 3.d4 exd4 4.Bc4. Figures are win rates by Lichess rating band; draws are rare at these levels.
Watch the Scotch Gambit Explained Move by Move
If you prefer to see the ideas first, the video below walks through the opening move by move before you read the deeper analysis.
The breakdown that follows covers the variations, the transpositions into the middlegame, and the practical tips that make this gambit pay off.
Key Ideas in the Scotch Gambit: Development vs. the Extra Pawn
The whole point of this opening is to develop fast and keep handing the opponent problems to solve. White wants to knock Black's pieces off their best squares and aim the c4-bishop down the a2-g8 diagonal. Black wants to stay solid and steer toward an endgame a pawn up. If White uses the development lead well in the first ten moves, White often stands close to winning. If not, Black consolidates and converts the extra pawn with accurate endgame technique.
The Race: Development vs. the Extra Pawn
Think of every Scotch Gambit game as a race. White is spending material to buy time; Black is spending time to keep material. Whoever wins their side of that trade wins the game. The first player to break the rhythm usually loses, which is why a single greedy move by Black can swing a roughly equal position into a lost one in two or three moves.
The f7 Pattern You Must Recognize: Bxf7+ and Qd5+
Before the variations, learn the one idea that decides most amateur Scotch Gambit games. Across the 4...Bc5, 4...Bb4+ and the greedy 5...dxc3? lines, White keeps reaching for the same two-move combination: Bxf7+ followed by Qd5+. The bishop check drags the black king out to f7. Then the queen check on d5 forks the exposed king and a loose bishop on c5, winning the piece back with interest while Black loses the right to castle. The f7-square is defended only by the king at the start of the game, which is exactly what makes it the target of this royal fork. Once you can see the pattern coming, you stop falling for it. For Black, the antidote is never a clever defensive move; it is simply refusing the bait, handing the pawn back, and finishing development.
All Variations of the Scotch Gambit
Black has five sensible replies on move four, and the Scotch Gambit has an answer to all of them. The first three keep the extra pawn or fight for the center; the last two give the pawn back for a quiet game:
- 4...Nf6: the most popular move, transposing to the Two Knights Defense.
- 4...Bc5: the Haxo Gambit, holding on to the d4-pawn.
- 4...Bb4+: the London Defense, the most testing of the pawn-grabbing tries.
- 4...Be7: the Scotch Gambit Declined, a calm setup.
- 4...d6: a second way to decline, usually transposing to 4...Be7.
Each one is covered below.
How the Scotch Gambit Arises: Move Orders and Transpositions
The Scotch Gambit is as much a move-order trick as an opening. Its defining 4.Bc4 sits at a crossroads of three related systems, and knowing the bridges keeps you from being surprised. The most important link is the Two Knights Defense. After 4...Nf6, play transposes directly into Two Knights territory, and the 5.O-O lines can flow into the Max Lange Attack. The c3 plans give the position an Italian Game flavor; when White supports the center with c3 and the bishop sits on c4, positions routinely transpose to the Giuoco Piano. There is also a recapture choice to keep in mind. After lines where White regains the pawn with Nxd4, the knight that develops next usually goes to c3 rather than d2, which keeps pressure on the center and the kingside. Learn these few bridges and one repertoire suddenly covers several openings at once.
4...Nf6 Variation
This line starts after 4...Nf6. The move pressures the e4-pawn and forces White to deal with it (5.O-O can be met by 5...Nxe4, and 6.Re1 runs into 6...d5).
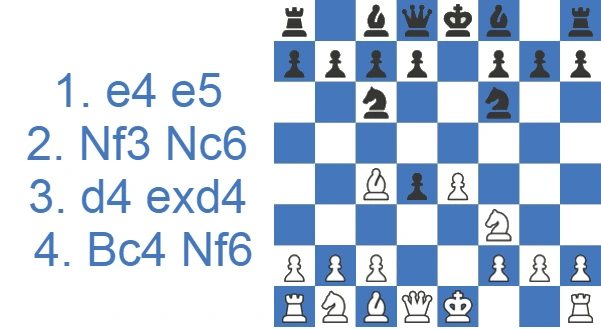
Once 5.e5 is played, Black has the thematic 5...d5 push, the Scotch Gambit main line. It generates counterplay and opens the diagonals for both bishops. The move hits the c4-bishop, gains the e4-square, and clears the path for Black's minor pieces. Anyone who knows the gambit expects it, so this is the idea to focus on. After 5...d5, White has to save the c4-bishop. Allowing 6.exf6 dxc4 would be a disaster: Black would have strong pawns on the c- and d-files, and White would be stuck for development.
So White usually plays 6.Bb5 to pin the c6-knight and double Black's pawns. With the knight pinned, White's next move will be Nxd4. Black needs to rescue the attacked f6-knight and reroutes it with 6...Ne4; White then captures on d4 (7.Nxd4) and the material is level again.
The sting has gone out of the position. Black is equal and ready to complete development, while White keeps probing and nudging Black's pieces for as long as possible.
The 5.O-O Line (Max Lange Attack)
Instead of grabbing space with 5.e5, White can keep the gambit alive with 5.O-O. After 5...Bc5 6.e5 d5 7.exf6 dxc4 8.Re1+ Be6 9.Ng5, the game turns into the Max Lange Attack, one of the sharpest lines in all of open chess. Both sides have to know the theory move for move. White throws everything at the e6-bishop and the f7-square, while Black holds on with 9...Qd5 10.Nc3 Qf5 11.Nce4, returning the material at the right moment to reach a roughly level but messy middlegame.
If you like forcing, memorize-or-lose positions, this is the line to study. If you would rather play on understanding, the 5.e5 line above is the safer practical choice.
4...Bc5 Variation
This starts with 4...Bc5 (the Scotch Gambit Accepted), guarding the d4-pawn with the bishop.
Here White often plays 5.c3, opening the queen's path and building toward the f7-square. By offering a second pawn, White is setting a trap. If Black grabs it with 5...dxc3, then 6.Bxf7+! drags the king out to f7, and after 6...Kxf7 7.Qd5+ White picks up the c5-bishop.
So 5...Nf6, covering d5 and preparing to castle, is the safe path for Black. Then 6.e5 d5 are the same moves seen in the 4...Nf6 variation. White can again try 7.Bb5, but because Black's dark-squared bishop is already out, White recaptures the d4-pawn with the c-pawn instead (8.cxd4).
After that, 8...Bb4 is tempting for amateurs, and White meets it with 9.Bd2. White usually targets the c-file once Black's c-pawns are doubled, lifting the queen to c2 and a rook to c1. Black can answer with the ...c5 break to liquidate one of the doubled pawns, or with the ...f6 break to fire down the half-open f-file.
4...Bb4+ Line
This begins after 4...Bb4+. The check can backfire on Black, because White gets a string of winning chances whenever Black slips.
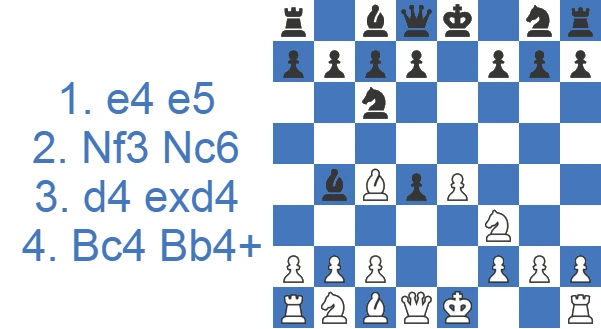
White usually answers 5.c3 with the same idea as the Bc5 line. Black then captures with 5...dxc3 (declining leaves Black short of squares: White castles, plays e5, and Black is cramped before getting the king to safety), and White recaptures with 6.bxc3.
From there, 6...Bc5 walks into 7.Bxf7+ Kxf7 8.Qd5+, again forking king and bishop and ending Black's castling rights.
So 6...Ba5 is the move to play. White castles with 7.O-O and sets about keeping the black king in the center. If Black plays 7...Nf6, then 8.Ba3 covers f8 and stops Black from castling. Black can try 8...d6 to escape the bishop's gaze, but 9.e5 dxe5 10.Qb3 lays a battery on the a2-g8 diagonal against f7, with Ng5 ready to pile on next.
If Black tries 7...Nge7 instead, then 8.Ng5 immediately leans on f7. If Black castles to defend it with 8...O-O, then 9.Qh5 hits h7 and f7 at once, and 9...h6 loses to 10.Nxf7.
Black's best plan is ...d6 to shut the a2-g8 diagonal, ...Qf6 to guard f7, then ...Nge7 and castling. These positions stay sharp and give White plenty of room to outplay an unprepared opponent.
Declining the Scotch Gambit: 4...Be7 and 4...d6
Not every opponent wants the extra pawn. With 4...Be7 or 4...d6, Black gives it straight back and asks for a calm game. The two moves usually transpose. After 4...Be7 5.Nxd4 d6, White just builds a healthy Scotch-style position: castle, Nc3, h3, Be3, and play on the center and kingside with ideas like f4 and Qf3.
There is no immediate attack here, but White keeps a small, lasting pull because Black's dark-squared bishop never reaches the active c5-square. This is the Scotch Gambit Declined. It will not win games on its own, but it is the line you will meet from careful opponents who refuse to be baited.
How to Play Against the Scotch Gambit: Black's Best Defense (Develop, Play ...d5, Don't Get Greedy)
From the Black side, the Scotch Gambit is easier to face than it looks, as long as you follow two rules: develop, and don't get greedy. The cleanest route is 4...Nf6, and after 5.e5 the move that solves all of Black's problems is 5...d5. It hits the c4-bishop, opens lines for development, and hands the pawn back at the right moment. A typical safe sequence runs 6.Bb5 Ne4 7.Nxd4 Bd7 8.Bxc6 bxc6 9.O-O Bc5, and Black is fully developed and equal.
The one thing to avoid is grabbing a second pawn. After 4...Bc5 5.c3, taking with 5...dxc3? runs into 6.Bxf7+! Kxf7 7.Qd5+, and White wins the material back with a raging attack. Return the pawn, finish your development, aim for the ...d5 break, and you reach an endgame where your structure is every bit as good as White's.
What You Gain and What You Risk With the Scotch Gambit
Pros
- White can create many opportunities to put their enemy’s King in jeopardy.
- Amateur players often get pleasant positions out of the opening.
- The tactical variations can improve a player’s attacking abilities.
- As White, you can play some lines with ease due to White s simple improvement and rein in the center.
Cons
- Black can equalize quickly if they know the theory.
- This line is not objectively good due to easy counter possibilities at the elite level.
- Endgames often favor Black due to extra material in many variations.
- Some move orders might be hard to play due to a lack of plan after a certain number of moves.
Common Traps in the Scotch Gambit: the Two Every Player Should Know
This trap starts with 4...Bb4+. White plays the usual 5.c3, Black takes with 5...dxc3, and White recaptures 6.bxc3. If Black now retreats the bishop with 6...Be7, then 7.Qd5 is winning. The battery aimed at f7 cannot be parried. Qxf7+ followed by Be6 is the mating idea if Black plays a passive move like ...d6. If Black tries ...Nh6 to guard f7, White just takes it with Bxh6 and the threat rolls on.
This is the trap club players fall into most often. After 4...Bc5 5.c3, Black is tempted to snatch a second pawn with 5...dxc3?. White answers with the thematic sacrifice 6.Bxf7+!. After 6...Kxf7 7.Qd5+, the king is dragged into the open, White forks king and bishop, and scoops up the c5-bishop with 8.Qxc5, leaving Black without the right to castle. It is the same lesson Black has to learn in every line of this gambit: one extra pawn is never worth your king's safety.
Five Positions to Test Yourself
Set up each position and find the best move. Use Hint for a nudge or Answer to reveal the engine’s top move.
Find the best move.
Find the best move.
Find the best move.
Find the best move.
Find the best move.
Should You Add the Scotch Gambit to Your Repertoire?
The Scotch Gambit is an opening where White gives up a pawn to start an attack. It often produces tactical positions, but it can lead to quieter strategic games too. It is not a serious try for an edge at the top level, yet club players keep getting good results with it. As a training opening, it sharpens your pattern recognition and your calculation.
Grandmaster Games with the Scotch Gambit: Mamedov, Liang and Grischuk
Is the Scotch Gambit Actually Sound?
Honestly, no and yes. Objectively, modern engines and master practice grade the Scotch Gambit as equal at best for White; with accurate defense Black returns the pawn, plays the ...d5 freeing break, and reaches a comfortable, structurally healthy game. That is why White scores only 26 percent in master databases. But objective soundness and practical results are different questions. Below 2000, the same line scores around 55 percent for White, because the positions are sharp, the plans are easy to follow, and one inaccurate move by Black can hand over the king. Call it dubious but thoroughly playable. As a practical choice up to club level it does real damage, and as a training opening it sharpens your attacking instinct and pattern recognition. Just do not expect it to trouble a well-prepared expert.
Case Study: Liang Crashes Through on f7 vs. Aronian
The cleanest illustration of what this opening is built to do comes from Awonder Liang's win over Levon Aronian in 2022. Even against a 2700-rated defender, the f7-square stays the story from move five to the finish. Treat it as a model game for the attacking ideas, not a recommendation to copy the opening against an elite player.
A few things are worth following move by move.
- 4...Bc5 5.Ng5 is the rare aggressive try where White immediately points two pieces at f7. Black's 5...Nh6 defends it the natural way, but it lets White cash in.
- 6.Nxf7 Nxf7 7.Bxf7+ Kxf7 8.Qh5+ is the same theme this whole article is about, executed with pieces instead of pawns. White trades a knight and bishop for two pawns and the black king's safety, then 9.Qxc5 collects the loose bishop, the exact c5 target the royal fork always hunts.
- The price is real: White has given back material and Black has an extra piece for two pawns. This is the trade the gambit always offers in miniature, development and king-hunt for material. The question for the rest of the game is whether Black's king can ever get organized.
- 10.c3 and 11.O-O show the practical point. Liang does not rush; he gets his own king safe and opens lines while Aronian's king sits on g8 with the rook still on h8 and pieces undeveloped.
- The turning point is around moves 17-22. With 17.g4 and 21.f3, White peels open the squares around the black king, and 22.fxe4+ is the moment the attack becomes decisive. Black has the extra piece, but it never coordinates in time.
- The finish, 26.Rxf7 and 28.Qf6, is the attacker's reward for getting there first.
The practical takeaway for a club player is the one this whole opening teaches: when you sacrifice on f7, you are buying time, and time only pays if you keep developing and opening lines toward the king. The moment you slow down, the defender's extra material starts to matter. Aronian was simply never given that moment.