
 By

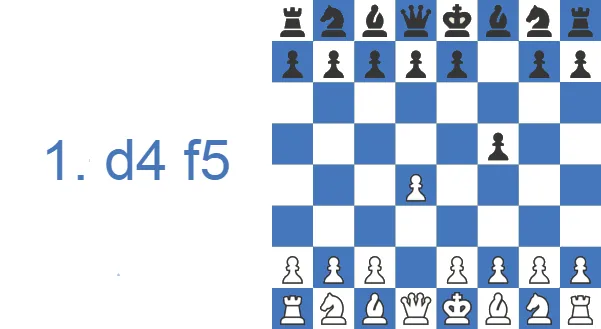
The earliest records of the defense reach back to the 18th century, yet it has surfaced only occasionally at the top. It has appeared in just one World Championship match, between Mikhail Botvinnik and David Bronstein in 1951.
The Dutch Defense at a Glance
- The Dutch Defense begins 1.d4 f5, where Black stakes a claim on the e4-square and aims for an unbalanced, attacking game (ECO A80-A99).
- The three main setups are the Leningrad (...g6 fianchetto, kingside attack), the Stonewall (...d5/...e6/...f5 pawn wall, grip on e4), and the Classical (...e6/...Be7, flexible center).
- It is fully sound up to club and master level, but it asks for accurate play against White's anti-Dutch tries such as the Staunton Gambit (2.e4) and 2.Bg5. Solid, double-edged, and full of winning chances for Black.
Study the Dutch Defense as White or Black
The Dutch Defense stakes Black's claim to the kingside with 1...f5 on move one, and White's choice of setup decides whether the game stays positional or catches fire.
Beat the Dutch Defense as White
First understand the queen-swing attack the Dutch Defense is built around, then decide how to face it: an early bishop raid to g5 or the direct pawn-storm plan with h3 and g4. Both anti-Dutch sections give concrete move orders rather than general advice.
Play the Dutch Defense as Black
Start with the capsule overview to decide whether the Dutch Defense suits a counterpunching style, then let the results section show what Black really scores with it band by band. Finish with the short trap line, a sequence every Dutch player should know cold whichever side of it they land on.
How the Dutch Scores for Black
These figures come from a broad pool of club games on Lichess, grouped by rating band. They show White scoring clearly ahead across every band, while draws stay rare and never reach seven percent even among advanced club players.
| Rating level (Lichess) | White wins | Draw | Black wins |
|---|---|---|---|
| 800, beginner | 53.8% | 4.0% | 42.2% |
| 1000, novice | 52.9% | 4.0% | 43.1% |
| 1200, improver | 53.1% | 3.6% | 43.3% |
| 1600, club | 51.6% | 4.4% | 44.0% |
| 1800, club | 51.2% | 5.4% | 43.4% |
| 2000, advanced club | 50.9% | 6.7% | 42.4% |
Source: Lichess opening explorer, blitz, rapid and classical games at the position after 1.d4 f5 2.g3 Nf6 3.Bg2. Figures are win rates by Lichess rating band; draws are rare at these levels.
The high draw rate reflects how often well-prepared players neutralize each other, but note the spread: Black scores plenty of full points here, which is exactly the appeal for someone playing 1...f5 to win rather than to hold.
Watch the Dutch in Action
If you prefer to see the ideas move before reading them, this 10-minute walkthrough covers the main Dutch setups on the board.
Key Ideas in the Dutch Defense: …f5, …Qe8-h5 and the Kingside Storm
As Black, you often just want to equalize as quickly as possible. Openings like the Berlin Defense or the Petrov Defense are examples of that modest approach, staying safe and avoiding positional weaknesses. To play for more, you have to create an imbalance, and the Dutch does exactly that. The move ...f5 builds an asymmetrical structure on move one, which makes it a fine choice for players who want to attack and play for a win.
The point behind 1...f5 is to claim the central light squares and a firm grip on the e4-square. Just one move in, the battle lines are already drawn for both sides. Each side expands on the wing where its pawn has advanced (d4 for White, f5 for Black). Black aims to launch a kingside attack, usually swinging the queen to h5 via e8 and planting a knight on e4, which clears the way for a rook lift with Rf6-Rh6. In that sense the opening is something of a mirror image of the King's Indian. White, meanwhile, defends on the kingside while expanding on the queenside with c4 and b4, then Rc1 and c5 to pressure the c-file.
A Dutch Defense Trap Every Player Should Know
One trap turns up again and again at club level when White plays an early Bg5. If White retreats carelessly, the bishop can get stranded on the kingside.
After 4...f4? the bishop on g3 is attacked, but White does not need to save it: 5.e3! opens the d1-h5 diagonal, and 5...fxg3?? runs into 6.Qh5#. Worth remembering from both sides: as Black, play 4...Nf6 before any ...f4; as White, keep the e3 and Qh5 idea ready.
Why Play the Dutch Defense?
Three reasons make the Dutch worth a slot in your repertoire. First, you play for a win as Black: the asymmetric structure created by ...f5 gives both sides real chances, so the half-point handshake is far less likely than after 1...d5 or 1...Nf6. Second, you sidestep an enormous body of mainstream theory. Your opponent's deeply prepared Queen's Gambit and Nimzo lines simply never appear on the board. Third, a single repertoire covers many White move orders, since the Leningrad and Stonewall setups can be steered toward regardless of when White plays c4, g3 or Nf3. The natural cost is that ...f5 slightly loosens the kingside, and the resulting double-edged positions punish careless play. If you like initiative over safety, that is a price worth paying.
Dutch Defense Theory: the Three Main Systems (Leningrad, Stonewall, Classical)
When studying Dutch Defense theory, it is more useful to treat the opening as a system with typical setups than as a strict sequence of moves. Black has three main systems to choose from, each defined mostly by its pawn structure.
In the Leningrad Dutch, Black's pawns go to g6 and d6. The Stonewall is marked by the d5-e6-c6 arrangement. The Classical Dutch keeps pawns on e6 and d6 and is sometimes called the fluid center, because Black keeps the option of going either way later: transposing to the Stonewall with ...d5, or breaking with ...e5 toward a Leningrad-style game. All of these can arise through different move orders, and in most cases White replies with some move order of g3, Bg2, c4 and Nc3. Alongside the first two systems, this article also covers a sideline called the Staunton Gambit, defined by 1.d4 f5 2.e4.
Leningrad variation: 6…d6 7.O-O Qe8
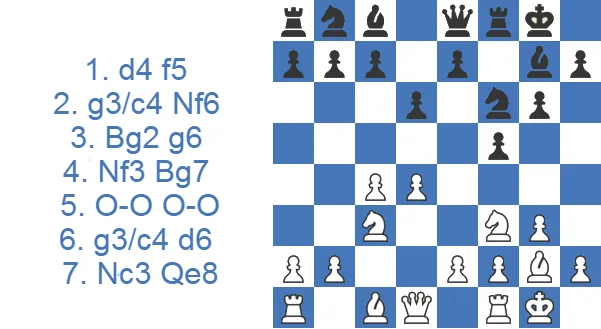
In the Leningrad, both sides usually fianchetto their kingside bishops. The main starting position is 6...d6 7.O-O Qe8, and it can be reached by several move orders:
a) 1.d4 f5 2.g3 Nf6 3.Bg2 g6 4.Nf3 Bg7 5.O-O O-O 6.c4 d6 7.Nc3 Qe8
b) 1.d4 f5 2.c4 Nf6 3.g3 g6 4.Bg2 Bg7 5.Nc3 O-O 6.Nf3 d6 7.O-O Qe8
We'll walk through line a), since 2.g3 is the most common reply against the Dutch. Both sides develop their kingside pieces with a fianchetto: 2...Nf6 3.Bg2 g6 4.Nf3 Bg7 5.O-O O-O. After castling, both sides fight for the center: 6.c4 d6, preparing a later ...e5. 7.Nc3 Qe8 supports that ...e5 push. White typically tries to stop ...e5 with 8.d5, ready to meet ...e5 with an en passant capture. But d5 gives up control of the c5-square, and Black exploits that with 8...Na6, planning ...Nc5 or even ...Nce4. White usually answers 9.Rb1 Bd7 10.b4.
One of White's main ideas is Nd4, increasing control of e6 and opening the diagonal for the light-squared bishop. To prevent it, Black undermines White's central pawn chain with ...c5 or ...c6, and the struggle for the center continues.
Stonewall Variation: 4…d5 5.c4 c6
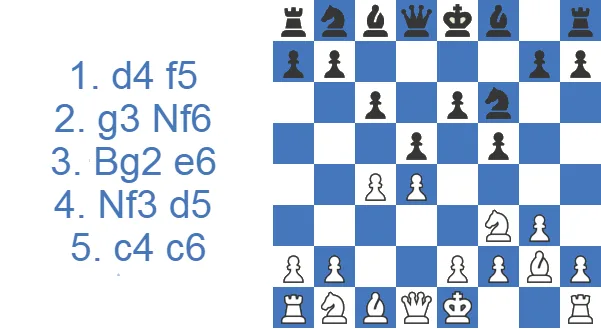
The standard move order into the Stonewall structure is 1.d4 f5 2.g3 Nf6 3.Bg2 e6 4.Nf3 d5 5.c4 c6. As the name suggests, the idea is a wall-like grip on the central light squares, above all e4, which lets Black drop a knight into e4 later. There are two downsides. First, Black takes on real dark-square weaknesses, and White typically tries to swap off Black's dark-squared bishop to remove the one piece that guards that complex: 6.O-O Bd6 7.b3 O-O 8.Ba3, and Black can no longer avoid the exchange of dark-squared bishops.
For that reason, instead of 7...O-O, Black usually plays 7...Qe7 to rule out 8.Ba3, then ...a5 and ...a4 to open the a-file for the rook. The second problem is the bad bishop on c8. It takes several moves to bring it to life, with a typical route of Bd7-Be8-Bh5, though the fianchetto with ...b6 and ...Bb7 is also common. Despite these two structural issues, Black leans on the attack: ...Qe8 and ...Qh5 to support a ...g5 advance, or ...Ne4 to clear the way for a rook lift with Rf6-Rh6.
The Classical Dutch and Ilyin-Zhenevsky Variation
Alongside the Leningrad and Stonewall sits the third great system, the Classical Dutch, reached after 1.d4 f5 2.g3 Nf6 3.Bg2 e6 with Black placing pawns on e6 and d6 and developing the bishop to e7. This is the most flexible Dutch structure. Black keeps the option of switching to a Stonewall with a later ...d5 or releasing the center with ...e5. Within the Classical lies the Ilyin-Zhenevsky Variation, named after the Soviet master who pioneered it, where Black supports a clean ...e5 break with ...Qe8, ...d6 and ...Nbd7. Unlike the Stonewall, there is no fixed pawn wall, so the bad light-squared bishop problem largely disappears. The trade-off: the ...e5 break must be timed precisely, or White's central space simply becomes a long-term plus.
Staunton Gambit: 2.e4 fxe4 3.Nc3 Nf6 4.Bg5
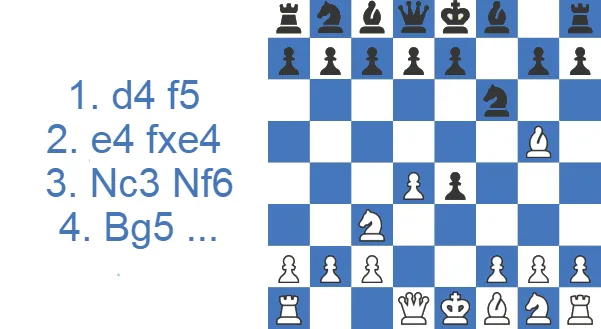
In the Staunton Gambit, White offers a pawn with 2.e4 to exploit the weakness along the e8-h5 diagonal toward Black's king as fast as possible. Black has little choice but to accept: ignoring it with 2...Nf6 3.exf5 simply drops a pawn for nothing, and propping it up with 2...e6 hands White a big edge after 3.exf5 exf5 4.Bd3. So after 2...fxe4, White keeps the pressure on with 3.Nc3 Nf6 4.Bg5, aiming to remove Black's best defender, the f6-knight.
Black would love to play ...d5 to shore up the center quickly, but right now 4...d5? loses to 5.Bxf6 exf6 6.Qh5+ g6 7.Qxd5. So Black prefers 4...Nc6, keeping ...Nxd4 in reserve. A typical continuation runs 5.d5 Ne5 6.Qe2 Nf7 7.Bxf6 exf6 8.Ne4 and ...Qe7. White often castles queenside, while Black aims to trade queens and reach safety.
How to Counter the Dutch Defense: Anti-Dutch Systems for White vs 1…f5
If you face the Dutch as White, you don't have to grant Black a smooth Leningrad or Stonewall. Several anti-Dutch systems strike before Black is fully set up. Here are the most reliable ones.
The Staunton Gambit (2.e4)
The most direct attempt at a refutation. White gives up a pawn to tear open the center and target the weaknesses left by ...f5 with rapid development.
White follows with f3, prising open lines toward Black's king. Black is fine with accurate play, but one careless move can be fatal, which is what makes the Staunton such a good practical try.
Meeting 2.Bg5: The Hopton Attack
The most popular surprise weapon at club level is 1.d4 f5 2.Bg5, the Hopton Attack, a cousin of the Trompowsky. White develops the bishop with tempo, eyes the f6-knight, and often follows with quick h4-h5 expansion. The cleanest equalizer is 2...h6 3.Bh4 g5 4.Bg3 Nf6, when Black grabs space on the kingside and prepares ...d6 and ...e5 in the center. Be careful, though. The greedy 4...f4? walks into the famous trap 5.e3 fxg3 6.Qh5#, so the knight must come to f6 first. Black can also sidestep the whole issue with 2...g6, heading for a Leningrad setup where the fianchettoed bishop neutralizes White's pressure. Either way, 2.Bg5 is annoying but not dangerous once you know the move order.
White launches an early kingside expansion with h4-h5. It is easy to learn and unpleasant to meet over the board.
The Korchnoi Attack (2.h3 and g4)
Named after Viktor Korchnoi, this gambit prepares g4 to blast open the f-file against Black's slightly loosened kingside.
Sharp and surprisingly venomous; Black has to react precisely or come under a strong attack.
The Raphael Variation (2.Nc3)
A flexible move that keeps an e4-break in reserve and can transpose into Staunton ideas.
Practical and easy to handle for White, sidestepping the main theoretical battles entirely.
ECO Codes, Move Orders and Transpositions
The Dutch occupies ECO codes A80 to A99. A80 and A81 cover early and minor lines, A84 and A85 the Classical and Stonewall, and A87 to A99 the various Leningrad setups. Because the opening is a system rather than a forced sequence, move order matters in its own right. Players who fear the Staunton Gambit (2.e4) can simply reach the same structures from 1.Nf3 or 1.c4, sidestepping White's pawn sacrifice. Likewise, 1.d4 e6 followed by ...f5 can transpose while keeping a French Defense in reserve if White avoids 2.c4. The flip side is that flexible move orders work both ways, since White can also transpose into anti-Dutch tries, so it pays to know which structure you are steering toward before you commit to ...f5.
Dutch Defense vs the London System: How Black Meets 2.Bf4
A common practical question: does the London System (1.d4 followed by 2.Bf4) trouble the Dutch? In short, no. Against an early Bf4, Black is happy to play ...d6 and ...Nh5, hitting the bishop and gaining time, or to head for a Leningrad setup where the fianchettoed bishop fights the London's queenside plans.
The Dutch is a genuinely independent answer to the London, not just a transposition. Black keeps the ...e5 break and active piece play firmly in mind.
Grandmaster Games with the Dutch Defense
Who Plays the Dutch at the Top Level?
The Dutch has never been a fashionable main weapon, but strong players reach for it precisely because it dodges preparation. Hikaru Nakamura has used it throughout his career, often in the Leningrad, and Magnus Carlsen has brought it out as Black in offbeat moments to unbalance the game. Ian Nepomniachtchi, Richard Rapport and Alireza Firouzja have all taken it into elite play in recent years. English Grandmaster Simon Williams, known online as the GingerGM, has done more than anyone to popularize the attacking Stonewall and Classical lines for amateurs. The defense carries serious historical weight too. Botvinnik, Bronstein, Reuben Fine and Efim Bogoljubov all trusted it, which is why so many of its key plans were worked out in classic games rather than computer files.
How I Meet the Dutch Defense as White
Here is one of my own games against the Dutch, 1920 for me against 1935. Black played neither the Stonewall nor the Leningrad here, but the ...e6 and ...c6 setup: 1.d4 f5 2.Nf3 e6 3.g3 Nf6 4.Bg2 c6, then 5...Bd6 and 6...Bc7, and the queen came out with 8...Qe8, the move described above. I traded on f6 with 9.Bxf6 Rxf6 and took space with 10.d5.

It did not stay one sided. After 11.Nd4 e5 the engine had me at +2.6, and my 12.Nc2 turned that into -0.6. By move 21 I was down to -3.2. Then 21...Qc8 handed it all back at once, +3.6, and I mated with 53.Qb5#.

So is the Dutch sound? On this evidence the opening was not what decided it. These ...f5 structures stay tense long after the theory stops: the evaluation swung by more than three pawns after my 12.Nc2 and by close to seven after 21...Qc8. If you play the Dutch or meet it, the part worth training is that middlegame, not the first ten moves.
Is the Dutch Defense Good? An Honest Assessment of Its Soundness
Yes, the Dutch Defense is a fully respectable answer to 1.d4 that has been used by World Champions and remains a regular guest in modern grandmaster play. It suits players who want to seize the initiative as Black rather than equalize quietly, and it leads to positions where both sides play for a win.
Whether it fits you depends on your style. Here is the honest balance sheet.
Strengths
- Creates an unbalanced fight from move one
- Clear attacking plans (especially the Leningrad)
- One repertoire covers many White move orders
- Less heavily analyzed than 1 Nf6 or 1 d5
Trade-offs
- f5 slightly weakens Black s kingside
- The e8–h5 diagonal needs watching
- You must know the anti-Dutch lines below
- Sharp early sidelines can punish careless play
Which Dutch Setup Fits Your Rating?
No two Dutch systems suit the same player, and matching the structure to your level is the fastest way to good results. Below roughly 1500, the Leningrad is the natural pick. The plans are intuitive (fianchetto, castle, swing the queen to h5 and storm the kingside) and tactics flow from the attack. Between 1500 and 1800, the Stonewall rewards players who enjoy clear strategic targets: the e4-outpost, the ...Ne4 jump and a slow kingside build-up, in exchange for learning to manage the bad bishop and the dark-square weaknesses. From 1800 upward, the Classical and Ilyin-Zhenevsky systems offer the richest play, since the flexible center and well-timed ...e5 break demand the kind of precise judgment stronger players can exploit. If a beginner asked me where to start, I would point to the Leningrad first, because the attacking plan almost plays itself. Pick the structure that matches how you already like to think.
Common Traps in the Dutch Opening: Two Worth Remembering
1.d4 f5 2.Bg5 h6 3.Bh4 g5 4.Bg3 f4. Black might think the bishop is trapped, but after 5.e3 fxg3 White delivers mate with 6.Qh5#.
1.d4 f5 2.c4 e6 3.Nc3 d5 4.cxd5 exd5 5.Qc2 c6 6.Nf3 Nf6 7.Bg5 Bd6 drops two pawns, on d5 and b7, after 8.Bxf6 Qxf6 9.Nxd5! cxd5 10.Qxc8+.
Case Study: Bluebaum vs. Firouzja, Leningrad Dutch
For an illustrative game of how the Dutch plays out at the top level, here is Matthias Bluebaum against Alireza Firouzja from 2025, a clean Leningrad that runs all the way to a drawn rook ending. It is a good model of the structures and trades you actually have to handle, rather than a one-move trap.
A few things are worth picking out for a club player.
Firouzja sets up a textbook Leningrad: 1...f5 with the early ...g6 fianchetto, ...Bg7 and ...O-O. Note that he reaches it through the 2.c4 move order (2.c4 Nf6 3.Nf3 g6), exactly the kind of transposition the ECO note above describes. White grabs queenside space with b4 and a4, which is White's standard plan in these lines.
The first real decision is 11...Ne4, the move that defines the Dutch. The knight lands on its dream square, and after 12.Nxe4 fxe4 Black has a half-open f-file and a pawn cramping White on e4. This is the ...Ne4 idea you see throughout this article, just in a slightly different dress.
The turning point is the central liquidation around moves 13 to 19. With 13...c5 Black hits the center before White can consolidate, and the trades that follow (14...cxd4, 15...Bxd4, the later ...exd5) dissolve the structure into an open, roughly equal middlegame. The practical point: the Dutch is not only about a kingside storm. When White plays soundly, Black has to be just as comfortable trading into a balanced position and playing good technical chess.
From move 26 the game becomes a tactical scramble (26...Nxg2, the queen trade on b6, the passed a-pawn racing to a7) and finally a rook ending where the a-pawn costs White a rook on move 44 but Black cannot convert the extra material. The half-point on move 56 is a fair result.
The takeaway for your own games: aim for the ...Ne4 setup, but be ready to switch from attack to accurate trading the moment your opponent refuses to cooperate. A Dutch player who can only attack will lose a lot of equal endgames.
Should You Add the Dutch to Your Repertoire?
The Dutch Defense is a dynamic, flexible answer to 1.d4 that lets Black counter a range of White setups. It invites an early central counterattack and creates imbalances on the board, which gives Black the chance to seize the initiative and play for a win in a way other defenses rarely allow. If you enjoy taking on risk and fighting tactical battles, the Dutch is well worth a try.
Test Yourself: Dutch Defense Positions
Make the move on the board. Hint gives you a nudge, Answer shows the move and why it works.
White offers the Staunton Gambit with 2.e4. What is Black's main reply?
Staunton Gambit, 4.Bg5. Black would like to play ...d5, but it drops a pawn. Bring out the knight that is still at home instead.
Black has just played 4...d5, a known mistake. Start the forcing line that wins the d5-pawn.
Black has just played 4...f4, attacking the bishop. Don't retreat it. Which pawn move sets a trap?
Black took the bishop with 5...fxg3. Finish the game in one move.
White prepared the Korchnoi Attack with 2.h3. What is the follow-up?
Against the Leningrad, White played Nd2 instead of Nf3. Which central break was that knight preparing?
Leningrad with 7...Qe8. Black wants ...e5 next. Which rook move gets White ready for the center to open?
Stonewall: Black castled before playing ...Qe7. Which move trades off Black's best minor piece?
Stonewall with 7...Qe7. White's knight has jumped to e5. What does Black play now?