 By
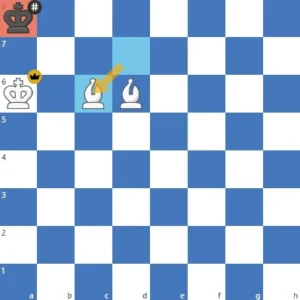
The two-bishop mate, summed up in 30 seconds
Yes, a king and two bishops can force checkmate against a lone king, and it is one of the more reliable basic mates to learn. The two bishops cover both color complexes, your king joins them, and together they herd the enemy king into a corner of the board.
- Two bishops of opposite colors plus your king beat a lone king every time; two bishops of the same color cannot.
- The method has three ideas: build a diagonal wall with the bishops, walk your king up to support them, then shrink the wall step by step toward a corner.
- Unlike the bishop-and-knight mate, the enemy king can be mated in any corner, so the 50-move rule is rarely a worry.
- The one real danger is stalemate in the final corner, so always keep a waiting move in hand before the last check.
The full move-by-move method, the exact king routes, and a board you can play out yourself are all below.
What is the checkmate with two bishops? The basic idea in one sentence
In the two-bishop checkmate, your king and both bishops work together to push the lone enemy king to the edge of the board and eventually checkmated in the board’s corner with one of the bishops.
Can You Checkmate With Two Bishops? Is King and Two Bishops vs King (KBBvK) a Forced Win?
Yes. A king and two bishops of opposite colors can always force checkmate against a lone king, and the win is far easier to execute than the notorious bishop-and-knight mate. Because the two bishops between them control both the light and the dark squares, the defending king is never able to slip through the diagonal net for long.
There is only one situation where it fails: two bishops of the same color. If both of your bishops travel on light squares, or both on dark squares, then half of the board is permanently out of their reach, and a lone king can simply sit on the wrong color forever. This only happens after an under-promotion, so in practice the mate with two bishops is virtually always available to you.
Why master this endgame technique? The bishop pair matters far beyond this mate
You may rarely face this exact position over the board, but the idea behind it, how a bishop pair works together, matters in almost every game. Similar to the knight and bishop checkmate, achieving checkmate with two bishops revolves around the core idea of restricting the opponent’s king. This entails maintaining control over both color complexes on the chessboard. Learning this mate shows the bishop pair at its purest, and the same instincts pay off in the middlegame and opening too.
How the Two Bishops Mate Compares to Other Basic Mates
It helps to see where this endgame sits among the elementary checkmates. The bishop pair is comfortably easier to handle than a bishop and knight, and unlike two knights it is a genuine forced win.
| Material vs a lone king | Forced mate? | Difficulty | Corner needed |
|---|---|---|---|
| Queen + king | Yes | Very easy | Any |
| Rook + king | Yes | Easy | Any |
| Two bishops + king | Yes | Moderate | Any corner |
| Bishop + knight + king | Yes | Hard | Only the corner matching the bishop’s color |
| Two knights + king | No (cannot be forced) | — | — |
The key takeaway is that with two bishops you may drive the enemy king to whichever corner is nearest, which keeps the whole job comfortably inside the 50-move limit.
The bishop wall: the one mental model that makes this click
The fastest way to stop memorizing moves and start understanding them is to picture your bishops as a wall. Two bishops on adjacent diagonals form an unbroken barrier the lone king cannot cross, because between them they cover both color complexes. Keep the bishops next to each other and the wall holds. Let them drift even one square apart and the king slips straight through the gap. Every step of the technique is the same action repeated. Nudge the wall one rank closer to the edge, bring your king up to plug any hole, and the enemy king’s escape squares shrink with each move. Once you frame the ending as build the wall, keep the bishops adjacent, shrink the wall, the four steps below stop reading like a recipe.
A famous near-miss: why the wrong corner never bites you here
The two-bishop mate is easiest to appreciate by looking at the ending it is not. In 2007 a young Magnus Carlsen failed to convert a bishop and knight against a lone king and let the win slip to a draw. That mate only works in the corner matching the bishop’s color and demands a long, exact king-and-knight maneuver, so even an elite player can run aground. The two-bishop version removes that landmine. There is no color-of-corner constraint, which means you can herd the king to whichever corner you like, and nobody can steer you into the one corner where mate is impossible. That single difference is why KBBvK counts as a routine technical win while bishop and knight gets a reputation for going wrong. The one trap that survives is the reflex stalemate. So before every move in the final corner, run the same check: does the king still have a legal square?
Delivering checkmate with two bishops: step-by-step technique (building and shrinking the bishop wall in four steps)
The 50-move rule, which comes into play in scenarios like Bishop+Knight or Queen vs. Rook, is not a concern when dealing with checkmate using a bishop pair. This is primarily because achieving checkmate with two bishops typically unfolds at a much quicker pace.
The key strategy behind executing the checkmate pattern with two bishops revolves around securing critical diagonals on the chessboard to construct a web of mate-threats. By positioning the bishops in adjacent squares, we form a V-shaped wall that boxes the enemy king in. With each move we shrink the mating net a little further.
Diagram 1 (D1)
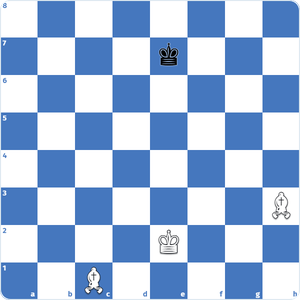
We will start with the position above (D1).
Step #1: Occupying the central squares with bishops
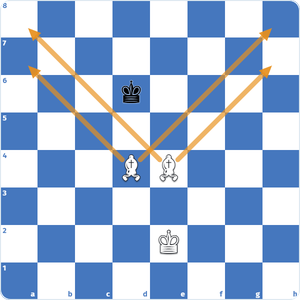
Diagram 2 (D2)
Our first task is to occupy the central squares, such as d4 and e4, with the bishops so that we reach the position in diagram 2 (D2) from our starting position (D1). The standard method is to bring the bishops to the long-diagonals first and then bring them to the central squares. 1.Bg2 Kd6 2.Bb2 and we now cover the long-diagonals. 2…Ke6 3.Be4, we don’t let the enemy king go to f5, 3…Kd6 4.Bd4 (D2) and now the mission is complete for our first step.
Step #2: Get your King to the central squares to support bishops
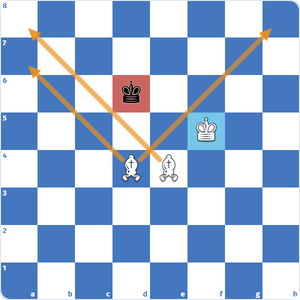
Diagram 3 (D3)
Our second step is probably the most straightforward. All we need to do is let our king join the party to support the powerful bishop duo. In this case, we want to transfer our king from e2 to f5: 4…Ke6 5.Kf3 Kd6 6.Kf4 Ke6 7.Kg5 Kd6 8.Kf5 (D3)
Step #3: Transfer your bishops to c5-d5 squares and King to e6
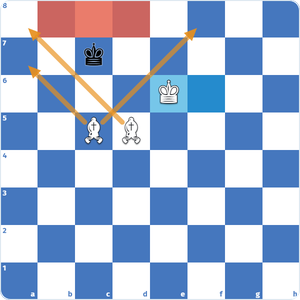
(Diagram 4) D4
Next we squeeze the enemy king into an even tighter box. We achieve this by advancing our bishops one square closer to the edge of the board, which would mean, placing the bishop pair on the c5 and d5 squares respectively in our case. So, 8…Kd7 9.Bc5 Ke8 10.Bd5 and now we need to get our king closer to the bishops. The optimal destination is the e6 square, which can be reached in just two moves: 10…Kd7 followed by 11.Kf6 Kc7 and 12.Ke6 (D4), successfully attaining our objective (D4). At this point, the black king is left with only four legitimate squares to maneuver.
Step #4: Trap Black’s King in the board’s corner and checkmate
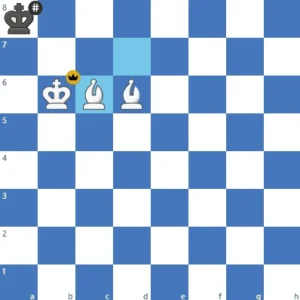
(Diagram 5) D5
The final phase has two parts: first drive the king into the corner, then cut it down to just two squares for back-and-forth movement. Just as in the previous step, we need to move the bishop pair one square further, b6 and c6, to achieve this net: 13…Kd8 (13…Kc8 14.Bb6 Kb8 15.Bc6) 14.Bb6+ Kc8 (14…Ke8 does not help either, 15.Bc6+ Kf8 16.Kf6 Kg8 17.Kg6 Kf8 18.Bc5+ Kg8 19.Bd5+ Kh8 20.Bd4# checkmate) 15.Bc6 Kb8 and now we need the help of our king, which we would want to be placed on a6 ideally: 16.Kd5 Kc8 17.Kc5 Kb8 18.Kb5 Kc8 19.Ka6 Kb8. Now we need to control c8 square and let the enemy king shuffle between a8 and b8: 20.Bd7 Ka8. From here it is a simple three-move finish with two checks. It’s crucial to withdraw the other bishop, positioning it back on the a7-g1 diagonal, thus delivering a check from a distant location. However, it’s essential to exercise caution to avoid accidentally stalemating the opponent, like the erroneous 21.Bc7??. 21.Bc5 Kb8 22.Bd6+ Ka8 23.Bc6# (D5) checkmate.
Common mistakes when checkmating with two bishops
The technique itself is reliable, but three errors turn a winning position into a frustrating one. Knowing them in advance is what separates a clean mate from a slow, nervous one.
Stalemating the king in the corner
This is by far the most common blunder. When the enemy king is shuffling between its last two squares, it is tempting to slam the bishop down and remove its final escape. If that move does not also give check, you have stalemated the opponent and thrown away the full point. Always confirm the king still has a legal reply, or that your move is checkmate, before you play it. The safe habit is to deliver the last blow as a check from a bishop on a distant diagonal, never by quietly taking the final square.
Letting the king escape back to the center
If your bishops drift apart, even by a single square, the king slips through the gap and you start over. Keep the pair on adjacent diagonals so they guard each other and form an unbroken wall, and only advance one bishop once the other is ready to support it.
Pushing the king toward the wrong corner
With two bishops you can mate in any corner, but the cleanest finish comes when your king and bishops are coordinated on the side you are driving toward. Decide on a corner early and herd the king there, rather than chasing it back and forth across the board.
Practice the checkmate with two bishops on a board with a friend
The best way to get good at this mate is to practice it regularly with a friend or against a computer opponent. Vary the initial positions of the pieces each time to challenge your adaptability and broaden your mastery of this strategic skill.
How to practice the two bishops checkmate effectively
Reading the moves once is not enough. The reason this ending feels hard at the board is that the enemy king almost never cooperates the way a diagram does, so you have to recognize the pattern rather than memorize a single line. The fastest way to internalize it is to set up the position and force the mate from many different starting squares.
- Against the engine: drop your king and both bishops onto random squares with a lone enemy king and play it out. Try to mate inside the 50-move rule every time; with two bishops you should finish far quicker.
- Against a friend: let them defend as stubbornly as possible. A good defender runs toward the center and toward the wrong-colored corner, which teaches you how to steer the king where you want it.
- From the danger zone: set up the final corner position and practice the last few moves on their own. This is where almost every botched two bishops checkmate goes wrong, so it deserves the most repetition.
Use the replayable game below to drill the full technique, then reset and try to reproduce it from memory against a defending king.
Test your skills: drill the final corner
Reading a line once is not the same as owning it, so turn the method into a practice drill. Set up the danger zone yourself. Lone king on a8, your king on a6, bishops on b6 and d7, then find the clean mate without stalemating. The forced finish runs Bc5 Kb8, Bd6+ Ka8, Bc6#. Work out for yourself why the quiet Bc7 instead would hand back the full point, because that is the mistake the drill is built to catch. Once that pattern is automatic, scatter your king and both bishops onto random squares against a bare king and force the mate from scratch, finishing well inside the 50-move count. In my own blitz games the corner is where I have watched winning positions slip, so it is the repetition I would tell anyone to run first.
How to Defend Against Two Bishops and a King (Surviving as the Lone King)
Sooner or later you will be on the other side of this endgame, down to a lone king against the bishop pair. You cannot save the game against accurate play, but you can make your opponent earn it, and weaker opponents miss the technique more often than you might think.
- Stay in the center as long as possible. Every move you spend in the middle of the board is a move your opponent must spend driving you out. The edge, and then the corner, is where you lose.
- Walk away from the bishops, not into them. Head for open space rather than toward the diagonal wall, and make your opponent rebuild the net from the other side.
- Play for stalemate. In the final corner, occupy the square that invites a careless quiet move. Many players stalemate the lone king purely by reflex.
- Count to fifty. If no capture or pawn move occurs in fifty moves you can claim a draw, so a disorganized opponent who wanders may simply run out of time on the rule.