
 By

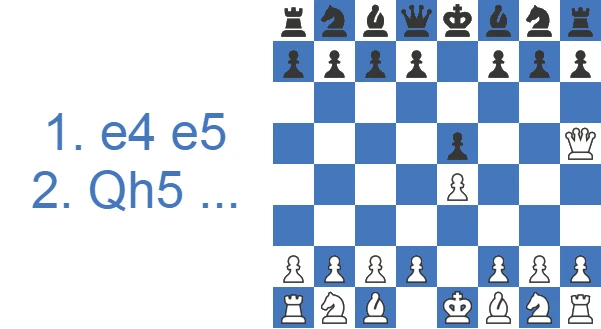
What makes the opening odd is white yanking the queen out on move two, against everything you're taught about development. That is why you rarely see it among strong players. Despite the dubious reputation, it still turns heads now and then: Magnus Carlsen wheeled it out in a World Rapid Championship game in 2018, where the gamble backfired and he lost. Hikaru Nakamura is another strong player who has tried it for fun.
How to Beat the Wayward Queen Attack (Quick Answer)
- Don't panic. After 1.e4 e5 2.Qh5, defend the e5 pawn with 2…Nc6 (or 2…d6). White will try 3.Bc4 aiming at f7, but 3…g6 hits the queen and forces it back.
- The one move never to play while the queen sits on h5 is …Nf6 too early. That walks straight into 4.Qxf7# (Scholar's Mate).
- Survive those two moves and black is simply better. White has spent the whole opening shuffling the queen around while you develop.
- Below is the full theory, a short video, the traps for both sides, and the sharp lines if you want to punish 2.Qh5 rather than just neutralize it.
Study the Wayward Queen Attack as White or Black
Few openings split beginners from club players like the Wayward Queen Attack, which White plays for one early trap and Black defuses with plain developing moves.
The White Side of the Wayward Queen Attack
With 2.Qh5 White targets e5 and f7 at the same time, and at lower ratings the Wayward Queen Attack ends games on the spot. Watch the model game below to see the trap land, then check how the opening's results fade as opposition improves, so you know when to keep it and when to retire it.
Shut Down the Wayward Queen Attack
Learning how to face the Wayward Queen Attack takes one sitting; the defense section below shows the setup that blunts the early queen and leaves her retreating with nothing. Sharper players can look at the countergambit that offers a pawn for development, and the case study walks through a full Wayward Queen Attack counter where Black converts the wasted tempi.
The refutation in three moves: 2...Nc6, 3...g6, then ...Nf6
The whole defense is a fixed order, and following it in sequence is what keeps you safe. First, defend e5 with 2...Nc6. It holds the attacked pawn, develops a piece, and keeps the annoying ...Nd4 jump in reserve. Second, when White adds the bishop with 3.Bc4 to set up the f7 mate, answer 3...g6. This blocks the mate and kicks the queen in one move, gaining a tempo. Third, once the queen has scurried to f3 or e2, play ...Nf6, hitting the queen again and developing as you go.
The order matters. Defend the pawn, then chase the queen, then develop. Skip a step (for instance 3...Nf6?? before the queen has moved) and you walk into 4.Qxf7#. Get it right and you are not merely safe. You are better, because White has shuffled the queen around while you have built a real position.
How Often It's Played and Who Wins
Black scores better than white overall, which is unusual for a line where white moves first. The catch is that these averages hide a huge swing by rating. At the beginner level the Wayward Queen Attack is everywhere and scores well, because the Scholar's Mate trap actually lands and many players simply don't know the refutation. As soon as you climb past casual-club level it almost disappears from practice, because once 3…g6 is common knowledge white is just worse.
Even though White commits the queen on move two, the Wayward Queen Attack actually scores a touch better for White at club level, reaching the low 50s in most bands while Black settles into the mid-40s. The early Qh5 forces sharp, decisive play, so draws stay rare at four to five percent. Here is the band-by-band breakdown.
| Rating level (Lichess) | White wins | Draw | Black wins |
|---|---|---|---|
| 800, beginner | 51.4% | 4.5% | 44.1% |
| 1000, novice | 50.3% | 4.2% | 45.6% |
| 1200, improver | 49.7% | 4.1% | 46.2% |
| 1600, club | 50.0% | 4.4% | 45.6% |
| 1800, club | 51.2% | 4.8% | 44.0% |
| 2000, advanced club | 52.2% | 5.1% | 42.7% |
Source: Lichess opening explorer, blitz, rapid and classical games at the position after 1.e4 e5 2.Qh5. Figures are win rates by Lichess rating band; draws are rare at these levels.
How the Wayward Queen Attack changes as you improve
This opening lives and dies by your opponent's rating, which is why the overall scores are so misleading. Below roughly 1200, 2.Qh5 genuinely works: the Scholar's Mate trap lands constantly, many players have never seen the refutation, and White scores well off 4.Qxf7# alone. In the 1200 to 1400 range it starts to wobble. Most opponents now know to defend f7, so the cheap mate dries up and the game becomes a coin flip decided by who knows the follow-up.
From club level upward (1500+), the line all but vanishes from serious play. 3...g6 is common knowledge, Black equalizes by move five and often gets the better game, and White is simply down tempi for nothing. I run into 2.Qh5 constantly below 1400 and almost never above it, which tells you most of what you need to know. Treat it as a trick that expires the moment your opponent learns one defensive idea.
Watch the Wayward Queen Attack in Action
There's a short video walkthrough on our YouTube channel if you'd rather watch the lines than read them.
The video covers the basics; the deeper lines and hidden resources are below.
Key Ideas of the Wayward Queen Attack: Why Anyone Plays 2.Qh5 (and Why It Stops Working)
The central idea is to launch a fast attack that can rattle inexperienced players into tactical mistakes. White usually drops the light-squared bishop on c4, and together with the queen the two pieces lean on the weakest point in black's camp, the f7 pawn.
White's threats are real for a move or two and no longer. Once black repels the early attack, a comfortable position follows without much effort. The one genuine upside of the Danvers Opening is that it drags opponents out of their book and steers the game toward a middlegame where white can just play "simple chess". That is arguably the biggest thing the opening has going for it.
How to Defend Against the Wayward Queen Attack: Neutralizing the Early Qh5
If your opponent has just played 2.Qh5 over the board and you need the short version, here it is. The whole defense rests on three rules.
1. Defend e5 first. The queen on h5 attacks the e5 pawn, so your second move has to hold e5. Both 2…Nc6 and 2…d6 do the job; 2…Nc6 is the most natural because it develops a piece and prepares …Nd4 ideas.
2. Meet 3.Bc4 with 3…g6. Once white adds the bishop to the attack on f7, 3…g6 blocks the mate and kicks the queen at the same time. After 4.Qf3 Nf6 the threat is gone for good and white's queen has nowhere useful to be.
3. Never play …Nf6 while the queen is on h5. This is the only way to lose quickly. 2…Nc6 3.Bc4 Nf6?? runs into 4.Qxf7#. Wait until you have played …g6 and chased the queen away, then …Nf6 is excellent.
Follow those three rules and you are not just safe, you are better. White has moved the queen two or three times and developed almost nothing, while you have a knight out, a fianchettoed bishop coming to g7, and an easy plan of …d5 to take the center. If you want to actively punish the line rather than equalize quietly, head to the traps and Kiddie Countergambit sections below.
Where White's queen runs to: Qf3, Qe2 and Qe3 retreats
After 3...g6 the queen has to move, and none of its homes are good. The most common retreat is 4.Qf3, which keeps an eye on f7 but blocks the natural g1-knight, and the threat evaporates the instant Black plays 4...Nf6. From d6 setups White sometimes prefers 4.Qd1, simply admitting the queen sortie achieved nothing and reverting to a normal Italian-style game with equal chances. Qe2 is the other retreat you will meet, again parking the queen in front of the f1-bishop.
Wherever it lands, the theme is the same. Black keeps gaining time by developing toward the queen with ...Nf6, ...Bg7, and ...d6-d5, while White untangles. That is the core problem with 2.Qh5. Every queen move hands Black another tempo, and those tempi pile up into a lasting initiative.
Wayward Queen Attack Theory: the Main Lines Move by Move
The e5 pawn is under attack after 2.Qh5, and both 2…Nc6 and 2…d6 are equally good ways to hold it. In both cases white continues with 3.Bc4, threatening mate on f7. Once black parries the initial threat, black is usually slightly better and develops naturally. By comparison, 2…Qe7 is an inferior choice, mainly because the queen on e7 gets in the way of the dark-squared bishop. On the plus side, 2…Qe7 defends f7 and e5 at once, so 3.Bc4 no longer makes much sense and white usually prefers 3.Nc3.
2…Nc6
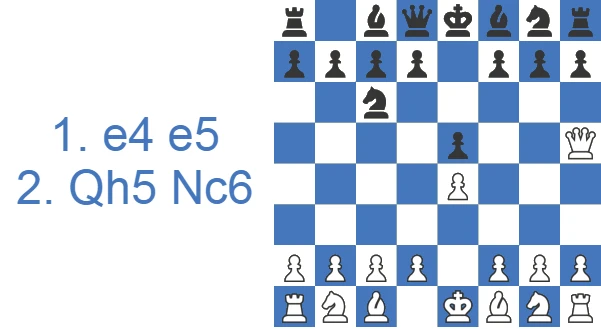
The best way to deal with the attack on e5 is 2…Nc6. It is a useful developing move and it sets up …Nd4 ideas for later. After 3.Bc4 black must of course avoid the blunder 3…Nf6??, which allows the Scholar's Mate motif 4.Qxf7#.
3…g6 is the move, forcing the queen to retreat. After 4.Qf3 white keeps eyeing f7, but the threat is easily dealt with by 4…Nf6. If white insists with 5.Qb3?? white runs into trouble for the reasons given in the traps section below. So white should change plans and develop instead.
5.Ne2
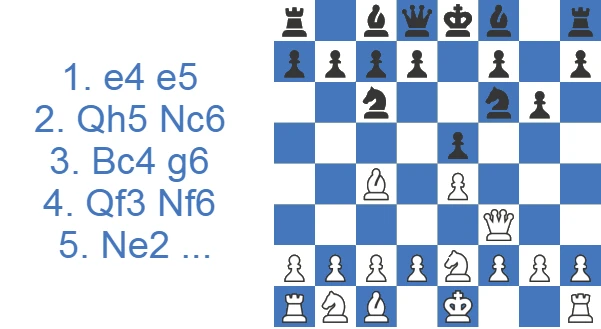
With the queen sitting on f3, the knight has nowhere to go but e2: 5.Ne2. Since black has already played …g6, the consistent plan is to fianchetto with 5…Bg7. A natural continuation runs 6.d3 d6, eyeing …Bg4, 7.h3 Nb4, hitting c2, 8.Bb3 Be6, challenging the defender of c2, 9.Na3 and after 9…d5! black strikes in the center and stands slightly better thanks to white's passive, disjointed pieces.
5.c3
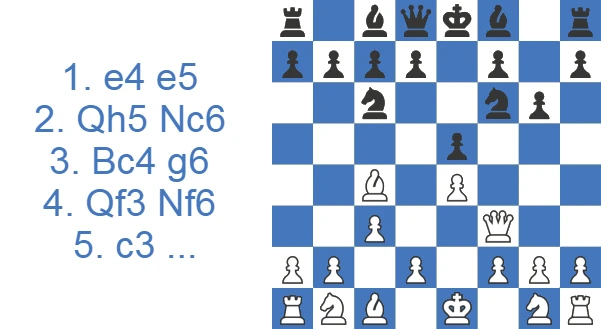
5.c3 is weaker than 5.Ne2. The queen is not on d1 supporting a d4 break, so the move's only point is to stop …Nd4. Against natural play white struggles for activity. After 5…Bg7 6.d3, the move 6…Na5 gives white a real headache. If 7.Bb3, black simply takes with 7…Nxb3 8.axb3 and then breaks with 8…d5.
If white avoids the trade with 7.Bb5, black gets the central break anyway: 7…c6 8.Ba4 d5! 9.exd5 b5 10.Bc2 cxd5, with a clear plus for black thanks to the space and strong center.
Since white has no good answer to the …Na5 and …d5 plan, 5.c3 is not recommended.
2…d6
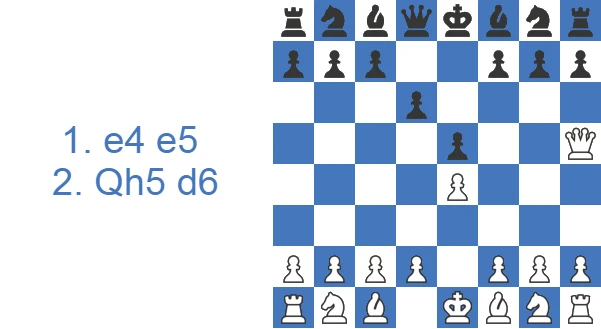
2…d6 may look like it shuts in black's dark-squared bishop, but the bishop is heading to g7 via …g6 anyway, so this is no problem. Again, after 3.Bc4 g6 4.Qf3 Nf6 white fails to pose any real question in the opening. The queen on f3 is misplaced, and this sample line shows why: 5.Nc3 Bg7 6.Nge2 0-0 7.0-0 c6, preparing the …d6-d5 break, 8.h3 (otherwise 8.a4 d5 9.exd5 Bg4! 10.Qg3 Bxe2 11.Nxe2 cxd5 12.Bb3 Nc6 and black stands much better thanks to the strong center) 8…b5 9.Bb3 a5, threatening …a4, 10.a3 and black just keeps squeezing white's position with 10…Nbd7 11.d3 Nc5.
So it may be better for white to retreat all the way to d1 after 3…g6, for instance: 4.Qd1 Nf6 5.d3 c6 6.Nf3 Bg7 7.0-0 0-0 8.Re1, with equal chances for both sides.
2…Qe7
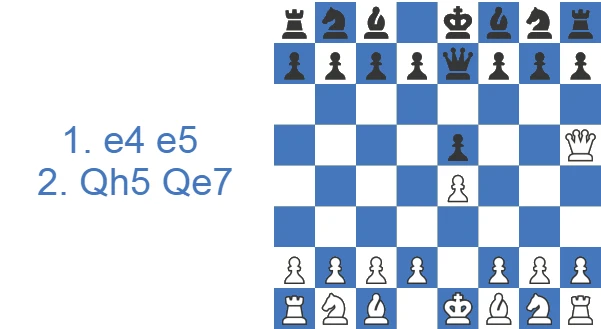
2…Qe7 is a slight inaccuracy because the queen blocks the king's bishop. On the upside it defends f7 in advance, so 3.Bc4 no longer comes with tempo. The idea is to retreat the queen to e2 if she gets chased. For example: 3…Nf6 4.Qe2 d6 5.Nf3 g6 6.Nc3 Bg7 7.d4 exd4 8.Nxd4 with an equal game.
White can also try 3.Nc3, intending Nd5, and black should stop it with 3…Nf6 4.Qd1 g6 5.d4 exd4 6.Qxd4, centralising the queen, 6…Nc6 7.Qa4, and the queen has wandered to the far side of the board. The position stays roughly balanced and playable for both sides.
2…Nf6: The Kiddie Countergambit
For players who want to fight fire with fire, there is 2…Nf6, the Kiddie Countergambit. Instead of defending e5, black ignores it and develops with gain of tempo. After 3.Qxe5+ black blocks the check and keeps developing with 3…Be7, intending …Nc6, …0-0 and …d5 with a clear lead in development for the pawn. A sample line is 4.Qf4 Nc6 5.Nf3 d5, and black already has open lines and faster pieces while white is a tempo behind with the queen still wandering.
To be clear, this is not objectively the best try: 2…Nc6 keeps the pawn and an edge with no risk. The Kiddie Countergambit is a practical surprise weapon. Against an opponent who greedily grabbed the pawn and expected an easy game, the initiative is often worth far more than the material. If you prefer a clean, risk-free edge, stick with 2…Nc6.
Common Wayward Queen Attack Traps
1.e4 e5 2.Qh5 g6?? is a panic move, a premature attempt to cover f7. It hands white a free pawn with 3.Qxe5 and then a whole rook after 3…Qe7 4.Qxh8. Black may try to keep the queen trapped in the corner with 4…Nf6, but within a few moves white frees the queen and cashes in. A sample line: 5.d3 d6 6.Bg5 Nbd7 7.Nc3 c6, with Nd5 in mind, 8.Be2 b5 9.Bg4, using the pin on the f6-knight. Next white captures on d7 and then on f6 to win still more material.
1.e4 e5 2.Qh5 Nc6 3.Bc4 g6 4.Qf3 Nf6 5.Qb3? tries to build a queen-and-bishop battery against f7, but it backfires on black's resourceful 5…Nd4! Black offers the f7 pawn, but it is poisoned and grabbing it costs white material: 6.Bxf7+ (6.Qd3, defending e4 and c2 together, does not help either, because 6…d5! 7.exd5 Bf5 and there is no way to hold c2) 6…Ke7 7.Qc4 b5 and the queen is overloaded defending c2 and f7 at once. The queen must run, and black wins a piece with …Kxf7.
Carlsen's 2018 game: what actually happened
The most famous outing of 2.Qh5 came at the 2018 World Rapid Championship, where Magnus Carlsen, the reigning world champion, tried it against Ernesto Inarkiev as a half-troll surprise. It did not work. Inarkiev defended soundly, refused to cooperate with any cheap tricks, and Carlsen went on to lose the game.
That result tells you what the move is worth. If 2.Qh5 cannot get an advantage in the hands of the strongest player on the planet, it is not getting one against a prepared opponent at any level. Carlsen knew that going in; the point was to surprise, not to claim an edge. So when you meet it, do not be rattled by the audacity of the move. Reply with the calm move order above and let white's early queen become a liability.
When 2.Qh5 Is Worth a Shot, and When It Just Loses Time
PROS
- potential tactical traps that could catch inexperienced players off guard.
- leads to original middlegame positions without the burden of exhaustive theory, enabling players to think on their own and engage in a straightforward game.
CONS
- In the opening, white wastes time with one-move threats that can be dealt with easily.
- By bringing the queen out early, Black gains the opportunity to develop with tempo, potentially forcing White into a passive position with a spatial disadvantage, as seen in the mainline with 5.Ne2.
What White should play instead
If you have the white pieces and want a real opening against 1...e5, the bishop you were itching to throw at f7 belongs in a sounder setup. The Italian Game (3.Bc4 reached via 2.Nf3 Nc6 3.Bc4) targets f7 the same way, but with a developed knight and no exposed queen. The Bishop's Opening (2.Bc4) keeps things flexible and can transpose into the same structures. For a more open, attacking game, the Scotch (2.Nf3 Nc6 3.d4) strikes in the center at once and gives white a genuine pull.
All three respect the principle the Wayward Queen Attack ignores. Develop pieces before the queen, fight for the center, and keep your queen off the firing line until it can do real work.
Case Study: Black Squeezes the d6 Setup
The clearest illustration of why 2.Qh5 fails comes from a full 2…d6 line. White never gets a threat going, and black slowly converts the extra tempi into a bind.
Look at what black actually does here, because the plan repeats in almost every Wayward Queen game. After 2…d6 holds e5 and 3…g6 kicks the bishop's target away, 4.Qf3 already concedes the point: the queen blocks the g1-knight, which is why white has to develop it the long way round with 6.Nge2. That awkward knight is the seed of all of white's later problems.
Black just develops sensibly: 5…Bg7, 6…0-0, and 7…c6 to prepare the …d5 break. The key practical lesson is in the bracketed line. If white tries 8.a4 to challenge the queenside, 8…d5! 9.exd5 Bg4! is the point. The pin on the e2-knight wins material flow after 10.Qg3 Bxe2 11.Nxe2 cxd5, and black has the big center he wanted all along. That little …Bg4 pin, available only because white's knight is stuck on e2, is the turning point of the whole structure.
In the main line white avoids that with 8.h3, but the squeeze just continues: 8…b5 9.Bb3 a5 threatens to trap the bishop with …a4, and after 10.a3 Nbd7 11.d3 Nc5 black has a knight heading for the strong b3 or e6 square, a space edge on both wings, and no weaknesses. White, meanwhile, is still untangling.
The takeaway for a club player: you do not need a forcing refutation against 2.Qh5. Hold e5, kick the queen, castle, and play …c6 and …d5. The extra time white burned on the queen turns into a lasting space advantage if you just keep making natural improving moves.
Test Yourself: Wayward Queen Attack Positions
Set up each position and find the best move. Use Hint for a nudge or Answer to reveal the engine’s top move.
Find the best move.
Find the best move.
Find the best move.
Find the best move.
Find the best move.