
 By
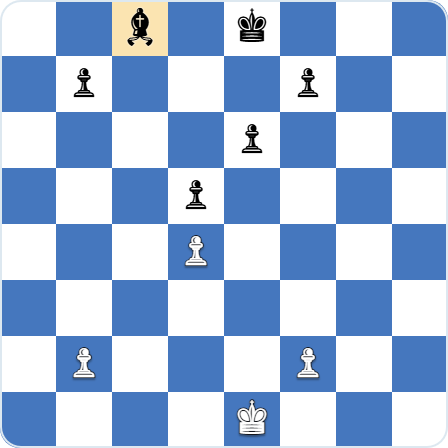
A bad bishop is one your own pawns have locked in. They sit on squares of the bishop’s own color, so it ends up defending more than it attacks, although that defensive work can still matter. Chess players even nickname it a “tall pawn,” because a bishop hemmed in by its own fixed pawns often does little more than a pawn would on the same square. The trap most club players fall into is rushing to swap that bishop off the moment it looks ugly. This guide takes the opposite, more patient view. We trace one game, Alekhine’s 1925 win over Yates, where the bad bishop was kept on the board on purpose, and we give you a single decision rule for trades that you can actually use at the board rather than just admire on a diagram.
Bad bishop in 30 seconds
- A bad bishop is a bishop boxed in by pawns on its own color, so it controls few squares and struggles to attack or defend.
- You can deal with your own bad bishop by trading it off, freeing it with a pawn break, or rerouting it outside the pawn chain.
- You exploit your opponent’s bad bishop by keeping it stuck and steering the game toward a knight versus bad bishop endgame.
What is a Bad Bishop in chess?
Bishops are long-range pieces that thrive in open positions. When the position is semi-closed or closed, bishops may suffer from passivity as they cannot move around freely or exert pressure on critical diagonals. This scenario could occur, for example, when a bishop is hemmed in by its own pawns and therefore has limited mobility and control over the square. Such bishops, lacking mobility due to certain characteristics of a pawn structure, are referred to as bad bishops in chess terminology. The term underlines a bishop’s inability to unleash its full potential.
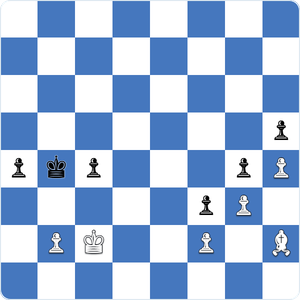
In the position above, white’s bishop can be called a bad bishop as it can never break free out of the pawn chain on the kingside. Despite the material count being in favor of the white, the endgame is lost for White, as black’s pawn majority on the queenside will be decisive. For this reason a badly placed bishop is sometimes called a “tall pawn”, since it does little more than a pawn would on the same square.
Good Bishop vs Bad Bishop
The quickest way to understand a bad bishop is to put it next to its counterpart. A good bishop sits outside its own pawn chain, sees long open diagonals, and can switch between attacking and defending without losing time. A bad bishop is the opposite, with its own pawns sitting on the same color squares and blocking the very diagonals it needs.
The difference is rarely about the bishop alone. It is decided by the pawn structure around it, and the same bishop can be good in one formation and bad in another. This is why experienced players watch where their pawns are heading long before they worry about the bishop itself. There is an old piece of chess wisdom that a bad bishop often defends good pawns, so trading it away is not always the right call.
As a practical rule of thumb, your bad bishop is usually the same color as your opponent’s good bishop. Spotting that match early tells you which trade to aim for and which one to avoid.
When a bad bishop is actually good
A bad bishop is not automatically a losing piece, and treating it as pure liability oversimplifies the position. There is an old saying worth taking seriously: a bad bishop often defends good pawns, so trading it away can do your opponent a favor. Tucked behind its own pawn chain, the bishop frequently shields weak-color squares and holds the structure together. A passive defender that keeps the position solid can be worth more than an active piece that loosens it. The clearest case is the opposite-colored bishops endgame. Here a materially worse or visually dominated bishop holds a draw it has no business holding, because the stronger side simply cannot attack the squares the defending bishop covers. Before swapping a bad bishop, ask what it is actually defending. Sometimes you keep it and improve everything around it instead.
What are the weaknesses of a Bad Bishop: less mobility, fewer targets
A bad bishop suffers from two major drawbacks: restricted mobility and the loss of attacking or targeting potential. This situation decreases the value and usefulness of a bishop. So, in the event that the position gets simplified after a series of exchanges, there is a possibility that the remaining piece will be superior to the bad bishop and therefore dominate, eventually playing a decisive role.
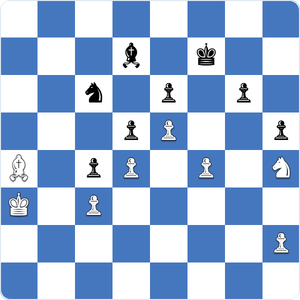
In the position above, white can capture on c6, simplifying the position into a bad bishop vs. a good knight scenario: 1.Bxc6 Bxc6
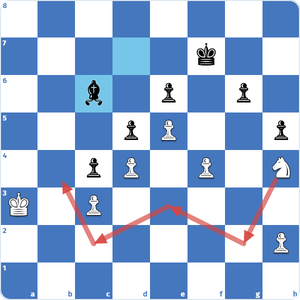
All there is left for white to do is penetrate with the king into the enemy camp and reroute the knight to target the roots of black’s pawn chains (e6 and g6).
Bad bishop versus good knight: the trade that really hurts
Comparing a bad bishop to a good bishop is only half the picture. The matchup that decides games is the good knight against the bad bishop. A knight attacks squares of both colors, so it can probe the holes a bishop locked to one color complex can never cover. Once pawns are fixed on the bishop’s own squares, those weak-color squares become permanent knight outposts. That is why a knight often beats a bad bishop in closed and semi-closed structures. The bishop is tied to defending the pawns it sits behind while the knight roams. Before trading a passive bishop for a knight, check what the bishop is defending and how strong that knight is. The exchange can remove the opponent’s best piece, but it can also leave your pawns or key squares unprotected.
Identifying a Bad Bishop in Your Game: the three kinds
To prevent acquiring a bad bishop or capitalize on an opponent’s bad bishop, recognizing its presence is crucial. Bad bishops can manifest in various forms, but they are generally categorized into three main types. The first type is easily recognizable during a game when the bishop and the allied pawns occupy the same color, constraining the bishop’s mobility within those pawns.
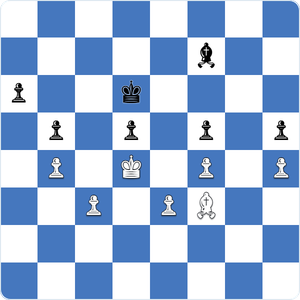
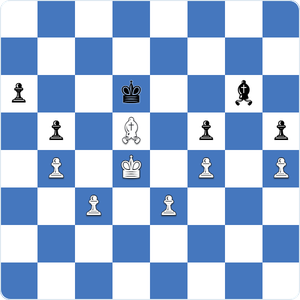
The position above is a study composed by Averbakh and it shows a good bishop against a bad bishop. The material is equal; however, Black’s bishop on f7 sits on the same color as its own pawns and the opposite color from White’s. This means the bishop can never attack white’s pawns and is forced to take on defensive responsibilities. On the other hand, white’s bishop is a perfect example of a good bishop that can target any of the enemy pawns. With white to move here, black cannot avoid being put into the zugzwang situation and losing one of the pawns. A sample technique for white would be: 1.Bd1 Be8 2.Bc2 Bd7 3.Bb1 Bc8 4.Bc2 Be6 5.Bd1 Bf7 6.Bf3 Bg6 7.Bxd5 and white won a pawn.
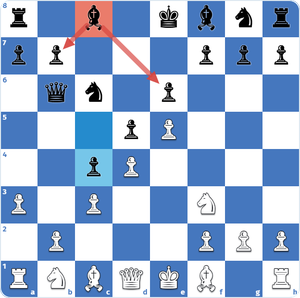
Sometimes a bad bishop is the main problem piece of a certain opening. For example, French Defense is a solid opening with its own advantages. However, due to the particular pawn structure of the French Defense with ..e6 and …d5, the light bishop on c8 typically becomes a bad bishop. One of the main objectives of the opening for black is to resolve the situation with the bishop. For example after 1.e4 e6 2.d4 d5 3.e5 c5 4.Nf3 Nc6 5.c3 Qb6 6.a3 c4, we can see that black has a space advantage on the queenside, however, at the cost of a bad bishop on c8.
The second type of bad bishop refers to a situation when the bishop’s mobility is restricted by the enemy pawns instead of its own pawns.
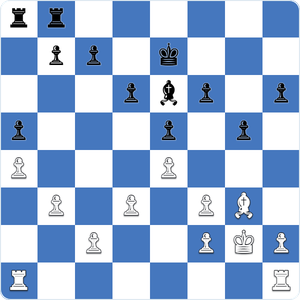
White’s bishop on g3 in the diagram above is stuck in the kingside and cannot get an active role in the game any time soon without sacrificing material. This allows black to create play on the queenside freely. Whereas, black’s bishop is perfectly placed on the opposite color of its own pawns and is ready to target white’s pawns on the light squares. When a bishop, like white’s dark-square bishop in the example, is encountered by a solid pawn chain like this, the bishop is said to be “running into a wall”.
The third and last type of bad bishop is when the bishop appears to be active and therefore gives the illusion of control but actually lacks any critical target.
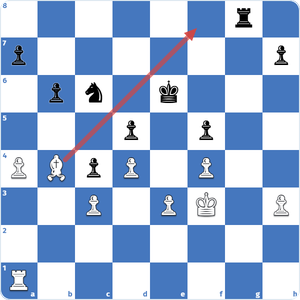
White’s bishop on b4 in the example above seems to be covering the a3-f8 diagonal; however, due to the lack of support by other pieces, in this case the rook, the bishop does not play a decisive role in the position. The bishop is also on the same color as most of white’s pawns, which restricts its mobility. Such positions demonstrate a scenario where a knight is superior to a bad bishop. For example, Black can reroute the knight to e4 via Nb8-d7-f6 and dominate the position. If black’s rook manages to penetrate the 2nd rank, with the help of a knight on e4, a mate threat on f2 (…Rf2#) would be something to be dealt with.
How to avoid a Bad Bishop: trade, break, reroute
Now that we’re acquainted with the three types of bad bishops, we can proactively prevent ending up with one during the game. Special attention to pawn color and bishop placement is crucial. If the position is likely to close due to pawn advances or if our pawn structure aligns with a potential bad bishop, considering a trade beforehand may be prudent. An important rule of thumb to keep in mind when deciding on a trade is that your bad bishop is likely to be the same color as your opponent’s good bishop. Below are a few examples for avoiding having a bad bishop or resolving the issue of the problem piece.
Openings that breed a bad bishop
Some openings produce the textbook bad bishop by design, which is why these are the positions you meet most often. In the French Defense, the e6 and d5 pawn wedge buries the light-squared bishop on c8 behind its own fixed central pawns, and freeing that piece is one of Black’s main long-term jobs. The Stonewall structure does the same with pawns on d5, e6 and f5, leaving the c8 bishop hemmed in until a break like …e5 or a reroute frees it. In the King’s Indian Defense the dark-squared fianchetto bishop can go passive once White clamps the long diagonal with a broad pawn front. The common thread is a pawn chain that fixes pawns on the bishop’s own color. Spotting the structure early tells you which freeing break to prepare, whether that is …c5, …e5 or …f6.
Trading the bad bishop off with …Ba6
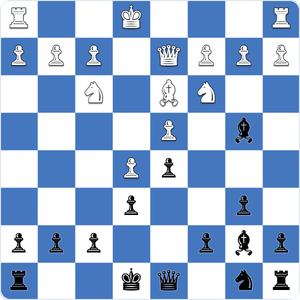
In the diagram above, black has a bishop pair. However, black’s light square bishop is not effectively placed due to the pawn structure, whereas white’s bishop is on an optimal square and exerting pressure on black’s queenside. With black to move here, an ideal move to consider would be 1…Ba6, trading the bad bishop with white’s superior bishop. There is no way for white to avoid the trade, so after 2.Bxa6 Nxa6 black has successfully eliminated possible threats by white’s light square bishop while getting rid of their own bad bishop. If white would continue with 3.a3, now it would be more prudent to keep our good bishop and simply retreat 3…Be7 instead of exchanging it for a knight on c3.
Activating the bad bishop with …Ba6 and a pawn break
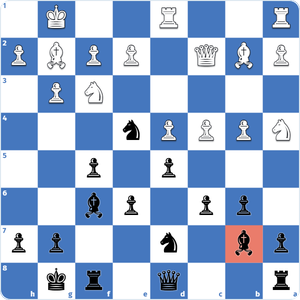
Black has a great knight outpost on e4 and a central control. However, the bishop on b7 is in a passive position due to pawns of the same color, like c6 and d5. With a simple move like 1…Ba6, black could resolve the situation with the bad bishop, turning it into a powerful piece after 2.c5 Bc4 3.Nd2 Nxd2 4.Qxd2 b5
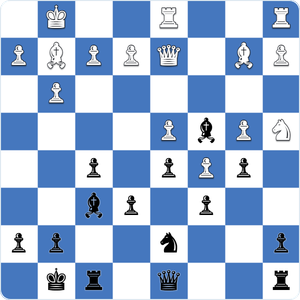
Activating the bad bishop by rerouting the c8 bishop to g4
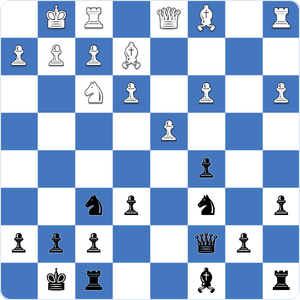
In our third example, we have a position with a structure that is typical of a Nimzo-Indian Defense. Black’s knights are actively developed on their natural squares, and the king has been tucked away to safety in a kingside castle. The remaining question to solve for black is how to bring the bishop on c8 into the game. One idea that comes to mind might be to fianchetto it via 1…b5, however, white can challenge black’s queenside expansion with 2.a4, while 1…b6 does not offer much activity to black after 2.Bb2 Bb7 3.dxc5 bxc5 4.c4.
The alternative option to consider would be a square on the c8-h3 diagonal, ideally f5 or g4 squares. However, the pawn on e6 is blocking its way out. So, 1…e5 suggests itself for this idea, but after 2.d5 Rd8 3.e4, it is a little unpleasant for black’s knights. Instead of rushing with the pawn move, black could prepare the pawn break with 1…Rd8!, placing the rook on the same file with the enemy queen, and creating a situational pin on white’s pawn on the d4. This move also prevents white’s d5 idea. After a move like 2.Qc2, stepping out of the pin, black could carry out with the plan and play 2…e5 now, followed by 3.Bb2 Bg4.
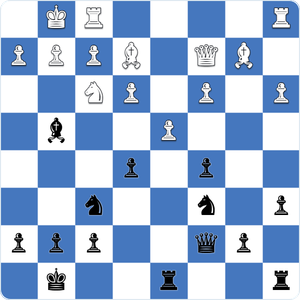
In just three moves, Black has brought the dormant c8-bishop to an active post on g4.
How to Play Against a Bad Bishop: keep the enemy bishop bad
Recognizing a bad bishop in your opponent’s camp is only half the job. The other half is making sure it stays bad. The simplest method is to avoid trading it, because trading one of your pieces for a passive bishop only does your opponent a favor. Keep it on the board and let it sit.
From there, the plan is usually to open a second front. A bishop tied to defending one weakness cannot also cover the other side of the board, so play where the bad bishop cannot reach. Trading into a knight versus bad bishop endgame is one of the cleanest ways to convert, since the knight attacks squares of both colors while the bishop is locked to one.
Keep an eye on the pawn breaks for both sides. The defender’s whole hope is usually a single freeing break, so stopping that break often matters more than grabbing space somewhere else.
Why a bad bishop decides the endgame
A bad bishop hurts most as the board empties. In the middlegame other pieces can paper over its weaknesses. In a pure bishop endgame there is nowhere to hide, and the side with the better minor piece often wins on the color complex alone. The defending bishop is glued to its own pawns and cannot contest the squares the opponent walks through, so a single outside passed pawn on the far wing settles things. The bad bishop cannot be in two places at once. Classical masters built whole games on this. Capablanca, Botvinnik and especially Petrosian were ruthless at fixing the enemy structure, steering into a knight against bad bishop ending, then converting on the wing the bishop could never reach. So judge a bad bishop not only by how it looks now, but by the endgame it is heading toward.
A club-player rule for the bishop trade
All the typology in the world is useless if you freeze at the board, so here is a concrete rule for when the clock is ticking. Before any bishop trade, check the colors. Your bad bishop is usually the same color as your opponent’s good bishop, and that is exactly the trade to seek, because you offload your worst piece for their best one. Other exchanges also depend on the position. Trading a bad bishop for an active knight can help, but do not give up a bishop that is holding your pawns or key squares without checking what replaces its defensive job. When the bad bishop belongs to your opponent, do the opposite. Restrict it, refuse the swap, and leave it stuck rather than help it off the board.
Famous Games with a Bad Bishop
#1 Arthur Pijpers – Oleg Romanishin, 2009
#2 Alexander Alekhine – Fred Dewhirst Yates, 1925
Coach’s takeaway: watch the pawns, not the bishop
Mobility and activity are essential factors in determining a piece’s true value. A bishop’s ineffectual placement, often influenced by the pawn structure, can reduce it to a pawn-like function. Thus, vigilance for the potential emergence of one of the three types of bad bishops is a vital aspect of positional play. Maintaining constant awareness of the harmony between pawns and the bishop is key to avoiding the development of a bad bishop.
FAQ's
What is an example of a bad bishop?
A classic example is a bishop trapped behind a chain of its own pawns, with little room to move. The light-squared bishop on c8 in the French Defense, blocked in by the e6 and d5 pawns, is the textbook case.
What is the difference between a good bishop and a bad bishop?
A good bishop has room and influence, usually working along open diagonals. It is not blocked by its own pawns and can operate on both sides of the board. A bad bishop is hampered by its own pawns, often stuck behind them on the same color squares. That limits its scope and makes it far less useful.
What is a tall pawn in chess?
A tall pawn is another name for a bad bishop. The bishop is so boxed in by its own pawns that it does little more than a pawn would on the same square, which is where the nickname comes from.
How do you fix a bad bishop?
There are three common fixes. Trade it for one of your opponent’s better-placed pieces, free it with a pawn break that opens a diagonal, or reroute it outside the pawn chain to an active square.
Is a bad bishop always bad?
No. A bad bishop sometimes does useful work defending its own pawns, and in closed positions or opposite-colored-bishop endings it can even hold a draw while looking completely dominated. Its value depends on the position, not on appearance alone.
Is a knight better than a bad bishop?
Often, yes. In closed positions where the bishop is hemmed in by its own pawns, a knight can outmaneuver it by hitting squares of both colors. That is why strong players aim for a knight against bad bishop endgame.