
 By

The line is named after the Icelandic master Rudolf Palme, who used it during the twentieth century. Unlike many gambits, it gives Black real chances to win back the pawn, and it still earns the occasional outing even at elite level today.
The Icelandic Gambit in 60 Seconds
| Main line | 1.e4 d5 2.exd5 Nf6 3.c4 e6 4.dxe6 Bxe6 |
|---|---|
| Black’s plan | Fast development, long castling, pawn storm against White’s King. |
| White’s plan | Keep the extra pawn, trade pieces, and win the endgame, or return the pawn to kill the attack. |
| Best for | Attacking players who enjoy open, tactical positions in blitz and rapid. |
| Is it sound? | Speculative but fully playable. Black gets real compensation, not a clear refutation against accurate play. |
| White’s safest answer | Decline with 4.d4, or accept and consolidate with 5.Nf3, Be2 and O-O. |
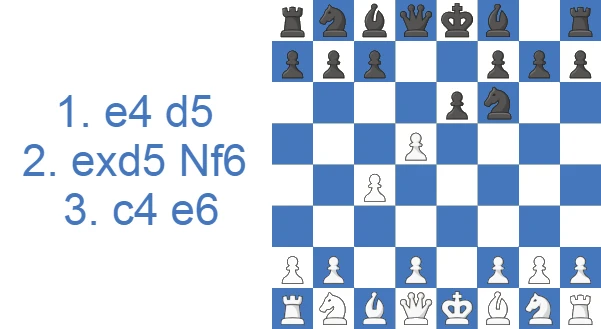
The Icelandic Gambit (also spelled Iceland Gambit, and known as the Icelandic Palme Gambit) is one of the sharpest replies to the Scandinavian Defense. After 1.e4 d5 2.exd5 Nf6 3.c4 e6, Black hands White a second pawn to rip the center open and chase the king before White finishes developing. It is not a main line at the top, but at club and online speed it scores well, because most White players do not know how to give the pawn back.
Study the Icelandic Gambit as White or Black
In the Icelandic Gambit Black tosses a pawn onto e6 on move three and dares White to prove the extra material outweighs a violent lead in development.
Meet the Icelandic Gambit as White
Taking on e6 is the test White has to pass, and holding the pawn afterward takes precise, unhurried moves. The two sections below spell out exactly what the Icelandic Gambit hands Black in exchange, plus the concrete plan White should follow to consolidate toward a better endgame.
Press the Icelandic Gambit as Black
Rapid development, two open diagonals for the bishops, and quick queenside castling are what the pawn buys. Study the compensation breakdown below to see that pressure in concrete terms, then use the practical advice to handle every Icelandic Gambit counter White may try, from greedy acceptance to the quiet declines you should know how to face.
Where the Icelandic Gambit Comes From
The Icelandic Gambit grows out of the 2...Nf6 Modern Scandinavian, the line in which Black declines to recapture on d5 right away and develops with tempo instead. Its name comes from the Icelandic master Rudolf Palme, which is why you will also see it written as the Palme Gambit. Icelandic correspondence and club players did much to popularize it last century, and the country's deep postal-chess scene kept the line alive long enough for it to earn a permanent place in Scandinavian theory. It sits in the same adventurous family as older central pawn sacrifices like the Danish Gambit, where one or two pawns go purely to buy a lead in development. You will sometimes also see the spelling Iceland Gambit, but it points to exactly the same opening.
How the Icelandic Gambit Scores in Practice
Master Games Statistics
| Results | Rate |
|---|---|
| Victory for White | 33% |
| Draw | 34% |
| Victory for Black | 33% |
Statistics from 2.5 Million Amateur Games
| Rating level (Lichess) | White wins | Draw | Black wins |
|---|---|---|---|
| 800, beginner | 43.3% | 3.6% | 53.1% |
| 1000, novice | 43.4% | 3.2% | 53.3% |
| 1200, improver | 43.7% | 3.2% | 53.1% |
| 1600, club | 44.3% | 3.7% | 52.0% |
| 1800, club | 43.8% | 4.2% | 52.0% |
| 2000, advanced club | 43.8% | 4.8% | 51.4% |
Source: Lichess opening explorer, blitz, rapid and classical games at the position after 1.e4 d5 2.exd5 Nf6 3.c4 e6. Figures are win rates by Lichess rating band; draws are rare at these levels.
What Black Is Really Paying For
Every gambit is a trade, and it pays to know exactly what Black is buying. The pawn handed over on e6 purchases three things at once. First, an open e-file aimed straight at White's uncastled king. Second, a clear lead in development. Third, the initiative that comes from making threats while White is still untangling. The light-squared bishop reaches e6 with a tempo, the f6-knight eyes e4 and g4, and the queen often lands on e7 behind the open file. Black's usual practical plan is to develop fast, castle queenside, and roll the g- and h-pawns at White's king while keeping the position open. White pays nothing right now but owes precise defense later: finish development, castle short, and be willing to give the pawn straight back the moment Black's pressure turns serious.
Watch the Icelandic Gambit in Action
The basics also come through clearly in a short video walkthrough on our YouTube channel.
Key Ideas of the Icelandic Gambit: What Black Is Really Paying For
By giving up a pawn, Black aims to build a fast attack against the White king. Black usually castles queenside and launches a pawn storm against White's kingside. White, by contrast, wants to trade queens and cash in the extra pawn. Because White's king is exposed and Black's pieces come out so quickly, the opening phase often decides the game.
The Game Plan for White and for Black
If you only remember a handful of ideas, remember these.
| Black should | White should |
|---|---|
| Develop with tempo and aim the e6-Bishop and f6-Knight at White’s King. | Finish development before touching anything on the Queenside. |
| Castle Queenside and push the g- and h-pawns at White’s King. | Get the King to safety quickly, usually by castling short. |
| Keep the position open, closed pawns kill the attack. | Offer the extra pawn back if it buys time to untangle. |
| Look for tactics on f2, the e-file, and the a2–g8 diagonal. | Trade Queens whenever possible to defuse the initiative. |
Icelandic Gambit Theory: the Three Ways White Can Meet It
The Icelandic Gambit Accepted usually leads to sharp, tactical play where Black castles long and hunts the enemy king. White typically tries to consolidate and trade pieces to reach an endgame a pawn up.
The Icelandic Gambit Declined typically leads to positional games where both sides play against the opponent's weaknesses. White often ends up with an isolated d-pawn and tries to make it count, while Black blockades the pawn and plays against it.
The Three Ways White Can Meet It
Once the gambit is on the board, White picks between three roads. White can accept the second pawn with 4.dxe6 Bxe6 and try to hold onto the extra material. White can decline with 4.d4, steering into a Scandinavian-style structure where Black usually regains comfortable equality but loses the attack. Or White can play 4.Nc3 first, which by transposition almost always folds back into the 4.d4 exd5 lines. The sections below walk through each path. The practical headline is short: the accepted lines are where Black's attacking chances run hottest, and the declined lines are where Black settles for an easy, slightly pleasant game.
Icelandic Gambit Accepted: 4.dxe6 Bxe6
This variation starts with White accepting the extra pawn (4.dxe6) and Black recapturing with the c8-bishop (4...Bxe6). White is a pawn up, but Black has excellent compensation for the pawn thanks to the activity of the pieces.
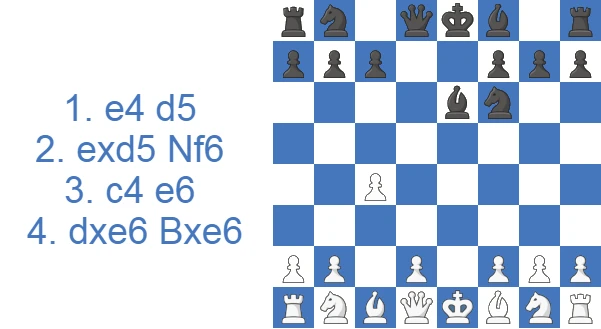
If White can develop smoothly over the next few moves, the extra pawn should tell in the endgame. To stop that, Black uses the active pieces to keep posing problems for White. After 4...Bxe6, White has two main moves: 5.Nf3 and 5.d4.
5.Nf3
This line begins with 5.Nf3. White develops the g1-knight, prepares short castling, and keeps the d4-square ready for the d-pawn push. Black typically heads for a double-edged position where the extra pawn barely matters because of the complications.
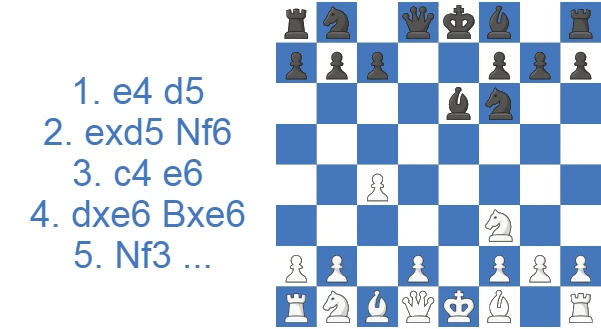
To get there, Black usually castles on the opposite wing to White's king, the queenside, then storms the kingside with the g- and h-pawns to hunt the king. White aims to stay solid and, if possible, trade the heavy pieces and reach an endgame with the extra pawn.
A sample line runs 5...Nc6 (preparing to castle long and developing the knight), 6.d4 (taking the center), 6...Qe7 (lining the queen up with the e1-king on the open e-file and clearing the back rank to castle), 7.Be3 (interposing a piece between the queen and king), 7...O-O-O (king to safety and the a8-rook into play), 8.Be2 (preparing to castle), 8...Ng4 (a typical move that hits the dark-squared bishop, aiming to win the bishop pair and weaken White's dark squares), 9.Nc3 (White can do little about Nxe3 and simply develops), 9...Nxe3, 10.fxe3, and 10...g5.
In the resulting position, because Black's rook sits on the same file as White's queen, the fork tricks do not quite work. The play is chaotic but the plans are clear: White wants to trade pieces and keep the extra material, while Black wants to checkmate.
5.d4
The second most popular try is 5.d4, expanding in the center. This move allows Black an extra option that 5.Nf3 does not: the check 5...Bb4+.
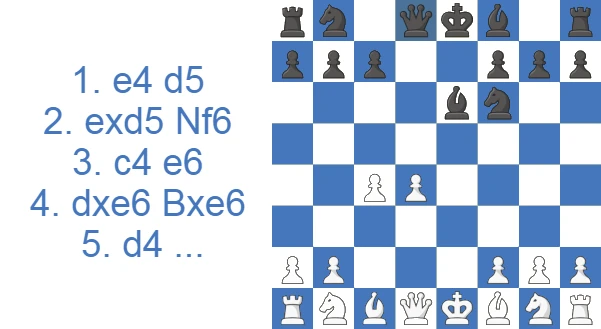
That f8-bishop is often a liability rather than an asset for Black if White reacts correctly. To keep the attack rolling, Black usually swaps it for White's dark-squared bishop and holds onto the initiative despite the pawn deficit.
These positions are heavily tactical, and the better calculator usually wins. One sample line: 5...Bb4+, 6.Bd2 (blocking the check), 6...Bxd2+ 7.Qxd2, 7...Qe7 (again the queen lines up with the enemy king), 8.Qe3 (the only move to stop the strong threat of ...Bxc4), 8...Nc6 (developing and preparing to castle queenside against the White king), 9.Be2 O-O-O, 10.d5 (forking the pieces), 10...Ng4 (the knight harasses and pushes back the queen), 11.Qg3 (the queen retreats to safety), and 11...Nb4 (eyeing the fork of king and rook on c2).
The resulting position is very chaotic, and whoever blunders first loses. Since Black has the safer king, White is far more likely to be the one to collapse, given the lagging development and exposed king.
Accepted Sidelines: 5.Be2 and the f2 Pitfall
Beyond the main 5.Nf3 and 5.d4 moves, White often reaches for a quiet developing setup with an early Be2 or the passive 5.d3, hoping to hide behind the extra pawn. Those calm-looking choices are exactly where Black's compensation bites. After a slow move order such as 5.d3 Bc5, the bishop on c5 and the f6-knight combine to put the f2-square under fire, and one careless tempo can hand Black a winning attack on the spot. The point that runs through every accepted line is the same. White must castle before touching the kingside pawns. An early h3 or d3 weakens the very squares Black is targeting, and against a prepared opponent that is usually the move that loses the game.
Icelandic Gambit Declined: 4.d4 exd5 (and the 4.Nc3 Transposition)
Here White does not take the second pawn and instead plays 4.d4 to expand in the center, sidestepping the complications. Black usually captures with 4...exd5 and gets a slightly more pleasant position. Because the c-pawn tends to trade off against Black's d-pawn, White's d4-pawn often becomes isolated, giving Black a clear target to play against.
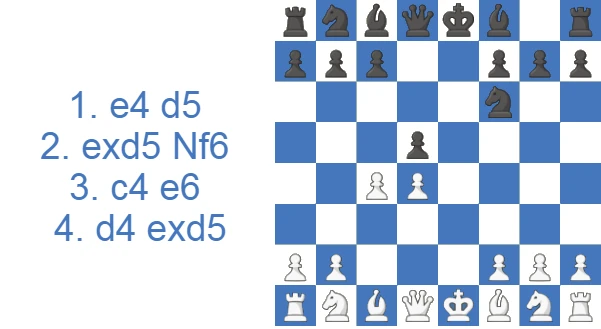
Below are the two most common replies to 4...exd5: 5.Nc3 and 5.Nf3.
5.Nc3
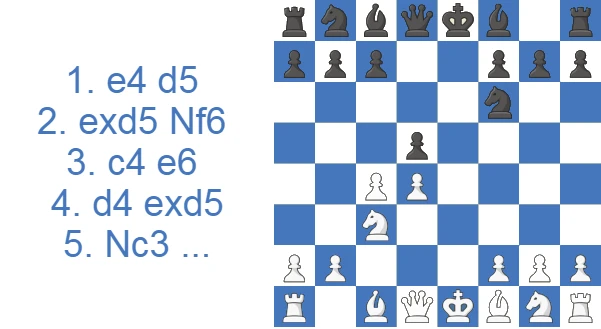
This line starts with 5.Nc3, and Black usually responds with either 5...c6 (solidifying the structure) or 5...Bb4 to pin the c3-knight. The play is positional, with both sides probing for weaknesses.
A sample line after 5...Bb4: 6.Bd3 (developing the bishop), 6...O-O, 7.Ne2 (preparing to castle), 7...dxc4 (saddling White with an isolated d-pawn), 8.Bxc4, 8...c6 (covering d5 and fixing the d4-pawn as a weakness), 9.O-O, 9...Nbd7 (developing the b8-knight), 10.a3 (kicking the b4-bishop), 10...Bxc3 (Black can take and play against the isolated pawn), 11.Nxc3, and 11...Nb6.
In the resulting position, Black sets up a blockade on d5 and halts the d4-pawn, while White wants to push it and free the pieces. Black is often happy to reach an endgame and grind down the d4-pawn.
5.Nf3
This line begins with 5.Nf3. Since we already covered the Nc3-Ne2 setup, the sample line here uses a slightly different piece arrangement.
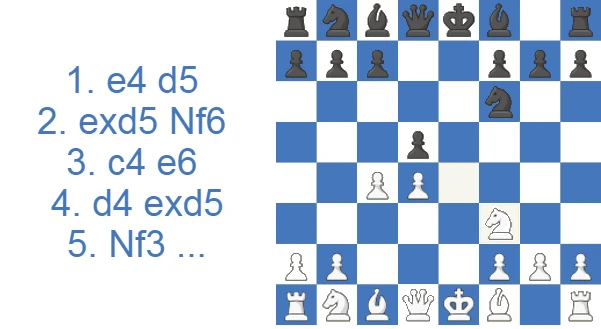
Black can again use the f8-bishop to check with 5...Bb4+. White blocks with 6.Nc3 and keeps the dark-squared bishop. The strategy is much the same: Black plays against the isolated d-pawn, while White wants to push it and seize key squares like c6.
A sample line after 6.Nc3: 6...O-O 7.Be2, 7...dxc4 (giving White an isolated pawn), 8.Bxc4, 8...Re8 (developing the rook with tempo), 9.Be3 (blocking the check and developing), 9...Be6 (trading off White's dangerous light-squared bishop on the a2-g8 diagonal), 10.Bxe6 Rxe6 11.O-O, and 11...Nbd7.
In the resulting position, White looks to advance the d-pawn. The a2-f7 diagonal matters, and Qb3 with Ng5 ideas are often in the air for White. Black usually plays ...c6 and follows the plans from the previous section.
Icelandic Gambit Declined: 4.Nc3
This variation starts with 4.Nc3 and usually transposes into the lines after 4...exd5, because White typically follows up with the d4-push (5.d4) to prevent ...d4 by Black. If White instead captures on d5, they are left with an isolated pawn on d2.
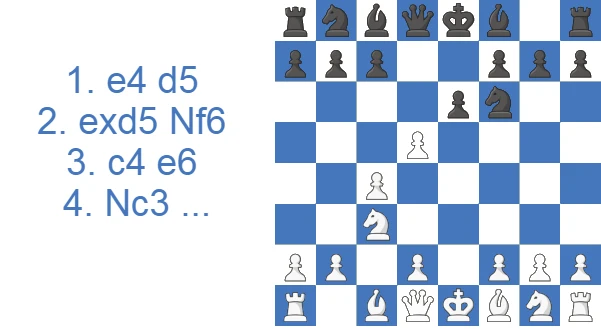
A quieter alternative such as 5.d3 is passive, and in these positional positions it simply hands Black a free tempo and a small edge.
Engine Verdict and Modern Status
Modern engines confirm what the master statistics already hint at. With accurate play White keeps a small edge, roughly +0.4 to +0.7, so the Icelandic is speculative rather than fully sound, and there is no forced equalizer hiding inside it. In practice the verdict is far kinder than the evaluation bar suggests. The even 33/34/33 result split in master games shows that at the top the gambit holds up, while Black's 52% score across millions of amateur games shows how hard the defense is to execute under pressure. The pattern is hard to miss whenever I play it: the side under attack burns clock and goes wrong long before the engine line would. That is why the gambit still turns up in blitz and rapid even at strong levels. Knowing the theory and finding it over the board against a fresh attack are two different things.
How to Beat the Icelandic Gambit: White's Best Response and Two Safe Roads
Most Icelandic Gambit wins happen because White grabs everything and forgets about the king. Beating the gambit is less about finding a refutation and more about staying calm. There are two reliable paths, and both keep White on top.
Option 1: Decline With 4.d4
The simplest answer is to not take the second pawn at all. After 4.d4 exd5, the game turns into a Scandinavian-style position where White has more space and easier development. Black equalizes more comfortably than in the accepted lines, but there is no attack to worry about, which is exactly what most White players want against a surprise weapon.
Option 2: Accept, Then Consolidate
If you do want the pawn, take it and then play for safety instead of greed. A clean setup is 4.dxe6 Bxe6 5.Nf3, followed by Be2, O-O and Nc3. Once the king is castled and the pieces are out, the extra pawn becomes a real asset. The trick is to be willing to hand the pawn back the moment Black's pressure gets serious; a pawn is a cheap price for a safe king.
A model line runs 4.dxe6 Bxe6 5.Nf3 Nc6 6.Be2 Bc5 7.O-O O-O 8.Nc3. White is fully developed, the king is safe, and there is no knockout for Black. From here White can think about trading queens and steering toward the endgame, where the extra pawn finally counts.
Practical Advice: For Black and For White
For Black, treat speed as the whole point. Develop every piece toward White's king, get the queen to e7 and the knight to c6, castle queenside, and only then push the g- and h-pawns. Keep the position open at all costs, because a closed structure quietly cashes in White's extra pawn. For White, patience beats greed. Finish development, castle short, and trade queens whenever the chance shows up to take the sting out of the initiative. Be ready to return the pawn the instant Black's attack gets dangerous; a pawn is a small price for a safe king and a clean route into a favorable endgame. The biggest over-the-board mistake by White is reaching for kingside pawn moves like h3 or d3 before the king is tucked away.
Icelandic Gambit vs. Portuguese Gambit: Choosing Your Scandinavian Line
The Icelandic Gambit is one of several pawn sacrifices that grow out of the Scandinavian Defense (1.e4 d5). They share the same attacking spirit but aim their pieces in different directions, so it helps to know which is which before you pick one.
| Gambit | Moves | Main idea |
|---|---|---|
| Icelandic (Palme) Gambit | 1.e4 d5 2.exd5 Nf6 3.c4 e6 | Open the e-file and develop the light-squared Bishop to e6 with fast pressure. |
| Portuguese Gambit | 1.e4 d5 2.exd5 Nf6 3.d4 Bg4 | Pin White’s resources and pressure d5 before regaining the pawn. |
| Classical Scandinavian | 1.e4 d5 2.exd5 Qxd5 | Recapture at once and develop solidly: no gambit, no risk. |
The Portuguese Gambit only appears when White meets 2...Nf6 with 3.d4. The Icelandic is what Black plays when White instead grabs space with 3.c4. The two often feel similar, but the Icelandic tends to lead to sharper, more open play, because Black usually gets the pawn structure cracked wide open. If you enjoy the Icelandic, the Portuguese is the natural second weapon to learn, since you will face both depending on White's third move.
Master Games with the Icelandic Gambit: Recent Examples
Strengths and Weaknesses of the Icelandic Gambit
Pros
- It usually offers very rich games in terms of tactical opportunities.
- White usually have an objectively better position.
- White is better in the endgames due to the extra pawn.
- This move order also allows both parties to play positional chess.
Cons
- If White declines the gambit, Black immediately equalizes and may even gain a slight edge.
- Exchanging the pieces and going for an endgame is often difficult.
- If White accepts the gambit, they might need to be precise or lose the game on the spot.
- White may end up with an isolated pawn if they decline the gambit.
Icelandic Gambit Trap: the f2 Shot Every Player Should Know
This trap comes from the Accepted variation when White plays 5.d3. Black develops the bishop with 5...Bc5. If White now drifts with a move like 6.h3, Black has 6...Ne4, and the f2-square comes under fire. Taking with 7.dxe4 loses on the spot: 7...Bxf2+ 8.Kxf2 (8.Ke2 Bxc4 is also hopeless) 8...Qxd1, and the queen is gone.
Case Study: Csonka vs. Shishkov, 2025
The most instructive complete game on this page is Balazs Csonka against Andrei Shishkov from 2025. It is a model of how White is supposed to handle the gambit: take the pawn, refuse to panic, untangle, and then convert. I have annotated the key moments for a club player.
The opening follows the textbook accepted line: 5.Nf3 Qe7, with Black's queen behind the open e-file exactly as the gambit wants. The instructive point comes early. Black wins the second pawn back with 6...Bxc4, so by move six the material is already level. That is the honest truth about the Icelandic at this level: White is not really playing a pawn up for long. The fight is about the king, not the pawn count.
Watch how Csonka refuses to be rushed. He castles on move 8, gets the rook to e1, and only then starts thinking about the center. Shishkov castles queenside (9...O-O-O) and reaches for the standard plan, ...h6 and ...g5 to drive the bishop and open lines. The turning point is the central break 16.d4 followed by 18.Qf3 and 19.d5: White uses the safety of his king to push back in the middle, and the d-pawn becomes a battering ram. By move 20 the pawn marches to d6 and Black's coordination starts to crack.
The key practical takeaway sits around moves 36 to 38. Csonka invites the queen trade with 36.Nd5 Qxd5 37.Qxd5 Nxd5 38.Rxd5, and the moment the queens come off, Black's attack is simply gone and the extra structural weaknesses decide. That is the whole White recipe in one sequence: survive the opening, castle, then trade queens and let the technique do the work. The long rook endgame from move 40 onward is just clean conversion. For a club player, the lesson to carry away is the one move that never appears on the board for White here, a premature h3 or g4 before castling. Csonka kept his king safe first, and that is why he was the one attacking by the end.
Should You Play the Icelandic Gambit?
The Icelandic Palme Gambit is an opening built for chaotic, tactical positions. Black gives up a pawn to go after the king, while White tries to consolidate and grind out the endgame. Beating it cleanly is hard, because it is a legitimate line rather than a trap. It can also turn positional if White declines, though Black usually equalizes quickly and may even take a small edge in those lines. If you like sharp games and you are willing to put in a little preparation, it is a fine practical weapon below master level and a useful surprise in faster time controls.
Test Yourself: Icelandic Gambit Positions
Make the move on the board. Hint gives you a nudge, Answer shows the move and why it works.
White is a pawn up after 2.exd5 Nf6. Which pawn move defends the extra pawn and sets up the Icelandic Gambit?
Black offered a second pawn with 3...e6. Which capture takes it with the advanced pawn?
White took the offered pawn. Which recapture develops a piece and eyes the c4-pawn?
Black's bishop on b4 has no defender. Which queen check attacks it at the same time?
White declined with 4.d4 and Black took on d5. Which bishop move pins the c3-knight to the king?
Black is developing against White's center. Which bishop development gives check, so that White must answer it?
Black's knight left f6 and uncovered the g5-bishop's line. Which capture wins Black's queen?
Black has the queen on e7 and the knight on c6. Which move gets the king safe and puts a rook on the d-file?
Both sides have castled. Which move finishes White's development by bringing the b1-knight to the square that eyes d5?
Black's bishop on g4 faces White's f3-knight. Which capture removes the knight?