
 By
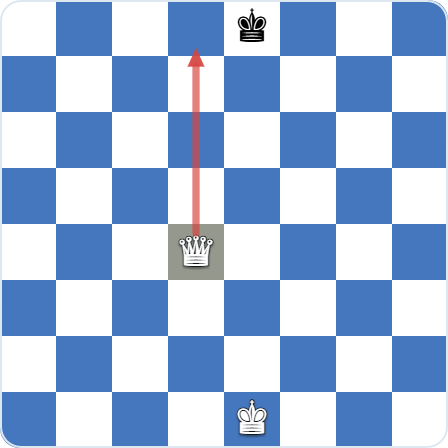
The queen is the strongest piece on the chessboard. She moves like a rook and a bishop combined, sweeping any number of squares along ranks, files, and diagonals, and from a central square she controls up to 27 of the board's 64 squares at once. All that reach comes with a catch, and that catch is the whole story of playing her well. Every decision about the queen turns on one tension: activity against safety. You want her active, pressing threats and supporting checkmates, but not so far forward that she gets chased, forked, or trapped. Lose her and you usually lose the game. So knowing when to bring her out, when to hold her back, and when to give her up on purpose matters more than anything else on the board.
The queen in one minute
- The queen is the most powerful piece in chess. She combines the moves of the rook and the bishop, so she can travel any number of squares in a straight line: horizontally, vertically, or diagonally; but she can’t jump over other pieces or hop like a knight.
- White’s queen starts on d1 and Black’s on d8, each on her own color, she’s worth about 9 points, and from the center she can control up to 27 squares at once.
- She can move any number of squares in all directions (horizontal, vertical, diagonal), control up to 27 squares from the center, switch between light and dark complexes, and capture along her path as long as nothing blocks her.
- Her typical job is to attack: the Queen supports checkmating patterns, threatens tactics like forks and skewers, and often leads the assault in the middlegame once development is finished.
- In terms of piece value, the Queen is usually considered worth 9 points (about equal to three minor pieces and a bit less than two rooks), which is why a queen sacrifice is dramatic and only justified if it gives a clear tactical or strategic payoff.
- You have to be careful with Queen: bringing her out too early can let your opponent gain tempo, and in fast time controls you can even stalemate the opponent by accident because she covers too many squares.
- Her influence also defines phases of the game: once queens (and a few more pieces) are traded, you’re basically in an endgame; while she’s on, it’s usually still the middlegame.
- Below we cover how she moves, where she starts, what she’s worth, and how to use her without getting her trapped.
- To see practical attacking ideas, common traps like Scholar’s Mate, typical stalemate tricks, and even the queens puzzle, keep reading.
What is a Queen in chess?
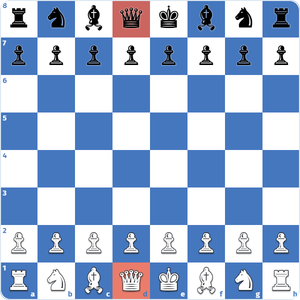
A queen in chess is a special hybrid piece that combines the movements of bishop and rook, and she stands next to the king in the starting position. For the white queen, the starting square would be the d1 square, which is a light square, and the black queen always starts on the d8 square, which is a dark square.
Historically, in the early versions of chess, such as Shatranj (the old version of chess played in Persia), the piece that would be equivalent to the queen was called ‘ferz’ and it moved differently than the queen in modern chess. ‘Ferz’ moved only one square diagonally in all directions. This feature made earlier versions of chess much slower and longer. The development of the modern queen in the fifteenth century in Spain was a game-changing milestone in the evolution of chess. The new rule regarding the queen accelerated the game’s pace, as the addition of such a strong piece made it possible to checkmate opponents with much fewer moves in comparison to earlier versions of chess. Another big outcome of this rule change was that the value of pawn promotion has drastically changed because of the possibility for each pawn to be promoted to queen.
A brief history: from the weak ferz to the most powerful piece
The queen was not always the board’s dominant force. In Shatranj, the medieval Persian ancestor of chess, the piece standing beside the king was the ferz, and it crept just one square diagonally at a time. Games crawled. Checkmate could take dozens of moves to engineer. Everything changed in late-fifteenth-century Spain, when reformers gave that square the combined reach of the rook and bishop, creating the queen we know today. The new piece was so much faster than anything before it that players of the era nicknamed the quicker game “mad queen chess.” The rule reshaped the game almost overnight. Attacks became sharper, games grew shorter, and pawn promotion suddenly carried real weight, since any pawn that reached the far rank could become a second queen.
Where does the queen start on the board?
Each side begins the game with one queen, and she sits right next to the king on the back rank. White’s queen starts on d1 and Black’s queen starts on d8, so the two queens face each other on the same file.
There’s a simple way to remember which square is hers: the queen always goes on her own color. The white queen starts on the light d1 square, and the black queen starts on the dark d8 square. If you set the board up and your white queen lands on a dark square, you’ve placed the king and queen the wrong way around.
The king takes the square beside her: e1 for White and e8 for Black, which is the other spot beginners most often mix up.
Watch the queen in action
Watching the queen sweep across the board in real games makes her reach far easier to picture than any written description. Once you have the queen down, see how her straight-line partner works in our guide to the rook chess piece.
How does a Queen move and capture?
Movement
A queen is a compound piece, meaning she combines the movements of a bishop and a rook.
She can move in any direction: vertically, horizontally, or diagonally, as illustrated in the diagrams below.
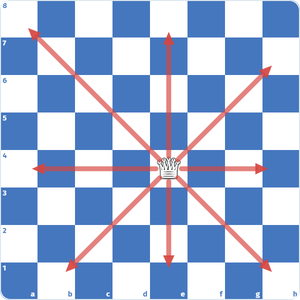
On an open and empty board, when a queen is placed in any of the central squares, such as e4-d4-e5-d5, it covers and controls 27 squares, which is the maximum a chess piece can achieve.
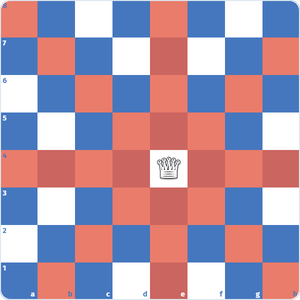
In the diagram above, the queen is placed on the e4 square, and the circles indicate the squares that the queen controls and can choose to move. One may also notice that almost half of the board (27 squares, only 5 squares less than half of the 64 squares) is filled with circles in the demonstration above, which makes her reach easy to see.
While a queen is a hybrid piece of rook and bishop and move functions as a long-range piece, it is important to note that one queen’s bishop-like abilities have one significant edge over a mere bishop’s nature: A bishop can never change a color complex; e.g., if it is a bishop controlling dark-squares, it will always be in that particular color complex. Because she also moves along ranks and files, the queen can reach squares of either color, granting her unrestricted control over any color complex.
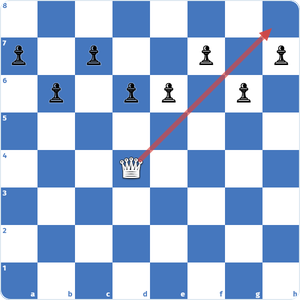
In the diagram above, the queen on the d4 square controls the dark squares of the board, including the critical squares like f6 and g7.
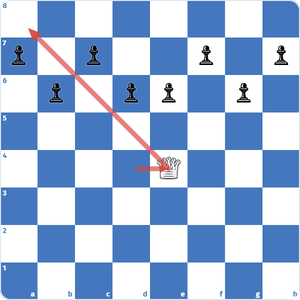
If the queen moves to the e4 square from the d4 square, as in the diagram above, she can then control the light-squares of the board, including b7 and c6. This feature of the queen, her ability to switch control of the color-complex, proves her superiority over a bishop in terms of being a diagonal moving piece. If the bishop was placed on the d4 square, it could never control b7 and c6. For this reason, a queen is a highly mobile piece to target opponents’ weak squares.
Capture
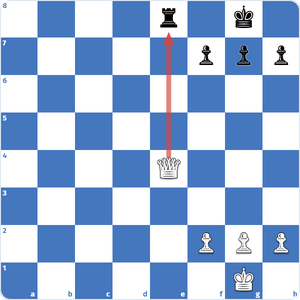
A queen can capture any piece that stands on its movement path. For example, the queen on e4 could capture black’s rook on e8 and deliver a backrank checkmate.
However, if black’s rook stood on the a8 square, she could still capture as she can also move diagonally:
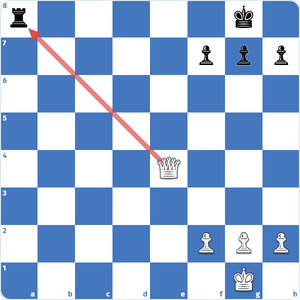
It is important to keep in mind that a queen cannot jump over the pieces like a knight to move or capture them. She can only capture as she moves.
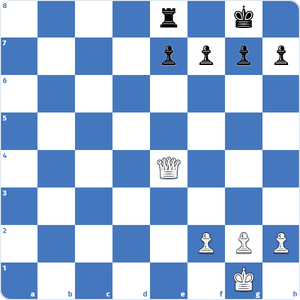
The queen would not be able to capture the rook in the position above because the pawn on e7 is standing in the way. It would be legal for the queen to capture the pawn; however, it would not be wise in this case, as the rook could recapture the queen in that case, and white would lose the queen.
The queen can move as many squares as she likes in one direction, as long as the path is clear. Even from a corner she still reaches 21 squares; from a central square like e4 that number climbs to 27. She also moves backwards just as freely as forwards, there are no one-way limits on her.
There are only two things the queen can’t do. She can’t jump over other pieces the way a knight can: if something stands in her path, she has to stop in front of it, or capture it if it’s an enemy piece. And she can’t move like a knight at all, the L-shaped hop simply isn’t part of her movement. That gap is exactly why a well-placed knight can fork or trap a queen: it attacks her from a square she can’t copy.
How a queen move is written: notation and symbols
In algebraic notation the queen is written with a capital Q, kept distinct from the king’s K so the two are never confused. A move like Qh5 means “queen to h5,” while Qxe5 means the queen captures whatever sits on e5. When two queens could reach the same square (after a promotion, for example), you disambiguate by adding the file or rank of the one that moves, as in Qae1 or Q1e3. On printed diagrams and in figurine notation the queen appears as a small crowned symbol rather than the letter. In FEN strings, which record a position, an uppercase Q marks a White queen and a lowercase q marks a Black one. Knowing these conventions lets you read game scores, follow analysis, and record your own games accurately.
The value of the Queen in chess: nine points and what that buys
The general consensus is that a queen is roughly equal to three minor pieces (e.g., two bishops and a knight) and slightly less valuable than two rooks. In chess, when evaluating the material worth of pieces, the queen is worth about 9, with the pawn as the base unit at 1, while a rook is valued at 5. Consequently, trading a queen for another piece is generally deemed unfavorable unless there is a specific tactical rationale justifying such a move, known as a ‘queen sacrifice.’ Due to the significant value attributed to her, sacrificing is often regarded as one of the most remarkable feats in chess.
It’s crucial to recognize that the material values assigned to chess pieces are general estimates and are relative. The absolute value of a piece is highly specific and contingent on its precise placement, function, and role in a given position. In certain situations, a humble pawn might even hold more value than a queen or a rook based on the specific characteristics of the position. An excellent method to cultivate a sense of the value of pieces is by engaging in training games featuring material imbalances. These positions could involve one side possessing a queen while the other side has three minor pieces, two rooks, or a combination of a minor piece and a rook. The position below would be an example starting position to use in training games, for example, against an engine:
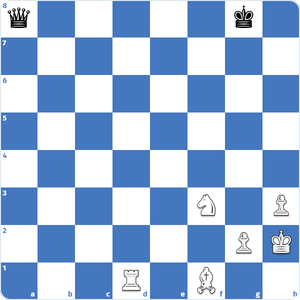
Here’s how the queen compares with the other pieces at a glance:
| Piece | Approximate value |
|---|---|
| Pawn | 1 point |
| Knight | 3 points |
| Bishop | 3 points |
| Rook | 5 points |
| Queen | 9 points |
| King | Priceless (can’t be captured) |
That puts the queen on par with roughly three minor pieces or two rooks, which is why trading her for anything less is usually a bad deal unless you get a clear tactical or strategic payoff in return.
Promotion: turning a pawn into a queen
The most common way a new queen reaches the board is not at the start of the game but at the end of a pawn’s journey. When a pawn reaches the far rank (the 8th for White, the 1st for Black) it must promote, and players almost always choose a queen, since she is the strongest piece on offer. This is where the term “queening” comes from. There is no limit to how many queens a side may have at once. So if you have kept your original queen, a promoted pawn gives you a second, and in rare endgames you might see three or more. Because promotion is so decisive, much of pawn-endgame technique revolves around escorting a passed pawn to the queening square, or stopping the opponent from doing the same.
Queen versus two rooks and other material
Since the queen is worth roughly nine points, players constantly weigh her against bundles of other pieces. The classic comparison is queen versus two rooks. The rooks total ten points, and when they coordinate and defend each other they usually hold the edge, especially in open positions where they can double up. A queen against a rook and a minor piece (about eight points) generally favors the side with the queen, since the lone queen attacks on her own while the weaker side has to keep two pieces working together. Against three minor pieces the queen is roughly balanced, though the three pieces often do well when the position stays closed and they have stable outposts. None of these counts is absolute. An exposed king or one dominant queen can overturn the raw point arithmetic in a single move.
Queen strategy: when to bring the queen out (and when not to)
As a highly mobile long-range piece, a queen is effective both in attacking and defending from a distance. She can also sometimes do both at the same time. However, the queen is mostly used in attacking to deliver a checkmate, usually with the support of other pieces.
The queen’s power tempts beginners to bring her out early for a quick checkmate. Some novices aim to deceive their opponents with the so-called Scholar’s Mate, executing opening moves like 1.e4 e5 2.Qf3 Nc6 3.Bc4 Bc5 4.Qxf7#.
However, attempts to achieve checkmate early by bringing the queen out rarely succeed against seasoned players. On the contrary, this strategy tends to backfire, as deploying the queen early may allow opponents to develop their pieces with tempo by attacking the queen. Additionally, it may face the risk of being trapped, leading to a significant disadvantage. Therefore, it is generally wiser to incorporate the queen into the game during the middlegame phase, once the development phase is complete.
The queen’s presence is often used to determine the definition of the game phase. An endgame typically starts when the queen’s and a few more pieces are exchanged – although there are also endgames featuring queens at times -, while the middlegame is where the queen shines. A queen can lead the army during an attack on the enemy king, orchestrating checkmate threats in collaboration with allied pieces.. Since she is a long-range piece, Queen is also a highly effective piece to utilize in tactical situations to gain material through motifs such as fork, discovery attack, pin, and skewer. To fully exploit the queen’s mobility, it is crucial to provide her with ample space, as she cannot unleash her true potential in cramped positions.
The queen-and-king checkmate every player must know
The single most important queen skill is delivering checkmate with just a queen and king against a lone king. The technique is the “box” method: use the queen to shrink the rectangle the enemy king is allowed to move in, herding it toward an edge while your own king marches up to help. As you shrink the box, check that the lone king still has a legal move whenever it is not in check. A knight’s-move distance by itself does not prevent stalemate. Bring your own king up to help control escape squares and coordinate the final checkmate. In my own blitz games this is one of the most common ways players throw away a full point, stalemating in a position they had completely won. Practice it until it is automatic.
Named checkmate patterns: back-rank mate and the queen on the seventh
Beyond the lone-king box mate, the queen anchors several attacking patterns worth recognizing on sight. The back-rank mate is the most common. The enemy king is hemmed in by its own pawns on the back rank, and the queen (or a rook) slides along that rank to deliver mate with no escape. The defender’s fix is “luft,” a pawn move that gives the king air. Just as dangerous is the queen on the seventh rank, deep in the opponent’s camp, where she picks off pawns and ties the enemy king and rooks to passive defense. Paired with a rook on the same rank, this often forces resignation. Learn to spot these recurring nets so you can both deliver them and defend against them before they form.
Queen coordination: batteries and the queen-knight duo
The queen reaches her full strength only when she works with other pieces. The most direct way to multiply her force is a battery: lining the queen up behind a bishop on the same diagonal, or behind a rook on the same file or rank, so the two pieces bear down on a single target together. A bishop-and-queen battery aimed at h7, for instance, is a textbook mating threat. The queen-and-knight duo is prized even more, because the knight covers exactly the squares the queen cannot reach. Its L-shaped jump patches the one gap in her movement, and together they weave mating nets and forks that neither piece could manage alone. The queen also pairs well with her own king in the endgame, where the two escort pawns and combine to checkmate.
The queen sacrifice: giving her up for compensation
Because the queen is worth so much, deliberately giving her up is one of chess’s most striking ideas. A queen sacrifice is not chaos. It is controlled violence, justified only when you get clear compensation in return. That payoff usually takes one of a few forms: a forced checkmate a few moves later, winning back more material than you gave (say, two rooks and a piece), an unstoppable passed pawn, or a king hunt the defender cannot survive. The discipline is in the calculation. Before parting with nine points you have to see the concrete sequence that makes it worthwhile, not just a hopeful attack. When it works, a queen sacrifice is the most memorable moment in a game. When it is merely speculative, it simply loses. Give her up only when the lines prove she has done her job.
When to trade the queen
Trading queens is one of the most consequential decisions in a game, and it pulls in opposite directions depending on who you are. If you are ahead in material or have a clearly winning endgame in sight, swapping queens off simplifies the position, removes your opponent’s biggest source of counterplay, and steers the game toward a technical win. That is why the side who is winning usually welcomes the trade. The reverse holds just as firmly. If your king is exposed or you are defending under pressure, exchanging queens often kills the attack and saves the game, so a defender will frequently go out of the way to offer the swap. Avoid trading when your own queen is the more active of the two, or when keeping queens on preserves real attacking chances against the enemy king. The short version: trade when it simplifies toward an advantage, decline when it kills your initiative.
What are the Queen’s vulnerabilities? Stalemates, poisoned pawns, and traps
Now and then the queen’s strength backfires, though it’s rare. The most prevalent scenario where the power of a queen can be a double-edged sword is the potential for stalemate danger in endgames. Due to the queen’s ability to control numerous squares, it may inadvertently restrict the enemy king’s movement, leading to a potential stalemate situation if not approached with caution. Below are two very common endgame positions, where white has just made their move but black has no legal moves to make on their turn, which leads the game to result in a draw due to the stalemate rule:
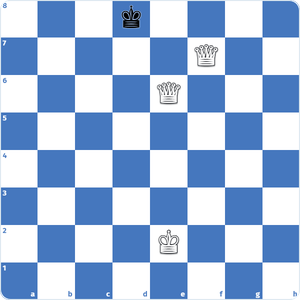
The situation depicted in the second diagram is frequently encountered in online games with extremely fast time controls. In such scenarios, both players move swiftly after white promotes a pawn to a queen. However, the immense power of two queens in controlling numerous squares necessitates special attention to avoid the risk of stalemate.
The eight-queens puzzle
The task of an ancient puzzle is to place eight queens in such a way that none of the queens can capture each other or stand in the range of capturing. Below is one possible configuration as a solution for this puzzle:
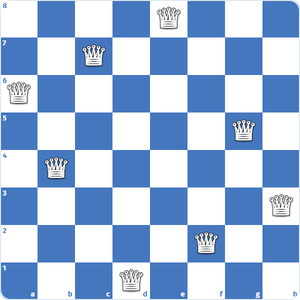
It was mathematically proven by Carl Jaenisch in 1862 that there are 92 possible such solutions. As an exercise, you may try to figure out one of the other 91 possibilities to place eight queens without being in each other’s capturing range.
Practical advice on the queen
A piece this strong needs handling with care, since she can create real threats against the enemy king. Losing the queen can be a decisive disadvantage. The queen typically plays a pivotal role in checkmating throughout the game. Examining the historical evolution of chess rules suggests that the introduction of the queen piece played a crucial role in shaping the modern chess we enjoy today.
FAQ's
What does the queen do in chess?
The queen is mainly used to attack the enemy king and deliver checkmate. Because of her long range, though, she can also defend well, even from across the board.
Is the queen the most powerful piece in chess?
Yes. The queen is the most mobile piece on the board. Unlike any other piece, she can move horizontally, vertically, and diagonally, as many squares as she likes in a straight line.
What is queening in chess?
Queening is promoting a pawn to a queen when it reaches the final rank. It is the most common way a new queen appears during a game.
Can you have two queens in chess?
Yes. If one of your pawns reaches the 8th rank (for White) or the 1st rank (for Black), you can promote it to a second queen. There is no limit on how many queens a side may have.
Can the queen jump over other pieces?
No. The queen cannot jump over anything, friendly or enemy. If a piece blocks her line, she has to stop in front of it. The only piece that can jump over others is the knight.
Can the queen move like a knight?
No. The queen can’t make the knight’s L-shaped move. She covers ranks, files, and diagonals only. Because of this gap, knights are one of the few pieces that can attack a queen without being attacked back.
Can the queen move backwards?
Yes. The queen moves the same in every direction, so she can go backwards, sideways, or diagonally backward just as easily as she moves forward.
Which square does the queen go on?
The white queen goes on d1 and the black queen on d8, each on her own color: the white queen on a light square, the black queen on a dark square.
How many squares can the queen move?
As many as she likes in a straight line until something blocks her. On an open board she controls up to 27 squares from the center, more than any other piece.
Which two pieces’ moves does the queen combine?
The rook and the bishop. The rook gives her straight-line movement along ranks and files, and the bishop gives her the diagonals.
What does the queen look like?
The queen is usually the second-tallest piece after the king, topped with a small spiked crown or coronet. Each player starts the game with one queen.
How much is the queen worth?
About 9 points, the highest value of any piece on the board, roughly equal to three minor pieces or two rooks.