
 By
By 
The king is the one piece you can never afford to lose. Checkmate him and the game ends on the spot, no matter how much material is still on the board. That single fact is why every other decision you make bends around his safety. And yet the king you spend the opening tucking behind a wall of pawns turns into a real fighting piece the moment the queens come off. This guide covers how the king moves and captures, the four conditions for castling, the difference between check, checkmate and stalemate, and how to wake your king up in the endgame. It finishes with the one cheap habit that wins games for players under 1400.
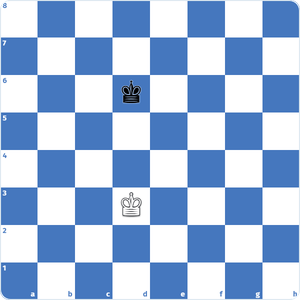
What is a King in chess?
The whole game is built around one goal: trapping the enemy king. Once he falls, nothing else on the board matters. He is at once the weakest piece on the board and the most important.
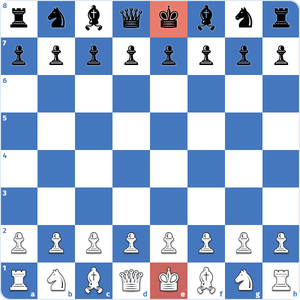
The Diagram – Starting position of the game.
Both sides begin with a bare King. The White King begins at the e1-square. The Black King starts at the e8-square. The game ends with a checkmate if this piece is unable to get out of the check.
Check, checkmate and stalemate: the king’s three danger states
Almost everything that happens to a king falls into one of three states, and mixing them up costs beginners countless points. Check means the king is under attack right now but still has a legal escape, so play continues. Checkmate means the king is in check with no legal way out, which ends the game on the spot. Stalemate is the trap that rescues lost positions: the side to move has no legal move at all, yet is not in check, so the game is drawn rather than lost. The difference shows up in real games all the time. A player a whole queen ahead can throw away the full point by leaving the enemy king with no moves and no check, turning a winning attack into a draw nobody wanted.
The three legal ways to escape check
When your king is in check you have exactly three options, and finding the right one quickly is a core skill. You can move the king to a square that is not attacked. You can block the check by putting one of your own pieces between the attacker and the king, which works only against sliding pieces like the rook, bishop and queen, and never against a knight or a pawn. Or you can capture the checking piece outright. If none of those three is available, the position is checkmate and the game is over. Running through move, block, capture in that order on every check is the habit that stops you resigning a game you could still have saved.
See the king in action (60-second clip)
Watching the king’s moves play out on a live board makes the one-square radius and the castling mechanics click far faster than text alone. If you found this helpful, the same visual walkthrough applies to our guide on the Queen chess piece, the king’s natural partner on the back rank.
Finished watching the video? Keep reading the article to discover all the nuances about the King comprehensively!
Where Does the King Start on the Chessboard? Which Side It Goes On (e1/e8)
At the start of the game, each king sits on the central files next to its queen. The white king starts on e1 and the black king on e8. They face each other down the e-file, one square to the right of where the queens stand.
An easy way to set up the back rank correctly is to place the queen first: the queen always goes on her own color, the white queen on the light d1 square, the black queen on the dark d8 square. The king then takes the square right beside her. If your queen ends up on the wrong color, the king and queen are simply swapped.
| Piece | White starts on | Black starts on |
|---|---|---|
| King | e1 | e8 |
| Queen | d1 (light square) | d8 (dark square) |
The king goes on the e-file, to the right of the queen from White’s point of view and to the left from Black’s. Because both kings sit on the e-file, they always start directly opposite each other. Remembering “queen on her color, king beside her” is enough to set both sides up correctly every time.
Can the King Capture or Attack Pieces? How the King Moves and Captures
Yes. The king can capture any enemy piece that stands on one of the eight squares next to it, using the same one-square move it always makes. Capturing with the king is a normal part of the game, especially in the endgame when few pieces are left.
There are two important limits. The king can never capture a piece that is defended by another enemy piece, because that would put the king in check. And the king can never move next to the enemy king, since the two kings must always keep at least one square between them.
The king moves exactly one square per turn. It cannot move two squares (the only exception is castling), and it has no jumping or long-range movement like the queen or rook.
Yes to both. Unlike the pawn, the king may move backwards, sideways, and diagonally as freely as it moves forward, as long as it stays one square at a time and does not move into check.
King chess moves and captures: Castling, the King’s One Two-Square Move
The King is able to move in all possible directions by one square. He moves in a way that captures as well. He is unable to move to a square that has been covered by a rival piece, unlike other pieces.
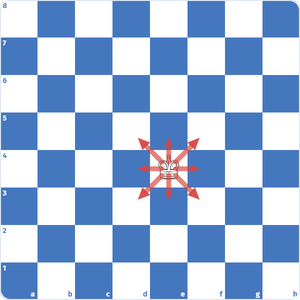
King chess piece movement, he can move one square in each direction.
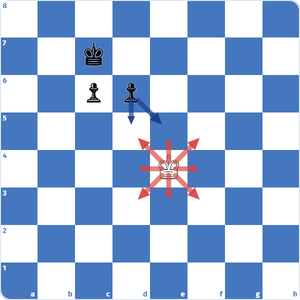
King cannot move to a square covered by an enemy piece or pawn.
As seen above, the e4-King cannot go d5- or e5-squares because the enemy pawns secured those places.
Likewise, Kings are unable to get nearer to one another. Thus, they are unable to mate one another. The game is declared a draw if the chessboard only remains with two Kings.
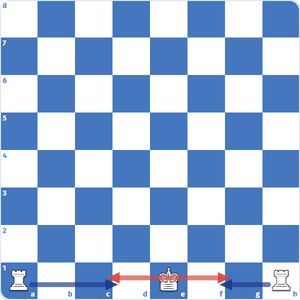
The right side is the short side, and the left side is the long side for White.
Castling is one of the King’s unique movements. The King usually finds safety by castling. With just one move, this move executes a significant change in position.
For the King to castle, the King should not be moved before. If the King moves in any direction before castling, he can no longer castle.
The King can castle both on the long and the short sides. Another requirement of this move is the Rook. Whichever side the King is headed to, the Rook also shouldn’t be moved before.
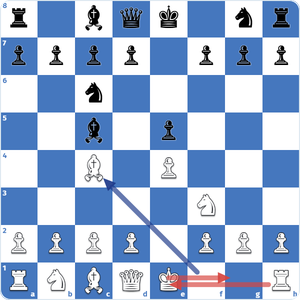
King can castle to safety on the short side.
To castle, King and Rook should be looking at each other. Before castling occurs, no other piece should be standing in between.
If the King is in check, he cannot castle.
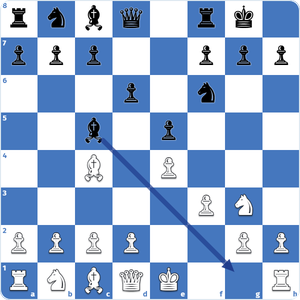
White King cannot castle because g1-square is assaulted by the c5-Bishop.
If the path of the King is covered by an enemy piece, the King cannot castle. As shown above, the White King cannot castle due to the enemy Bishop. In order to castle on the short side, g1-square must be secured.
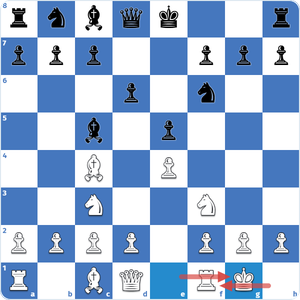
White King castled on the Kingside.
If all mentioned requirements are met, the King can safely castle.
The Four Conditions for Castling
Castling is only legal when all four of these are true:
- Neither the king nor the chosen rook has moved earlier in the game.
- There are no pieces between the king and that rook.
- The king is not currently in check.
- The king does not pass through or land on a square attacked by an enemy piece.
You can castle on either side: kingside (short castling) or queenside (long castling), as long as the conditions above are met for that side.
Kings can never stand on adjacent squares
One legal restriction applies to the king and to no other piece: the two kings can never sit on squares next to each other. A king attacks all eight squares around it, so moving your king beside the enemy king would put it on an attacked square, which is illegal. The rule has real teeth in the endgame. It means a lone king can never checkmate another lone king, so bare king versus bare king is an automatic draw. It also explains why the defending king keeps getting shouldered off key squares. The attacker leans on this can’t-touch rule to control space and push the enemy king toward the edge, where mates get built.
The King’s Role in Chess
King plays a critical role as the purpose of the battle is to ‘checkmate’ the enemy King. The word “check” refers to when the King is being assaulted. If an assaulted King is checked, he must flee from the check to prevent the “checkmate”.
There are three ways of preventing the checkmate:
1. The King has to move to a safe square.
2. Or the attack should be blocked by another piece.
3. Or the piece checking the King should be captured.
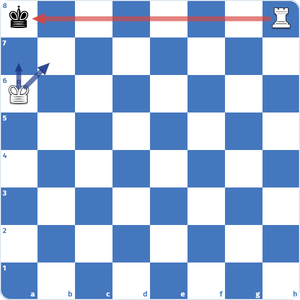
White checkmated Black.
We can see an example position above where White checkmated their opponent. Since Black cannot meet the requirements we mentioned, it is a checkmate. The game ends with White’s victory.
To avoid being checkmated, King has to stay safe and protected until the danger is no longer out there. Similar to other pieces, King plays different roles during the three diverse stages of the game.
During the opening stage, King typically gets castled to safety.
Once the pieces are developed and the fight begins, the King must be held safe and secure. It is not recommended to play with the King too often during this stage.
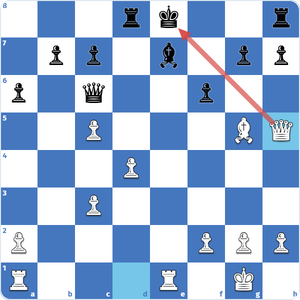
The Black King is in trouble.
If the King is not held in safety, the enemy pieces will disturb him. Squares like f2 and f7 are critical for the King’s protection because they are vulnerable.
The pawns in front of the castled king are his bodyguards. If that pawn shield is broken up after castling, the king becomes an easy target. Hence, moving them without a concrete plan is not recommended.
Perhaps the most critical role of the King gets into action in the endgames. After hiding safely all game, the king finally wakes up in the endgame and becomes a real fighting piece.
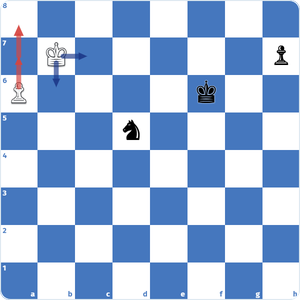
King protects the a-pawn. The game will be won once the pawn is promoted.
As shown above, the King can protect the pawns and help them become new Queens. This often occurs when the Queens are traded off. If the Queens are on the board, activating the King is very risky.
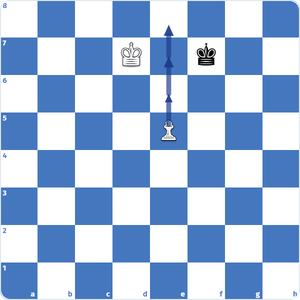
The King paves the way for the e-pawn. This red carpet allows White e5-pawn to promote.
Also shown above, the King can cover the pawn’s path to become a new Queen. By shouldering the enemy King, the White king clears a path for the passed pawn to promote.
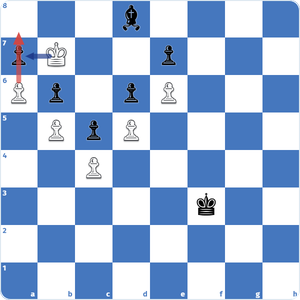
The White King is too active.
When there are few pieces remaining on the board, the King’s activities are crucial. The above game illustrates how active the White King is. The King is close to the enemy pawns, whereas the Black King is far away. Despite being a Bishop down, White will easily win the game with the King’s activity.
The value of the King piece in chess: Why It Has No Point Value
Unlike other pieces, King is invaluable. To protect the King, every measure should be taken.
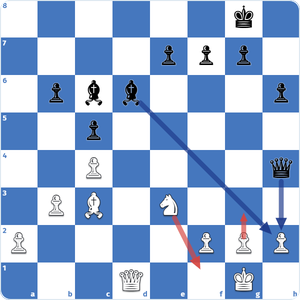
Black is threatening Qxh2.
To prevent attacks on the King, moves like h3 or g3 are often helpful to keep it safe from danger.
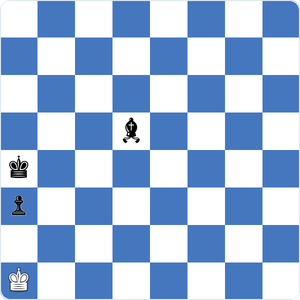
It’s a theoretically drawn endgame.
Even when a position looks lost, never forget what the king can do. Some positions might seem losing, but they can be saved due to the ‘stalemate’ rule.
In the example above, the White King is in the ideal location at the ideal moment, making the game a classic “wrong color Bishop endgame” in which the a-pawn cannot be promoted. Even if Black pushes the pawn all the way down, the White King can shuffle between a1- and b1-squares.
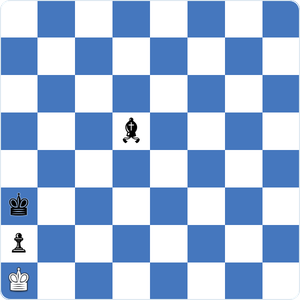
An example of a stalemate.
As the game progresses, Black plays Ka2, and the game peters out with a draw.
The stalemate rule occurs when one side has no legal move and is not in check. If Black possessed a dark-squared Bishop in the above position, they could win the game.
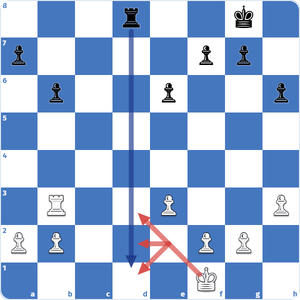
Ke2 can prevent Black’s Rook infiltration.
Kings are great at covering squares. This typically favors the side with the active King at the endgame. By securing the critical squares, Kings can prevent enemies from invading the allied area.
In the position above, White can play Ke2 (K=King chess symbol) to prevent Black’s idea of Rd1. If Black gets the Rd1 move-in, their access to the first rank can give them a slight edge. White King can position itself and cover the critical squares, like in the mentioned example.
King Endgame Strategy: Activating Your King Once the Queens Come Off
Once the Queens are off the board, the Kings need to be slowly activated near the action. This typically allows them to be rapidly involved in the game once a massive exchange chain occurs.
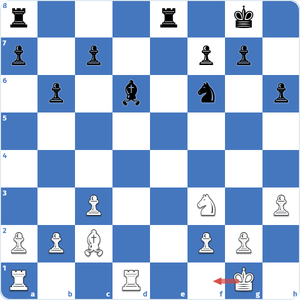
King needs to get into the action.
In the above position, the Queens are off the board. The White King can be ready for a possible exchange storm. Once the exchanges occur, the closest King to the middle will hold a considerable initiative. To achieve that, White can play Kf1.
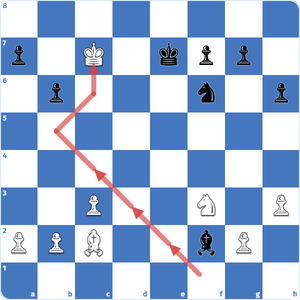
The White King is closer to the enemy pawns.
After exchanging the Rooks, the White King has gone on a journey. He played a crucial role in White’s endgame attack by staying closer to the enemy pawns.
Activating your king once the queens come off: opposition and the active king
In the endgame the king stops hiding and starts fighting, and the idea that governs this stage is opposition. Opposition is the standoff where the two kings face each other with exactly one square between them. Whoever is not to move holds the opposition and can force the other king to step aside. In king and pawn endings, grabbing the opposition is often the whole difference between promoting your pawn and watching it get blockaded. The wider principle is king activity. The king that reaches the center or the enemy pawns first usually wins, even a pawn down. In my own blitz games the losses that sting most are the ones where I sat my king on the back rank in a pawn ending while my opponent marched his into the middle. Capablanca’s endgames are the cleanest place to watch an active king turn a small edge into a full point.
What are the King’s weaknesses? The Three Squares That Get Kings Mated (f2/f7, the Back Rank, g2)
The biggest weakness of the King is its value. The enemy will constantly seek an assault on him. The more pressure gets in its way, the more material you may have to give up to keep him safe.
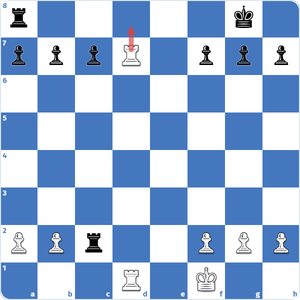
Back rank mate is one of the most common checkmate patterns.
Once the King is castled, the short side’s default pawn structure prevents it from breathing. Creating a breathing room such as h7- or h2-squares (by moving h3 or h6) is often preferred to prevent back-rank checkmates. These breathing spaces are also called ‘luft‘.
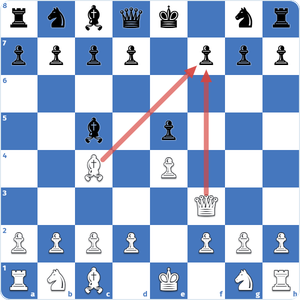
The f7-square is under attack.
The f7-square for Black and the f2-square for White are vulnerable locations because they are only guarded by the King. This typically allows for various tactical and checkmate ideas in these places.
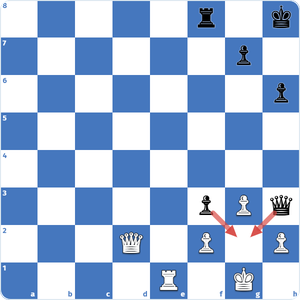
An example of Lolli’s mate.
The pawns in front of the King can create serious weaknesses. In these cases, the King may not be able to protect himself, and the game can be lost. To avoid this, it should be thought through before pushing those pawns.
The above position illustrates a game where the f3-pawn is covering the g2-square. Since White pieces cannot guard the g2-square, Qg2 will end the game in the next turn. The name of this motif is ‘Lolli’s Mate’.
Named king-safety patterns: the back rank, Lolli’s mate, and Lasker-Thomas 1912
King safety sinks in fastest through the patterns that punish ignoring it. The back-rank mate strikes when a castled king is boxed in behind its own three pawns and a rook or queen lands on the first rank. The cure is luft, one tempo spent on h3 or h6 to give the king a breathing square. Lolli’s mate goes after the weak f-pawn and the g2 or g7 square that only the king defends. The sharpest example is Edward Lasker against George Thomas, London 1912, where a queen sacrifice drags the black king from g8 all the way to mate near h1. If you are rated under 1400, back-rank mates cost you far more games than any opening trap ever will. Making luft before move 25 is about the cheapest insurance you can buy.
A coach’s take: why the king decides every game
The game ends when the King falls. Every master would rather give up a Queen than get checkmated. As long as the King lives, there is always hope. Utilizing King during the endgames is essential to outplaying the opponents. I recommend that readers read Capablanca’s books and examine his games. His endgame play and understanding of the King activity have been game-changers for many players.
FAQ's
Can the king move two squares in chess?
No. The king moves only one square per turn in any direction. The single exception is castling, the move where the king travels two squares and the rook jumps over it.
Is the king a powerful piece in chess?
The king is the most valuable piece, since losing it ends the game. In terms of mobility it is one of the weakest, because it only reaches the eight squares directly around it.
How does the king move in chess?
The king moves one square in any direction: forward, backward, sideways, or diagonally. It can never move onto a square where it would be in check.
Can the king capture pieces?
Yes. The king can capture any undefended enemy piece on a square next to it. It cannot take a defended piece, because that would leave the king in check.
Can two kings be next to each other?
No. The two kings must always have at least one square between them, so they can never stand on adjacent squares. This is why a lone king can never checkmate another king.
Can you win a game with just a king?
No. A lone king cannot deliver checkmate, so the best a king on its own can manage is a draw.
What happens if the king is captured?
The king is never actually taken off the board. When it is attacked and has no legal way to escape, that is checkmate, and the game ends right there.
What is the difference between checkmate and stalemate?
Checkmate is when the king is in check and has no legal move to escape, which loses the game. Stalemate is when the side to move has no legal move but is not in check, which draws the game.